Having looked around and seeing so many Arduino based I have decided to learn on the job and build one. I have been hacking about with the RPi for a while so it shouldnt be too challenging, well at least at the start.
I have a 275lt cube which is sumped. Its been neglected a bit and while the fish and softies have been doing great the hard corals all slowly died

Time to get back to slow and steady changes and stability.
The main things I want the controller to do are:
Auto Top Off
Temperature Control
Light Control (This may turn problematic!)
Dosing 3 part
Web interface
Email alerts
Fish feeding
Ph Monitoring
SG Monitoring
So to start I got the Arduino set up with a screen. I am using an Uno at the moment but think an upgrade to a mega is on the cards. I have a 1602 LCD Display already so hooked that up using this schematic.

This is woking fine and now I need it to show something. I am using a DS18B20 Temperature probe hooked up simply using this schematic.

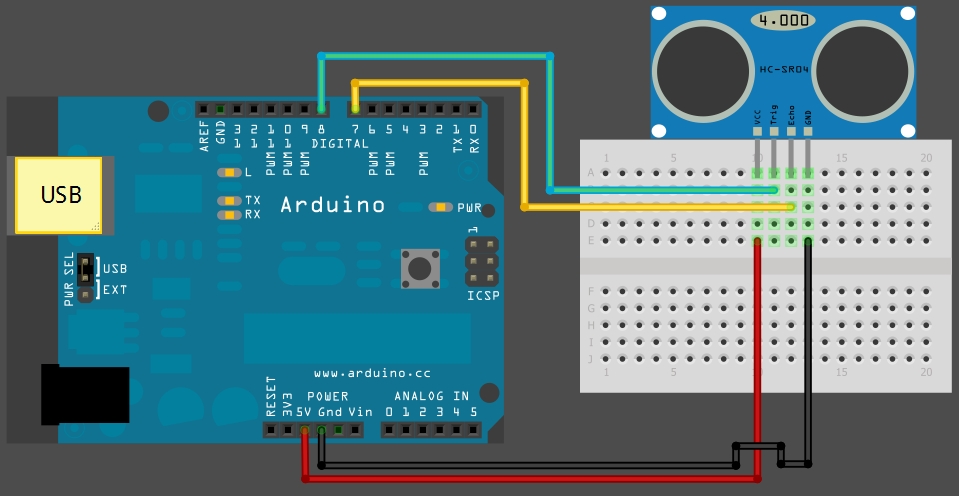
And lastly today I hooked up an ultrasonic sensor. The HC-SR04 sensor is placed in to top of my RO reservoir and tells me the percentage water left in it. This will be useful as the reservoir is hidden away down the side of my stand and its a pain to check. This is hooked up like so:
So with that all setup I started coding the thing. Its not too pretty but it works

#include
#include
#include
#include "SR04.h"
// initialize the library with the numbers of the interface pins for the display
LiquidCrystal lcd(7, 8, 9, 10, 11, 12);
// Temp Sensor
#define ONE_WIRE_BUS 2
OneWire oneWire(ONE_WIRE_BUS);
DallasTemperature sensors(&oneWire);
float currentTemp;
// RO Sensor
#define TRIG_PIN 3
#define ECHO_PIN 4
SR04 sr04 = SR04(ECHO_PIN,TRIG_PIN);
float a;
int waterLevelRO;
void setup() {
sensors.begin();
// set up the LCD's number of columns and rows:
lcd.begin(16, 2);
}
void loop() {
sensors.requestTemperatures();
// set the cursor to column 0, line 1
// (note: line 1 is the second row, since counting begins with 0):
lcd.setCursor(0, 1);
currentTemp = sensors.getTempCByIndex(0);
lcd.print("T1:" + String(currentTemp) );
lcd.print(" ");
a=sr04.Distance();
waterLevelRO = (100 - (a / 39)*100);
lcd.print(String(waterLevelRO) + "% RO");
delay(1000);
}
This displays my Temp on the left of the screen and my RO % on the right.
So things that need changing so far... The screen! Its already half full up and I haven't added hardly anything! I am looking at moving to a I2C Oled 0.96" like this https://www.gearbest.com/lcd-led-dis...pp_775602.html
It uses less GPIO pins which is a win and can display lots more!
I have a conductivity sensor on its way from china to test some salt level measurements, if it doesnt work it will be a useful leak detection sensor. I also have an SD card board on the way for data logging and a Lithium battery charging board to add power backup.
I need to work out how I am going to do the network stuff. I have experience using the NodeMCU which has built in wifi so I might go down that route. I also need to workout how to wire stuff up. I am thinking of using RJ45 ethernet ports and cables.
So I hope update this thread as a reference to myself and perhaps help someone who is thinking this arduino stuff is too complicated!