
|
|
|
|||||||
 |
| Thread Tools |
 02/19/2018, 10:43 PM
|
#351 |
|
Registered Member
Join Date: Oct 2014
Location: Toronto GTA,Canada
Posts: 1,763
|
almost level, things shifted a tiny bit since I did pick up and move around tank to get the foam under.
I will pull the shimmy's and level all over again. I think it would be wise for me to fill the tank and see how the foam works. (before i do drywall at top) Also having tank full of water will roughly give me the water level line. (not running, just to the point of a tiny drip into overflow. |

|

|
|
02/20/2018, 01:21 AM
|
#352 | |
|
Registered Member
Join Date: Oct 2014
Location: Toronto GTA,Canada
Posts: 1,763
|
Quote:
 2 hours of constant adjustments, between Bottom Stand, Tank Glass and Top Wall.... Plus getting Corner just right. Shimmy's aare banged in tight, cut, and done!! I couldn't end today without this Part Finished, since Tank is NOW LOCKED IN so I can moved forward the rest of the work. That "X" on the Styro is a reminder to replace with Plywood. (I noticed the sump running under The Stand is misting a lot of salt creep (which would ruin the Outter Drywall) |
|
|
|
|
|
02/20/2018, 12:38 PM
|
#353 |
|
Registered Member
Join Date: Oct 2014
Location: Toronto GTA,Canada
Posts: 1,763
|
Tank (Water Fill Test)
This has to be done now, not later.  Will see Water Line, leveling, Foam compression, Shifts, leaks etc Bit nervous, but all holding while I wait for tank to fill. |
|
|
|
|
02/20/2018, 12:53 PM
|
#354 |
|
Registered Member
Join Date: Oct 2014
Location: Toronto GTA,Canada
Posts: 1,763
|
TANK Filled up (Compression did happen) Will let it settle
Tank looks like to nice Frosty Glass of Cold water  I put in Shimmy's at TOP of Tank. (Lightly Snug before Water Fill)  After fill, I can tell the foam compressed since shimmys are a bit looser. I can tell that foam is compressed all around, but not much (NOT Flattened to paper thin) No leaks. Will let tank settle for a while and check leveling. |
|
|
|
|
02/20/2018, 02:56 PM
|
#355 |
|
Registered Member
Join Date: Oct 2014
Location: Toronto GTA,Canada
Posts: 1,763
|
STAND SEALED (Waterproof Chalking)
Even though there was compression, the STAND/TANK is still Level and Flush with wall.  My confidence is high enough, that I sealed the STAND. Sump room is now about 85% WaterProof Sealed around (FROM THE OUTSIDE Wall). |
|
|
|
|
02/20/2018, 04:54 PM
|
#356 |
|
Registered Member
Join Date: Oct 2014
Location: Toronto GTA,Canada
Posts: 1,763
|
DRICORE-SubFloor (Around Tank) Complete
I know these are BORING updates, but nobody more than me want's to get to the Fun Part. (The Man Cave Sump Room)  There is a gap in the SubFloor, to Install the DRYWALL and a Extra 1/8"-1/4" GAP for any expansion from humidity/heat. You can see how dusty things were (From Drywall Work) since New DriCor Pieces are cleaner. |
|
|
|
|
02/20/2018, 05:53 PM
|
#357 | |
|
Registered Member
Join Date: Jun 2006
Location: Charlotte, North Carolina
Posts: 1,300
|
Nice job on the subfloor! And I don't think the updates are boring. We are seeing progress. Anyways boring updates are much better than no updates at all
Marty Quote:
|
|
|
|
|
|
02/20/2018, 06:14 PM
|
#358 |
|
In Memoriam
Join Date: Jan 2004
Location: Huntington Beach, CA
Posts: 3,059
|
You did it!!!
Now for a few anthias 
|
|
|
|
|
02/20/2018, 07:36 PM
|
#359 |
|
Registered Member
Join Date: Jul 2015
Posts: 227
|
Keep it coming Wally - I am living vicariously through your tank build.... ahhh man cave sump room ....
Sent from my iPhone using Tapatalk |
|
|
|
|
02/20/2018, 08:32 PM
|
#360 |
|
Registered Member
Join Date: Oct 2014
Location: Toronto GTA,Canada
Posts: 1,763
|
Big Update Coming (Turbo Progress) BUT A RIDDLE FOR NOW
RIDDLE: What Hurts more than getting a Wooden SLITHER? Answer: A Rough Jagged Slither JAMED under your FINGER NAIL. Ouuuuuuchhh!! The Good News is it came out whole.....But I can measure my heartbeat rate since I feel my heart beating from the throbbing pulses. Last edited by Wally.B; 02/20/2018 at 08:41 PM. |
|
|
|
|
02/20/2018, 08:42 PM
|
#361 | |
|
Registered Member
Join Date: Oct 2014
Location: Toronto GTA,Canada
Posts: 1,763
|
Quote:
Maybe a few slightly smaller ones
|
|
|
|
|
|
02/20/2018, 08:47 PM
|
#362 | |
|
Registered Member
Join Date: Oct 2014
Location: Toronto GTA,Canada
Posts: 1,763
|
Quote:
Here another not-so-boring update. I'M STARTING TO Cheat (or get creative to moving things along faster).  Rather than painting back of Drywall and waiting for it to dry, I thought of just doing a Plastic Sheet Vapour Barrier. I can always SOMEDAY paint from the inside. BUT PLASTIC is better in some way, since I saw what my Painted Drywall became after 10 years, flaking, cracking, brittle. Working on the Drywall, and it's starting to look like the Dream Design I came up with a few months ago. Photo's coming soon. |
|
|
|
|
|
02/20/2018, 09:36 PM
|
#363 |
|
Registered Member
Join Date: Oct 2014
Location: Toronto GTA,Canada
Posts: 1,763
|
The END of Pre-Build is Getting CLOSER ( Starting to Look like the Original Plan)
The DREAM TANK plan (Months ago).... 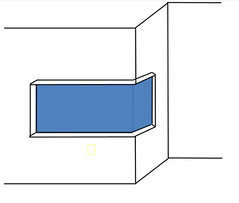 Present....  Yes, I went Taller on the Stand and I think it will be good. Except the Man Cave Side will need a Ladder 
|
|
|
|
|
02/21/2018, 08:35 AM
|
#364 | |
|
In Memoriam
Join Date: Jan 2004
Location: Huntington Beach, CA
Posts: 3,059
|
Quote:
Everything is looking amazing, tank is a perfect fit. |
|
|
|
|
|
02/21/2018, 09:47 AM
|
#365 |
|
Registered Member
Join Date: Apr 2003
Location: Mtl. Canada
Posts: 7,824
|
Starting to look pretty slick, Wally!
__________________
Matt. Current Tank Info: 53x32.5x26 190g dt 60g of sumps 3 tank-100 gal frag system 6xAI prime 8xt5. 4x maxspect gyre. Skimz Dual internal sicce pump skimmer Deltec PF601s ca rx+Kalk stirrer |
|
|
|
|
02/21/2018, 02:55 PM
|
#366 |
|
Registered Member
Join Date: Oct 2014
Location: Toronto GTA,Canada
Posts: 1,763
|
SNEAK PEEK UPDATE ( Found Ultimate Bead Trim [Plastic] ) Finishing Touches
Tank is moving only for Finishing. I'll post a picture when I'm done (including a series of how I did it). I wasn't happy with the Metal Paper SheetRock Trim at the Tank Top since (metal) I know will corrode over time. (Painting or Sealing isn't guarantee for test of time) I found a local Drywall Supply Store and they had all kind of great Drywall Trims. (PLASTIC)  They had J, J-Mud, Rounded Edge, and Straight Cut. I TOOK THEM ALL at $3 a 10foot Strip. This open up many possibilities, including the Access Door Edge points. STAY TUNED (Update coming soon) |
|
|
|
|
02/21/2018, 08:32 PM
|
#367 |
|
Registered Member
Join Date: Oct 2014
Location: Toronto GTA,Canada
Posts: 1,763
|
MEGA/MICRO UPDATE (TANK Should Be REC-ROOM Installed/Complete TOMORROW) The Details on Progress TODAY
The MEGA mean a big Step Forward today towards completion. The MICRO means the very fine work achieved. This was two days before as a reference on Progress.  This is now (With Summary of Progress TODAY). THINGS ARE DRYING so I have to wait till tomorrow to move forward.  NOW THE DETAILS (For those who care). (1) I had to CUT THE DRYWALL Even and increase the GAP for the PLASTICE L-Bead  Trust me, IT TOOK "Nerves of Steel" to put pressure on that Super Hard/Sharp X-acto Knife and run (many passes) that close the Front Face of The Starphire Glass. (2) Drywall Bead-Edge Selection/Install I played with all the Plastic Bead Edges I bought. The J-Bead was too tight, and not Flush and would interfere with the Tank Trim (flush) I got an idea to REVERSE the install with a J-Edge.  The choice for this way was to protect the SUMP Room Drywall (From moisture and mist) To install the Edge level and firmly....I FIRST STAPLED IT.  That edge is design for Drywall MUD, and I almost did it. THEN I DECIDED, for a better Waterproofing WAY.  Window/Door Chalking (WaterProof and Paintable) for J-Edge Adhesive  The Smear the Chalking over the Bead Holes and over the edge. RESULT OF THIS is my Drywall Edge and inside is pretty Moisure Proof. I'll still paint the Sump Room Side Drywalls with a Waterproofing Paint. (3) Tank Side Drywall (Finishing) The right side Wall Had a Big gap (for Sliding the Tank in).  I use some strips of Plywood and INSTEAD of Mud, use the Chalking to hold it inside the J-Edge bead. I also ran Chalking along the whole top Drywall Edge near the Tank (So the wall above is water resistant) (4) The Crooked/Hacked CORNER I Couldn't use Silicone at the Corner since the Corner has a significant Gap AND NEEDED TO BE STRONG, Even Finish. I didn't want to use Corner Edging up to the Ceiling (since there is already one there)  So some Drywall Tape, a Small piece of SheetRock Paper/Metal Edging, and Some MUD worked.  That's it. Never did this before, and learned/experimented along the way. ONWARD to (Final Sanding, Painting, and Tank Trim) |
|
|
|
|
02/22/2018, 06:25 AM
|
#368 |
|
Registered Member
Join Date: Jul 2015
Posts: 227
|
To quote OutKast: so fresh and so clean clean
Sent from my iPhone using Tapatalk |
|
|
|
|
02/22/2018, 09:40 AM
|
#369 | |
|
Registered Member
Join Date: Oct 2014
Location: Toronto GTA,Canada
Posts: 1,763
|
Quote:
NO MORE Dish Soap in this Tank (For those who know what happened just before I started this Build). Dishwasher Leak, dripping in my RO Reservoir . |
|
|
|
|
|
02/22/2018, 10:53 AM
|
#370 |
|
Registered Member
Join Date: Aug 2007
Location: Edmonton, AB
Posts: 16
|
Hey Wally, just kind of unrelated question to your tank, why did you opted out insurance involvement in repairs of your basement, its just odd to me that someone who seems this much detail oriented towards his fish tank is happy with quality of the repairs hes done to his own house.
Sent from my iPhone using Tapatalk |
|
|
|
|
02/22/2018, 11:35 AM
|
#371 | |
|
In Memoriam
Join Date: Jan 2004
Location: Huntington Beach, CA
Posts: 3,059
|
Quote:
|
|
|
|
|
|
02/22/2018, 11:53 AM
|
#372 | |
|
Registered Member
Join Date: Oct 2014
Location: Toronto GTA,Canada
Posts: 1,763
|
Quote:
If it were not for the Flood and Insurance this project would have never happened, and I'd still have a 65 Gallon OLD tank. The lucky, or unlucky part of the Flood is it happened right where 3 rooms meet (thus 3 rooms affected for costs of Wall and Flooring). But there are a few reasons for doing myself: -> Insurance Contractor wanted everything done fast so no time to break up things into a Fish Tank (They were going to just restore old Sump Room Walls as was) -> Insurance Budget was MATERIAL AND LABOUR (roughly 50/50) -> I took Budget $ and was Allowed to Spend it all on Materials -----> Therefore I Got a Subfloor Expansion within Budget -----> Insurance was going to replace with Carpet with Carpet , I got WPC for less. (and larger area) -----> They were going to paint 6 flood damage walls only (Leaving scratches, and marks on the rest). I painted 14 walls (for less, and new Colors) -----> I also had time to do some extra Electrical Outlets, and Home Theatre wiring. Some money was left over to pay for a Portion of the New Fish Tank too. And I took my time to do it right (thinking each step of the way), which would have never happened in a Flash Insurance Repair. Downside, is it took 3 months, not 3 weeks, and I got that Slither Jammed under my finger nail. And yes as Rakie says this is Basement, but it's coming out better quality than in our Living Room on Main Floor done by builder. Wife Likes WPC Flooring and wish we had it in Kitchen (since Soft, Warm, and Waterproof) So summary is things came out 500% better than letting insurance do it all. Last edited by Wally.B; 02/22/2018 at 12:10 PM. |
|
|
|
|
|
02/22/2018, 12:16 PM
|
#373 |
|
Registered Member
Join Date: Aug 2007
Location: Edmonton, AB
Posts: 16
|
Thanks for your reply Wally, reason I asked was mostly related to drywall repairs and removing of the corner of the wall. Im working in fire and flood restoration industry for bit over 20 years and from my experience you cheated your self out of some money as insurance companies usually pay out only 50-60% of what they are willing to pay there contractor if he does the work, they are also willing to implement changes in materials and finishes you want to upgrade to and contractor doing the work is usually more then happy accommodate owners who want to perform some changes in house for some extra cash on side. For what insurance was planing to do is probably what you have insured house to, thats why is recommended to call insurance and get house re-evaluated after every upgrade or bigger changes in house that effects its value and changes scope of work thats required in case that something happen. I think youll see that corner to start sagging and wall to ceiling separation in less then year and walls will develop cracks along side of drywall joins in 6 months or less. My assumptions are based on your pictures in this tread and improper materials and techniques used. But I guess its your basement and it would be you looking at your tank and all those defects around it. And me asking this question is not trying to insult you or something, it was just extremely surprising to me to see it from you whos so nick picking about planing, record keeping and details analyzing everything that I had to ask as I am following your adventures for ages here.
Sent from my iPhone using Tapatalk |
|
|
|
|
02/22/2018, 12:19 PM
|
#374 | |
|
Registered Member
Join Date: Oct 2014
Location: Toronto GTA,Canada
Posts: 1,763
|
Quote:
I tried painting some cardboard strips to PRACTICE TANK TRIM. I tried Matching Wall, and Also a Slightly Darker Shade in Same Color. Just doesn't look right to me. (It would be good if I exposed all Tank Edges, and Had Black Silcone all around, but then I still need to cover with Trim for Top EuroTrim & Lower Water Line) I could try a darker paint since paint store does offer changing paint to shades darker, but I can't see myself painting over beautiful oak. So I TOOK a Shelf From Desk to Home Depot and Got matching STAIN, and a MATTE Overcoat.  Hope it looks good. (I can always sand the oak and paint if not, but not possible the other way around) |
|
|
|
|
|
02/22/2018, 12:33 PM
|
#375 | |
|
Registered Member
Join Date: Oct 2014
Location: Toronto GTA,Canada
Posts: 1,763
|
Quote:
I didn't get 66% (which they offered if I just took cash). I got 66% for Wall work, but got 100% for Flooring since I provided bills for Materials and they were ok with that since it added up to same as labour+materials. Sure it's not perfect, but better than what I did before. I don't think that corner will sag, since I re-enforced it to the Steel Main Basement beam (right above), and also from the Sump room side. Sure some materials are not ideal, but Contractors don't build sump rooms for heavy salt/water/moisture at normal prices. Last contractors build rotted, and flaked. Maybe not the best Contractor. I've lost some trust in them after last house painting (if you don't specify details to nth Degree). Also I may not have shown the details. I am using Green Mold Tape for drywall joints. And Re-enforcing with wood at Joints on back side. Also vertically to Ceiling. No insult taken. Offer advice if you know better ways. I like to learn. We'll see in a year how things go. (The only thing I know may go wrong is the Fish tank bottom wall is attached to side walls (tank will vibrate on the SOLID overkill STAND), but those cracks will be behind desk. My biggest concern a Year from now is will I keep Killing SPS Frags (like in the past) I'll probably punch a few more holes in walls for things I forgot. I'll probably scratch up my office floor, and drip solder on it. This is a Man Cave, and not a Corporate Headquarter. But thanks for caring and looking out for me. Last edited by Wally.B; 02/22/2018 at 01:08 PM. |
|
|
|
|
|
|
|


