
|
|
 04/21/2008, 09:58 AM
|
#1 |
|
Registered Member
Join Date: Jul 2007
Location: Michigan
Posts: 708
|
5.5 AIO ala Sandeep w foam/ rock wall
2 months ago I built a 2.5 gallon tank with a foam/rock background inspired by the tanks of RC members Kannin, Tiggsy, and customcolors. I was very happy with the way the background turned out but I found the tank to be too small to work with. The mere act of sticking my hand in the tank to place a coral causes it to overflow. There is only about 3-4" of clearance between the background and the front glass. After seeing the build threads from members Sandeep and danoreef I was inspired to try a 5.5 AIO but with a foam/rock wall. Also, instead of partitioning off the back or the end of the tank for the filter/fuge, I partitioned off a corner and created the background walls for the back of the tank and for the angled partition. There were a few things I learned form my 2.5 gal build that made me do things a little different. In the 2.5 I used "lace rock". I'm not sure, but I think the origin of that stuff is terrestrial. This time I used dry live rock. It definately has more of a marine look. Also, I tried to fit the rocks close together so there would be as little as possible foam needed to fill the gaps. Another thing I did differently was use Beckett's Pond Foam which is black and supposedly more up to the task of holding up underwater than Great Stuff. I took lots of pics and will post them to the thread when I get home. The tank should be ready to fill with water tonight. Check back in a few hours for the pics
|

|

|
|
04/21/2008, 10:23 AM
|
#2 |
|
Were all mad here.
 Join Date: Nov 2007
Location: London Ontario Canada
Posts: 608
|
Can't wait too see the pics!

__________________
Reef Central Corner Club Aquarium Dumpster Diver Extraordinaire Money talks, mine says "Good-Bye" Current Tank Info: RIP:60g Pentagon Reef 100lbs LR 20g Sump Deltec Mce 600 Mag 750 250W Metal Halide & 2x39W T5's Phosban ReactorX2 5gal refugium 36xTO RIP:135G FOWLER /Agressive |
|
|
|
|
04/21/2008, 04:51 PM
|
#3 |
|
Registered Member
Join Date: Jul 2007
Location: Michigan
Posts: 708
|
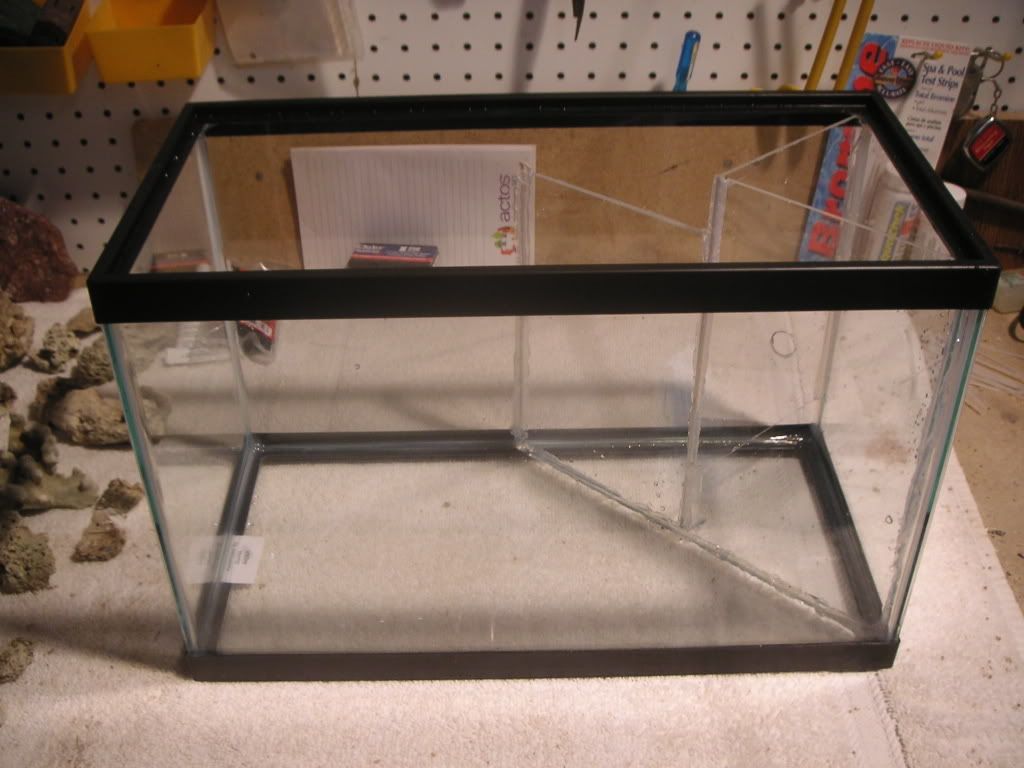
OK, here's some pics. Here is a pic of the tank with the acrylic dividers already siliconed in place and the cuts for the overflow and underflow. There are no teeth cut because they will be cut through the foam and rock in that area. Also you can see the hole for the MJ 400 nozzle.
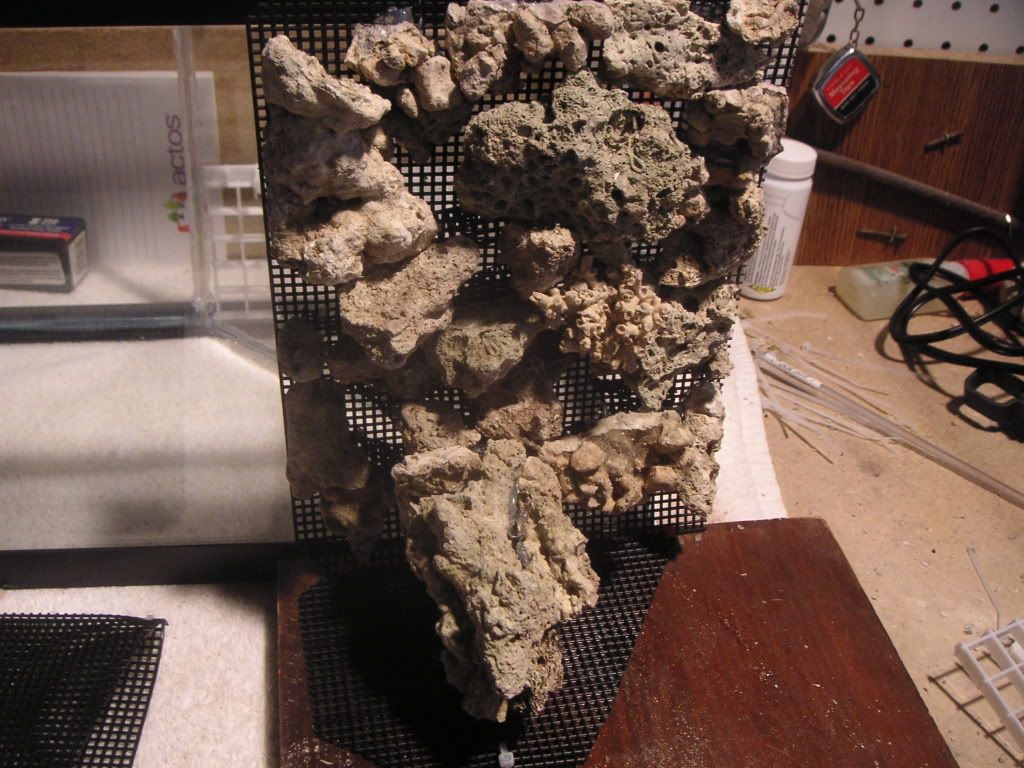
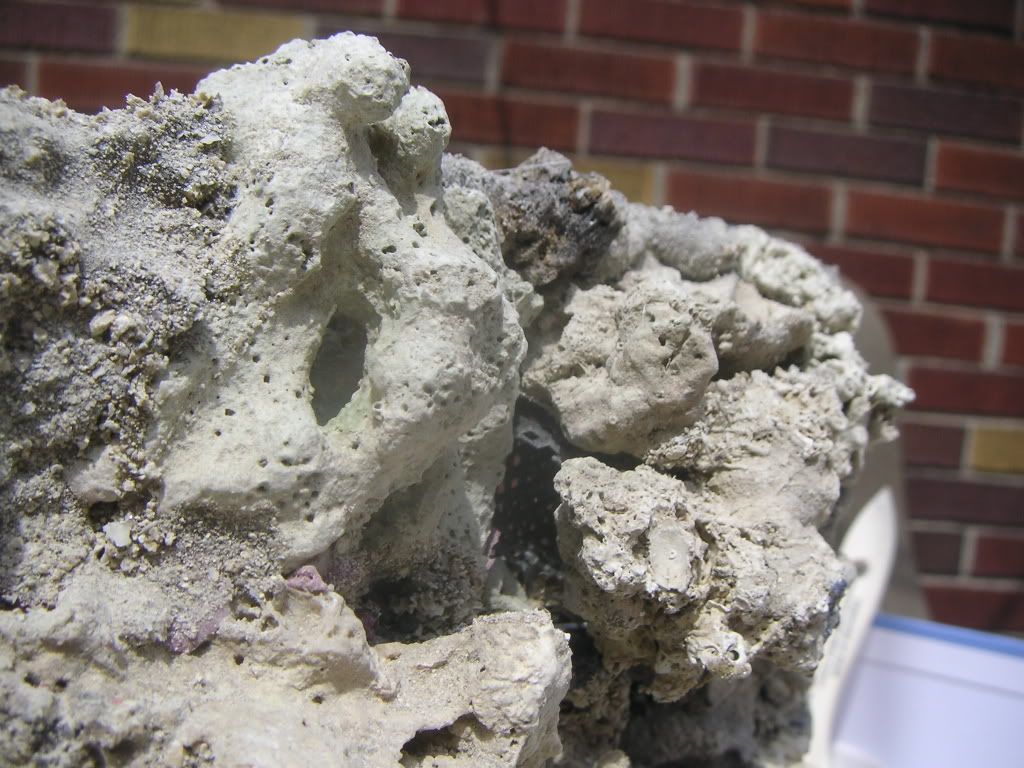
 These are the rocks I used.. I got them from my LFS. Definately more "salty" looking than the "lace rock" I used in the 2.5 build. 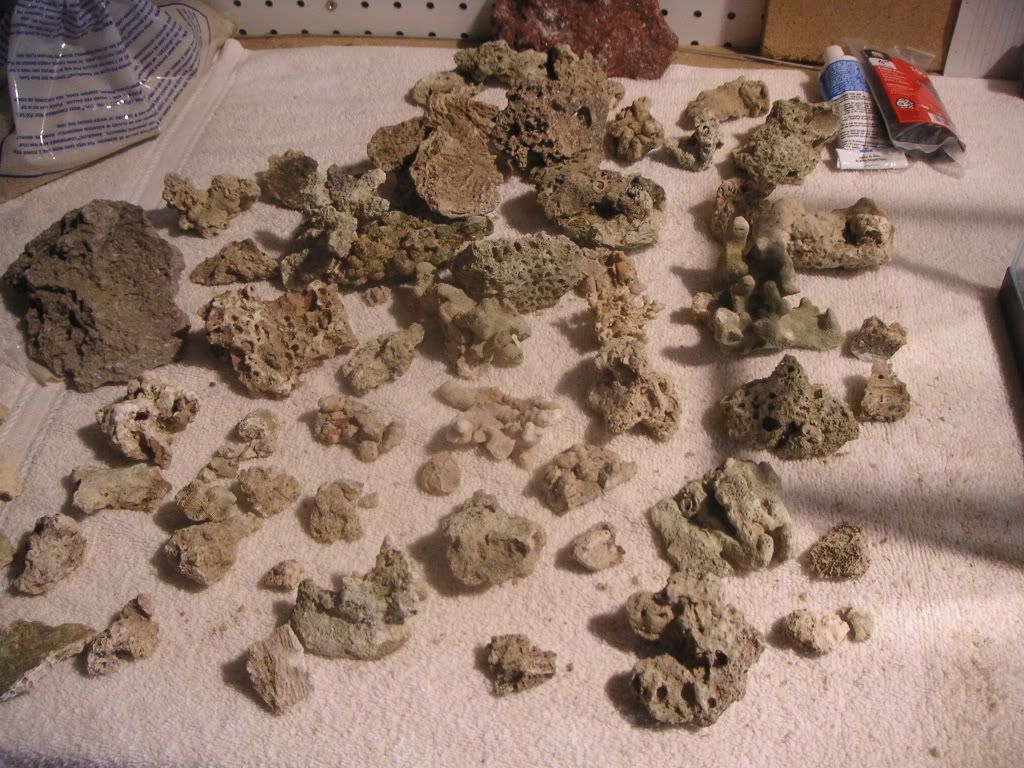  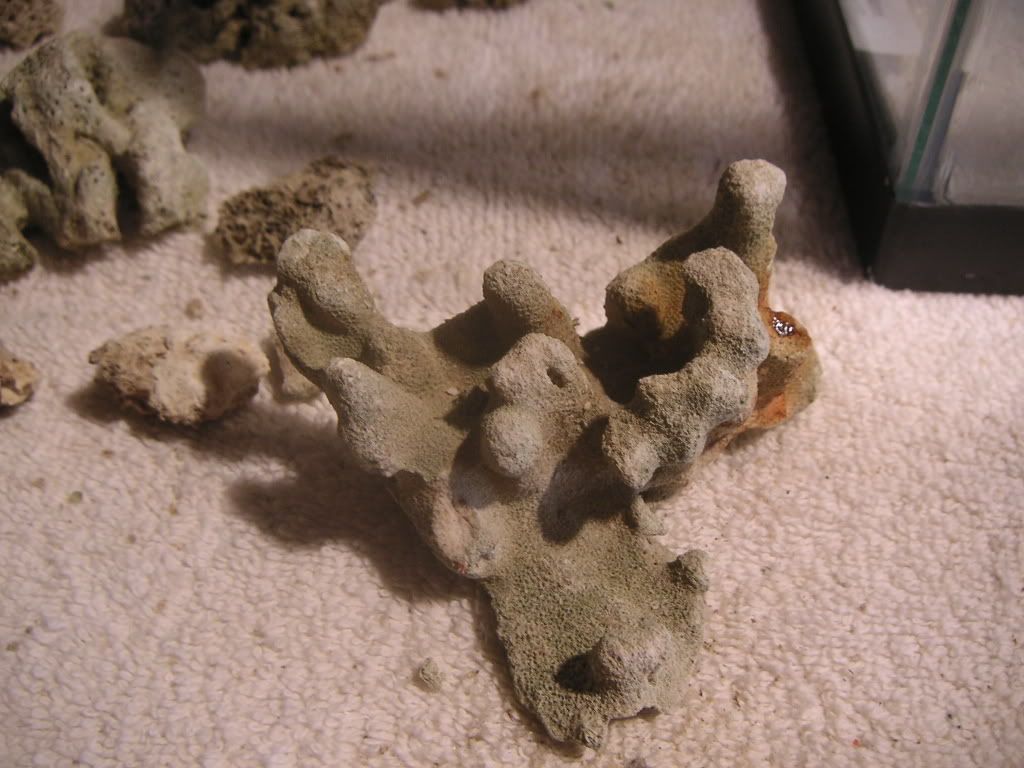 This is the frame for the back of the tank 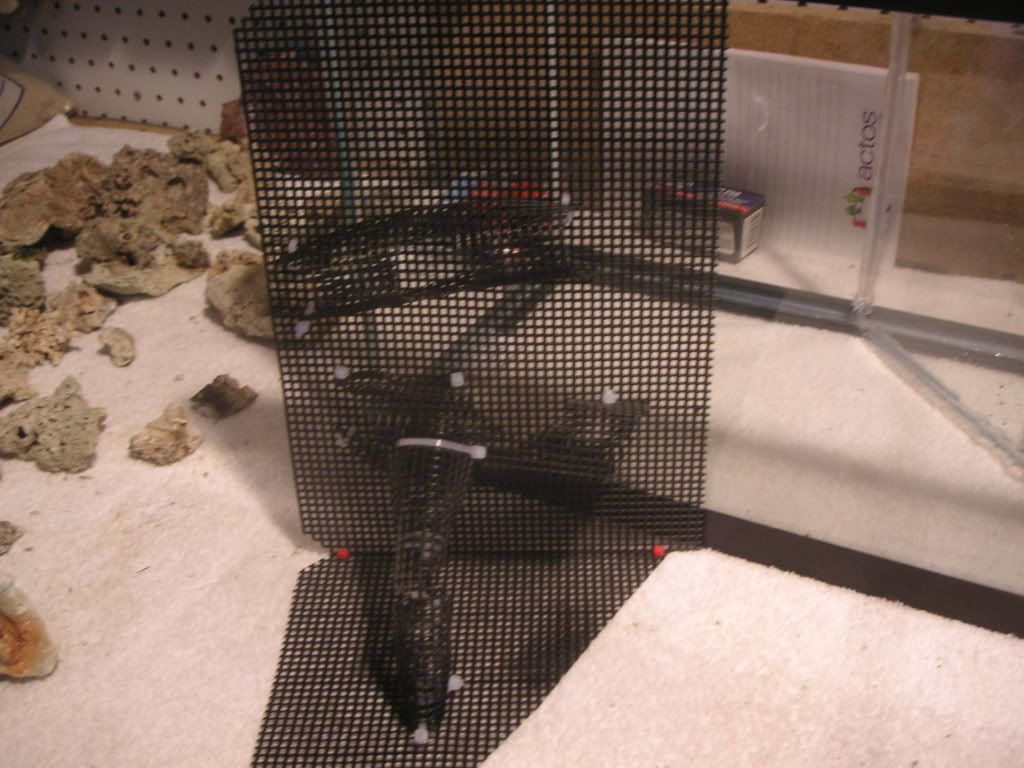 There are some tubes built in for the fish to swim through. 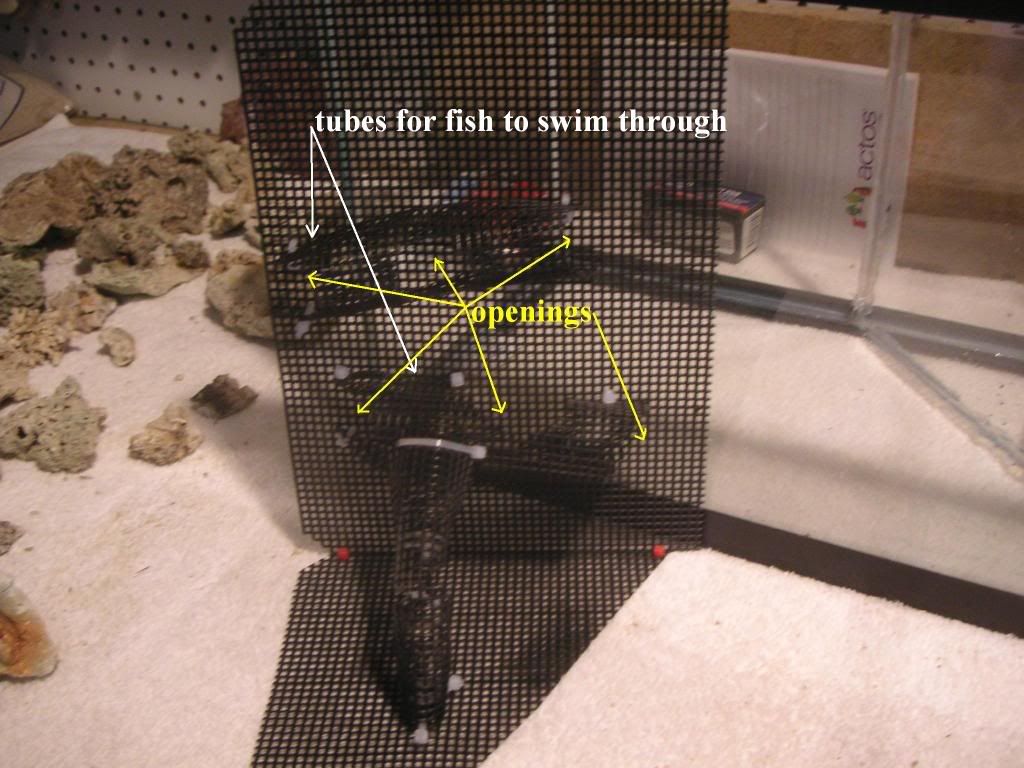 You can see them better in this pic 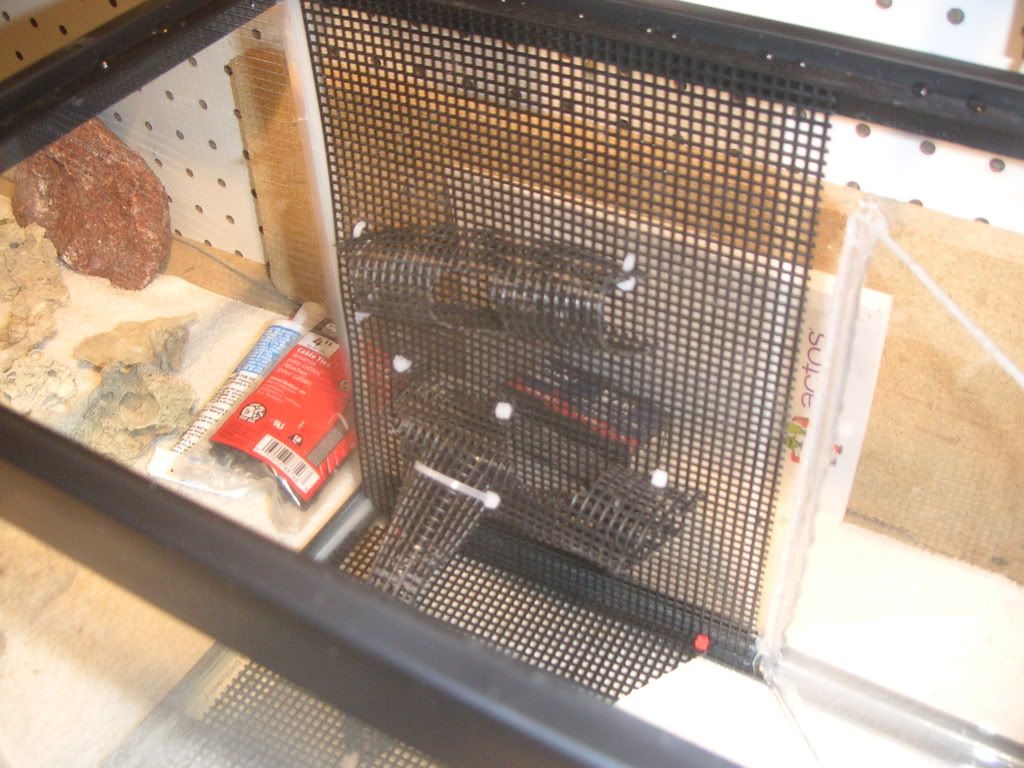
|
|
|
|
|
04/21/2008, 04:56 PM
|
#4 |
|
Registered Member
Join Date: Jul 2007
Location: Michigan
Posts: 708
|
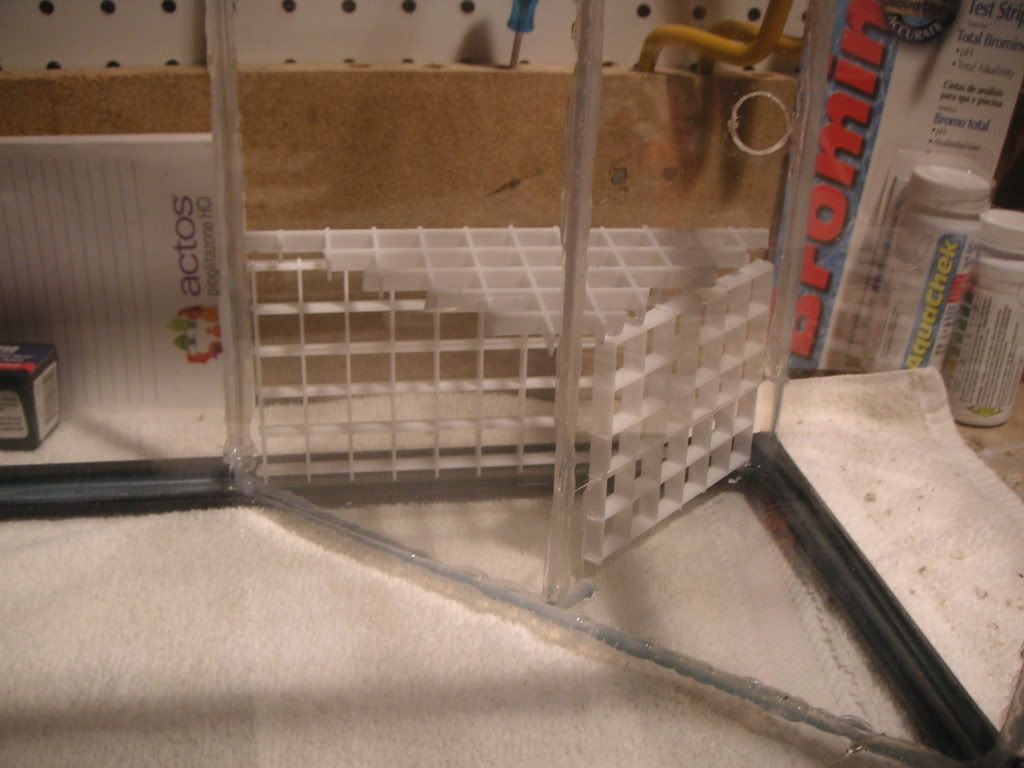
I built a frame out of egg crate in the first chamber that will support some mechanical filter media. I built it relatively low in the chamber so I can put chaetomorpha on top and use the tank light for growth. That way I won't need a 'fuge light. So the water will spill in through the overflow, past the chaeto, and through the filter media. Below that and in the second chamber will be the heater, LR live sand and LR rubble.
|
|
|
|
|
04/21/2008, 05:08 PM
|
#5 |
|
Registered Member
Join Date: Jul 2007
Location: Michigan
Posts: 708
|
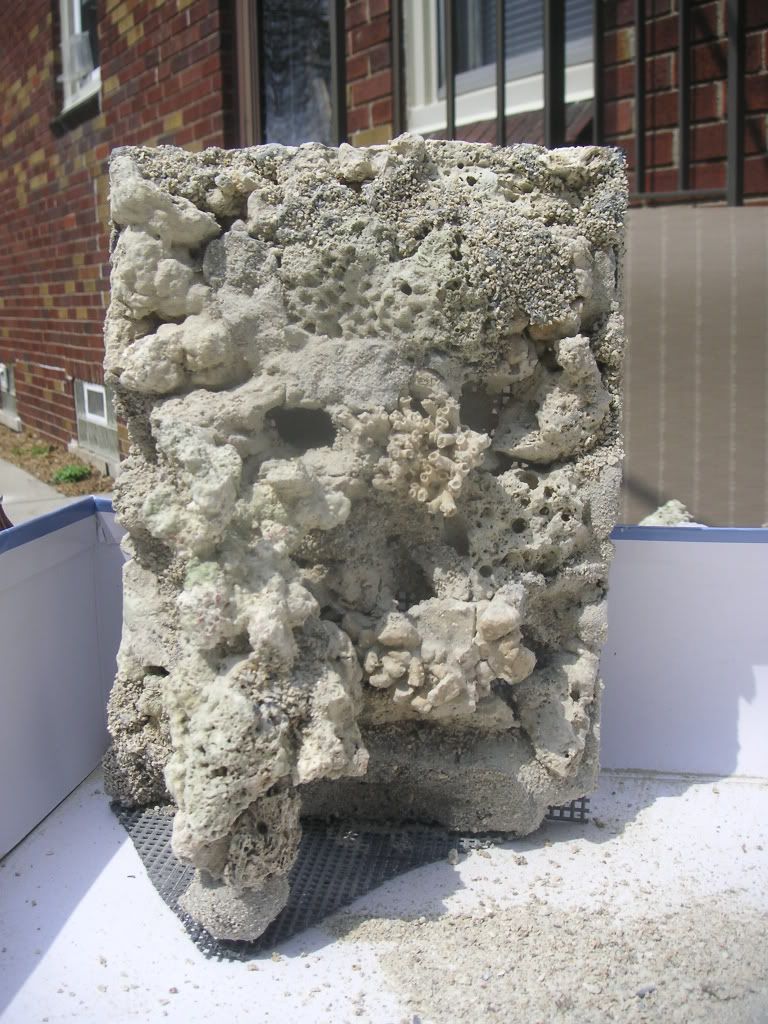
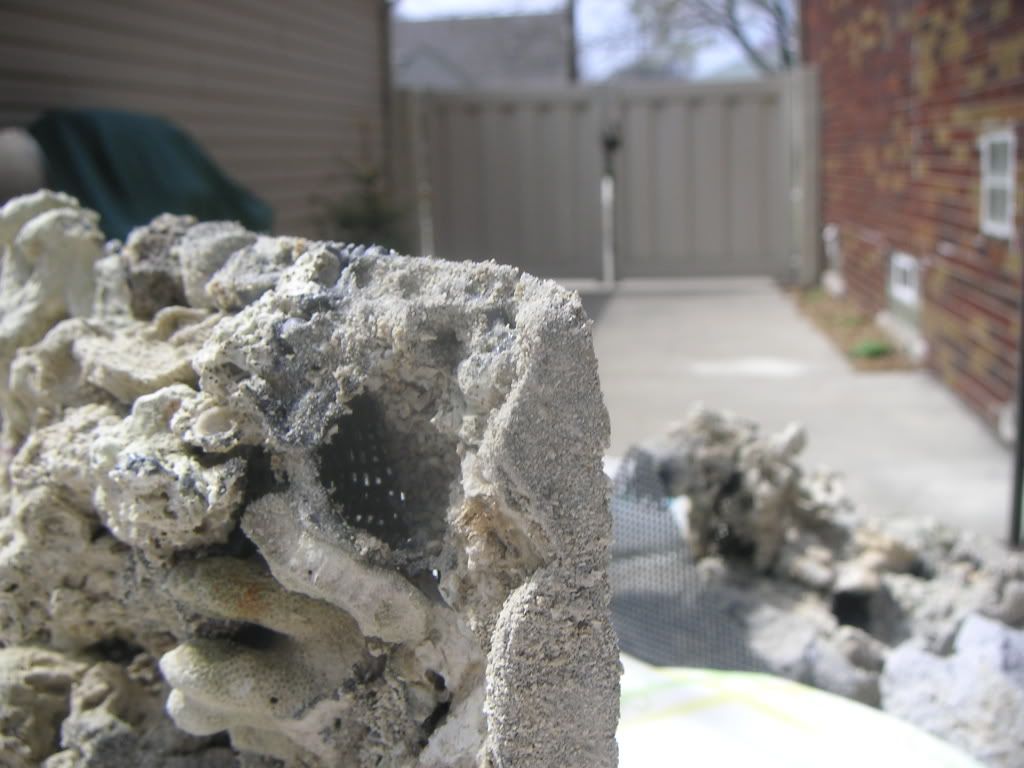
Here's a pic of the panel for the back of the tank with the rocks attached - with silicone. Not a very secure attachment, but after the foam is applied and has a chance to harden it will be fine.
 This is the panel that will cover the divider on the right side of the tank. This piece has some really interesting areas for the fish to swim through. Eight openings all together 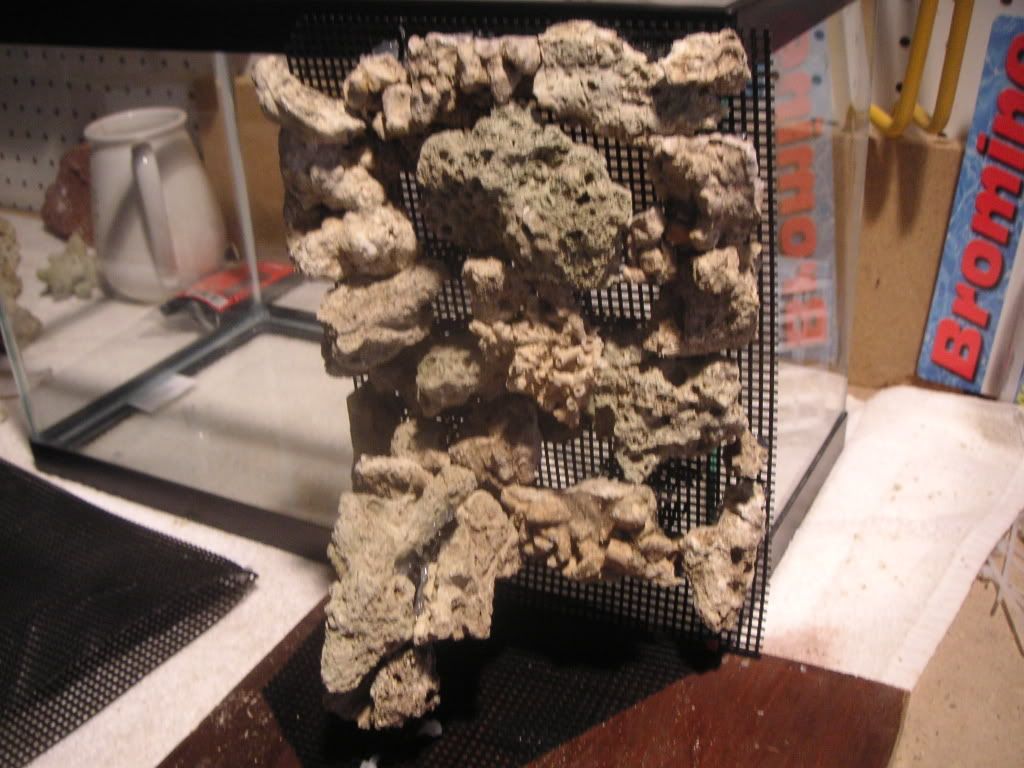 Foam applied 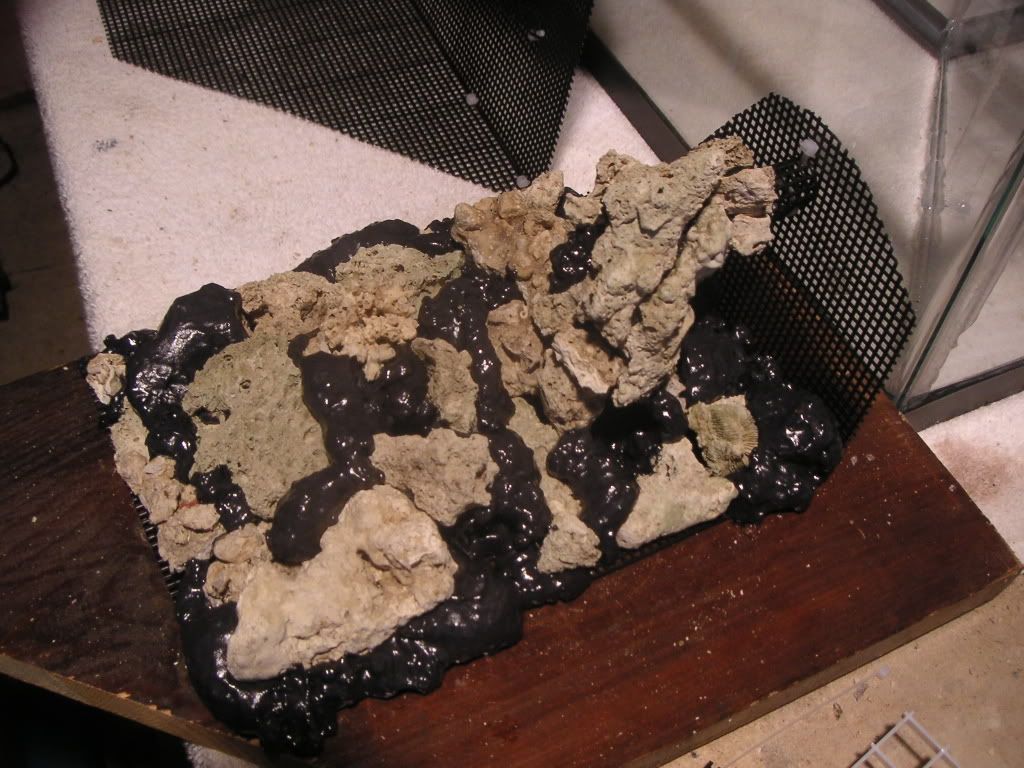 and trimmed  This is the foam I used. 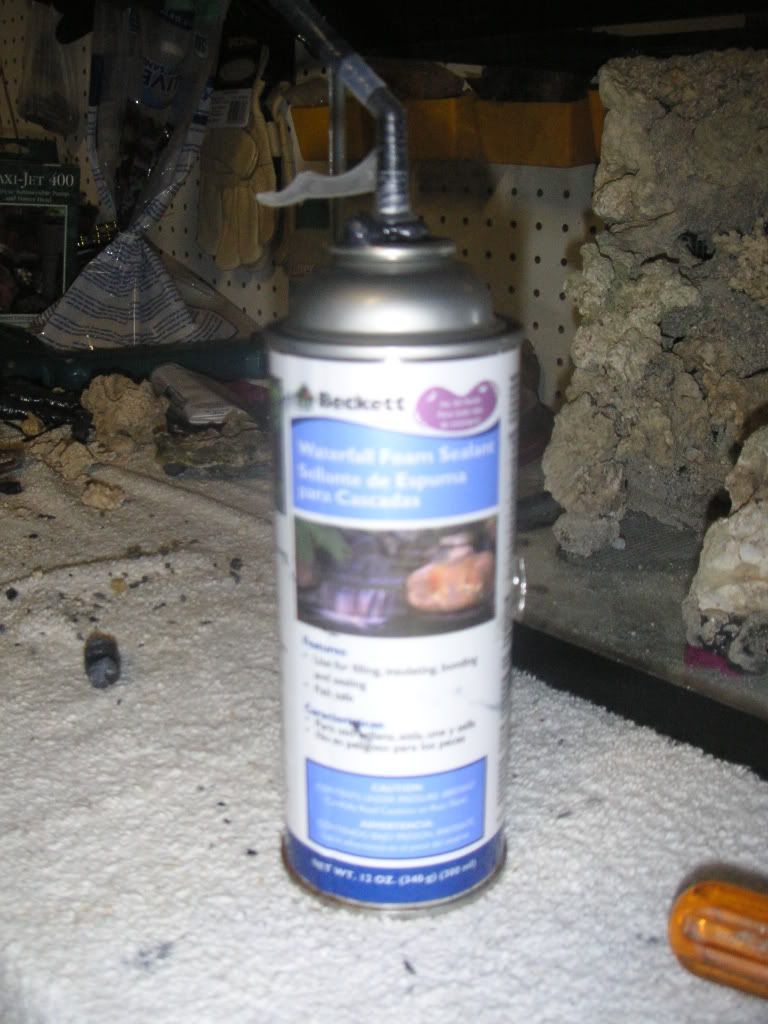 Here, I've started to add the fiberglass resin and sand. I made the sand with left over rock and a hammer  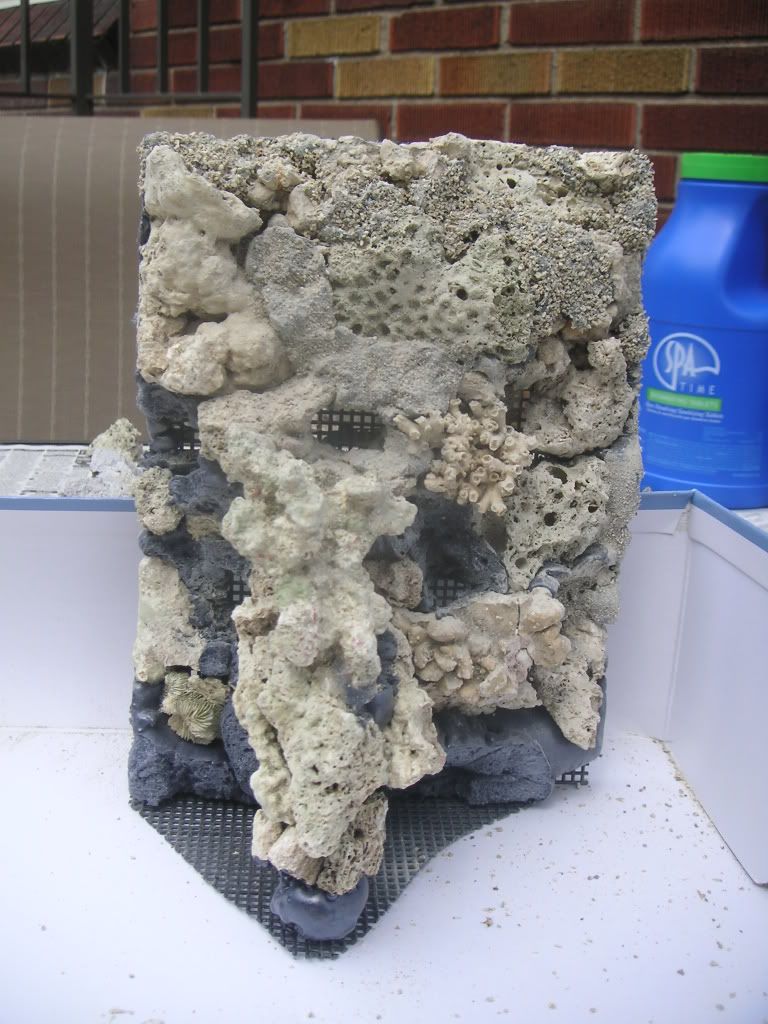
|
|
|
|
|
04/21/2008, 05:15 PM
|
#6 |
|
Registered Member
Join Date: Jul 2007
Location: Michigan
Posts: 708
|
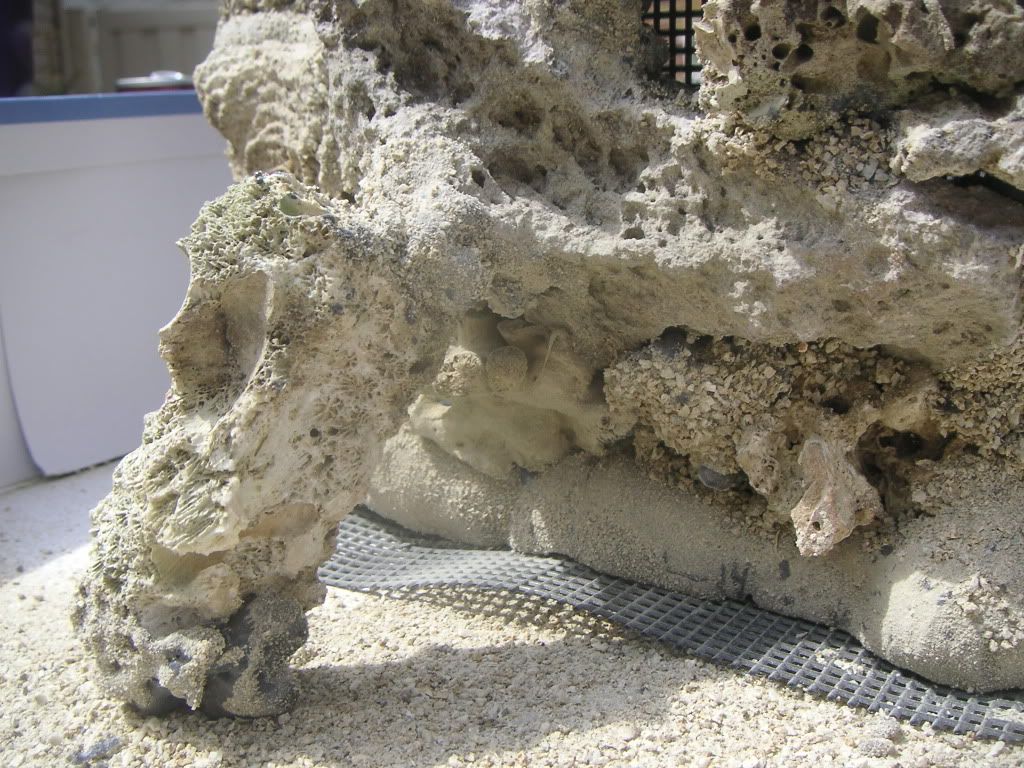
Left side piece (back of tank) all done
 And the right side 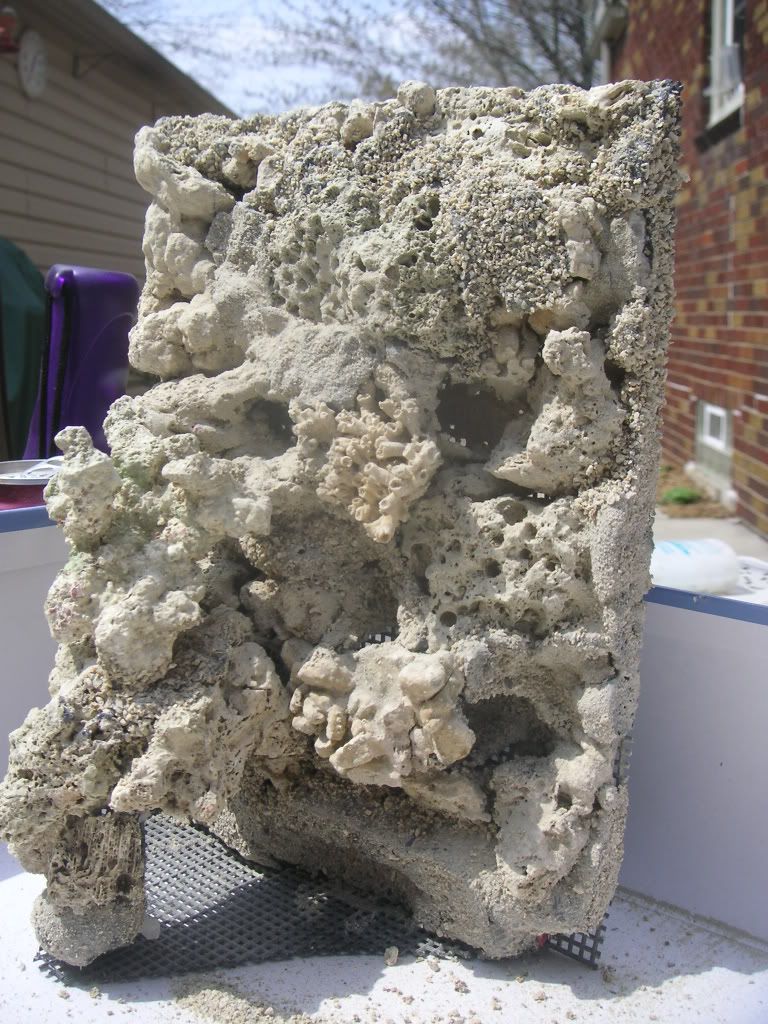 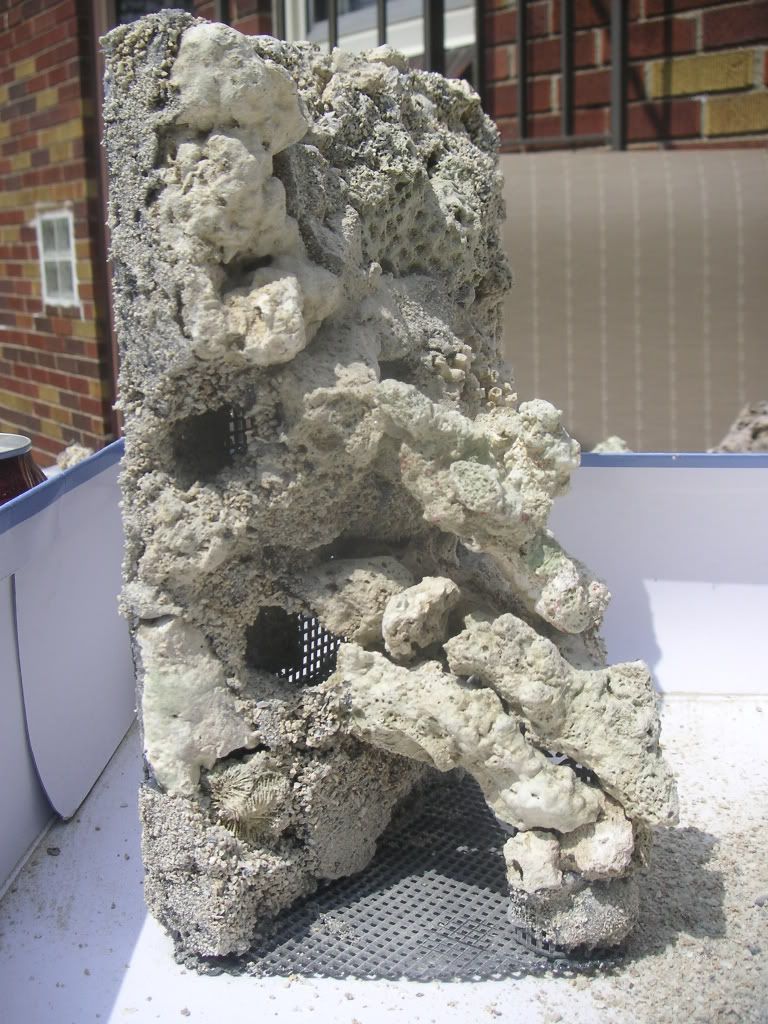 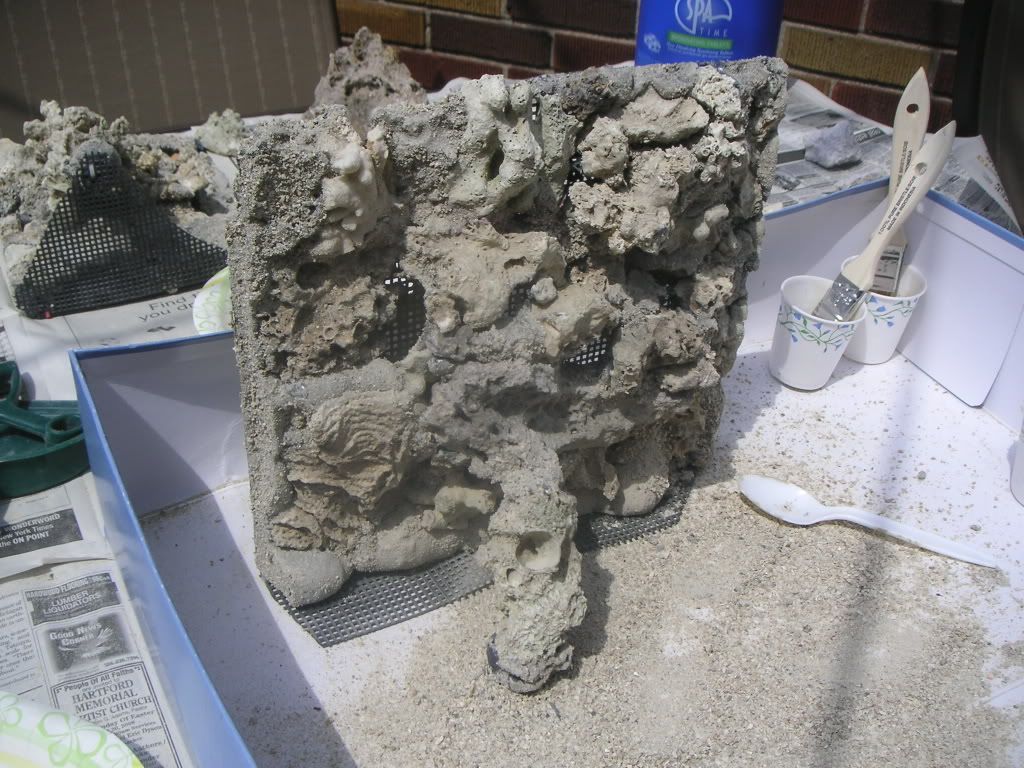 Detail shot. This is where the MJ 400 nozzle will be 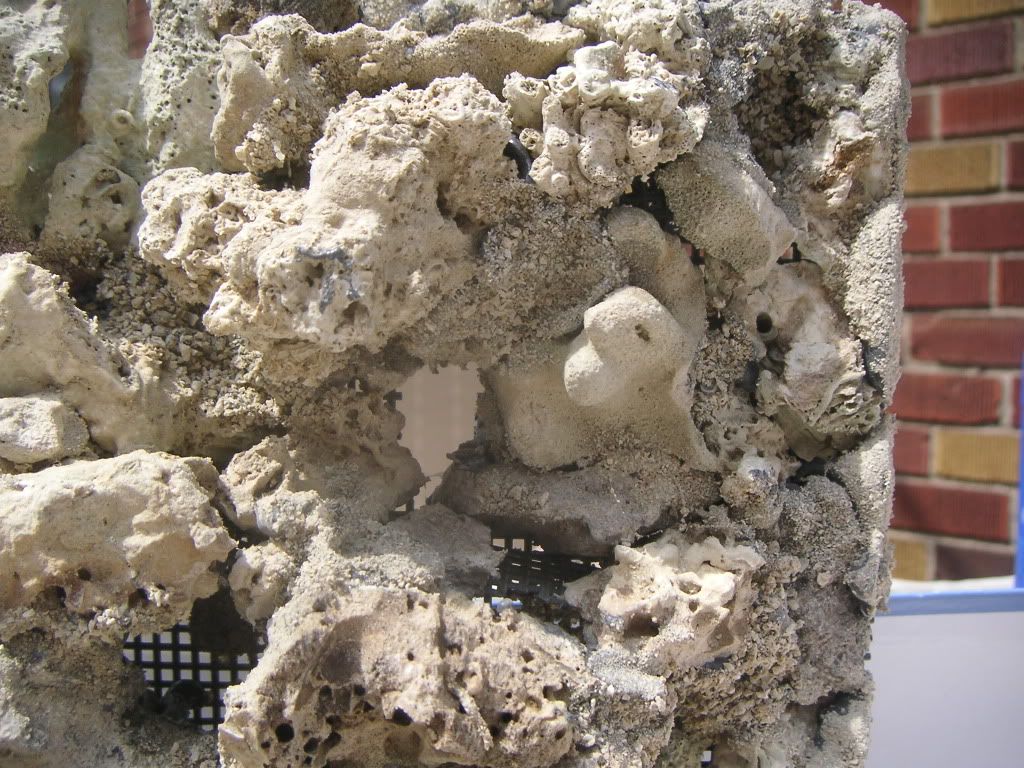
|
|
|
|
|
04/21/2008, 05:19 PM
|
#7 |
|
Registered Member
Join Date: Jul 2007
Location: Michigan
Posts: 708
|
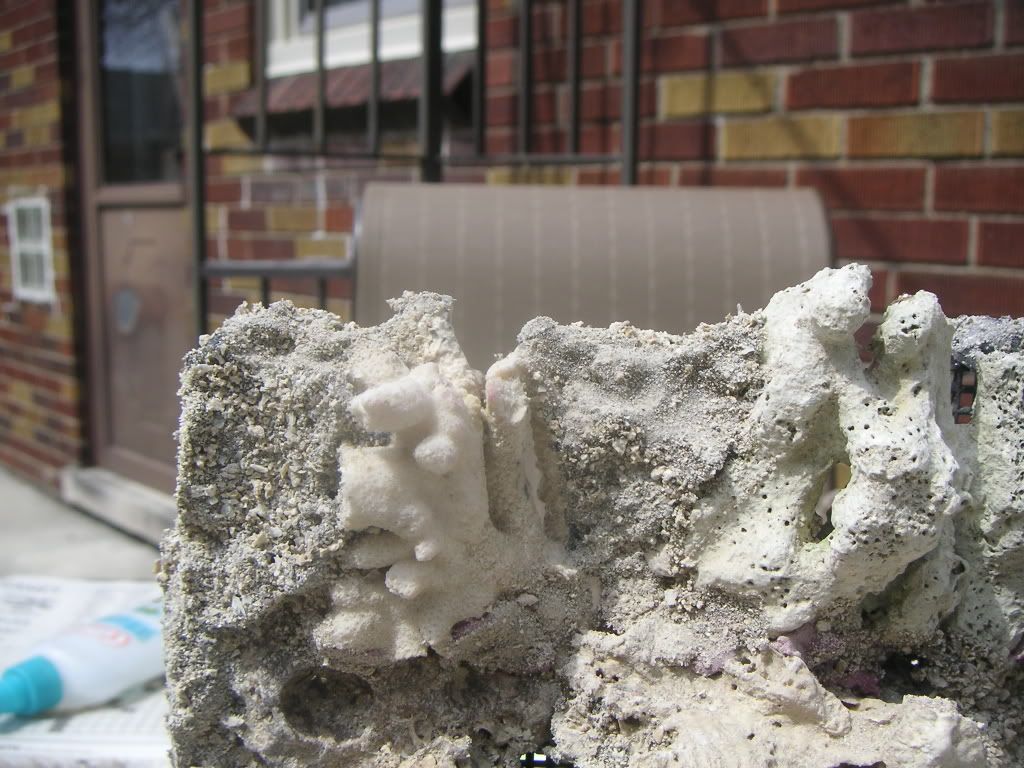
Some more detail shots
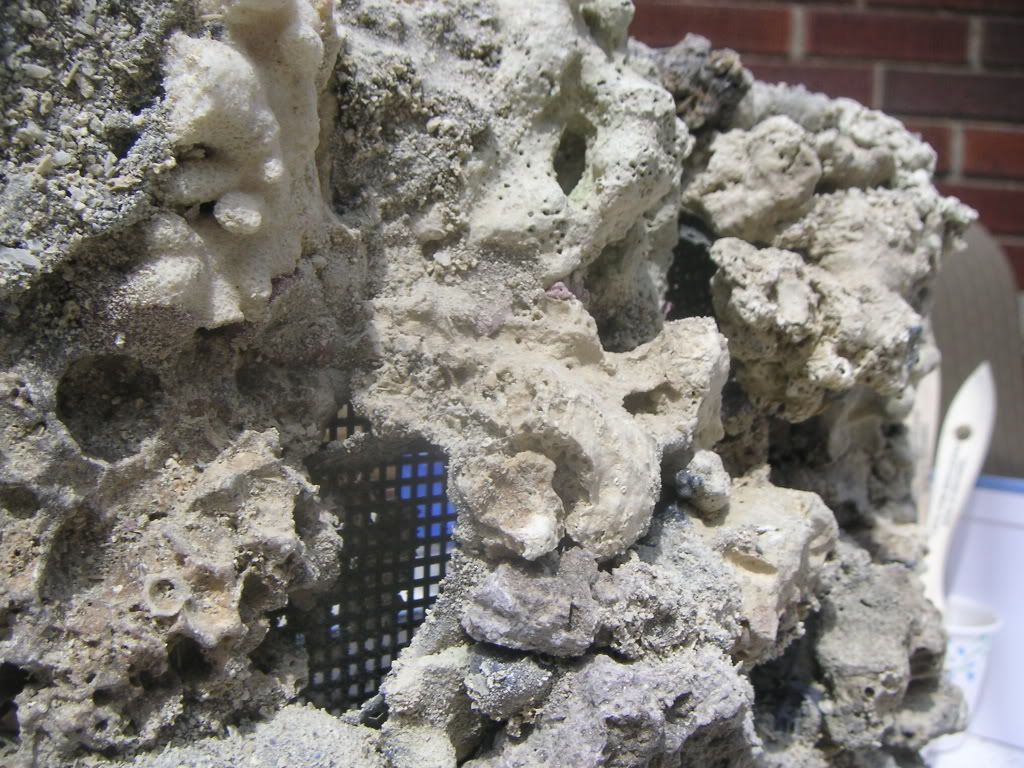      Since these pics were taken, I made a surry out of fiberglass resin and sand to the consistance of toothpast and filled in the back side of all the swim throughs so no light will show through and the frame cannot be seen at all |
|
|
|
|
04/21/2008, 05:23 PM
|
#8 |
|
Registered Member
Join Date: Jul 2007
Location: Michigan
Posts: 708
|
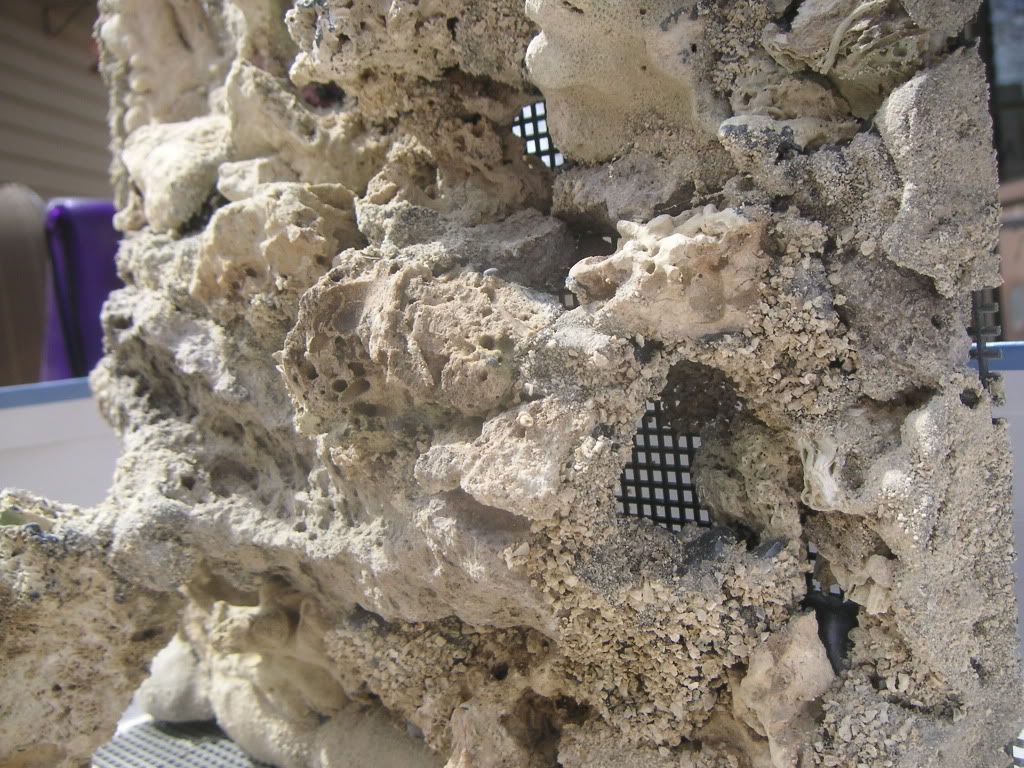
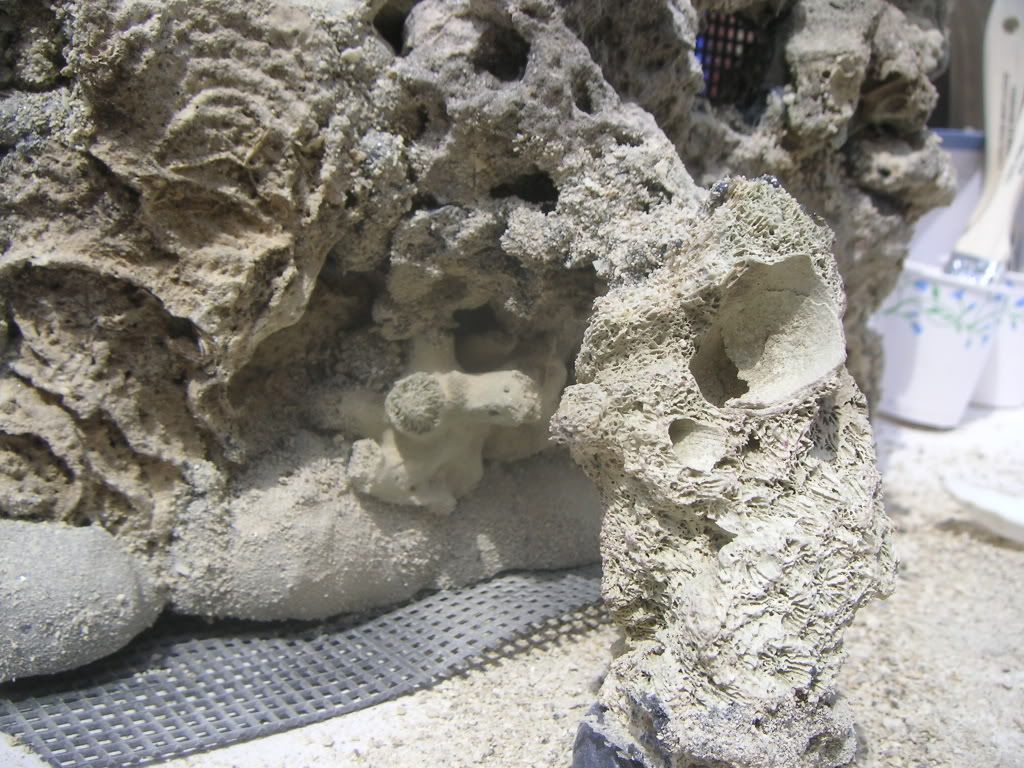
Here is a close up of where the overflow will be. I placed some rocks there that already had "teeth" and filled in between with foam.
 Then I cut teeth into the foam. 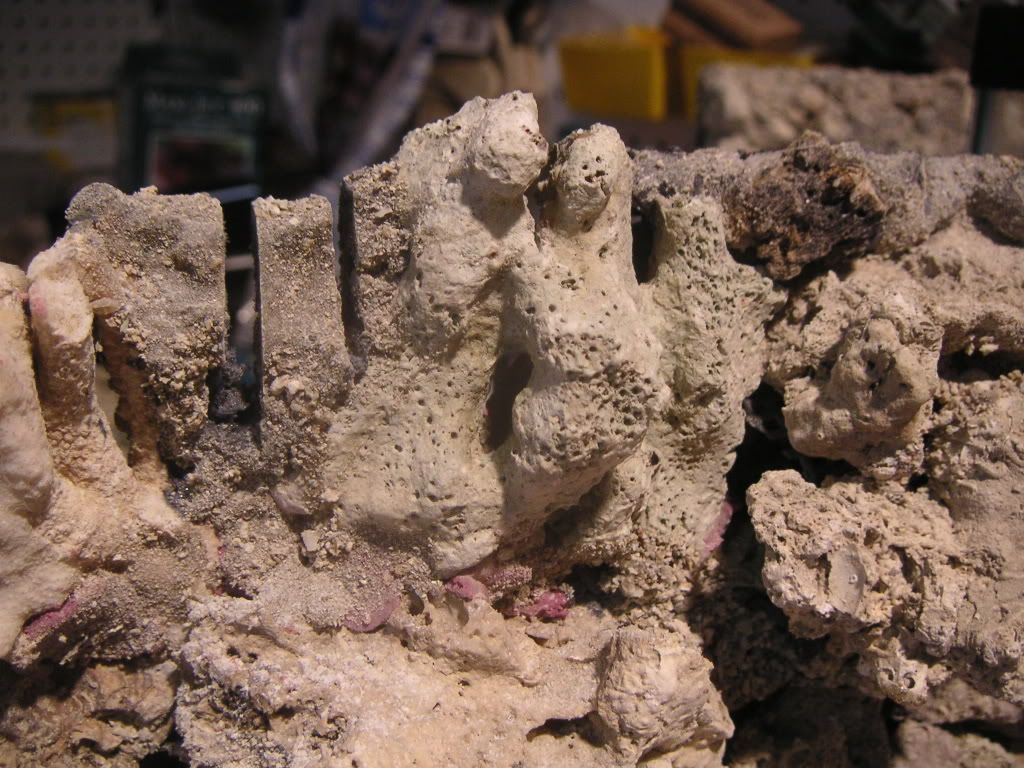 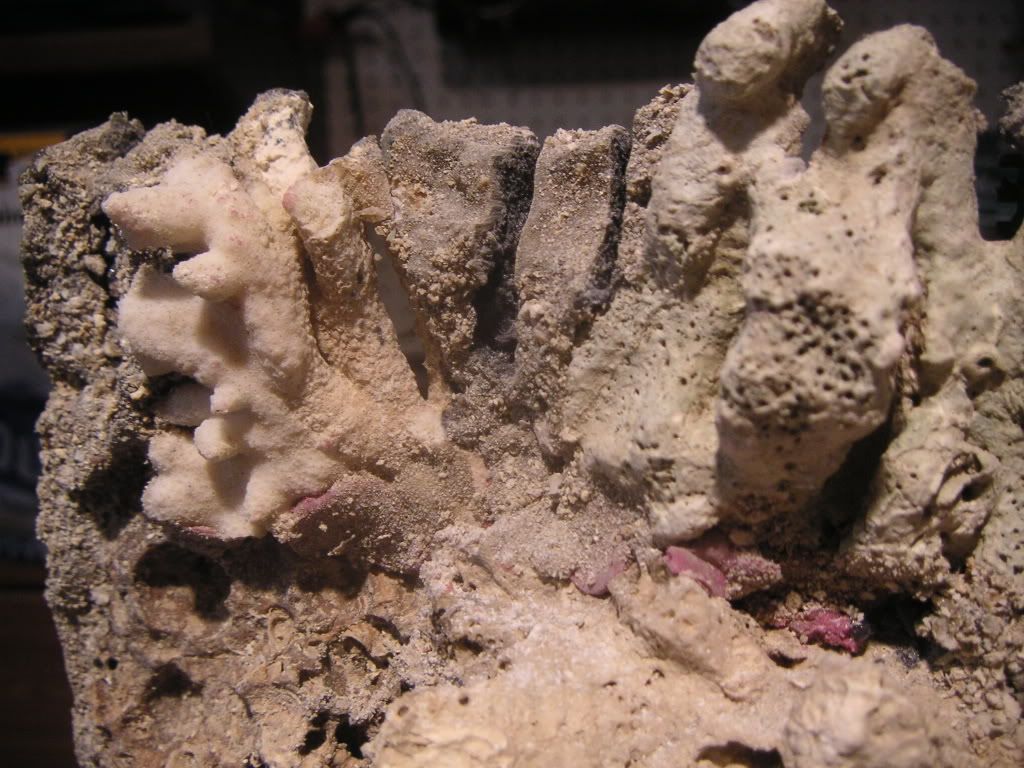 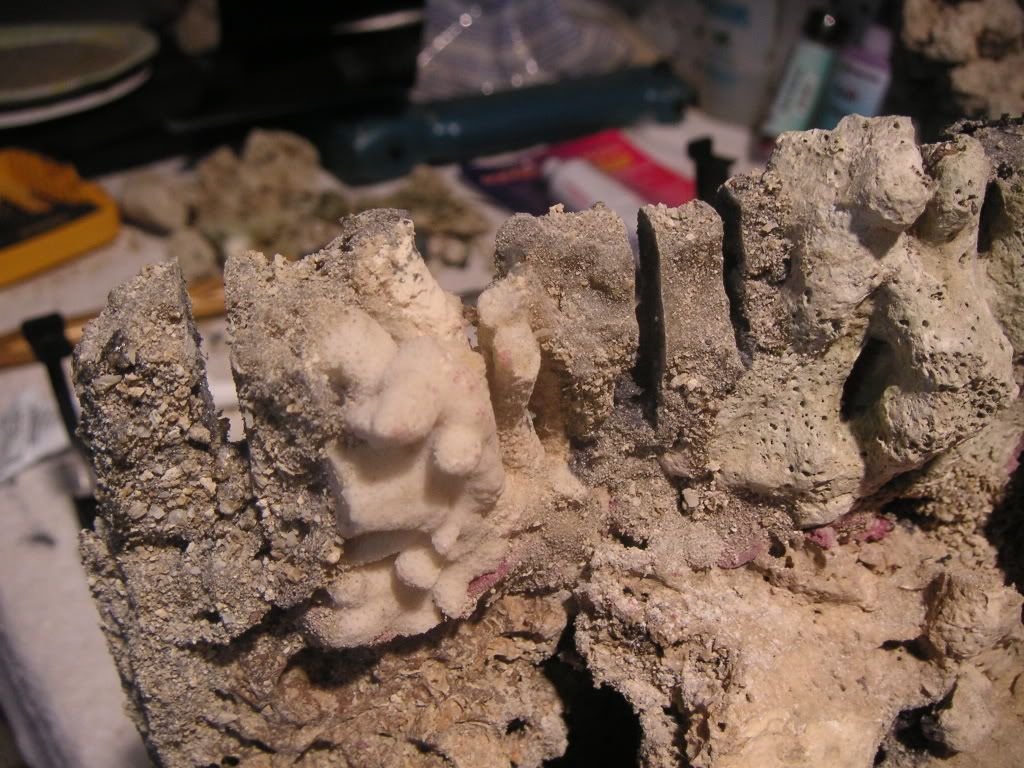 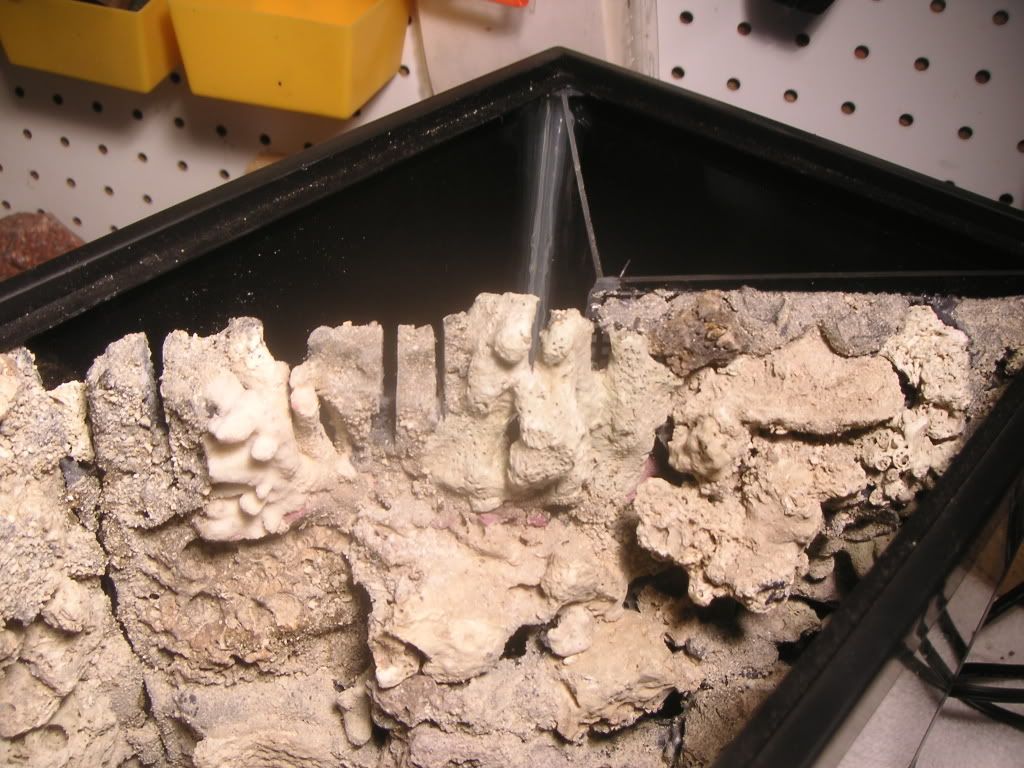
|
|
|
|
|
04/21/2008, 05:28 PM
|
#9 |
|
Registered Member
Join Date: Jul 2007
Location: Michigan
Posts: 708
|
Here's the FTS. I added some FG resin and sand to the seam between the 2 panels today so I can't add water until tomorrow.
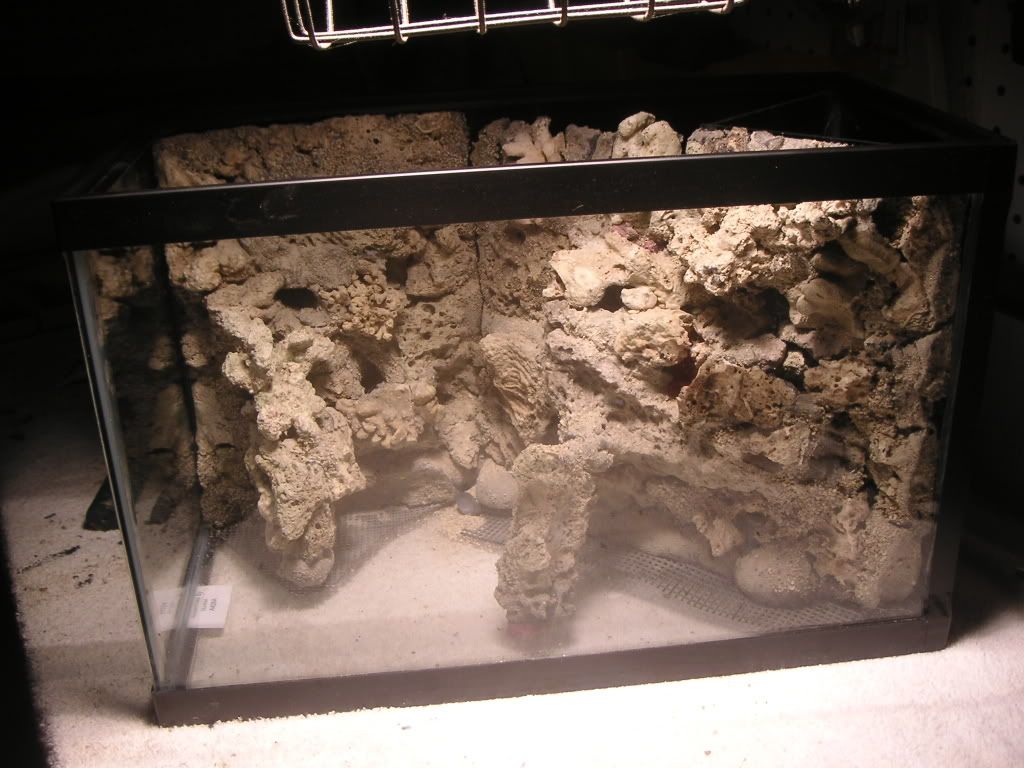 Once again, I'd like to thank Kannin, Tiggsy, customcolors, Sandeep, and danoreef for their inspiration for this tank. |
|
|
|
|
04/21/2008, 06:43 PM
|
#10 |
|
Registered Member
Join Date: Dec 2006
Location: kaukauna, wi.
Posts: 3,879
|
that looks sweet!!!!!!!! i bow to you now
 you took a lot of time and effort on that 5gal. i will be tagging along to see it with live stock in it too. i bet a cleaner shrimp will love the tunnles. you took a lot of time and effort on that 5gal. i will be tagging along to see it with live stock in it too. i bet a cleaner shrimp will love the tunnles.
__________________
PLEASE DONT USE GREAT STUFF (THE YELLOW STUFF) IN YOUR TANK........USE POND FOAM (THE BLACK STUFF).. I BEG YOU! Great stuff====$5 a can 24-48 hour cure Epoxy to cover it====little as $5 for small projects or up to $100+ for larger projects and another 24-48 hour cure I hope you covered it well cuz if you didnt it will start to break down in a few months sand is another added cost to cover up the yellow. Pond foams====$9-$15 a can 24-48 hour cure DONE! You can cover it with sand if you want to (YOU DONT HAVE TO) though but thats added cost again Current Tank Info: 75 gal under way |
|
|
|
|
04/21/2008, 10:25 PM
|
#11 |
|
Premium Member
Join Date: Sep 2007
Location: Destin, FL
Posts: 1,482
|
Damn that's pimp.
Great job! What kind of Resin did you use? |
|
|
|
|
04/21/2008, 10:49 PM
|
#12 |
|
Registered Member
Join Date: Dec 2003
Location: Denver, Colorado
Posts: 9,579
|
Very cool!! Cant wait to see is all set up.
Spleify
__________________
Make it a Great Day!!!! Current Tank Info: 60 gal SPS cube, with 25 gal refugium, 400W MH, DIY Lumenarc III, DIY skimmer, DIY stand and canopy. 40 breeder LPS with 40 gallon sump, DIY stand, 250W MH |
|
|
|
|
04/22/2008, 07:45 AM
|
#13 |
|
Registered Member
Join Date: Jan 2008
Location: St. Louis
Posts: 388
|
That is very awesome...the more and more i see these foam projects the more and more i want to do it on my 55...it's a great alternative to taking up so much space with base rock to get a good stack to have "tables" for corals
|
|
|
|
|
04/22/2008, 09:16 AM
|
#14 |
|
Were all mad here.
Join Date: Nov 2007
Location: London Ontario Canada
Posts: 608
|
Very nice!
Did you use anything to cure it?
__________________
Reef Central Corner Club Aquarium Dumpster Diver Extraordinaire Money talks, mine says "Good-Bye" Current Tank Info: RIP:60g Pentagon Reef 100lbs LR 20g Sump Deltec Mce 600 Mag 750 250W Metal Halide & 2x39W T5's Phosban ReactorX2 5gal refugium 36xTO RIP:135G FOWLER /Agressive |
|
|
|
|
04/22/2008, 04:40 PM
|
#15 |
|
Registered Member
Join Date: Jul 2007
Location: Michigan
Posts: 708
|
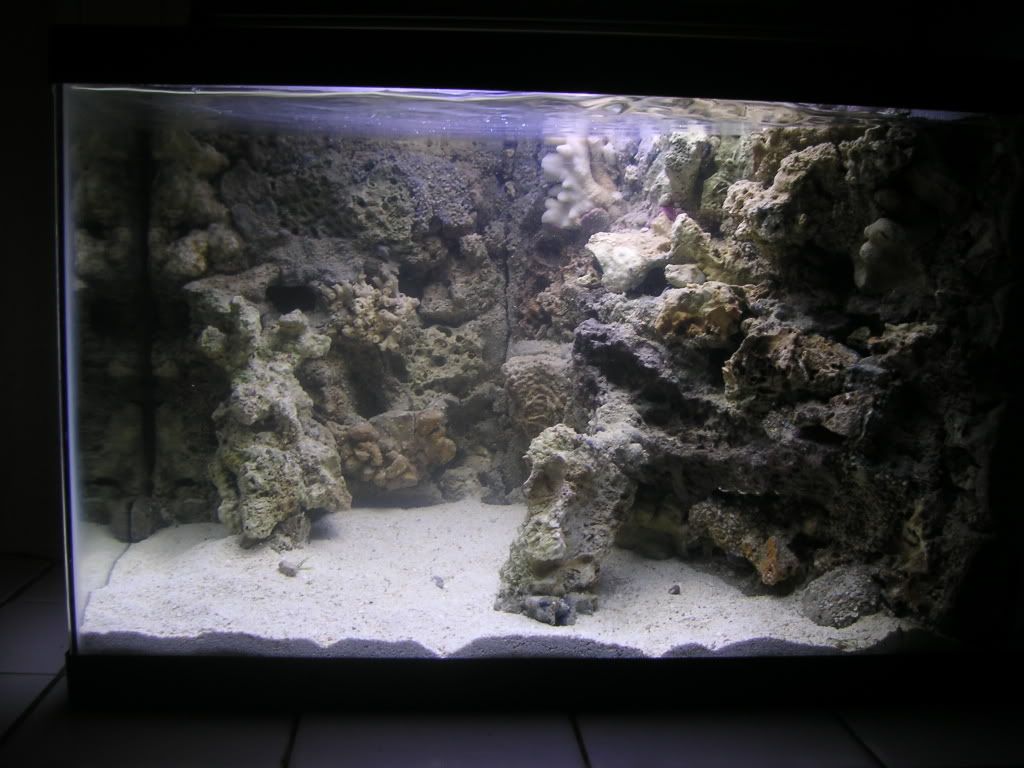
Thanks for the compliments. I used Bondo brand fiberglass resin. I didn't use anything to cure it but time. Today I tore down the 2.5 gallon tank I set up 2 months ago and used the LR and sand to put in to this tank. The inhabitants went in to my Biocube 8.
|
|
|
|
|
04/22/2008, 07:43 PM
|
#16 |
|
LSF Undercover Agent
Join Date: Jan 2008
Location: Salt Lake City, UT
Posts: 169
|
More pics with water soon? (please)
|
|
|
|
|
04/23/2008, 07:36 AM
|
#17 | |
|
Registered Member
Join Date: Jul 2007
Location: Michigan
Posts: 708
|
Quote:
|
|
|
|
|
|
04/23/2008, 07:50 AM
|
#18 |
|
Registered Member
Join Date: Sep 2005
Location: Hollywood Florida
Posts: 3,633
|
very nicely done
|
|
|
|
|
04/23/2008, 08:37 AM
|
#19 |
|
Registered Member
Join Date: Dec 2007
Location: Clarksville, TN
Posts: 1,166
|
Looks Killer!
|
|
|
|
|
04/23/2008, 04:23 PM
|
#20 |
|
SCRK member
Join Date: Jan 2004
Location: Whittier, CA
Posts: 1,444
|
i have thought about doing this to my 6 gal tank, nicely done.
__________________
Ed "Get Busy Living Or Get Busy Dying" "Were discussing man,...you have your wrong opinion i have my right one. Its called communication." Mac Inger Current Tank Info: working on establishing a 32 Gal. Nano-Cube |
|
|
|
|
04/23/2008, 05:46 PM
|
#21 |
|
LSF Undercover Agent
Join Date: Jan 2008
Location: Salt Lake City, UT
Posts: 169
|
Wow, you have truly inspired me to go big on my next build! Can't wait to see some 'stock in it.
|
|
|
|
|
04/23/2008, 05:51 PM
|
#22 |
|
Registered Member
Join Date: Mar 2008
Location: Greater Boston
Posts: 115
|
That thing is crazy, good job. I really like the ideas i see on this site for small tanks. crazy.
|
|
|
|
|
04/28/2008, 06:34 AM
|
#23 |
|
Registered Member
Join Date: Jul 2007
Location: Michigan
Posts: 708
|
Added 7 lbs of live rock to the filter Friday. All kinds of pods swimming around back there now.
|
|
|
|
|
04/28/2008, 06:53 AM
|
#24 |
|
Registered Member
Join Date: Feb 2008
Location: Brighton, TN
Posts: 353
|
Man that really looks nice - good job!
|
|
|
|
|
04/28/2008, 08:20 AM
|
#25 |
|
Registered Member
Join Date: Apr 2008
Location: G-town, Maryland
Posts: 577
|
Nice project man, its going to look nice in a few months.
|
|
|
|
 |
|
|


