
|
|
 05/25/2008, 08:09 PM
|
#1 |
|
Registered Member
Join Date: Jan 2007
Location: Springfield, il
Posts: 246
|
Drjuice28's 210 AGA Reef from scratch (pic and DIY intense!)
Well, I began reefing in 2005 with a 24g nanocube. I learned the basics, and had a really great small tank going. (It's on here somewhere, Drjuice's 24G mega-modded nanocube I think) Just like most of you out there, I ran into a full tank with the desire to put a bunch more in! I'd been thinking about an upgrade for some time, but never had the excuse for my wife to let me invest in it.
Then tragedy, or good fortune depending upon how you look at it, struck. My sump cracked, leaking several gallons of water into my sump room before I could stop it. The process of building a new one, stirring the sand bed within, etc, threw my small tank into a crash. The result was pretty tough to handle, lost more than 80% of my coral specimens. Being my first major setback, I wasn't ready to throw in the towel. Instead, I used it as a springboard to begin tank upgrade discussions. With Christmas 2007 rolling around, all I asked for was a permission slip to start looking for a major upgrade. Somehow, the wife gave in, and the search began. I knew that I wanted a 2nd hand setup to save some startup cash, and I really wanted to go 24" deep, either 150, 180, or 210. I scoured RC, local forums, craigslist and ebay for almost a month (Just not that much for sale in January!) before I found something that I thought would work. An RC member in Iowa (6-7 hours away) was selling a drained setup with oak stand and full Hamilton Halide setup for a price that I couldn't refuse. Two weeks later, I had a rental airline transport van and was on my way to pick it up. Here's what I went to get (keep in mind that I planned on refinishing the entire thing!) 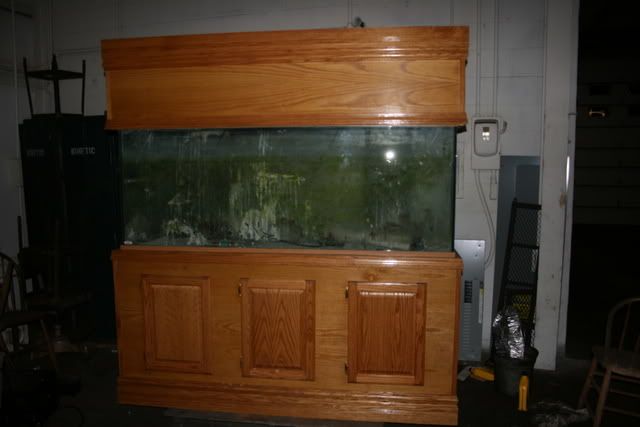 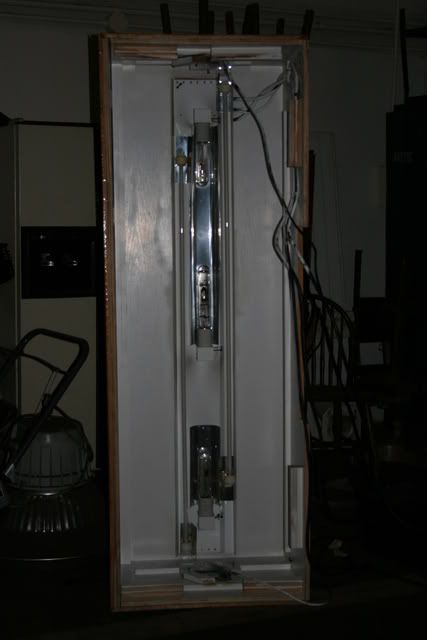 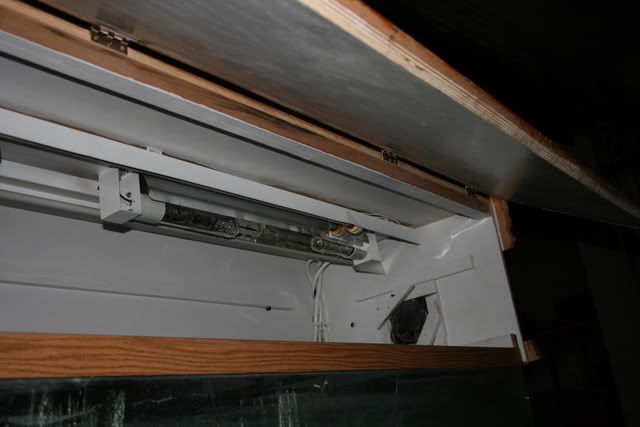 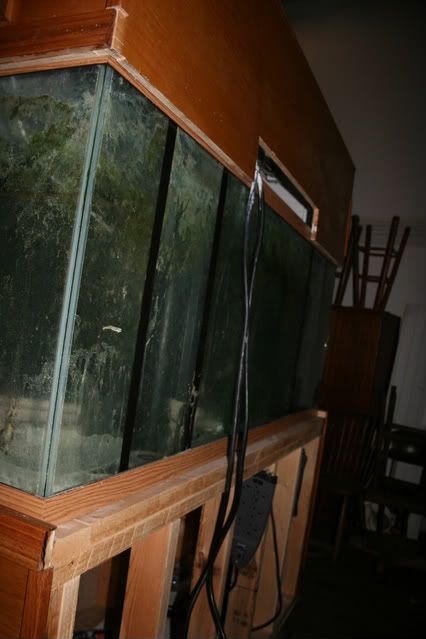 Can you believe how dirty the tank itself is?! But what fun is a tank build without some good old elbow grease? That light fixture is a hamilton 3x400 or 250x2 + 400 MH setup (he had both dual ballasts included, along with 2x80W t-5. The stand looked like solid construction, later confirmed, but without the nice trim/molding that I planned on adding myself.
__________________
~nj~ |

|

|
|
05/25/2008, 08:12 PM
|
#2 |
|
Registered Member
Join Date: Jan 2007
Location: Springfield, il
Posts: 246
|
Our trip to pick it up traversed 4 states, and put a total of 980 miles on the van (all in about 30 hours). Arriving at this guy's shop in Iowa was quite an experience. The first time I laid eyes on this huge setup (keep in mind I'm upping from only 24G!), I walked straight back to the car to warn my wife "Now remember, we measured out the dimensions of this thing in the living room before we left, and it will be just fine" Wow did it look big in person. Luckily, the previous owner had a forklift (what are the chances?) to load it into the back of the van with. I couldn't believe it, but it nearly didn't fit. Only 1/2 an inch to spare side to side, with the canopy laying on top of the rest of it.
The drive home seemed longer than the trip out, and I made sure to call all of my neighbor guys to come help lift this thing out of the truck and into my garage. I had loaned MY forklift out that day I guess. 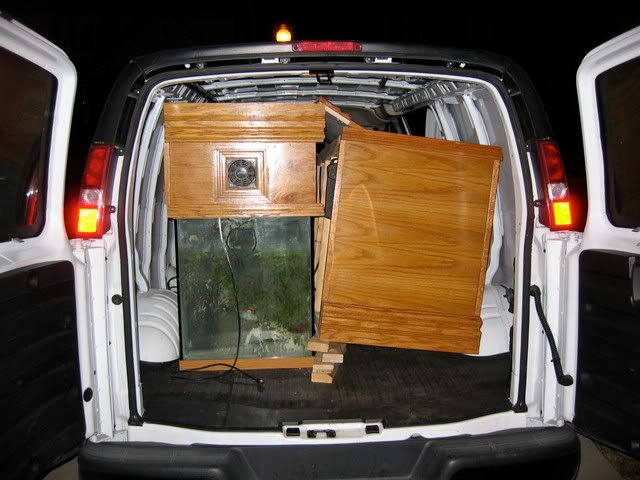 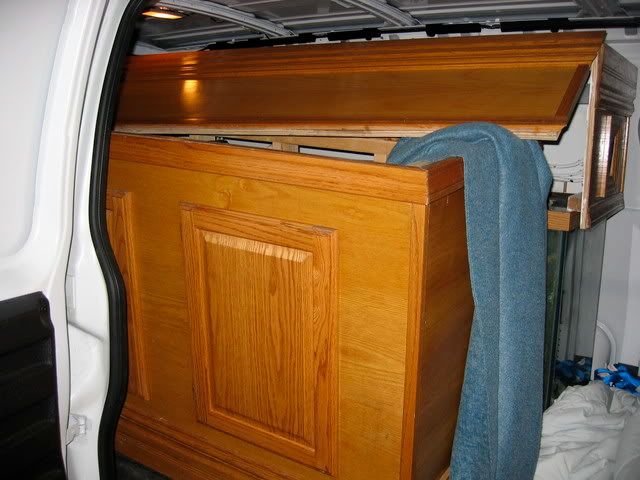 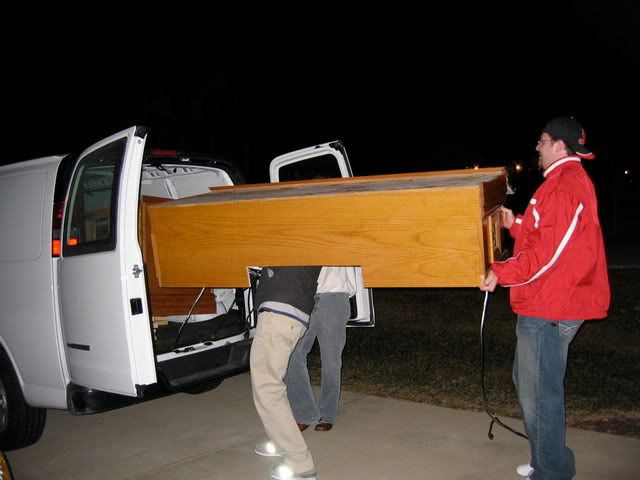 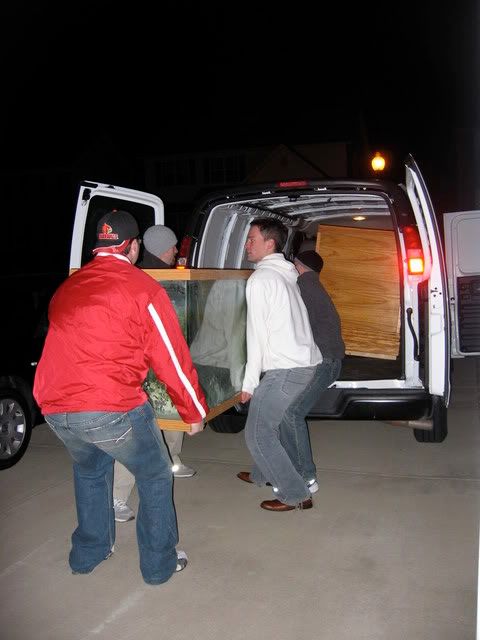 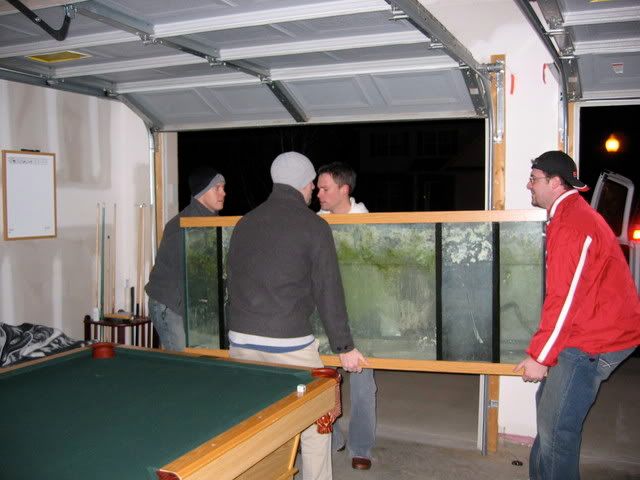 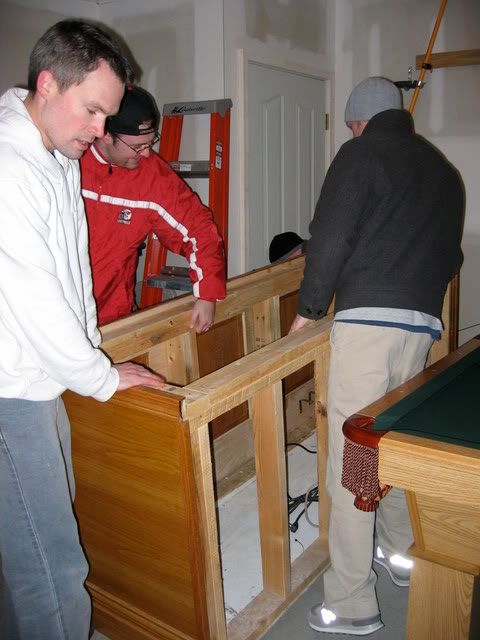 The tank must have weighed about 500lbs (Too lazy to look up the official weight) But we got it in the garage, and called it a night, exhausted. Thus began the 3 month period of my wife complaining that she'd never, ever get her garage spot back!
__________________
~nj~ |
|
|
|
|
05/25/2008, 08:15 PM
|
#3 |
|
Registered Member
Join Date: Jan 2007
Location: Springfield, il
Posts: 246
|
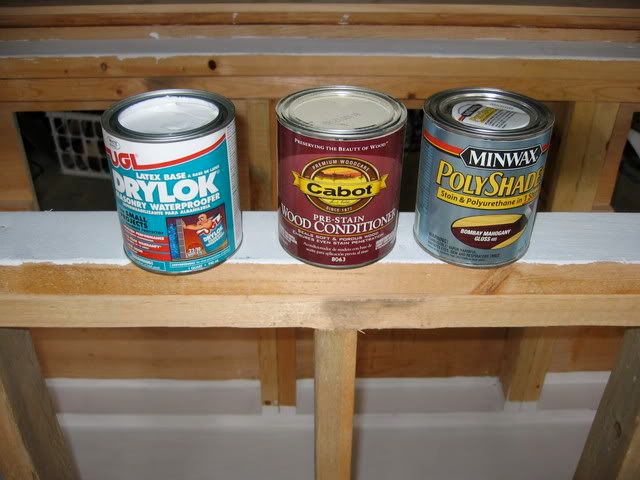
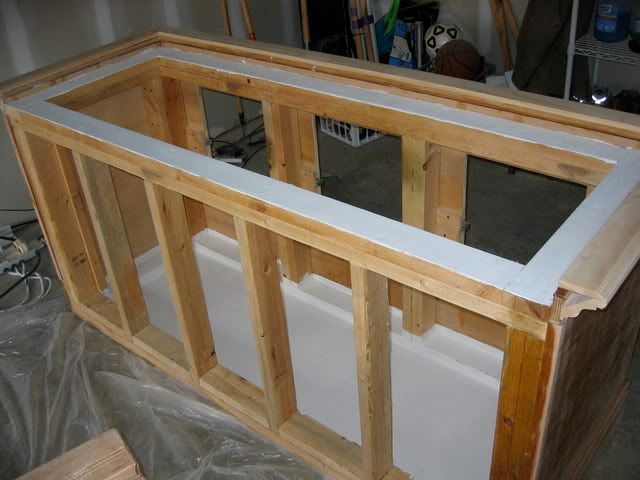
After work calmed down a couple of weeks later, I began my project/obsession. First step was a trip to Lowe's to pick out new molding and trim to dress this baby up a bit. Also picked up extra sandpaper, concrete sealer, stain primer, mahogany stain, and polyurethane. I started by loading 2 thick coats of concrete sealer onto the base of the stand's inside to seal it. That stuff works pretty well, and isn't too difficult to apply. With all micro-gaps filled, the stand should hold more than 15G of water before a leak hits the living room.
  After drying, the sanding began. I ripped off all of the molding that I planned on replacing, and put the electric sander to work. It really wasn't all that bad, but it will be a LONG time before I ever strip crown molding again. All those nooks and crannies... gives the shivers thinking about it again.  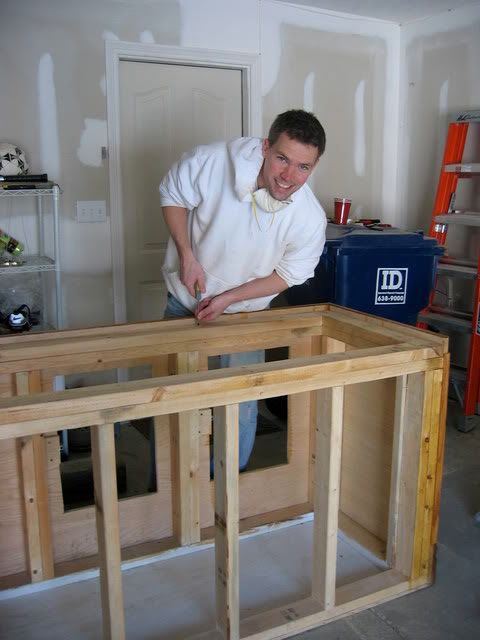 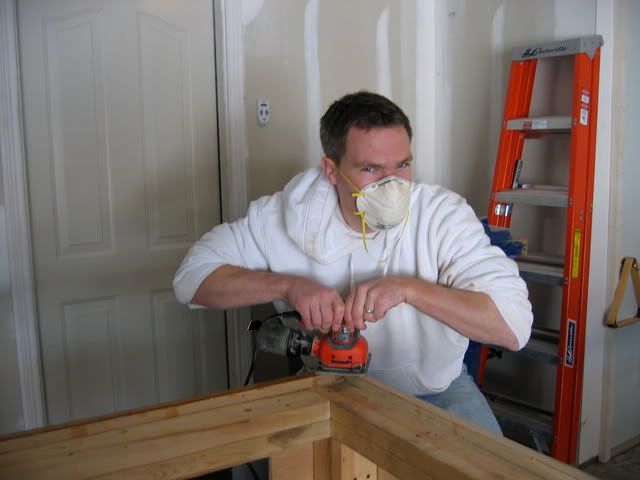
__________________
~nj~ |
|
|
|
|
05/25/2008, 08:19 PM
|
#4 |
|
Registered Member
Join Date: Jan 2007
Location: Springfield, il
Posts: 246
|
After finishing all of the stand sanding, I went to work measuring and cutting the new trim and molding for the base and canopy. Took a little while, but came out really nicely.
  Had to have a beer now and again to keep me motivated...  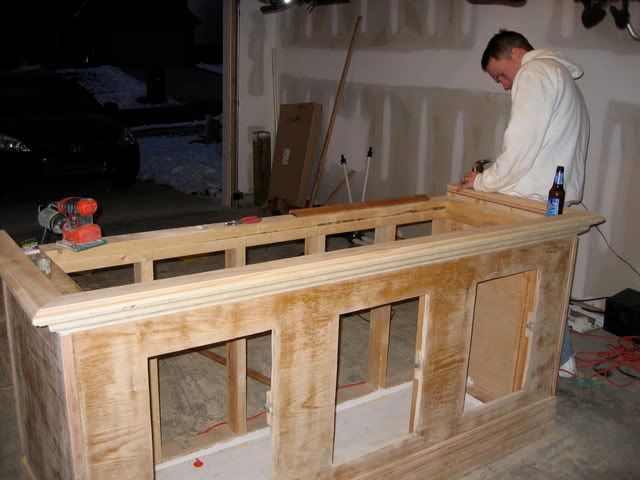 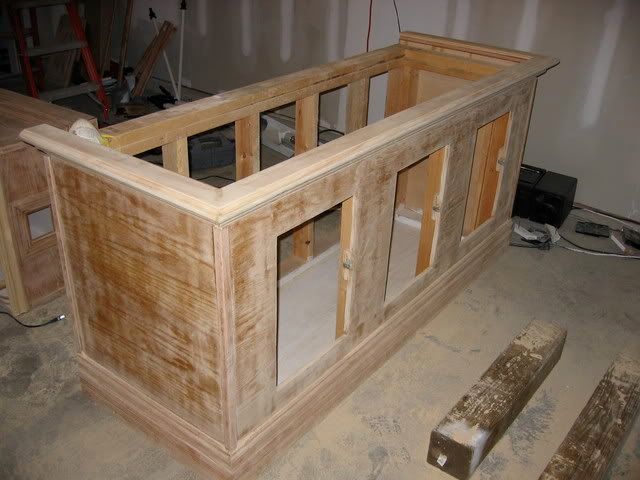 After finishing the stand, I stripped all of the hardware out of the canopy and started working on it. Fully sanded and with new molding. You can see in the earlier pics that the previous owner did not raise the trim to cover the wood finish on the border of the tank itself, a detail that I corrected in measuring and placing the new molding. (though you won't be able to tell until its all sitting in the living room!) 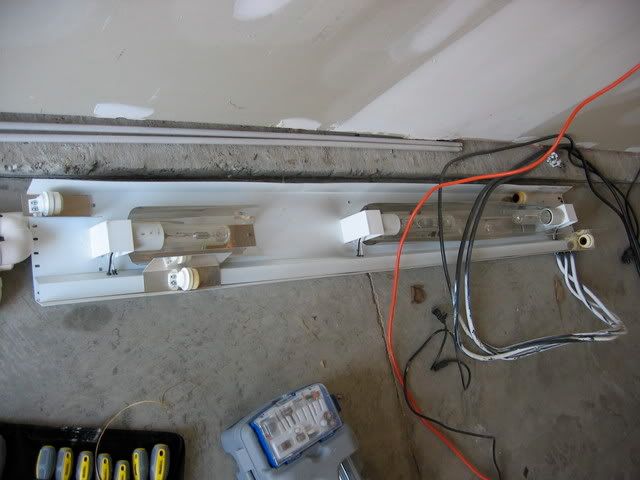 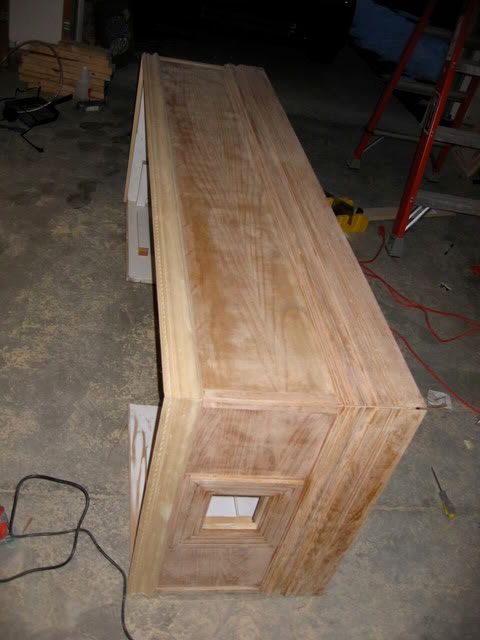 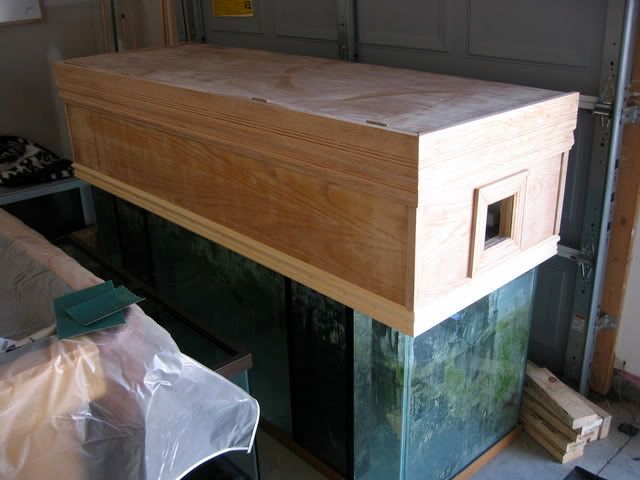
__________________
~nj~ |
|
|
|
|
05/25/2008, 08:21 PM
|
#5 |
|
Registered Member
Join Date: Jan 2007
Location: Springfield, il
Posts: 246
|
On the next sunny day that we had, I decided that the tank just had to be cleaned. It was disgusting, and I still can't figure out how the previous owner got it into that shape! There was algae all over all glass panes, plugging the mega overflows, coating the durso standpipes... it was crazy. But how does one clean a reef ready 210 that's sitting in a crowded garage by himself? I though about moving it to the grass in the front yard, but it would be WAY too heavy to tip onto its side without help (and I need to keep those neighbors on my good side until the tank goes in the living room!). Instead, I slowly pushed it 3 feet onto the front edge of the driveway, and went to work with it in the upright position. The before and after shots tell the story. I ended up throwing a MJ-1200 in while I worked and sprayed it down to keep the water from accumulating in the base.
It looks and smells SO much better now! 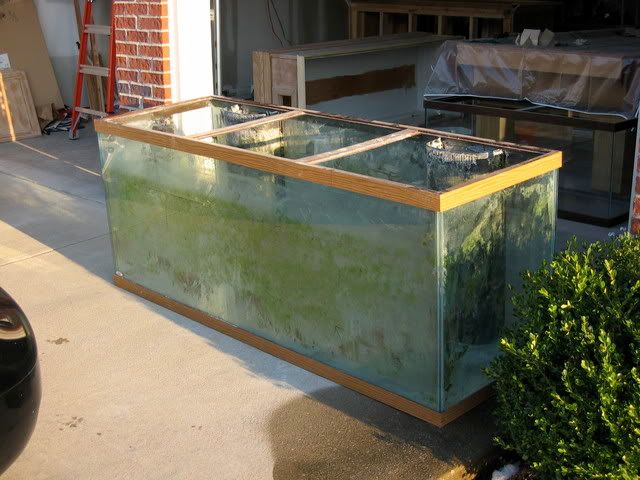 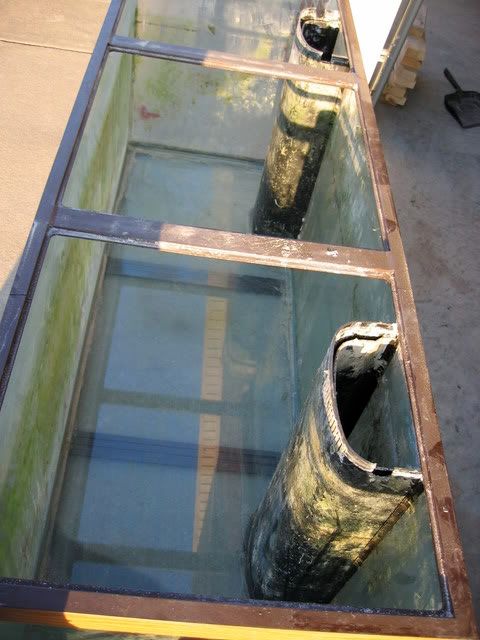 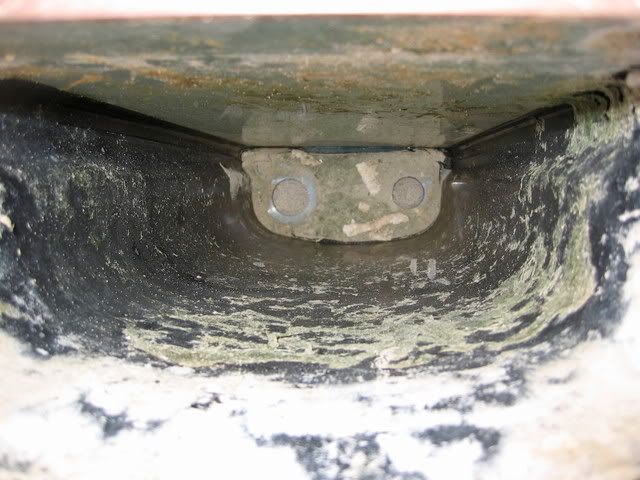 And after 1 hour, dilute vinegar, and a few scrub brushes... 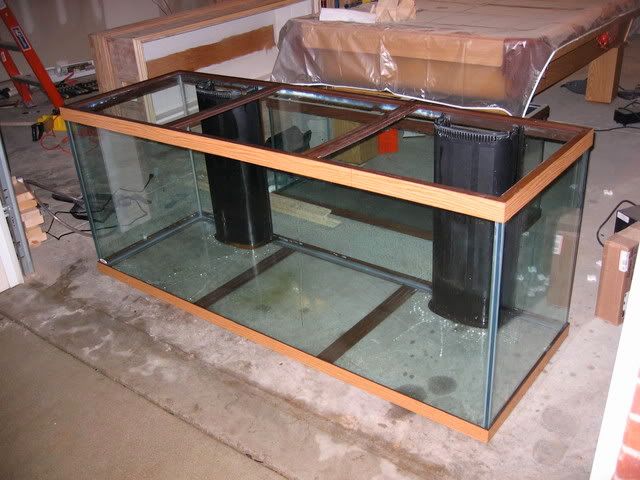
__________________
~nj~ |
|
|
|
|
05/25/2008, 08:30 PM
|
#6 |
|
Registered Member
Join Date: Dec 2007
Location: Mansfield, Ohio
Posts: 111
|
It looks way better! This is going to be a good build!
|
|
|
|
|
05/25/2008, 09:03 PM
|
#7 |
|
Registered Member
Join Date: Sep 2007
Location: SE Pennsylvania
Posts: 139
|
Very nice. My 65g came to me looking that way. Amazing what a little vinegar and water will do. - Although, my 65 is a wee bit easier to move around than that beast. Hmm... a 180+ would be nice...
|
|
|
|
|
05/26/2008, 06:47 AM
|
#8 |
|
Registered Member
Join Date: Jan 2007
Location: Springfield, il
Posts: 246
|
Thanks Screename and xdfireguy, a little bit of work can go a long ways! OK, a LOT of work, but who's keeping track. OK, my wife is, but I'm used to it!
It's so true though that the size of the tank is such a bear to deal with. Anytime I want to get anything done that requires moving either the canopy, tank, or stand I've got to get someone to help me! Good time to have friends that live nearby I guess!
__________________
~nj~ |
|
|
|
|
05/26/2008, 06:49 AM
|
#9 |
|
Registered Member
Join Date: Jan 2007
Location: Springfield, il
Posts: 246
|
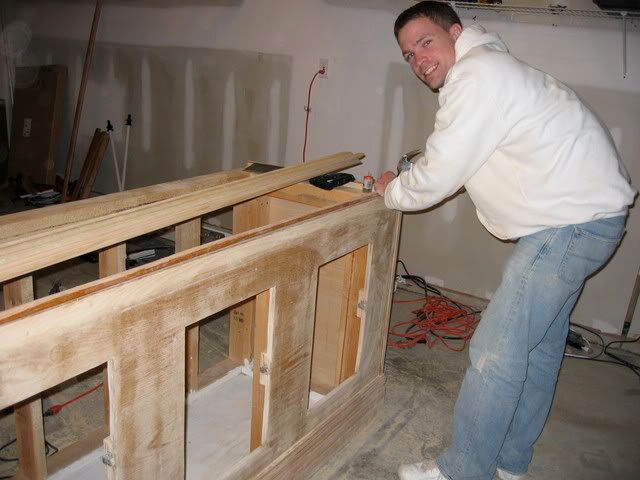
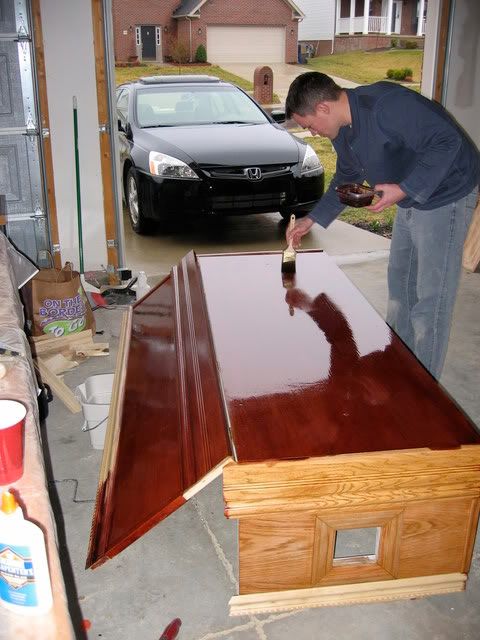
With all of that out of the way, I started staining the whole thing. I used one of the gel stains from Minwax. It's thicker than standard, and easy to handle on a brush. Despite the fact that it says "with polyurethane all in one step", I still planned (and recommend) on coating separately down the line. You just have to be careful not to lay the stuff on too thick, as is a tendency with a thicker material. On vertical sections, too thick an application was readily evident as it started to clump and layer on itself with gravity. I had to restrip an entire section to get it right the 2nd time! In the end it came out gorgeous. It's much more uniform than it looks like in these sunlight exposed pics. After 2 coats of polyurethane on top, it shines bright!
 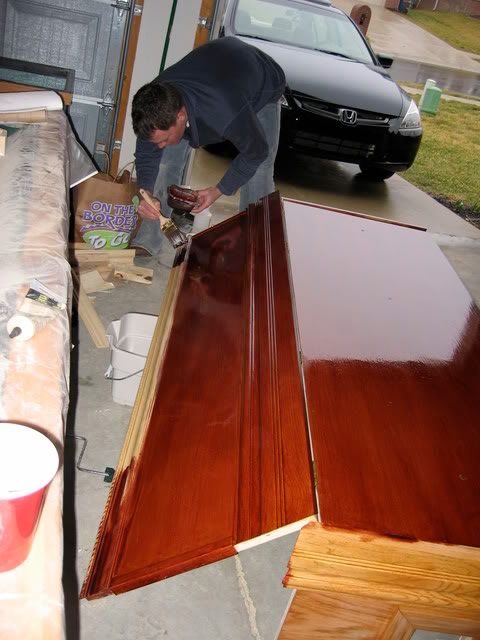 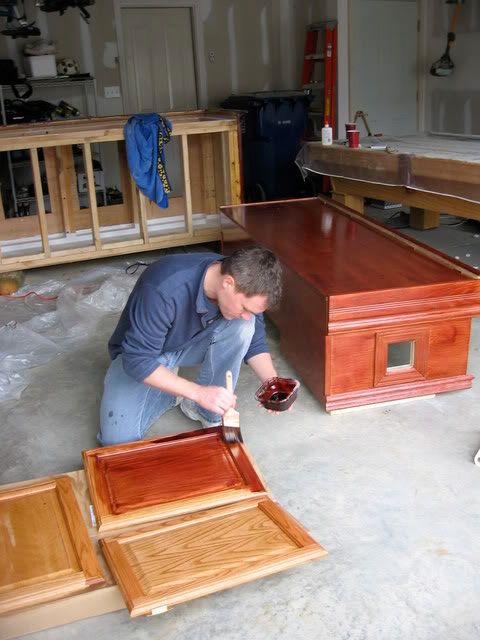  And then the 2nd coat... Sorry, I'll get more pics of the whole thing fully coated...
__________________
~nj~ |
|
|
|
|
05/26/2008, 06:57 AM
|
#10 |
|
Registered Member
Join Date: Jan 2007
Location: Springfield, il
Posts: 246
|
With some of the major grunt work out of the way, I started to think about some of the electrical work that needed to be done. The previous light fixture was poorly designed in my opinion. With end caps/mounts placed so close to 250 and 400W MH's, significant heat damage was evident. A lot of the original wiring was toast too, wanted to replace it to be on the safe side. It looked like it was only a few lightings away from making the whole canopy go up in flames!
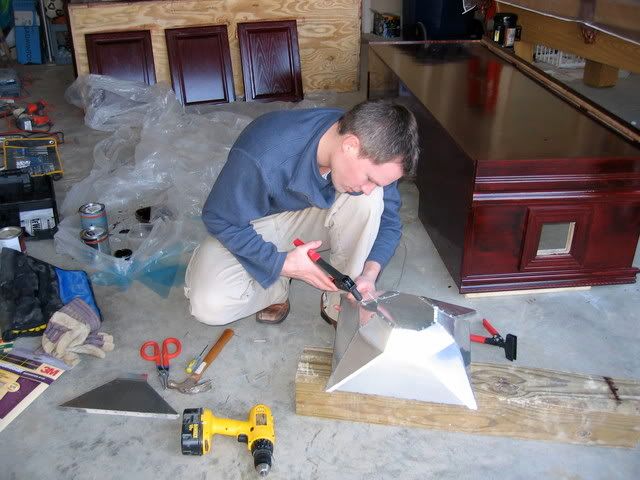
After a lot of research, I decided that I wanted to fabricate (sounds better than 'make') my own lumenarc-style reflectors. I laid out some templates on poster board to get the sizing right. I wanted to go with a larger one on my 400W center buld and mini's on my 250's on the sides. there's a few places to get mirror-finish alluminum to build these out of, I ended up going with one of the skylight companies, Velux. (Solatube is another good choice, and HD carries it) A 4' section of 14" diameter tubing was $60 something at my doorstep, just enough for the 3 reflectors I wanted to make. Here's the piece layout. It was like a puzzle to fit it all together without wasting material or coming up short! 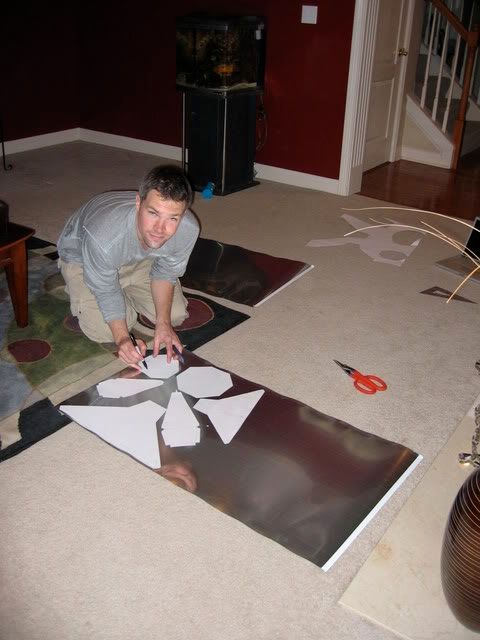 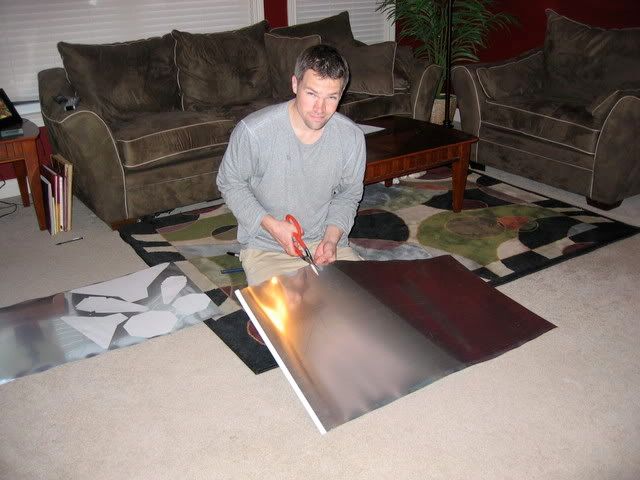 After tracing all of the pieces, I cut each one out with a pair of heavy tin snips ($20 Lowe's). I had considered using the dremel cutting tool, but this was much easier, I promise. That being said, if you want to try this, be patient! This step takes an hour, and gets a bit boring! I picked up a pair of welding crimpers ($25 Lowe's) to bend each fold. This step only takes 20min: 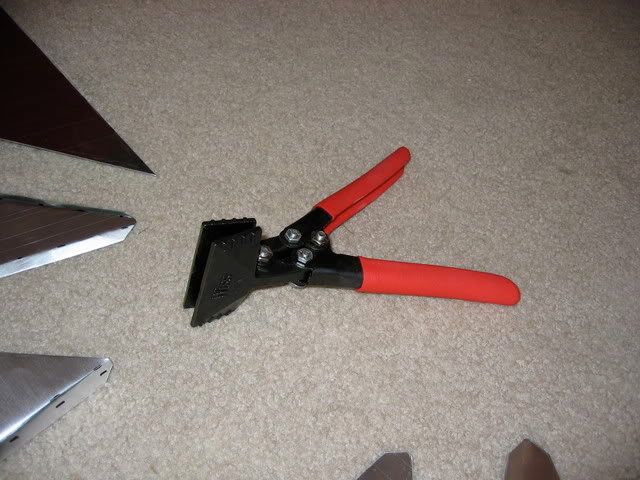 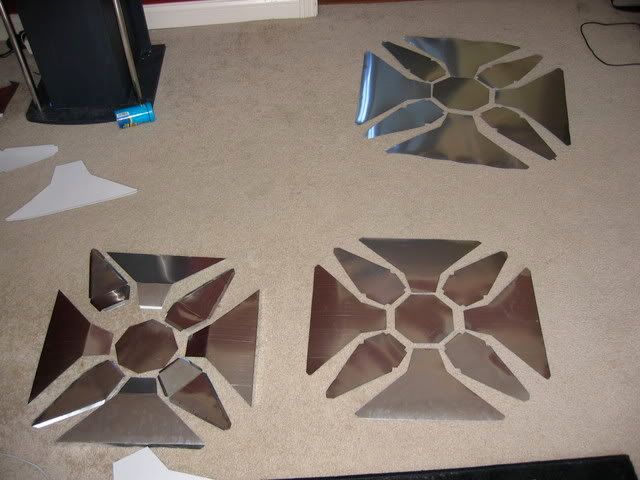 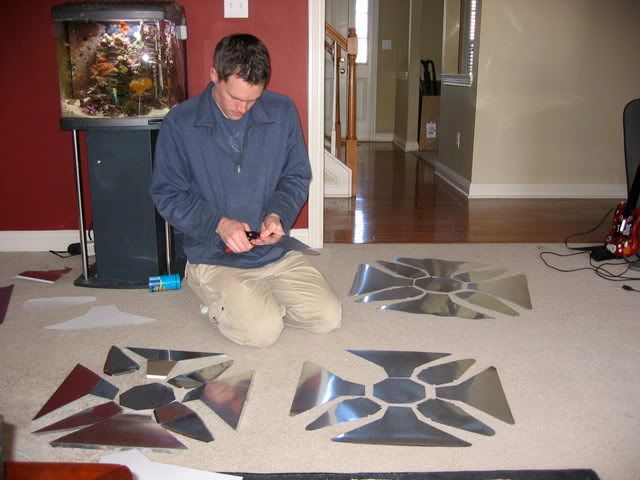 
__________________
~nj~ |
|
|
|
|
05/26/2008, 07:04 AM
|
#11 |
|
Registered Member
Join Date: Jan 2007
Location: Springfield, il
Posts: 246
|
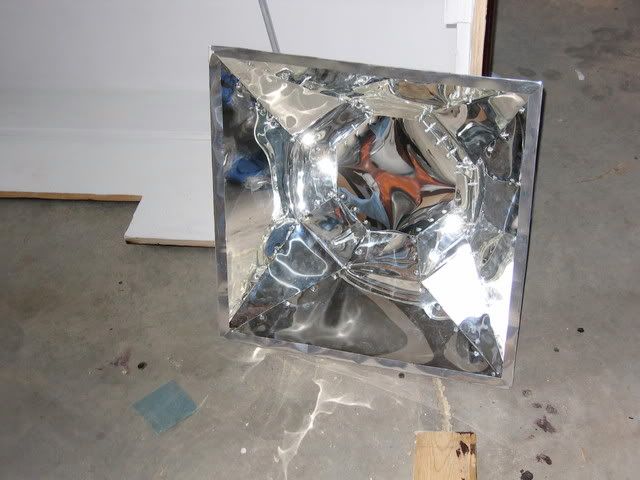
The next step was to take all of the pieces to the garage and start fitting them together. The key, as most threads of this sort will tell you, is to attach each piece to the top octagon, and work your way equally down each side. Attaching the pieces requires a 3/16" bit and matching rivots. You can get a cheap handheld rivotter at Lowes for like ten bucks. It took quite a while, fit, drill, rivot, repeat. but once they were all together, they looked awesome. Each seam got about 2-3 rivots in it, and it was really a solid structure at the end of it all. Wear some gloves for the last few steps though! Bending the last couple of joints into perfect position will be tough, and that aluminum is sharp!
 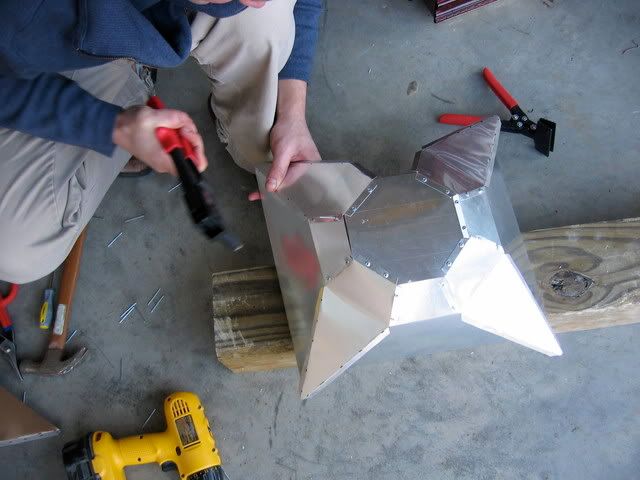  You can see the final stain on the stand/canopy in the background there too. I don't have pics of it directly, but the next step in building these is to add the mogul bracket. I just cut 3" wide strips of leftover reflective aluminum and bent them to fit the moguls that came with my system. Use the mogul itself to trace a circular cutout on the side of each reflector, then just cut it out! The mogul will slide right into the reflector, then just rivot the bracket to the top, and you're done! Here's the best pic that I think I have of that part: 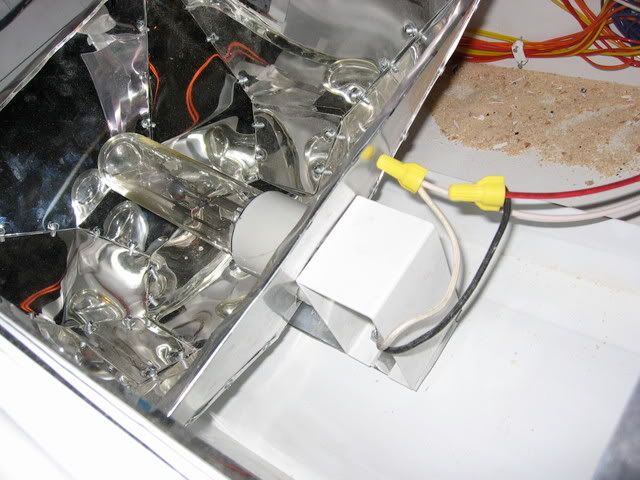
__________________
~nj~ |
|
|
|
|
05/26/2008, 07:08 AM
|
#12 |
|
Registered Member
Join Date: Jan 2007
Location: Springfield, il
Posts: 246
|
The refelctor patterns are available from a couple of guys on RC. I've got them saved to a hotmail account if anyone wants them. They aren't to scale, so you have to either go to Kinkos and upsize them, or measure out your own using the dimensions provided.
Here's a better comparison of the stand refinished, next to its original color and trim. Pretty drastic change! 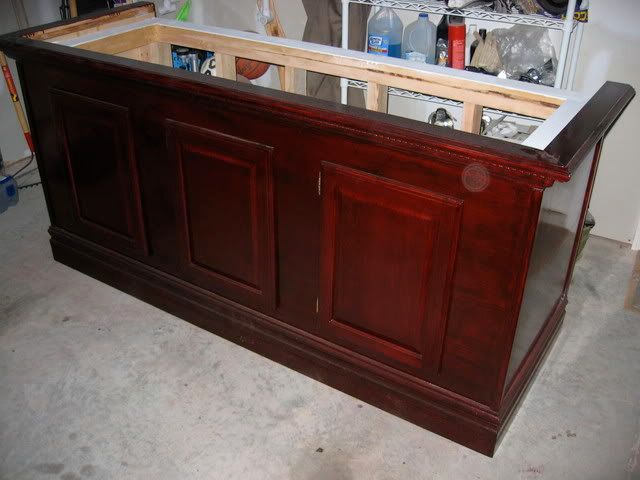 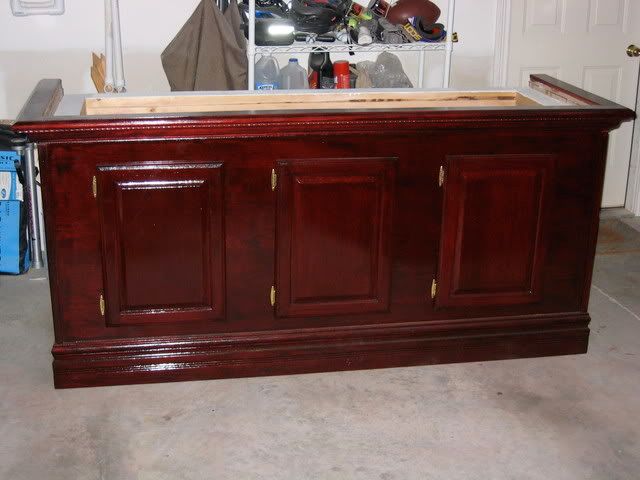 Next in line was the huge job of tackling the lighting mess that I had... great components without any good layout... had to start from scratch!
__________________
~nj~ |
|
|
|
|
05/26/2008, 07:18 AM
|
#13 |
|
Registered Member
Join Date: Jan 2007
Location: Springfield, il
Posts: 246
|
I did all of my rewiring in one afternoon, and got so into it that I forgot to take pics along the way. My mistake! (let me know if I can clarify any of the equipment or steps for you DIY'ers) Essentially, I took every screw and bolt off of the old Hamilton unit and laid everything out on the ground. I found that the wiring to the MH moguls was pretty fried. So crispy that you could break the plastic coating just by flexing it 90 degrees! I cut it all out, and rewired straight from the quick disconnect cables that were in fine shape. I measured out the middle of the canopy and the 1/4 and 3/4 points to begin mounting the lumenarcs. I decided to keep the metal platform that the old light system was built from to space out the lights from the inner surface of the canopy and assist with air circulation and cooling. After bolting the moguls to the lumenarcs, and the pair to the plate, I wired each individually back to the ballast.
Next, I broke out my new delivery from reefgeek: a T-5 retrofit 3x80W icecap 660 setup. The instructions were a breeze on wiring, but I needed to figure out where to mount them with the new reflectors in place. I wanted to build a bracket or hanging device to hold them just below the largest of the reflectors, but a few inches up from the water's surface too. Once again, a trip to Lowe's. I got some 3/4" 90 degree aluminum strips and fabricated brackets from the inner canopy to hang 13" down. Just far enough to clear the lumenarcs. then I mounted the endcaps and standoffs to the brackets, put the bulbs in to space them out correctly, and mounted it to the canopy. The icecap ballast and mount are tucked up behind the middle reflector. There's a lot of wiring, but it really wasn't that difficult to work out. All in all, its powered by a Hamilton 400W ballast, a Hamilton 2x250W ballast, and an icecap 660 ballast. The tank purchase came with a Hamilton 2x400W ballast too, so if I ever want to switch up to 3x400W MH it will be a snap. 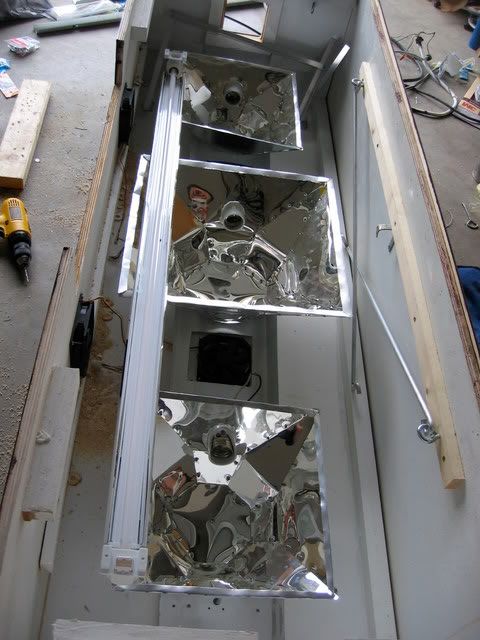 Here's a full shot of the canopy turned upside down: 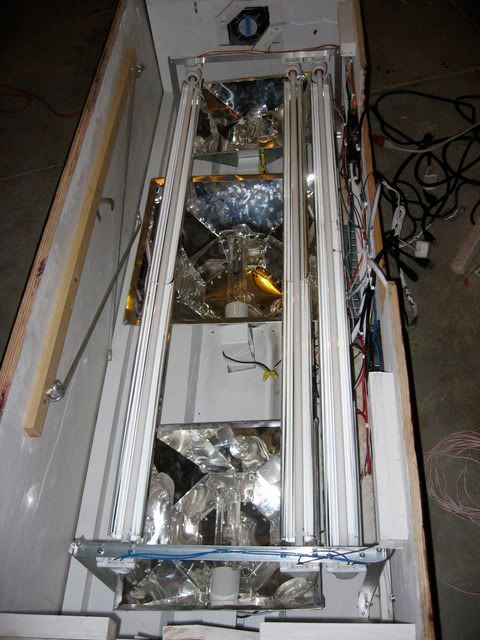 Experience these new reflectors in their full reflective glory! (The light isn't even on in this pic!) 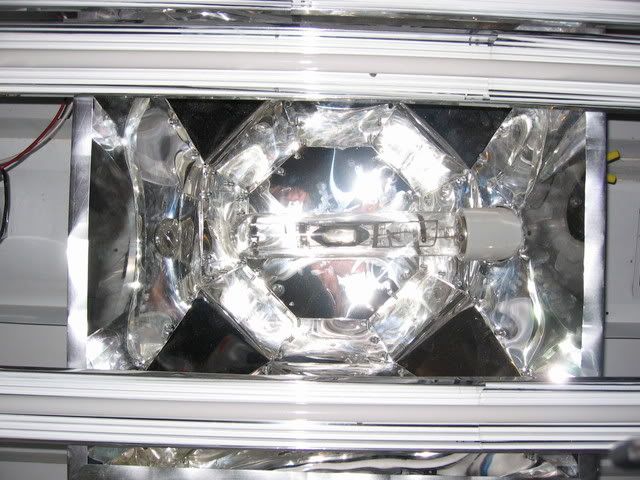 A shot of the MH mogul mounted, bracket holding it to the top of the reflector, and takeoff wiring: Here's the best pic I have of the aluminum bracket that I put in: 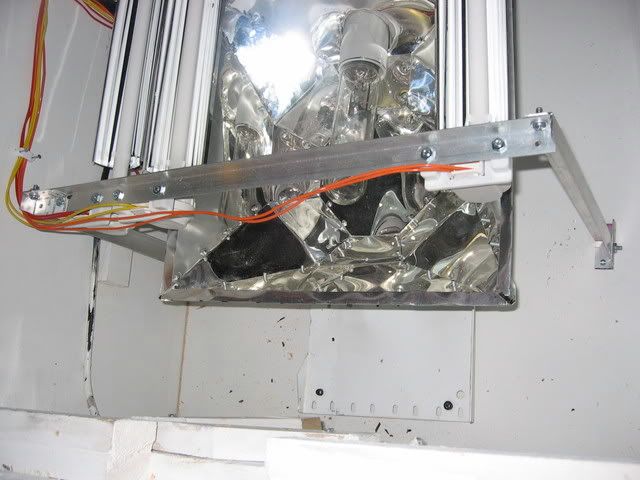 And the IC ballast tucked in up there: 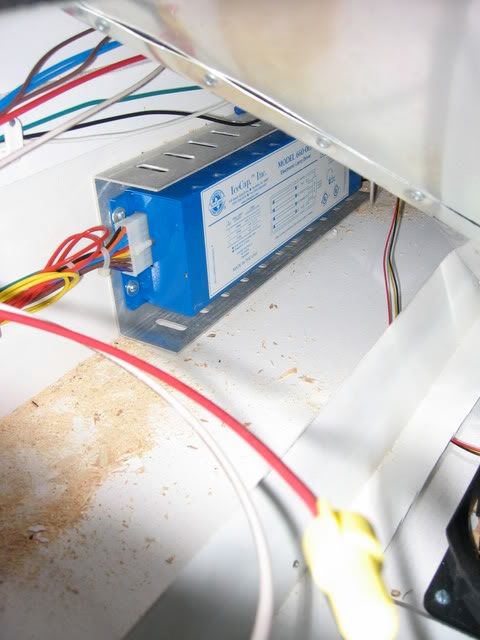 Another close up: 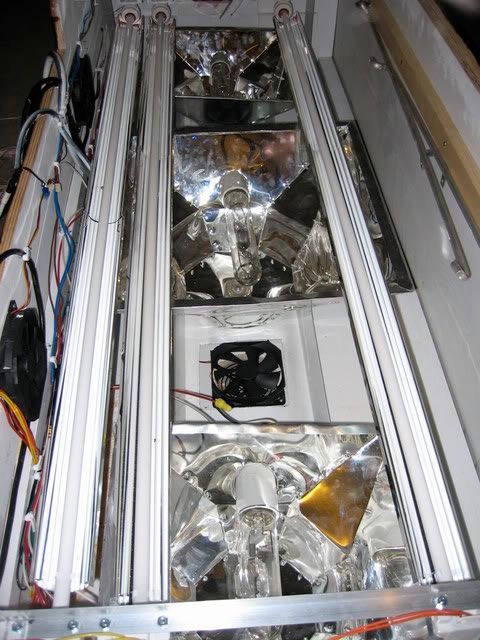
__________________
~nj~ |
|
|
|
|
05/26/2008, 07:42 AM
|
#14 |
|
Registered Member
Join Date: Apr 2006
Location: Baltimore, MD
Posts: 2,758
|
Talk about a diy light. Nice job!
__________________
Chris ------- 34 Gallon Red Sea Max 130! Setup (Just got back into the hobby) Current Tank Info: 34 Gallon RedSeaMax! |
|
|
|
|
05/26/2008, 09:15 AM
|
#15 |
|
Registered Member
Join Date: Apr 2003
Location: Central Florida
Posts: 3,737
|
Great so far! I love the DIY reflectors and it looks like you did a really nice job on the wood finish too. It must've been a perfect balance of work vs. beer

|
|
|
|
|
05/26/2008, 09:35 AM
|
#16 |
|
Premium Member
 
Join Date: Sep 2000
Location: Portland, OR
Posts: 1,468
|
WOW!! That stand is BEAUTIFUL!!! Great job! The DIY luminarcs came out nice also. Cant wait to see this build progress.
Dennis |
|
|
|
|
05/26/2008, 10:04 AM
|
#17 |
|
Registered Member
Join Date: Jan 2007
Location: Springfield, il
Posts: 246
|
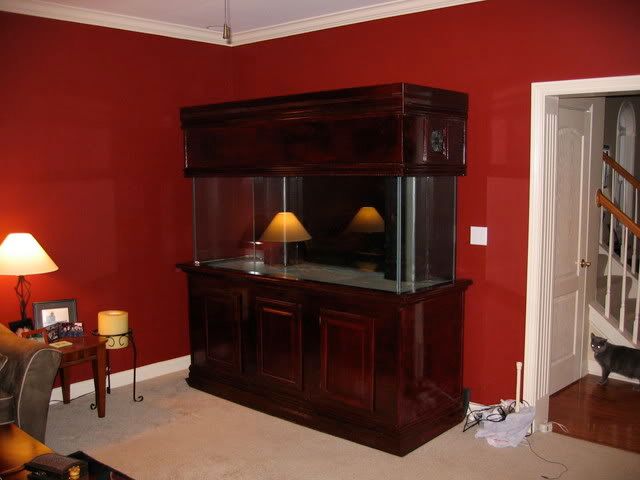
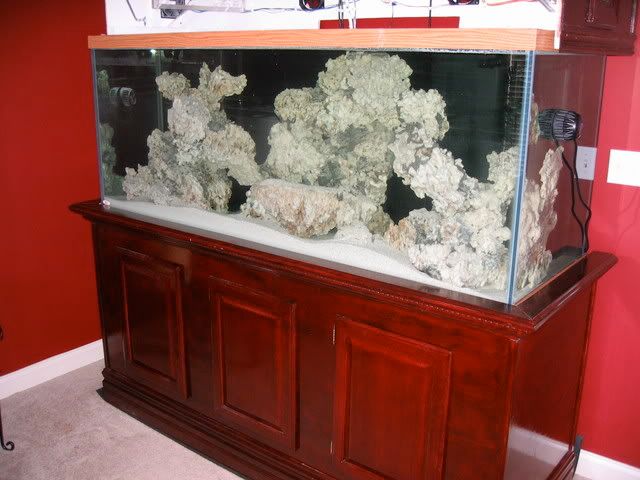
With all of that work done, I thought that it was time to move the tank into the house (finally!) Had to pull all of the neighbor guys over, and we managed to move the tank into the living room (same guys in the pics above). What a chore! I would have gotten more pictures of it, but I put my wife to work watching the clearance at each and every turn. No joke, we barely got it in with 4 guys lifting. Wow, it looks bigger inside! I don't think that I ever would have been able to convince the wife to let me buy it had she seen how it looks now!
Anyways, the list of to-do's was as follows at that point: 1. Need to figure my sump layout for the 75G AGA that I've got, cut baffles and silicone them into place. I'll probably drill it for a 1.5" bulkhead to the return pump too. (already purchased a clean 75G AGA from a local reefer) 2. I ordered 200# of Marcorocks at the end of March, supposed to be shipped this week. Will start working on dry aquascaping layouts 3. Plumbing! My durso's (came with my setup) have barbed ends on their bulkheads. One fits 3/4" tubing, and the other fits 1 1/4" tubing. I'm planning on changing those all out. I just don't know what the previous bulkheads have been through. If one fails, I want it to be a new one that I put in so that I have nobody else to blame! Plus I can easily work them into standard 1" and 1.5" plumbing without the barbs that they have now. 4. Need to order a bunch of salt (IO) and aragonite base (planning a 2" sand bed). Going to use DRsFoster/Smith since they have flat cost shipping and I'm ordering about 300lbs! Hmmm...that's enough for now. I hope nobody keeps close tabs on exactly how long all of those things take! I'll get some fresh 'in-house' pics, and some of the lights all in action..
__________________
~nj~ |
|
|
|
|
05/26/2008, 10:07 AM
|
#18 |
|
Registered Member
Join Date: Jan 2007
Location: Springfield, il
Posts: 246
|
1. Finally had the tank moved into the house, and I promised some pictures. I set it on a treadmill thick mat, and leveled it with a couple of shims to the left side.
 After getting it set up, I sat waiting for a replacement 250W MH bulb, as I had blown one in the build process. It finally arrived, and I lit up the beast! Without water, the tank makes the entire house glow as eerie blue. I'm sure that the neighbors wonder...  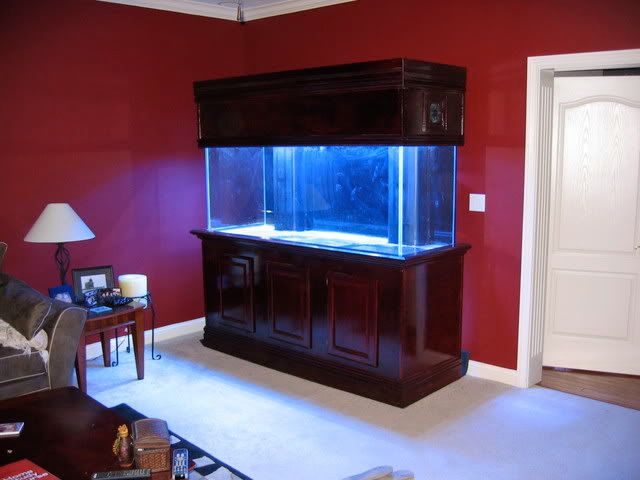 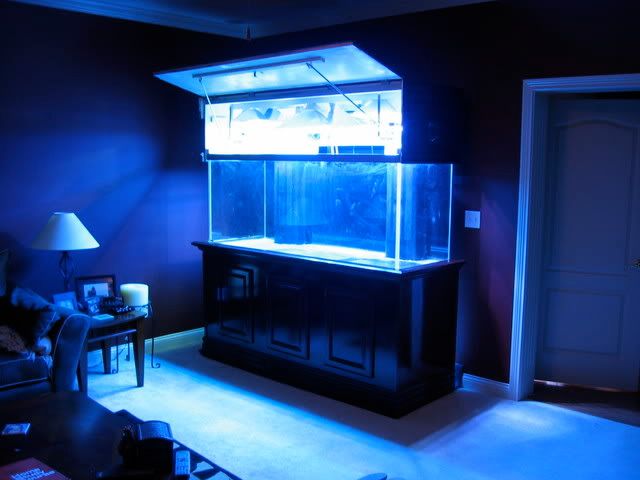 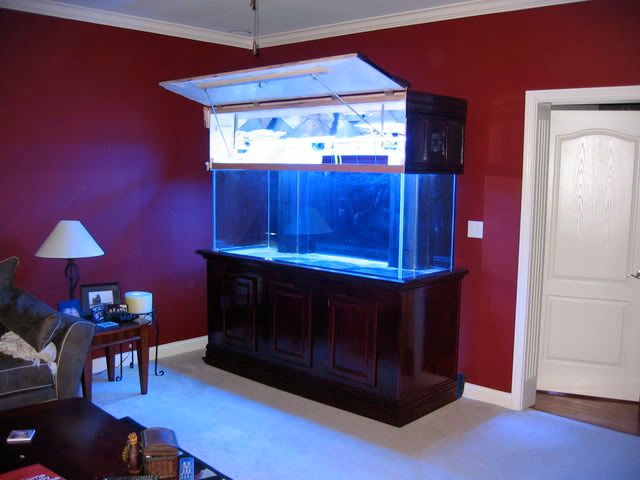 The last picture shows off the strut system that I put into the canopy lid. The prior owner didn't appear to have one, makes me wonder what a pain it must have been to do any work inside the tank. Maybe that explains why it looked so terrible and covered with algae when I picked it up!
__________________
~nj~ |
|
|
|
|
05/26/2008, 10:11 AM
|
#19 |
|
Registered Member
Join Date: Jan 2007
Location: Springfield, il
Posts: 246
|
I've started working on the plumbing, but it is definitely a ways from complete. I think that I'll tackle it in 2 phases. Since it will drain and return through the wall and into the maintenance closet behind, I will start with the lines in the living room. I ordered a few new bulkheads and spa flex from Savko (super fast shipping by the way). The drain lines are 1.25 inches, so I adapted them up to 1.5 inch, added a double union ball valve to each, then connected them to one another. Next, I'll do the same with the 1 inch retuns, and drill through the drywall into the back room.
The real hangup is still planning out that sump (75G AGA). Until I decide on the layout, I won't be able to finish the plumbing (as t connects directly) I'm looking at a bunch of Melev's setups to see which I want to make, or if I want to stay simple like I have with those I've made in the past. I feel like I need to plan reactor space for equipment that I don't yet own! Any suggestions? I drilled my first piece of glass yesterday too! A set of glass tops came with the sump tank that I purchased a couple of months ago. Since I plan on drilling that 75G for a return pump, I thought that I'd better get some practice. It really wasn't too difficult. The key is to TAKE YOUR TIME! Plan on 20 minutes per hole, and you're sure to do fine. 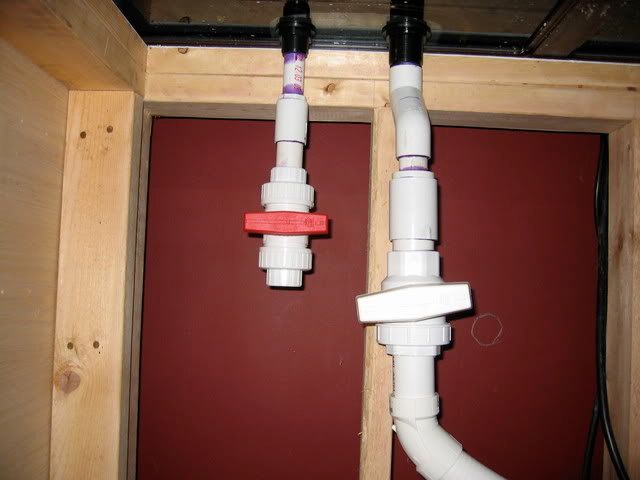 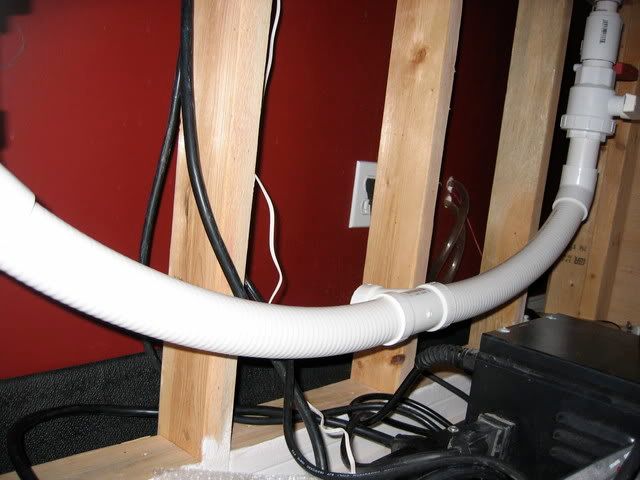 Oh yeah, also got a couple of MP40W vortechs... 
__________________
~nj~ |
|
|
|
|
05/26/2008, 10:13 AM
|
#20 |
|
Registered Member
Join Date: Jan 2007
Location: Springfield, il
Posts: 246
|
Well, made some progress on the sump.
I started by drilling it for a 1.5" bulkhead. It took a while to build up the nerve to start, but once I did, patience got me through it. I used a starter template to get the diamond bit going, then had a hose running constantly over the site. I think that it took a good 20-30mins to get through it. End result was great, no chipping or anything. After getting that done, I went to Lowe's to buy the acrylic needed to section off the sump compartments in the 75G. I have always liked using the .22 Lexan product, easy to work with. I cut the pieces from two 24x48 inch sheets, and rough-fitted them in. Looked great, so i started siliconing them all into place. I'll post some pics of the whole thing when its done. Now the bad news. I had to move the holding tank that my old clowns were in since it was on the wall that I plan to plumb the new lines through. In the process of transferring the remaining live rock, coral, and clowns, I must have done something wrong. Either changed the salinity by hastily adding an extra couple of gallons of freshly mixed salt H2O, or stirred up too much detritus in the transfer, because they both passed away. I guess there won't be a big homecoming for them into the new tank after all, which is really sad. I've had them for for more than 3 years now, and I'll miss them when the new tank is up and running. 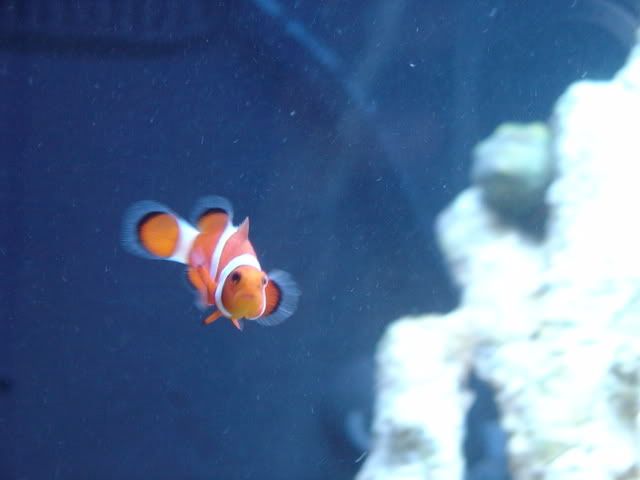
__________________
~nj~ |
|
|
|
|
05/26/2008, 10:22 AM
|
#21 |
|
Registered Member
Join Date: Jan 2007
Location: Springfield, il
Posts: 246
|
Thanks for the encouragement! I agree, I'm having as much fun building the system as I will enjoying it later on once it's finished.
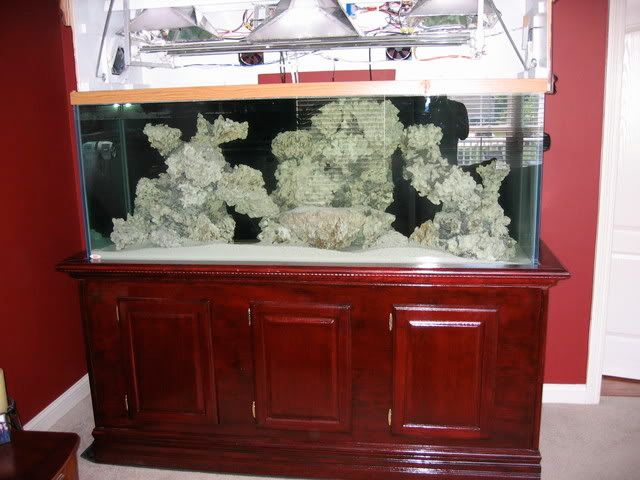
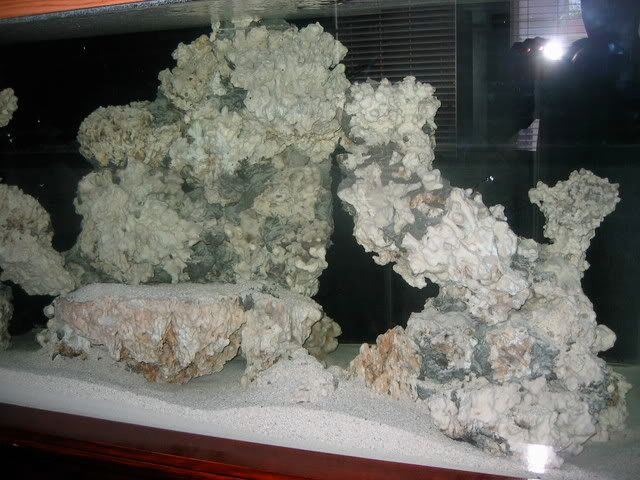
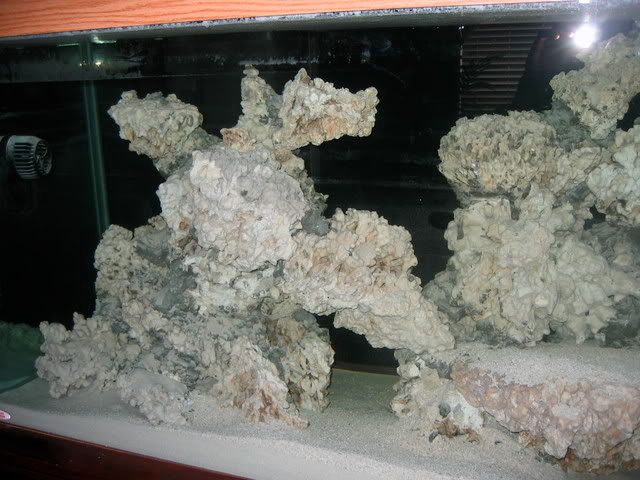
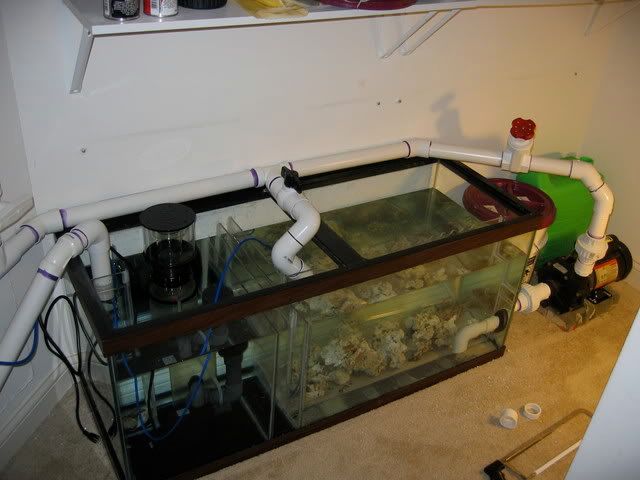
I've been making some real progress the last couple of days! The Marco rock has been through 3 1/2 weeks of soak with a couple of 100% water changes. I had plans to lay out some interesting aquascaping, then load it all into the tank with some extra lifting help. Here it is all laid out in the lawn, 200lbs of Marcorock. The pieces are larger than they look in the photo! Most of the pieces on the right end are larger than a football:    After taping out a layout of the tank on the garage floor (including the overflows), I started building. I used a 1/4 inch drill bit, about 100 clear zip ties, and a LOT of time. Built some pretty cool structure in my opinion. I thought that it would be sturdy enough to lift into the tank at that point, but I was wrong. As soon as two of us tried to lift the pillars, the zip ties started popping one by one. Soon we just had this loose, amorphous pile of rocks. Not exactly the grand aquascape I'd hoped for. Knowing that I needed more support, I picked up a bag of Portland cement that a bunch of people have had good luck with in DIY rock projects. I used it to support the towers at the seams, and a bunch along the back surfaces. Here's a pic of the first one done, still wet so the color is a bit off... The once heavy towers were now REALLY heavy. 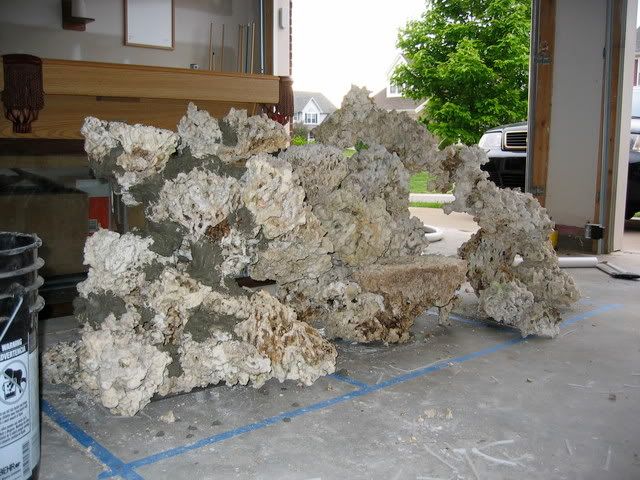 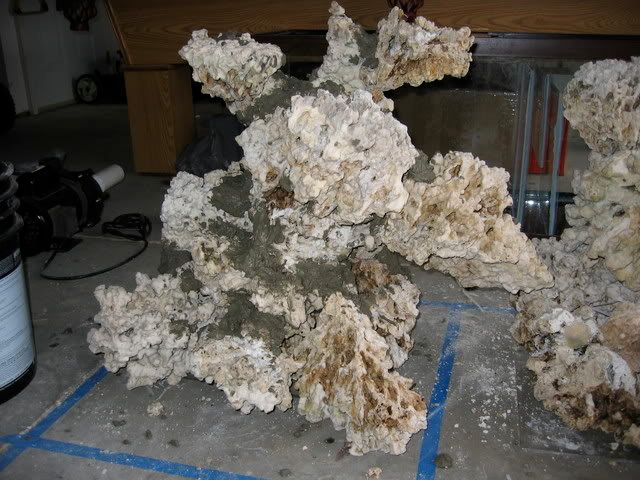 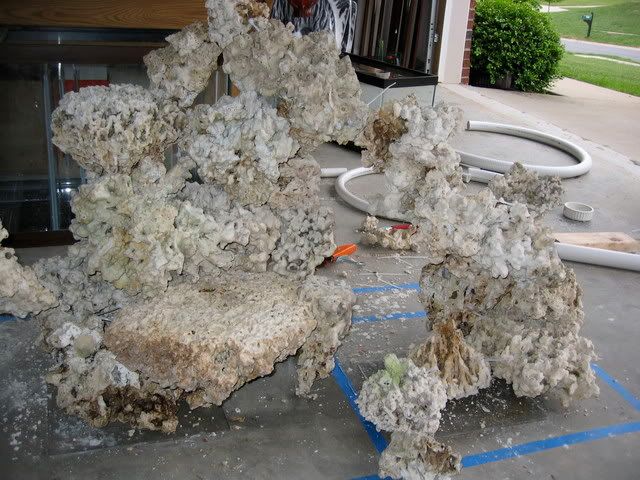 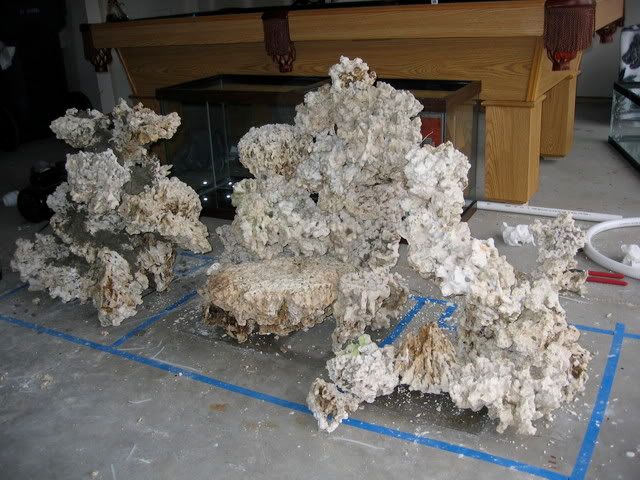 Again, two of us tried to lift them in three sections into the tank. It was a LOT harder than I had hoped, but we got it done. Due to the cross bracing on the top of the tank, a lot of careful maneuvering had to be done as we lowered them into place. I thought that they looked great once they got in though!
__________________
~nj~ |
|
|
|
|
05/26/2008, 10:23 AM
|
#22 |
|
Registered Member
Join Date: Jan 2007
Location: Springfield, il
Posts: 246
|
__________________
~nj~ |
|
|
|
|
05/26/2008, 10:28 AM
|
#23 |
|
Registered Member
Join Date: Jan 2007
Location: Springfield, il
Posts: 246
|
The plumbing has been weighing on me for too long. I'd already drilled holes in the wall behind the tank leading to my maintenance (previously 'coat') closet, and fed the return and drain lines through. I finally got around to finishing the sump baffles, and carried that in too. After an hour of cleaning out the entire closet so that I could see exactly how much space I had to work with, here's what I had:
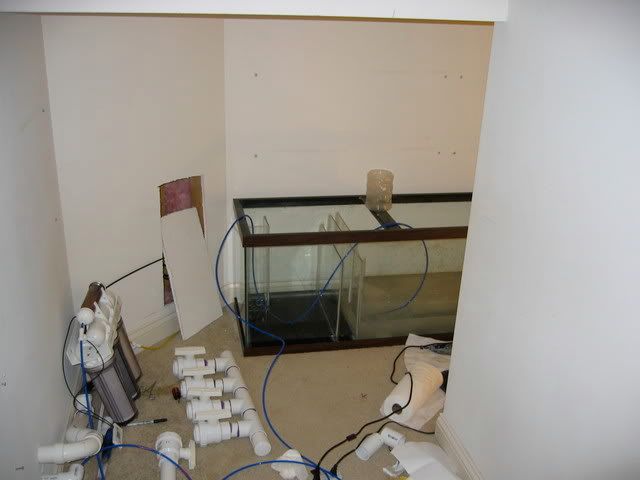 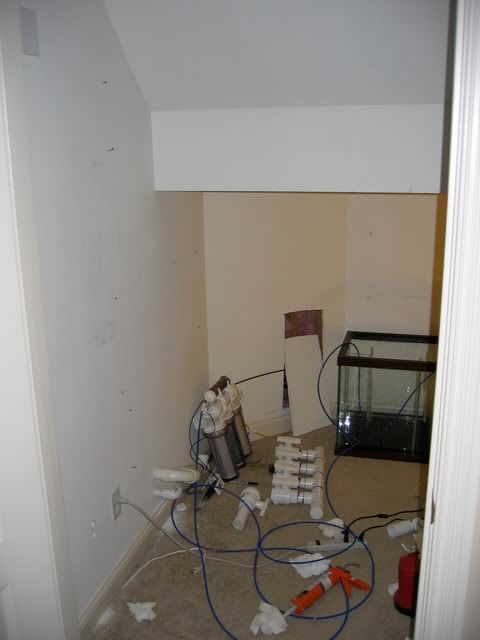 you can see the manifold that I put together there on the ground, as well as the RO lines leading to a water line behind that corner. Around the corner to the right, there's enough space for a frag tank and the barracuda pump.
__________________
~nj~ |
|
|
|
|
05/26/2008, 10:38 AM
|
#24 |
|
Registered Member
Join Date: Jan 2007
Location: Springfield, il
Posts: 246
|
By the way, I didn't cut that big hole in the drywall! We had a pluming incident last year with the water line there, and a plumber came over to fix it. That was the present he left, and I never got around to fixing it..
__________________
~nj~ |
|
|
|
|
05/26/2008, 10:47 AM
|
#25 |
|
Registered Member
Join Date: Jan 2007
Location: Springfield, il
Posts: 246
|
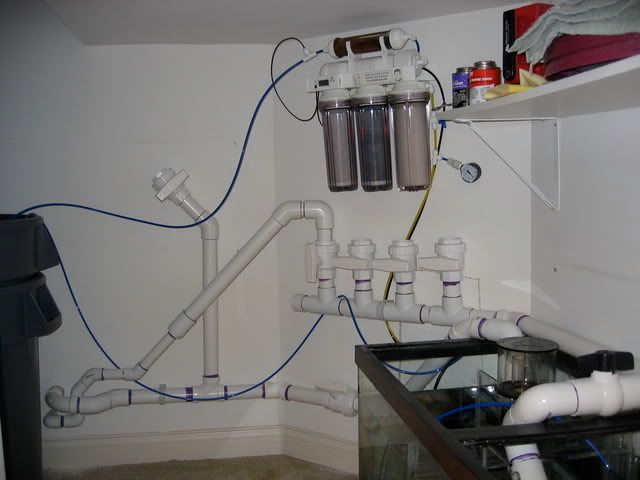
Now, after a painful amount of work on it this weekend, here's where I stand. You can see that I plumbed the sump out to a Reeflo Barracuda, which leads back through a gate valve to control outflow. It then dumps a line to the refugium, before entering the manifold. Right now, only one manifold outflow is in use (far left), which runs to the return line. You can see the drain line coming in as well (1.5"). The T going up to a ball valve dead end will eventually lead to a brute can as part of my automated water change system.
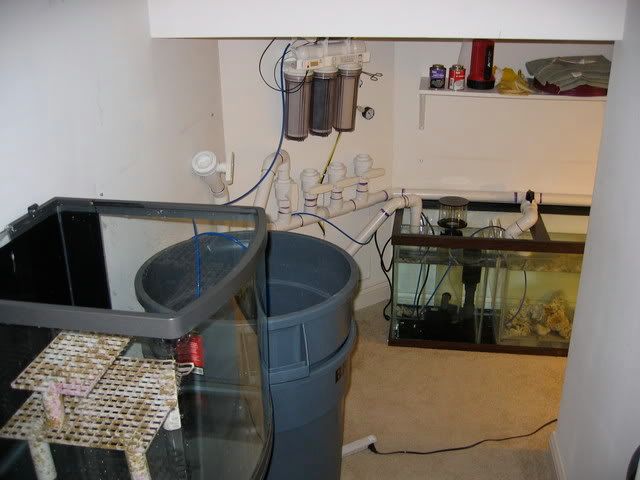   Here's this little nook tucked around the corner. Hard to get a good perspective with a camera. I built this little stand to raise the frag tank enough to use gravity to return the flow to the sump. It will eventually be supplied by a takeoff from the manifold. Yet to be drilled, baffled, etc though. A word to the wise. Don't ever think that it will be OK to test out your plumbing for the first time at night. Do it when you know you'll have 4 hours to work on leaks if you need to during the day! I had a few spots that needed attention (intake/outflow from the barracuda, 1 bulkhead under the tank, one union, one random joint). But it takes a long time to get everything sealed when water is in the lines causing problems! I think I finally called it quits at about 12:30 last night when I finally had the damage under control... 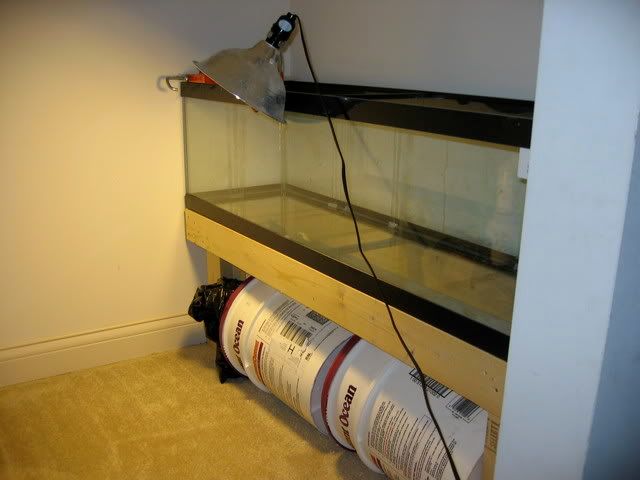
__________________
~nj~ |
|
|
|
 |
|
|


