
|
|
 02/06/2012, 10:43 PM
|
#51 |
|
More Idiot Than Savant
Join Date: Nov 2005
Location: Billings, MT
Posts: 560
|
Hey there tgunn!
I used Morton brand Solar Salt in the blue bag. It has very uniform gravel sized granules.
__________________
Current tank- 300 gal with enough critters to fill a 50 gal....barely. 30+ years in the hobby (man I'm getting old), former LFS manager, and oh.... I'm Batman. |

|

|
|
02/07/2012, 10:12 AM
|
#52 | |
|
Registered Member
Join Date: Apr 2003
Location: Cupertino, CA USA
Posts: 4,027
|
Quote:
I tried making DIY rock a number of years ago but it ended up being the most dense, heavy rock you could ever imagine. It was so dense it wouldn't cure after months of soaking. This time around I'm hoping to create very light and porous rock; yours looks like what I'm hoping to achieve. Thanks, Tyler |
|
|
|
|
|
02/08/2012, 12:08 AM
|
#53 | |
|
More Idiot Than Savant
Join Date: Nov 2005
Location: Billings, MT
Posts: 560
|
Quote:
For the record, I used the following ratio by volume of material: 1 part Portland Cement 2 parts crushed coral (poultry calcium in my case) 1 part salt I forgot to mention earlier that I think you'll be fine with the crushed limestone. There's a thread around here somewhere about folks using pulverized limestone for substrate. What is the most important part of making poreous rock is to mix it as dry as possible. You want it about the consistency of cottage cheese but with minimal liquid. And if you do use salt, mix your other parts with the water first and add salt at the very last. Mix only long enough to get the salt evenly distributed and then start working with it. Also, when making your rock in the mold, try to avoid packing it too much. That leads to denser rock as well. If you want to make a tall structure, try to make it in the mold horizontally. If you make tall structure vertically, the bottom gets more compacted and dense from all the weight above it. Or better yet, make a bunch of peices of rock and build your tall structure out of them. That ends up looking more realistic to me. Oh, and if you do use salt in the mix, it will make your rock more brittle. Salt and cement aren't totally compatable. I didn't really have any problems with flat or rounded flatish pieces but most of the branches I made ended up breaking. I was careful with them but they were very brittle. If you make branches I would suggest not using salt on them. If you haven't seen this thread yet, give it a read. You probably only need to look through the first 20-40 pages to get most if not all of the information you need. The next 2-4 splits (can't remember how many there were) just degenerate into mostly useless experiments that don't go anywhere. Trust me, I know. I read them all. The Ultimate DIY Rocks! One thing that isn't in the first part though that I did pick up on which makes sense, is don't cure your cement rock submerged in water. It will only take longer for the pH to come down. This is the cement cure I'm talking about. Cure your rocks for 30 days in air. Keep them damp for at least the first week if you can. Cement doesn't complete it's hydration process as well when submerged and that's where the high pH comes from. You may still have to cure for a bit under water with water changes to get a stable pH but the time should be greatly reduced. I'll be sure to let you know becuase none of this batch of rock was cured underwater. Good luck!
__________________
Current tank- 300 gal with enough critters to fill a 50 gal....barely. 30+ years in the hobby (man I'm getting old), former LFS manager, and oh.... I'm Batman. |
|
|
|
|
|
02/08/2012, 06:30 AM
|
#54 |
|
Registered Member
Join Date: Jul 2008
Location: Seattle, WA
Posts: 291
|
WOW a great saltwater tank in Billings MT.
Do you guys have LFS there ? |
|
|
|
|
02/08/2012, 07:44 AM
|
#55 | |
|
Registered Member
Join Date: Apr 2003
Location: Cupertino, CA USA
Posts: 4,027
|
Quote:
I suspect I used too wet of mix in the past, leading to it compacting down considerably. Good to get another confirmation on the limestone. I believe its mostly dolomitic and calcite limestone around here. Not the best for buffering, but using silica wouldn't have exactly given me that either. I was, however, able to get some interesting shapes like this:  Lol, I've still got the original rock; it's been piled up along my fence in the back yard for the past 4 years. Maybe I should see if it has cured! I think I'll start by making a number of small batches and experiment to see how thick of rock I can make with the salt added -- as you said I probably have to back off if I want to make branchy rocks. I'd ideally like to build a somewhat intricate aquascape with lots of branchy type rock pieced together. One of the LFSes here has a display tank with a load of branch rock in it, and I love how the fish dart in and out of the rockwork all over the place. My old tank used a lot of fiji rock that didn't lend well to such an open construction. Now its interesting you mention NOT curing in water for the first while. My rock went straight into water and I was never able to get over the pH spikes. I'll try without water for a few months and then soak for a few months to ensure all the salt dissolves out. Thanks again! Tyler |
|
|
|
|
|
02/08/2012, 01:48 PM
|
#56 |
|
Registered Member
Join Date: Jun 2005
Location: Ocoee, Fl
Posts: 1,580
|
it looks awesome
|
|
|
|
|
02/08/2012, 10:58 PM
|
#57 | |||
|
More Idiot Than Savant
Join Date: Nov 2005
Location: Billings, MT
Posts: 560
|
Quote:
Quote:
Quote:
__________________
Current tank- 300 gal with enough critters to fill a 50 gal....barely. 30+ years in the hobby (man I'm getting old), former LFS manager, and oh.... I'm Batman. |
|||
|
|
|
|
02/09/2012, 07:02 PM
|
#58 |
|
Registered Member
Join Date: Jul 2008
Location: Seattle, WA
Posts: 291
|
Good luck with your new amazing tank. I visited MT many times but I have not seen any LFS in Butte or Missoula. A friend told me there was one in Missoula and it is nice.
I met few people from MT at LFS in Spokane WA. They were driving for about 5 hours and get nice corals. I have asked them about how they get their fish and corals and they said online. They get in a grope of 3 or 4 so they can get free shipping. |
|
|
|
|
02/09/2012, 07:04 PM
|
#59 |
|
Registered Member
Join Date: Jul 2008
Location: Seattle, WA
Posts: 291
|
Good luck with your new amazing tank. I visited MT many times but I have not seen any LFS in Butte or Missoula. A friend told me there is one in Missoula and it is nice.
I met few people from MT at LFS in Spokane WA. They were driving for about 5 hours and get nice corals. I have asked them about how they get their fish and corals and they said online. They get in a grope of 3 or 4 so they can get free shipping. |
|
|
|
|
02/09/2012, 07:18 PM
|
#60 | |
|
Registered Member
Join Date: Apr 2003
Location: Cupertino, CA USA
Posts: 4,027
|
Quote:
http://www.reefcentral.com/forums/sh...php?p=19857126 I was a bit disappointed with the water softener salt as it had larger crystals than I'd have liked. Nothing a hammer won't fix though. Thanks, Tyler |
|
|
|
|
|
03/14/2012, 07:28 AM
|
#61 |
|
Registered Member
Join Date: Jun 2005
Location: Ocoee, Fl
Posts: 1,580
|
updates?
|
|
|
|
|
03/15/2012, 12:03 AM
|
#62 |
|
More Idiot Than Savant
Join Date: Nov 2005
Location: Billings, MT
Posts: 560
|
Thanks for giving me a nudge lusenut! I do have updates but they're not very exciting so I've been procrastinating in posting anything. But you asked for it so this is what you get.
 Electrical is in and fully functional. I installed two 20 amp breakers myself, which was a first for me, but my panel has really easy access and with the help of the interwebs it wasn't too hard to pull off. GFCI outlets are installed first in line on both circuits with downstream outlets protected by the GFCI. You'll see in the pictures I also installed outdoor covers to protect from water splashes. I like the safety they provide but my space is very limited to plug things in so I'll probably be cussing these things every time I try to plug something new in. 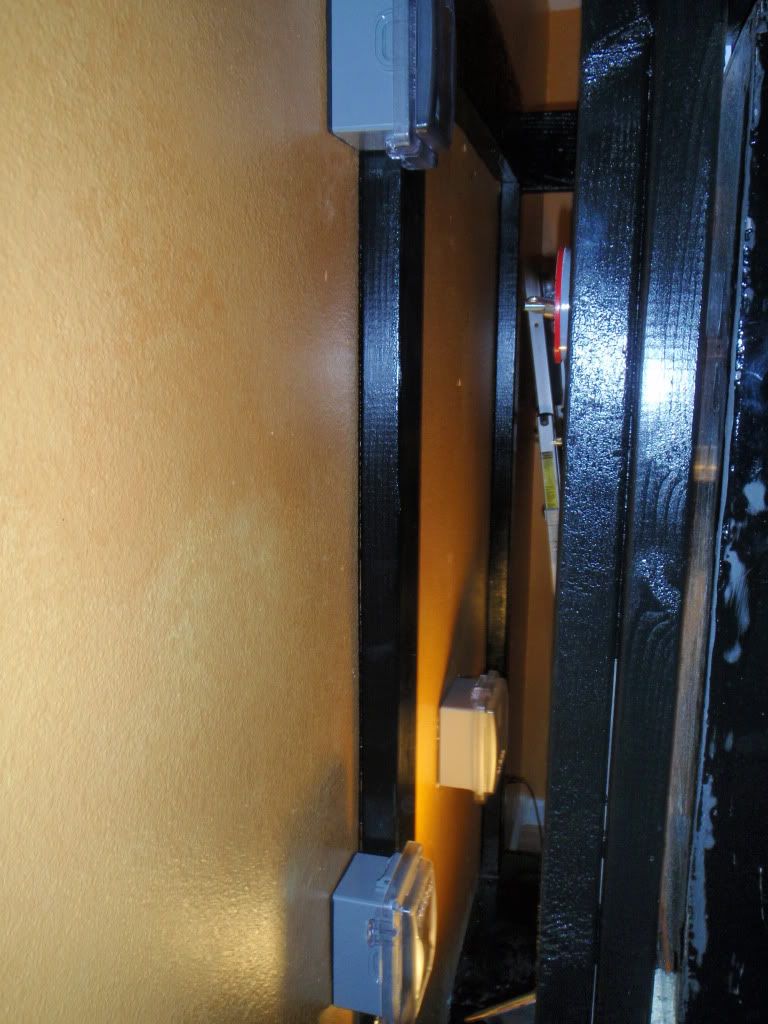 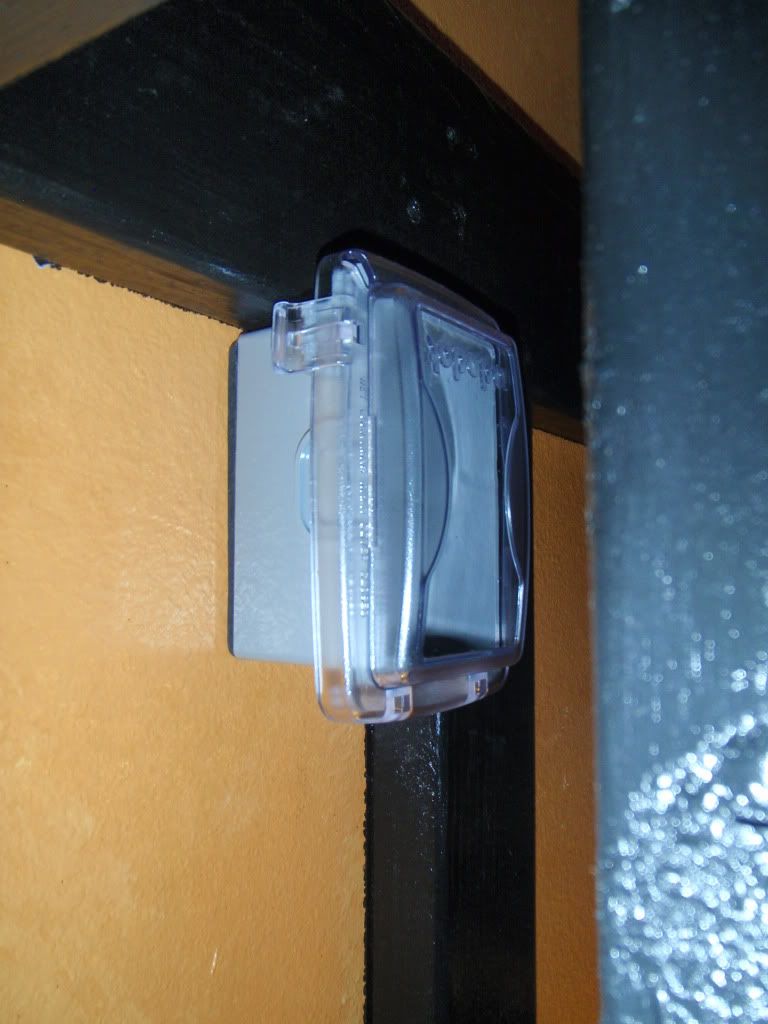 I also installed the upper framework that the skin on the stand will attach to. Once complete it will have a floor to ceiling one-piece look. Additionally, I installed my halide pendent hangers. They slide on a very beefy drawer slide so that I can move them out from over the tank to change bulbs more easily. I've got my old mini Lumenarc up there just for grins and giggles. That will not be used on the main tank so please ignore for now. 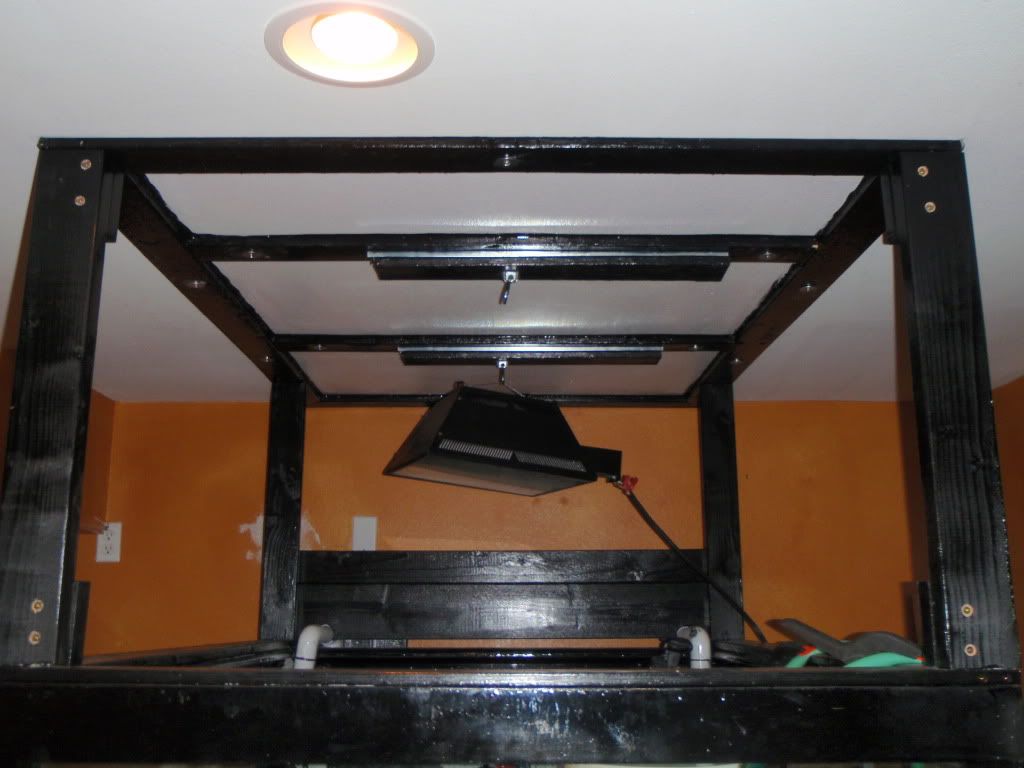 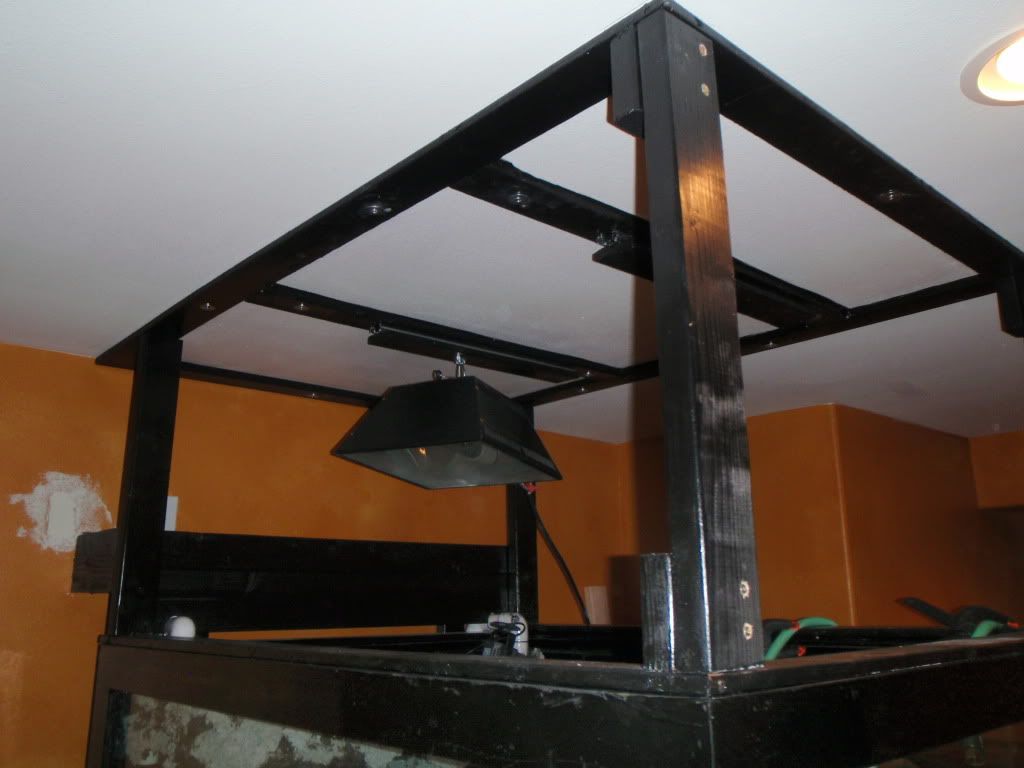 I've been pouring epoxy in the sump and that's nearly ready. Once that is done it will allow me to start plumbing the system. I also attempted to drill my frag/sea grass tank that was all glass. Of course I broke it. It was a stupid mistake. I know how to drill glass but I got inattentive at the last moment. Anyway that caused me to re-evaluate parts of the system. Because I already had that tank I wanted to use it but it wasn't big enough to provide everything I wanted in it and hold all the potential water when the surge tank fired. I was going to have to plumb in an additional tank just to catch all the post surge water which would have meant drilling two holes in the glass tank, installing multiple bulk heads, and increasing the complexity (and potential plumbing failure points). So at this point I've decided to build a larger frag/sea grass/surge overflow tank out of plywood to make it just one tank and reduce complexity. Even if I have to buy more epoxy it will still be cheaper than purchasing a like sized glass tank and attempting to drill it. I have decided that building a tank out of plywood just for the ease of drilling is reason enough to do it that way. The next major item I will be working on is ventilation. I need to punch a 4”-6” hole through my house for the vent pipe, install a fan, and wire it up to power and a dehumidistat. Easy-pesy.  For those that have more knowledge on ventilation than I do I have a question though. The room the tank is situated in requires a 240 CFM fan, according to internet calculators, to vent properly. However, I could use some more humidity in my house. It's pretty dry where I live in MT normally (especially in winter) so I actually want this tank to add some humidity to the house but not to the point that it causes major condensation in the winter or mold problems. The room the tank is in is also in the basement and has an open door way (no door to this room) so I probably need to really consider a bigger volume when calculating but again, I do want to add some humidity. I've been considering the Panasonic FV-20NLF1 Whisperline but was wondering if I could get away with one size down that does 120 CFM. I don't plan on attaching any other inlets to this fan, just the tank room. Any suggestions/ideas/thoughts? For those that have more knowledge on ventilation than I do I have a question though. The room the tank is situated in requires a 240 CFM fan, according to internet calculators, to vent properly. However, I could use some more humidity in my house. It's pretty dry where I live in MT normally (especially in winter) so I actually want this tank to add some humidity to the house but not to the point that it causes major condensation in the winter or mold problems. The room the tank is in is also in the basement and has an open door way (no door to this room) so I probably need to really consider a bigger volume when calculating but again, I do want to add some humidity. I've been considering the Panasonic FV-20NLF1 Whisperline but was wondering if I could get away with one size down that does 120 CFM. I don't plan on attaching any other inlets to this fan, just the tank room. Any suggestions/ideas/thoughts? Well, that's really about it for now. I'm really anxious to get this thing plumbed up so I can get saltwater flowing through it but I'm afraid I might still be a couple of months away from that. At any rate, thanks to all for continuing to tag along on what's turning out to be a multi-year build!
__________________
Current tank- 300 gal with enough critters to fill a 50 gal....barely. 30+ years in the hobby (man I'm getting old), former LFS manager, and oh.... I'm Batman. Last edited by CyclistMT; 03/15/2012 at 12:09 AM. |
|
|
|
|
03/15/2012, 01:26 PM
|
#63 |
|
Registered Member
Join Date: Jun 2005
Location: Ocoee, Fl
Posts: 1,580
|
Soon I hope to be in the same boat you are. Right now I have a 120 gal tank setup that I did a lot of foam work in. I wanted to try it out before I did foam in a big expensive tank. My future plans when my roommate moves out is to build a 300 gal plywood tank in the roommates old room and put it in the wall with foam rock walls on the 3 sides.
|
|
|
|
|
03/15/2012, 03:39 PM
|
#64 |
|
Registered Member
Join Date: Oct 2011
Posts: 243
|
Great system.
|
|
|
|
|
03/15/2012, 05:57 PM
|
#65 |
|
Registered Member
Join Date: Apr 2003
Location: Cupertino, CA USA
Posts: 4,027
|
On my former 140g tank I vented the canopy using a 100cfm fan which put the air into the fishroom which had an hrv vent rated around 60 cfm. That prevented the vast
Majority of humidity from going into the living spaces. But some clearly still did. Nothing unreasonable though. I'd say if you vent from the canopy to outdoors you are in good shape. As long as it keeps the canopy space reasonably cool with all the lights on I can't see why 120cfm wouldn't be enough. The summer is the time when you will want to be able to ensure most of the moist air goes outside though. Your house ac will have to work real hard to keep up otherwise. |
|
|
|
|
03/15/2012, 06:41 PM
|
#66 |
|
Registered Member
Join Date: Sep 2008
Location: El Paso, Texas
Posts: 1,340
|
nice build
__________________
rpjaws Current Tank Info: 500 glln system/ Reef |
|
|
|
|
03/15/2012, 06:48 PM
|
#67 |
|
Registered Member
Join Date: Aug 2006
Location: Owings Mills, Maryland
Posts: 690
|
What an awesome build!
Looking forward to seeing this come to life!
__________________
If you want to see my tank click on the little red house. Current Tank Info: 40g Breeder - RKE - LEDs the works... |
|
|
|
|
03/15/2012, 10:11 PM
|
#68 | |||||
|
More Idiot Than Savant
Join Date: Nov 2005
Location: Billings, MT
Posts: 560
|
Quote:
Quote:
Quote:
Quote:
Quote:
I just need to get the wife to quit spending all of my bonus money and I don't understand why the kids need straight teeth. Seems overrated to me.  Current Music Selection: Adelita's Way - Sick
__________________
Current tank- 300 gal with enough critters to fill a 50 gal....barely. 30+ years in the hobby (man I'm getting old), former LFS manager, and oh.... I'm Batman. |
|||||
|
|
|
|
03/23/2012, 09:24 PM
|
#69 |
|
More Idiot Than Savant
Join Date: Nov 2005
Location: Billings, MT
Posts: 560
|
OOOOOOO, what could it be???????
__________________
Current tank- 300 gal with enough critters to fill a 50 gal....barely. 30+ years in the hobby (man I'm getting old), former LFS manager, and oh.... I'm Batman. |
|
|
|
|
03/24/2012, 11:43 PM
|
#70 |
|
More Idiot Than Savant
Join Date: Nov 2005
Location: Billings, MT
Posts: 560
|
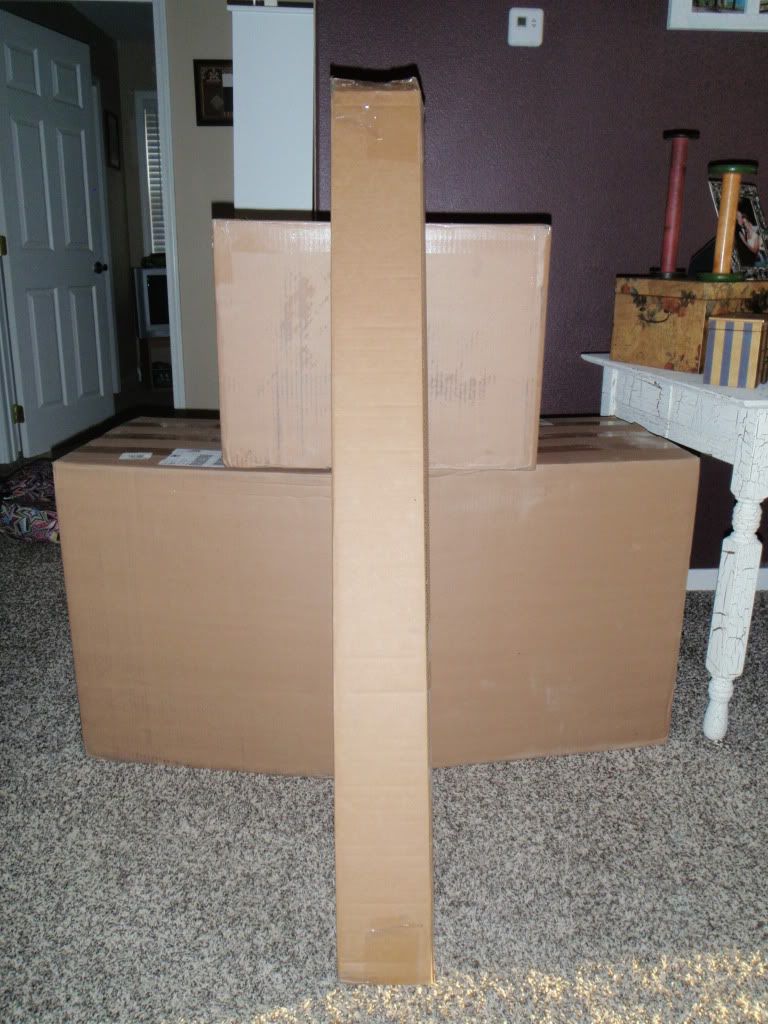
Ok, fine. Since no one wants to play along here is what was in the boxes.
Lighting! 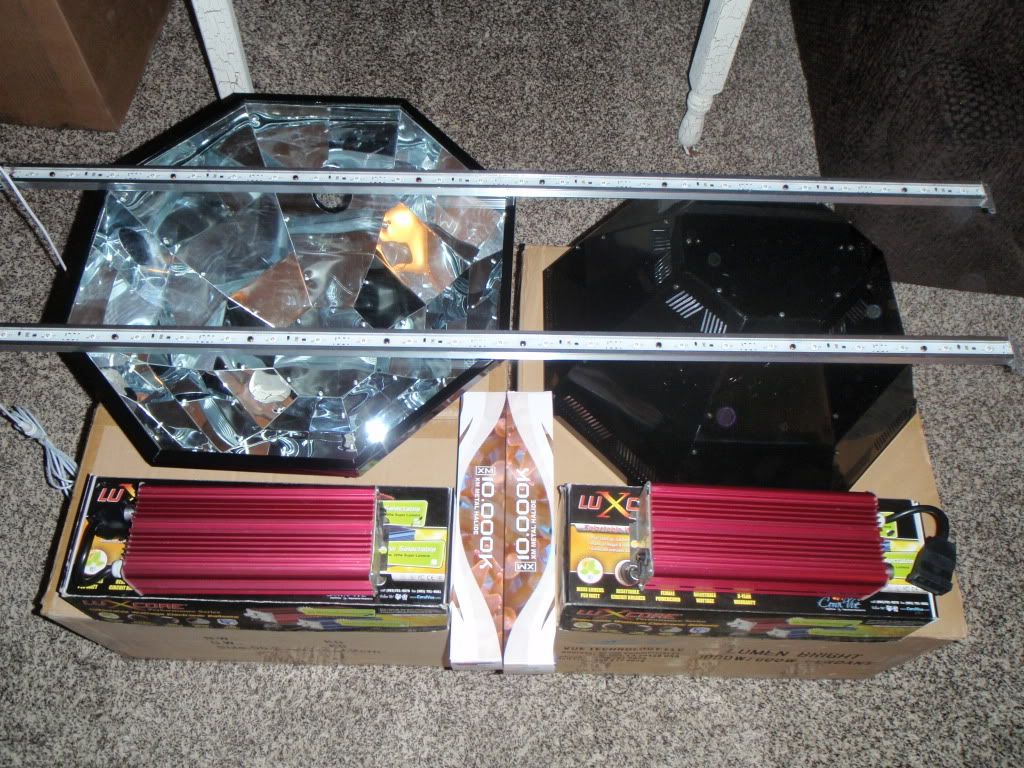 Those are Lumenbright larges. XM 250W 10K for lots of par.  Luxcore select a watt in case I find out 250W won't cut it I can go to 400W. Or maybe I can overdrive my 250s with the HQI setting. Anyone know what the Superlumens setting does? Overdrive for 400w? 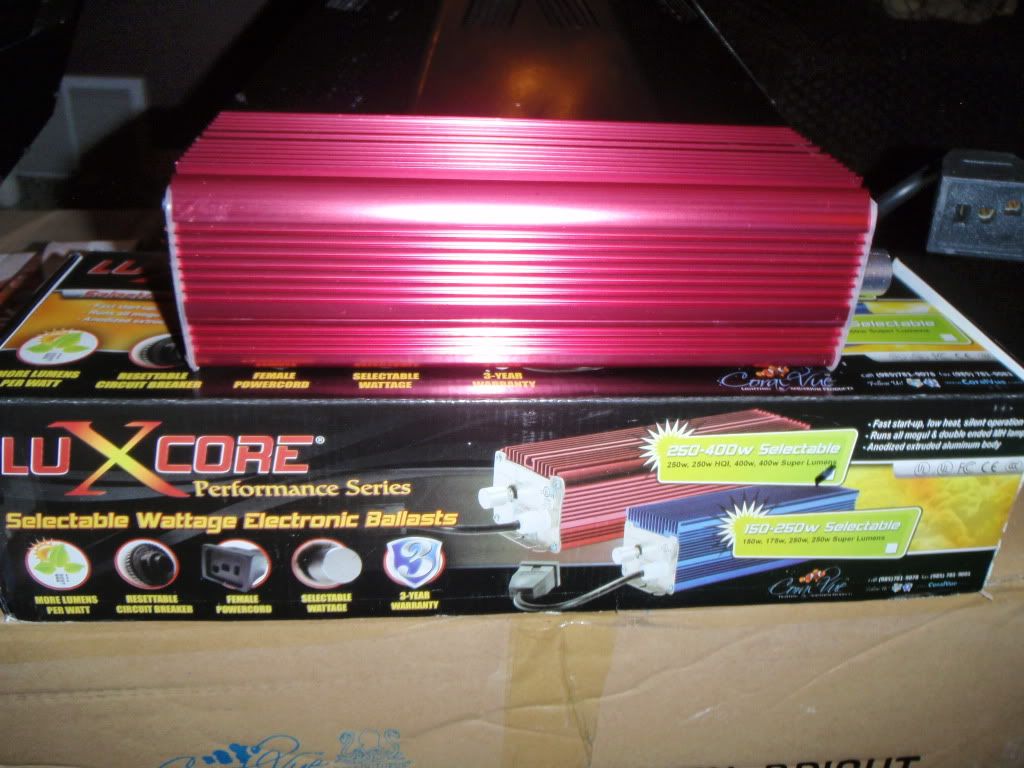 48" Evoslim LED for blue suplementation. I got the 3w version and I'm quite impressed with them. It seems to be put together well and is more "beefy" than the online photos seem to indicate. I think these are a great value. 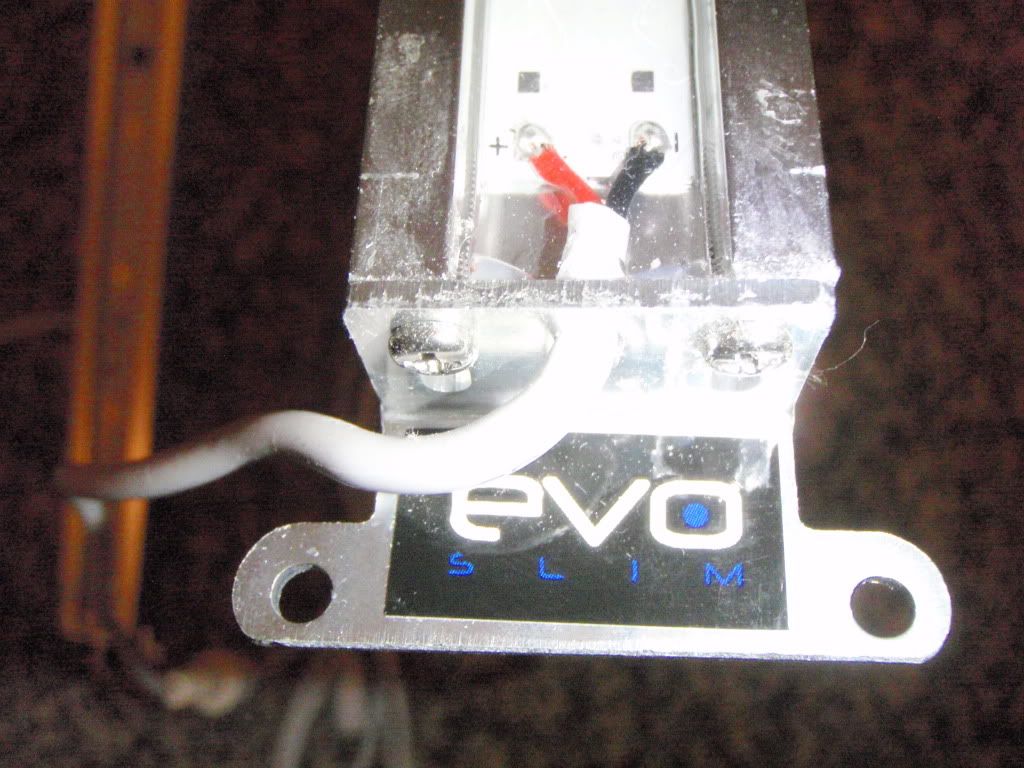 Like a kid at Christmas I had to semi install the lights to see what they look like. I'm nowhere near being ready to use these but what the heck, putting them up was a whole lot more fun than watching epoxy dry. Final instalation of lights will be much cleaner than this. 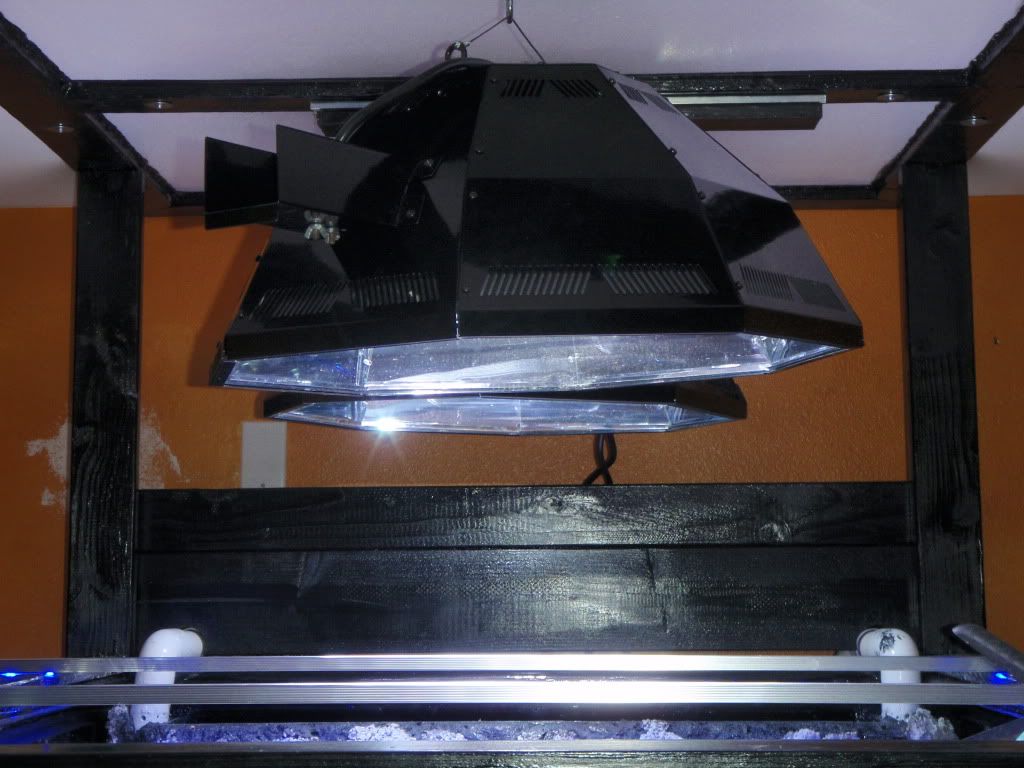 Here is what the color with the LED's looks like. I'm very happy with the results since this is what I was hoping to achieve. I really liked the color of my 175w Iwasaki's with UVL actinics on my last tank and I think this comes very close with a little bit more blue. I can't wait to see how corals "pop" under this. 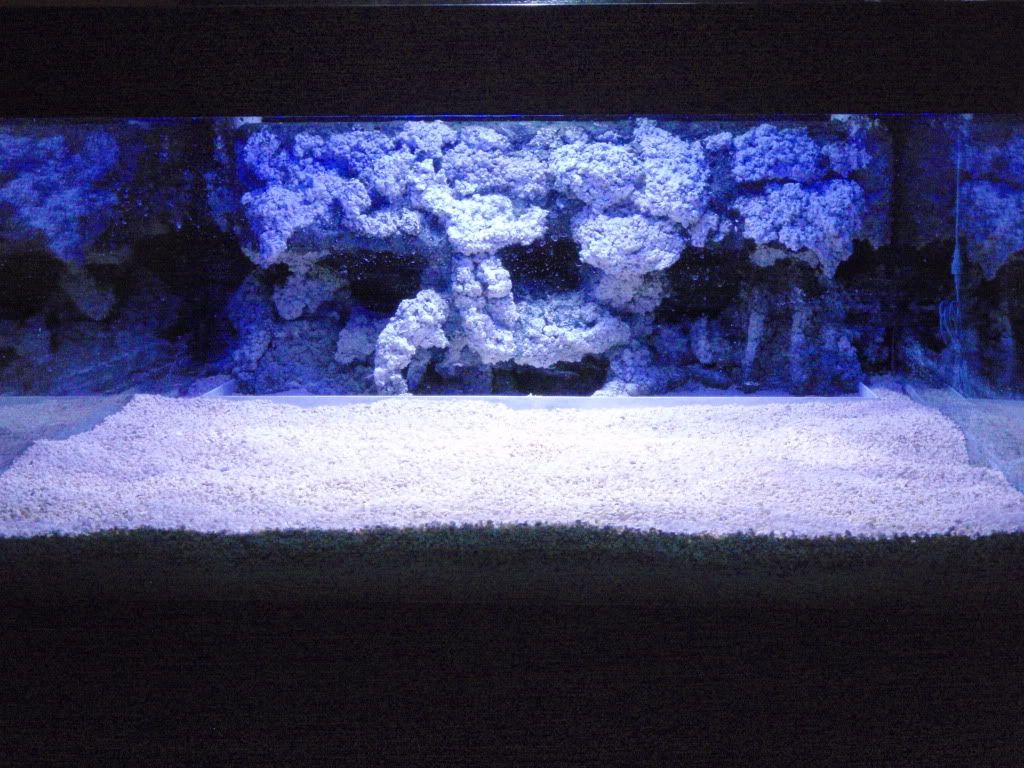 And finally, here's a blue only shot. Of course my point and shoot camera cannot accurately capture how this looks but this is close as I can get it. Maybe I need to add a DLSR to my equipment list.  As for other progress, not much to report. I'm epoxying the surge header tank and frag/sea grass tank. The sump is getting closer to done but not there yet. I'm still waiting on my main system pumps and actuated ball valve to arrive and as soon as they do I can begin plumbing. So that's it for now! Current music selection: Monster Magnet- Superjudge
__________________
Current tank- 300 gal with enough critters to fill a 50 gal....barely. 30+ years in the hobby (man I'm getting old), former LFS manager, and oh.... I'm Batman. |
|
|
|
|
03/25/2012, 01:52 AM
|
#71 |
|
Registered Member
Join Date: Sep 2008
Location: El Paso, Texas
Posts: 1,340
|
man I wish I had your DIY skills lol!
__________________
rpjaws Current Tank Info: 500 glln system/ Reef |
|
|
|
|
03/26/2012, 07:19 AM
|
#72 |
|
Registered Member
Join Date: Apr 2003
Location: Cupertino, CA USA
Posts: 4,027
|
Looking good! I see a face in the rock-wall! Aaaa!
Out of curiosity, whats the box-like structure at the base of the overflow for? It looks like you're trying to keep the sand out of that area? |
|
|
|
|
03/26/2012, 10:19 PM
|
#73 | ||
|
More Idiot Than Savant
Join Date: Nov 2005
Location: Billings, MT
Posts: 560
|
Quote:
Quote:
__________________
Current tank- 300 gal with enough critters to fill a 50 gal....barely. 30+ years in the hobby (man I'm getting old), former LFS manager, and oh.... I'm Batman. |
||
|
|
|
|
03/27/2012, 11:22 AM
|
#74 | |
|
Registered Member
Join Date: Apr 2003
Location: Cupertino, CA USA
Posts: 4,027
|
Quote:
The crushed oysters you're using in the main area of your tank have a much nicer consistency than the stuff available where I am. Looks just like the crushed coral I've got sitting around. Neat idea about having another area with finer sand for those creatures requiring it. Tyler |
|
|
|
|
|
03/27/2012, 01:00 PM
|
#75 |
|
Team RC Member
Join Date: Sep 2003
Location: NY
Posts: 17,749
|
Somehow I missed this thread until now and I haven't read it all yet, but I wanted to say - the tank looks amazing so far, and thanks for the O-MAZ-SHG!
__________________
Inconveniencing marine life since 1992 "It is my personal belief that reef aquaria should be thriving communities of biodiversity, representative of their wild counterparts, and not merely collections of pretty specimens growing on tidy clean rock shelves covered in purple coralline algae." (Eric Borneman) |
|
|
|
 |
|
|
 Similar Threads
|
||||
| Thread | Thread Starter | Forum | Replies | Last Post |
| 300 gallon plywood tank build re post!!!! | dericcanderson | Do It Yourself |
42 | 09/04/2011 11:04 AM |
| Looking to build a 300 gal glass tank need advice ?? | steelhant | Do It Yourself |
6 | 12/01/2010 06:35 PM |
| FS: Complete 300 gal Oceanic tank and livestock | greenbench | Tampa Bay Reef Club | 2 | 07/05/2010 07:46 AM |
| 300 gallon plywood tank build | dericcanderson | New to the Hobby | 180 | 06/04/2010 08:37 AM |
| CyclistMT's 150 Gal Plywood and Glass Build Log | CyclistMT | Reef Discussion | 55 | 12/06/2009 05:22 PM |


