
|
|
 03/21/2009, 11:49 PM
|
#51 | |
|
Team RC Member
Join Date: Jul 2006
Location: STL
Posts: 14,754
|
Quote:
 Can't wait to get the tank on it and see how it sits. Just got to cut out for the plumbing and laminate it. Can't wait to get the tank on it and see how it sits. Just got to cut out for the plumbing and laminate it. Woohoo, I own page 3! 
__________________
-Brett 180g Marineland Starfire In-Wall 278 gallon system |
|

|

|
|
03/21/2009, 11:58 PM
|
#52 |
|
Carpe Noctem!!!
 Join Date: Jul 2004
Location: Western Colorado
Posts: 8,548
|
I missed the last few pics... looks nice! That lap top looks small next to the skimmer

__________________
Hop Current Tank Info: 300-gallon in-wall system (mixed reef) |
|
|
|
|
03/22/2009, 12:02 AM
|
#53 | |
|
Team RC Member
Join Date: Jul 2006
Location: STL
Posts: 14,754
|
Quote:
 Getting it done slowly but surely... Might work on getting the plumbing cut-out tomorrow. Then hopefully laminate the top sometime this week. Getting it done slowly but surely... Might work on getting the plumbing cut-out tomorrow. Then hopefully laminate the top sometime this week.
__________________
-Brett 180g Marineland Starfire In-Wall 278 gallon system |
|
|
|
|
|
03/22/2009, 11:36 AM
|
#54 |
|
Registered Member
Join Date: May 2008
Location: Boise, ID
Posts: 234
|
Looks great so far! Nice clean build. Can't wait to see the rest come together.
I like the 2" space between baffles in the sump. I made mine 1" and it's a pain get the detritus out of that section. What's the 6" lip on the left side of the sump for? Are you thinking the drain will go through it so the salt creep will be contained? Keep the updates coming. I'll be following along. |
|
|
|
|
03/22/2009, 01:13 PM
|
#55 | |
|
Team RC Member
Join Date: Jul 2006
Location: STL
Posts: 14,754
|
Quote:
Thanks Bill! I plan on drilling two holes into the top of the sump for bulkheads. This way the drain lines will have something to be secured to. Might help a little with salt creep but that's not my main focus for the lip. I'm still designing the sump and am going to include a bubble tower for the remote refugium drain. I'll update as soon as I have something to show.
__________________
-Brett 180g Marineland Starfire In-Wall 278 gallon system |
|
|
|
|
|
03/22/2009, 03:54 PM
|
#56 |
|
Team RC Member
Join Date: Jul 2006
Location: STL
Posts: 14,754
|
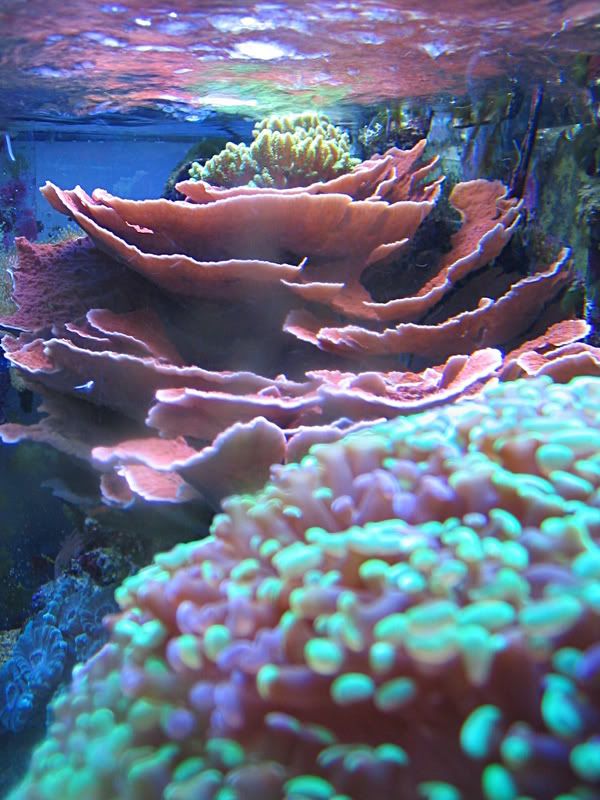
I figured I should post a more updated pic of my 40g since I'm still maintaining it. For some reason I can't get a good front shot so I took this one through the side pane. Thought it was at least good enough to show you guys. The Monti is literally stretching from the front pane to the back. It's only a 12" wide tank. That "froghammer" in the foreground is about 10" in diameter.
__________________
-Brett 180g Marineland Starfire In-Wall 278 gallon system Last edited by Misled; 04/02/2018 at 05:01 PM. |
|
|
|
|
03/22/2009, 04:29 PM
|
#57 |
|
Carpe Noctem!!!
Join Date: Jul 2004
Location: Western Colorado
Posts: 8,548
|
That is a cool shot! Great coral!
__________________
Hop Current Tank Info: 300-gallon in-wall system (mixed reef) |
|
|
|
|
03/22/2009, 08:42 PM
|
#58 | |
|
Team RC Member
Join Date: Jul 2006
Location: STL
Posts: 14,754
|
Quote:
I'm still maintaining the 40g, but just not putting any money into it. Trying to focus all my time/funds towards the 180g. I really only see it about once a week now as it's over at my folks place. Decided not to move it to the new house cause of the hassle. Still need to clean it up though....
__________________
-Brett 180g Marineland Starfire In-Wall 278 gallon system |
|
|
|
|
|
03/22/2009, 08:47 PM
|
#59 |
|
Team RC Member
Join Date: Jul 2006
Location: STL
Posts: 14,754
|
UPDATE:
I got a couple more mini projects done the last couple days. I started with some final leveling/flattening of the stand. As stated in the last couple posts, I was having an issue with some small gaps under the level as I looked down the length of it. I had some left over galvanized sheet metal from our HVAC project, so I decided to see what would happen if I tried shimming a bit with these. Worked like a charm. My level now sits totally flat along the 6' length. No gaps. Tools: Tin shears and some metal. 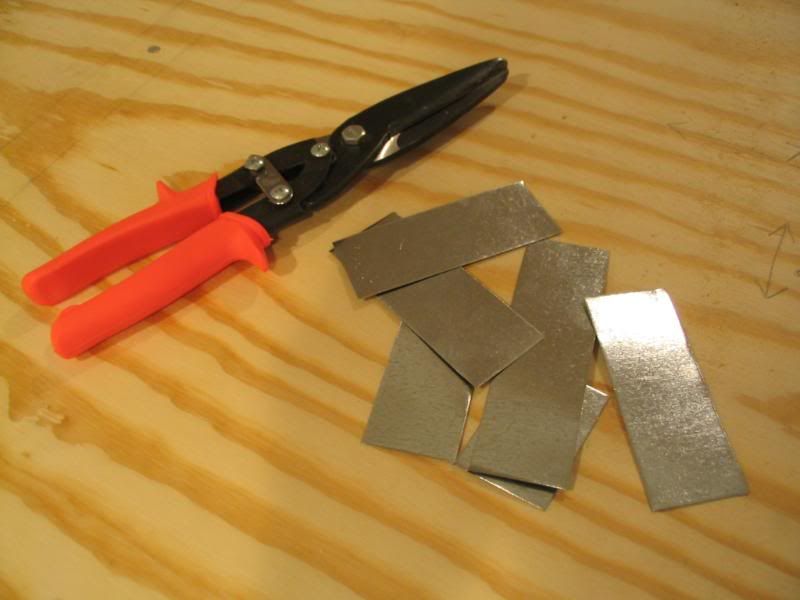 About as flat as I can get it. 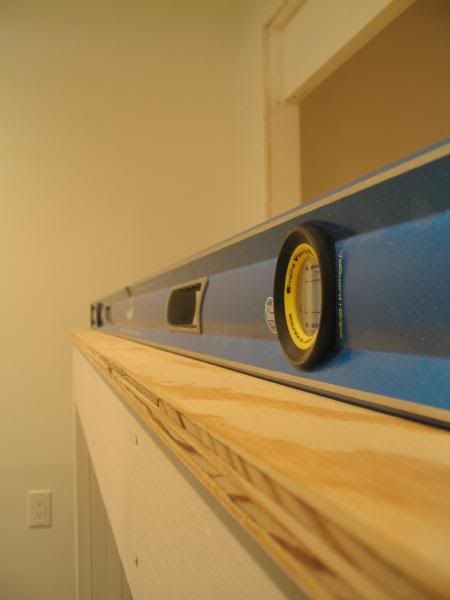 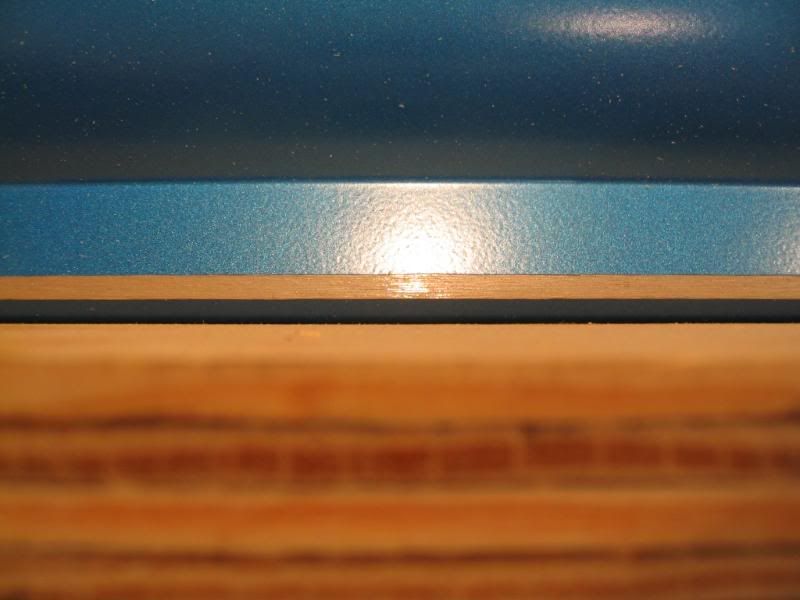
__________________
-Brett 180g Marineland Starfire In-Wall 278 gallon system Last edited by Misled; 04/02/2018 at 05:02 PM. |
|
|
|
|
03/22/2009, 08:54 PM
|
#60 |
|
Team RC Member
Join Date: Jul 2006
Location: STL
Posts: 14,754
|
Next project....
Went ahead and cut the access holes for the plumbing. Needed to get out the big boy tools for this job.  I plan on laminating the top so I wanted the cut to be as smooth and accurate as possible. Not that anyone would ever see it once the tank is set, but I'll know it's there. I plan on laminating the top so I wanted the cut to be as smooth and accurate as possible. Not that anyone would ever see it once the tank is set, but I'll know it's there. Got out the beast. 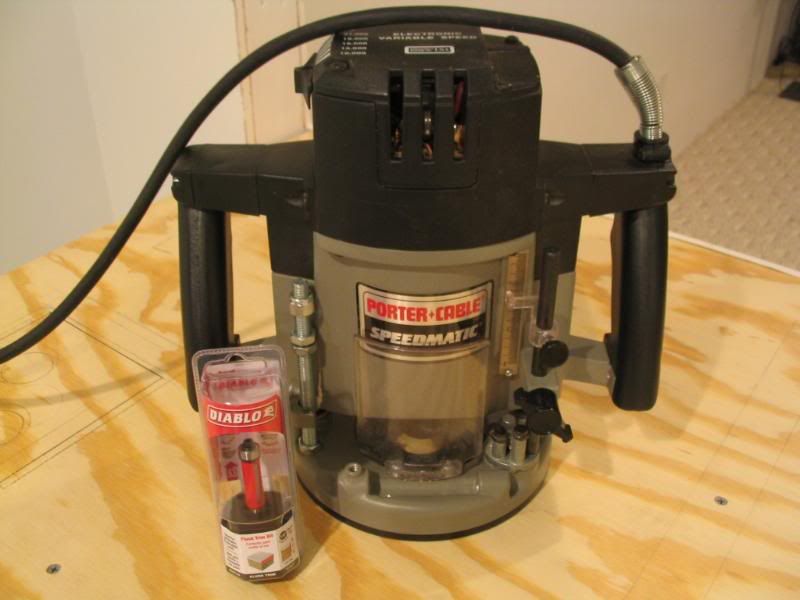 I'm sure avid router users are familiar with flush trim bits, but here's a closeup. Melev uses these extensively on his sump builds. I used it to cut right next to my framework, nice and smooth. The bearing follows right along the profile of your work to guide the blade. 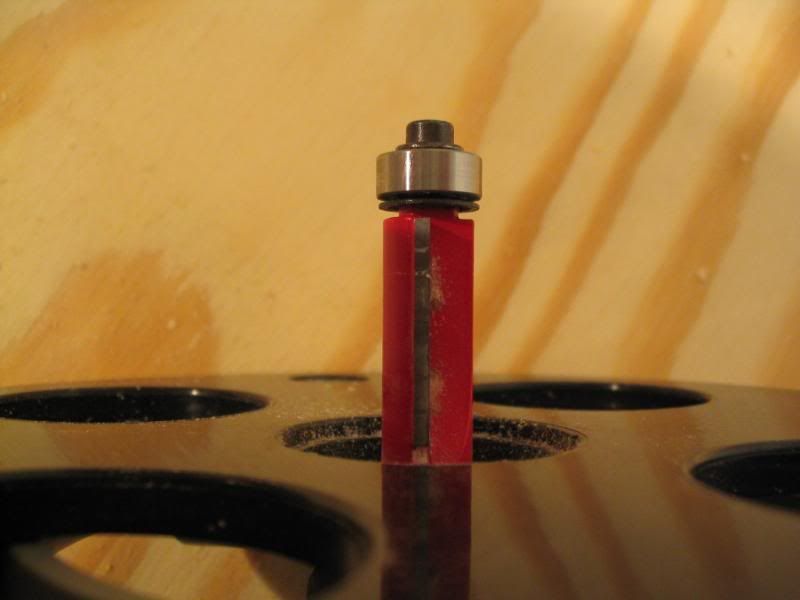 Started with a template. 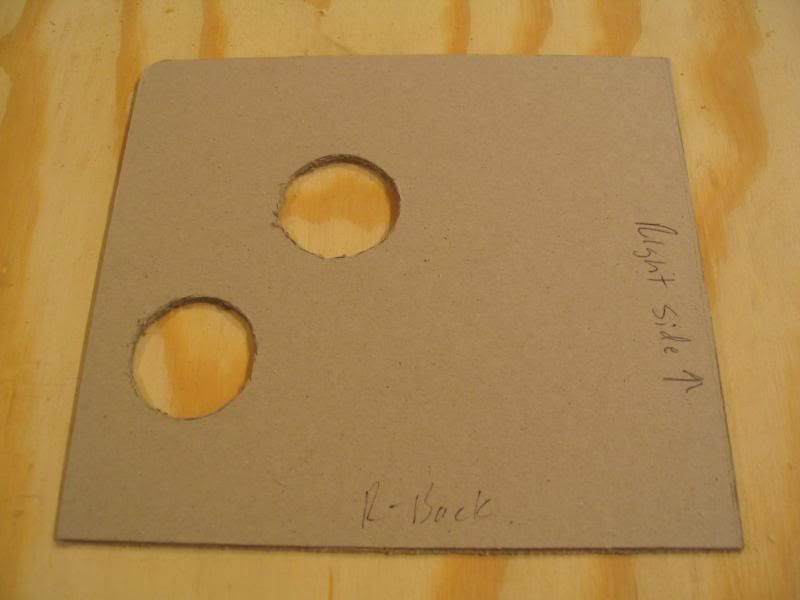 Some measurements. Measure 100 x's, cut once. 
__________________
-Brett 180g Marineland Starfire In-Wall 278 gallon system Last edited by Misled; 04/02/2018 at 05:03 PM. |
|
|
|
|
03/22/2009, 09:03 PM
|
#61 |
|
Team RC Member
Join Date: Jul 2006
Location: STL
Posts: 14,754
|
Here we go....
Another handy tool for the box are some spade bits. These make nice round holes typically larger than what your standard drill bits will cut. Here I'm making some starter holes so I can drop in the router. Always drill half way through the work and finish from the bottom up. This way you won't risk tearing out the bottom side.  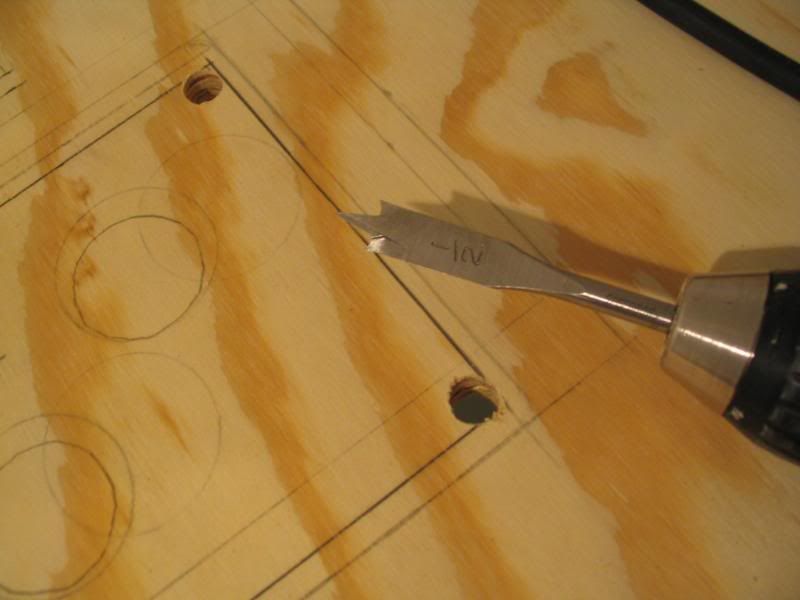 Once the router was set, I used a straight edge to guide the router. 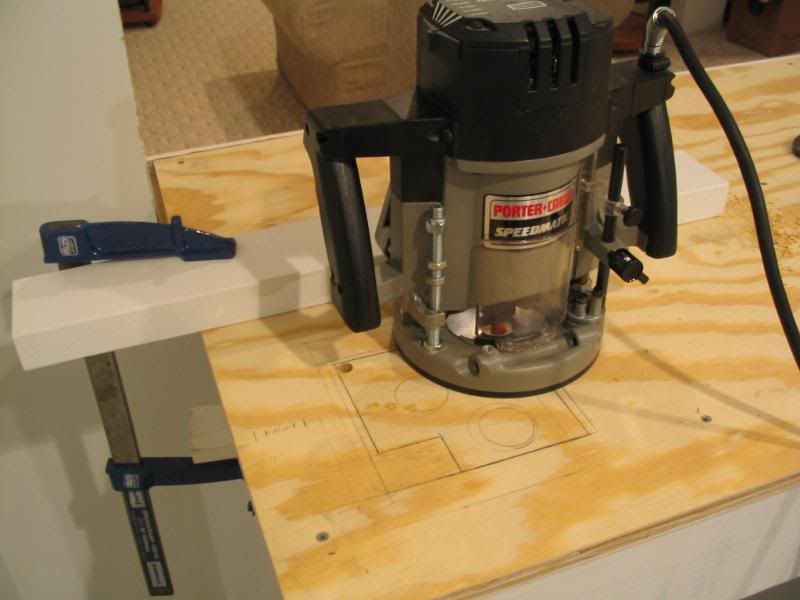 Voila! The first hole cut. 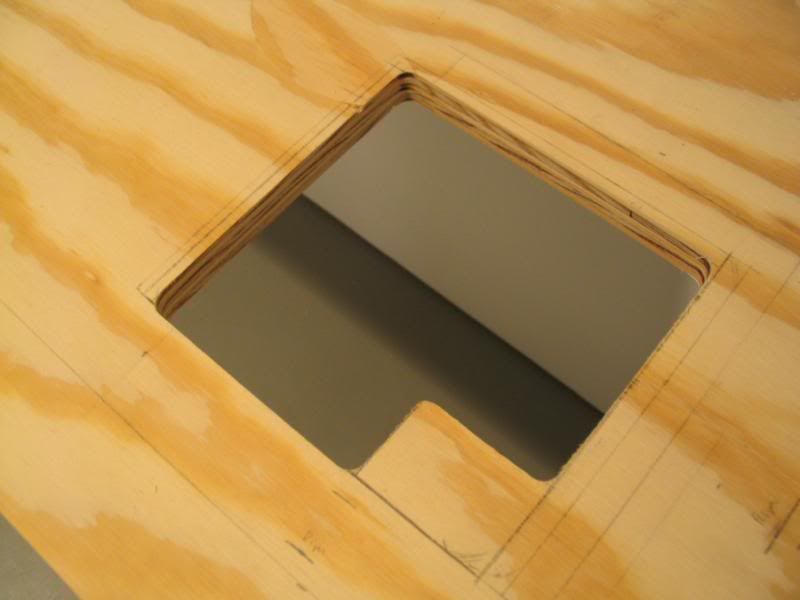 Notice the detail the flush trim bit can make. I followed the framework around with the router to make the cut. 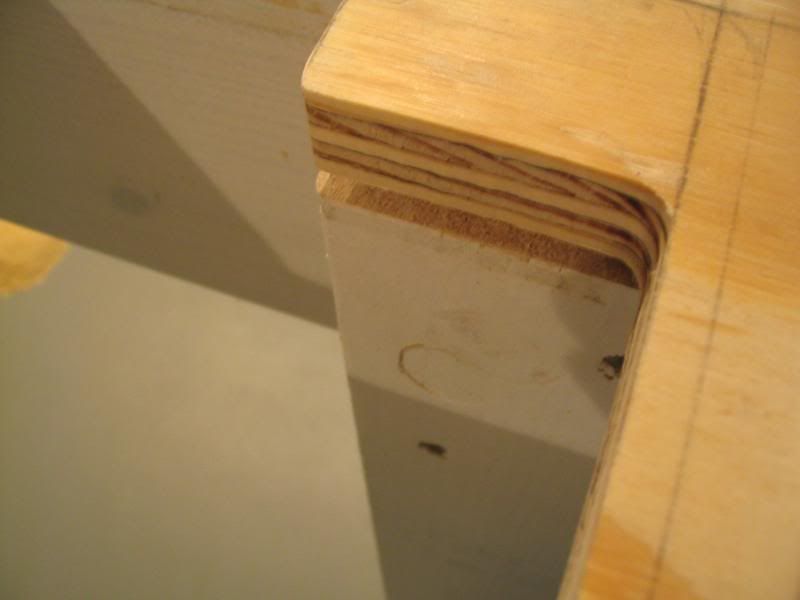
__________________
-Brett 180g Marineland Starfire In-Wall 278 gallon system Last edited by Misled; 04/02/2018 at 05:03 PM. |
|
|
|
|
03/22/2009, 09:10 PM
|
#62 |
|
Team RC Member
Join Date: Jul 2006
Location: STL
Posts: 14,754
|
Here's the left side plumbing access.
 And the right. 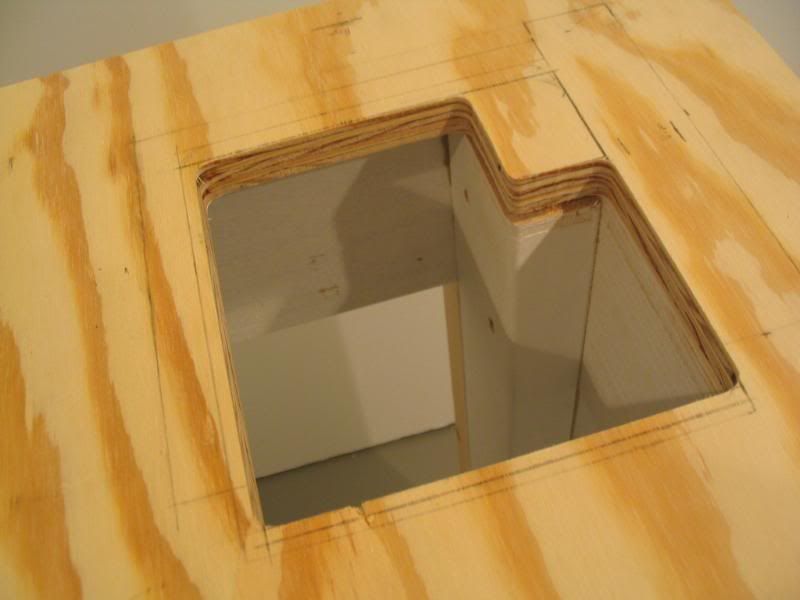 And when it's all done... the remains. Kind of sad. 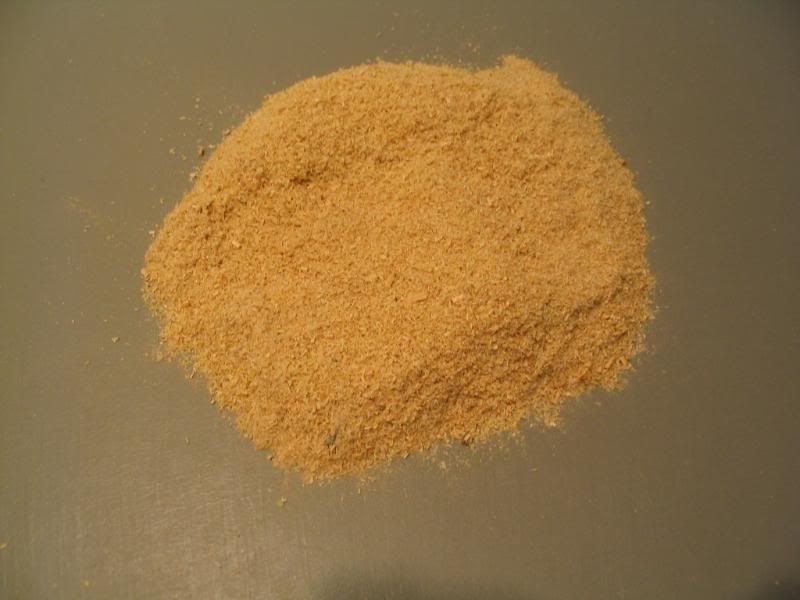
__________________
-Brett 180g Marineland Starfire In-Wall 278 gallon system Last edited by Misled; 04/02/2018 at 05:04 PM. |
|
|
|
|
03/23/2009, 12:19 AM
|
#63 |
|
Registered Member
Join Date: May 2008
Location: Boise, ID
Posts: 234
|
Those gaps you found with your level would have driven me nuts. However, if it were me fixing it, I would have had to rebuild the stand when I made it worse trying to fix it.
Nice job!That's the most detailed write up I've ever seen on using a router. But it's those kind of write ups that make these threads informative.
|
|
|
|
|
03/23/2009, 12:33 AM
|
#64 |
|
Registered Member
Join Date: Sep 2008
Location: Vancouver WA
Posts: 517
|
Looking good. Wish I had cut my access holes a bit bigger. Was a PITA trying to get those nuts tight.
__________________
Josh Click on the redhouse for my 180 build. Current Tank Info: 180 gallon pennisula reef |
|
|
|
|
03/23/2009, 06:39 AM
|
#65 | |
|
Team RC Member
Join Date: Jul 2005
Location: houstonia
Posts: 7,989
|
Quote:
well done, drummereef!
__________________
-Chris- You don't win friends with salad. "Look! They're trying to learn for free!" ... "Use your phony guns as clubs!" Current Tank Info: rectangluar? wet? |
|
|
|
|
|
03/23/2009, 09:13 AM
|
#66 | |
|
Team RC Member
Join Date: Jul 2006
Location: STL
Posts: 14,754
|
Quote:
__________________
-Brett 180g Marineland Starfire In-Wall 278 gallon system |
|
|
|
|
|
03/23/2009, 09:14 AM
|
#67 | |
|
Team RC Member
Join Date: Jul 2006
Location: STL
Posts: 14,754
|
Quote:
Thanks gradth! I just hope I cut them in the right place.
__________________
-Brett 180g Marineland Starfire In-Wall 278 gallon system |
|
|
|
|
|
03/23/2009, 09:15 AM
|
#68 | |
|
Team RC Member
Join Date: Jul 2006
Location: STL
Posts: 14,754
|
Quote:
Thanks crvz.
__________________
-Brett 180g Marineland Starfire In-Wall 278 gallon system |
|
|
|
|
|
03/28/2009, 12:07 AM
|
#69 |
|
Team RC Member
Join Date: Jul 2006
Location: STL
Posts: 14,754
|
UPDATE:
Back at it today... Part of the reason I started this thread was to help DIY'ers, like myself, with various reef related projects. And, I also wanted to try my hand at some projects I've never tackled. That being said, I'd never laminated before. So... earlier this week I picked up some Formica Laminate sheet to laminate the top of the tank stand and header above the stand. This turned out to be quite the stinky project. I urge anyone who uses contact cement, or any solvent based product, to please follow the manufacturer's instructions and turn off all gas appliances including the pilot lights. This is of utmost importance as the adhesive vapor could ignite in the presence of an open flame.  With that little disclaimer aside let's proceed. I chose a Formica product that was readily available at the orange box called micro-dot in a black finish. 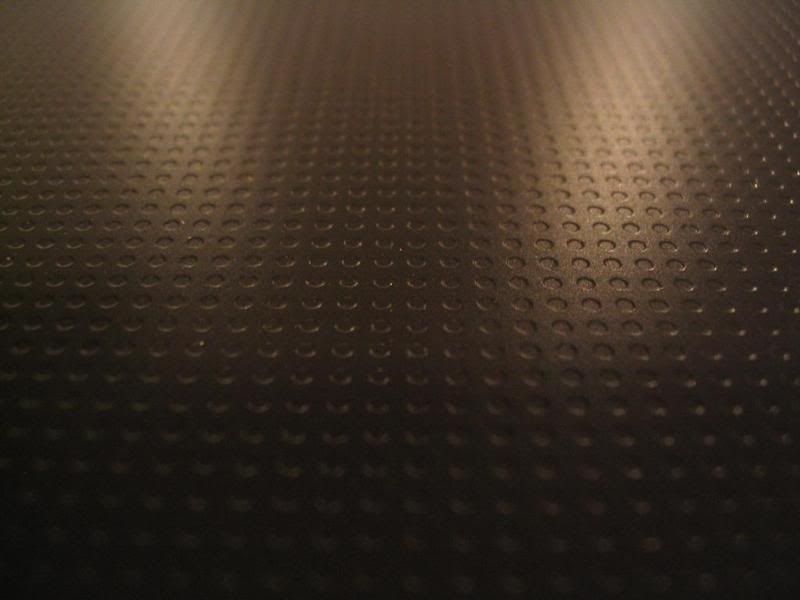 I measured the pieces and added an inch or so to each dimension for overhang. There are a variety of ways of cutting laminate but I chose a utility knife since it was late at night and noise was a concern. I taped off the cutting area to minimize chipping. 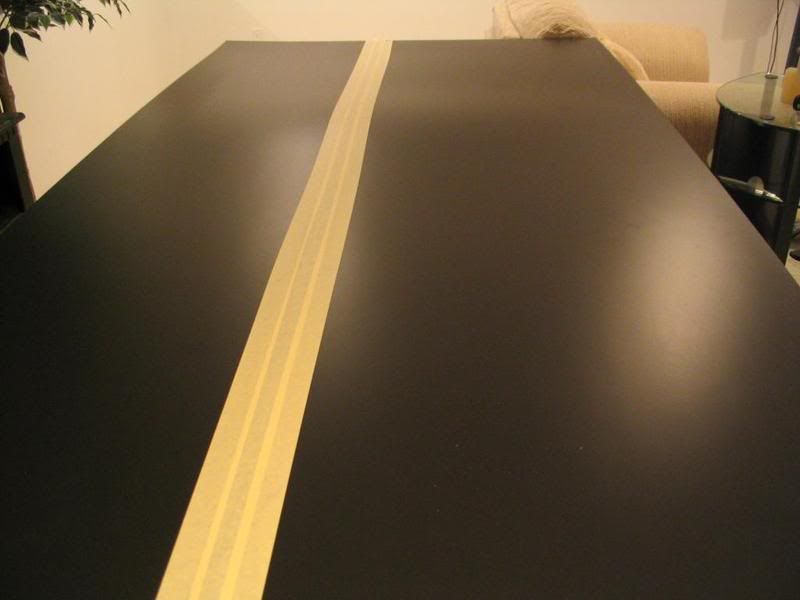 Then I snapped a chalk line. 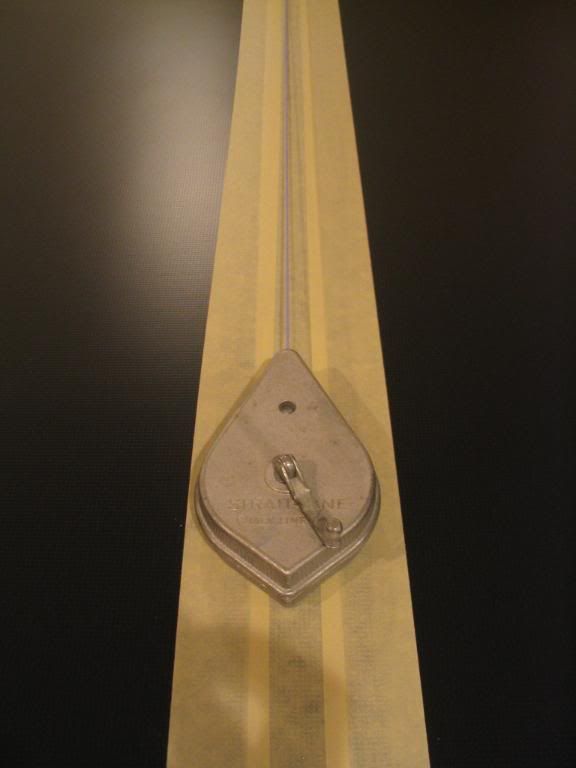 Carefully tracing the chalk line with the utility knife, I made multiple passes. Probably a dozen or so passes with a firm grip to avoid blade slippage. Once I felt the blade was almost through the laminate I was able to easily snap it along the cut line. 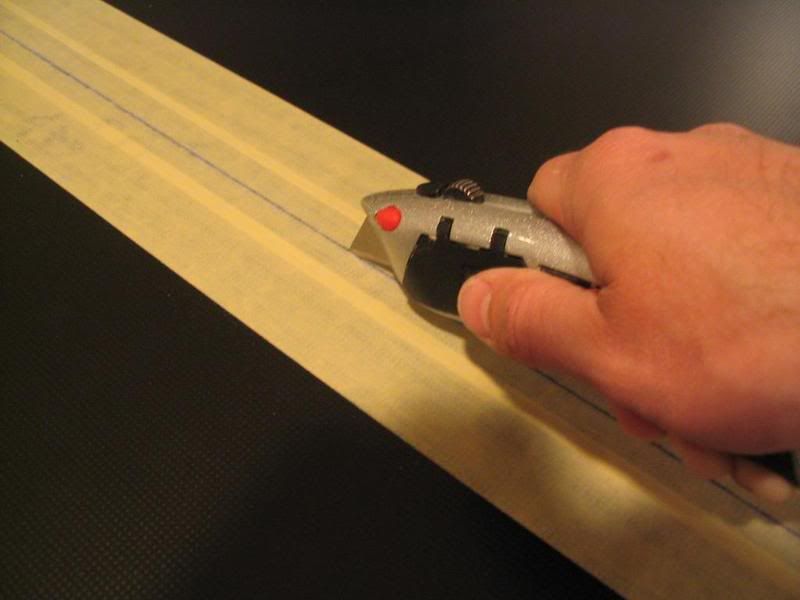 Then I let the laminate acclimate approximately 72 hours per recommendation by the manufacturer. 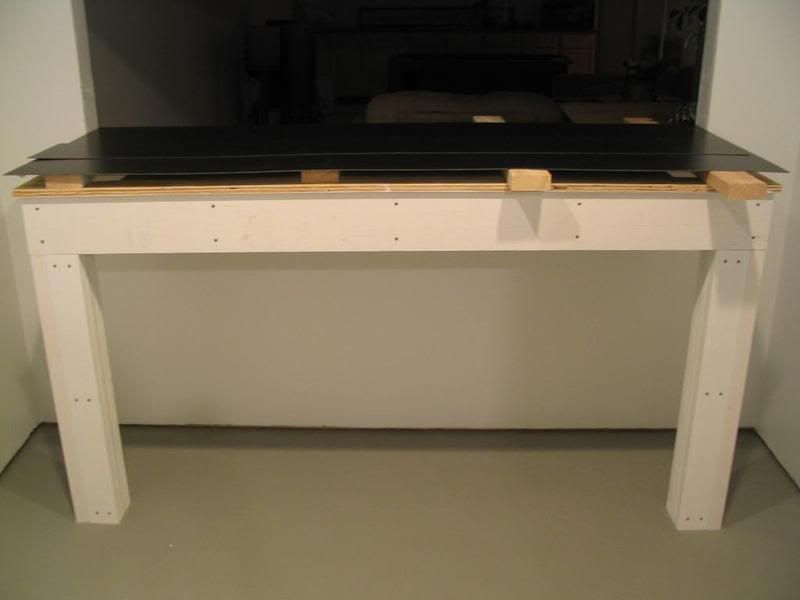
__________________
-Brett 180g Marineland Starfire In-Wall 278 gallon system Last edited by Misled; 04/02/2018 at 05:05 PM. |
|
|
|
|
03/28/2009, 12:14 AM
|
#70 |
|
Team RC Member
Join Date: Jul 2006
Location: STL
Posts: 14,754
|
Now that the laminate had properly acclimated, I was able to proceed with gluing it up.
Here's a short list of tools I used. 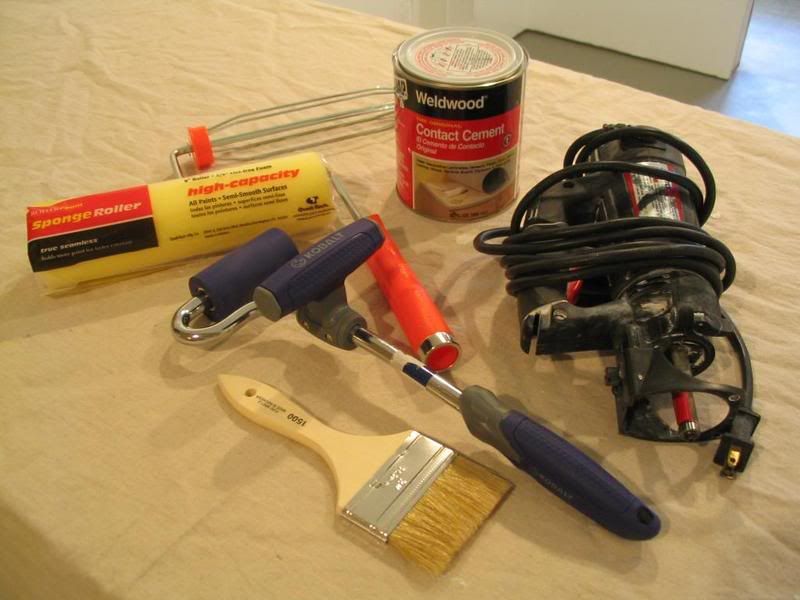 I chose to use Dap Weldwood Contact Cement to glue up the laminate. Again, this stuff is REALLY stinky. I urge you to follow the manufacture's instructions and turn off all gas appliances. This includes your furnace, water heater, gas logs, and all pilot lights. 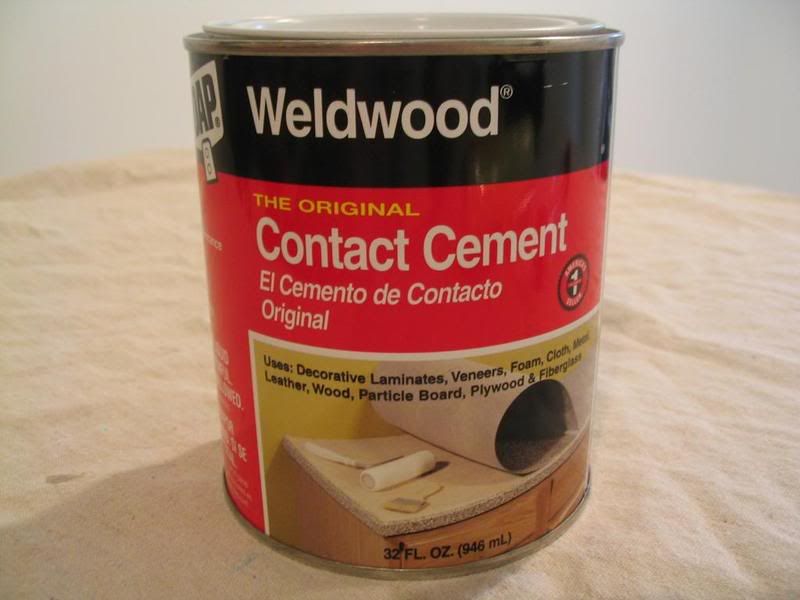 Here we go! I used a foam roller to apply two coats of contact cement to each surface to be glued. Let each coat dry approx 15-20 minutes between coats. 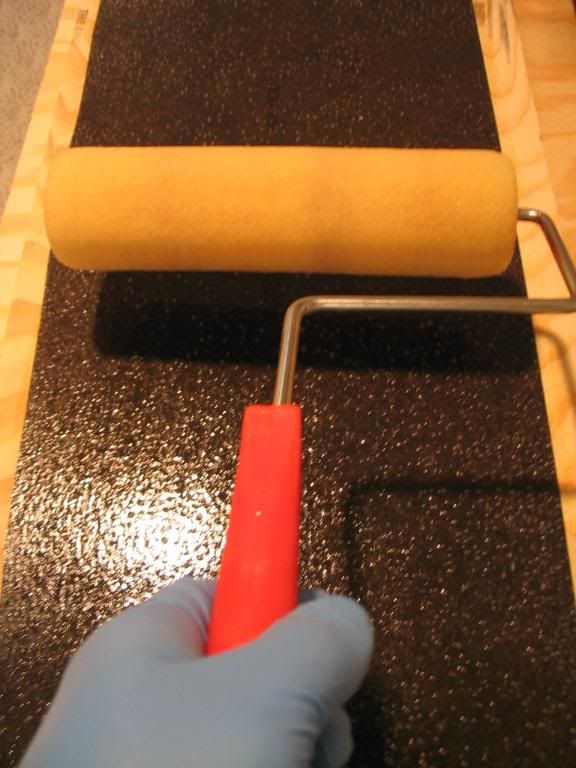 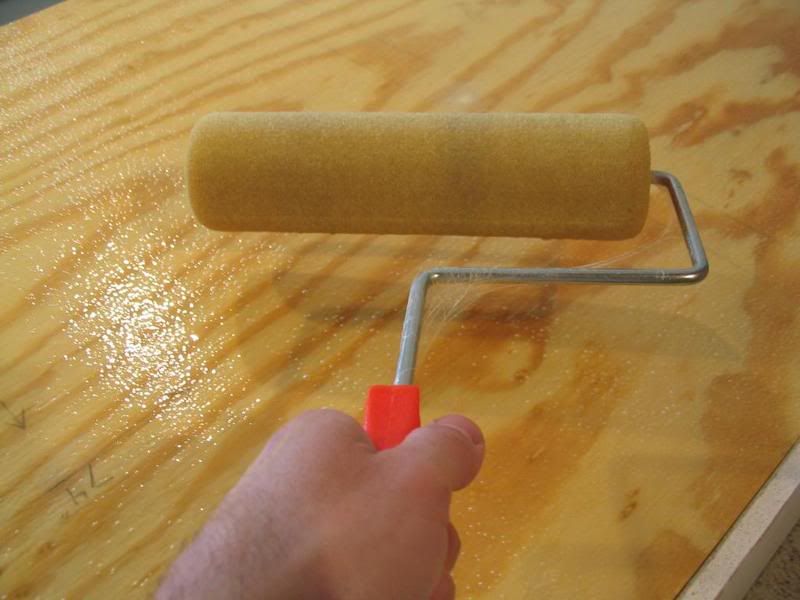 When ready, the surface will look glossy. There will be a slight tack to each surface but should not "leg" when touched. 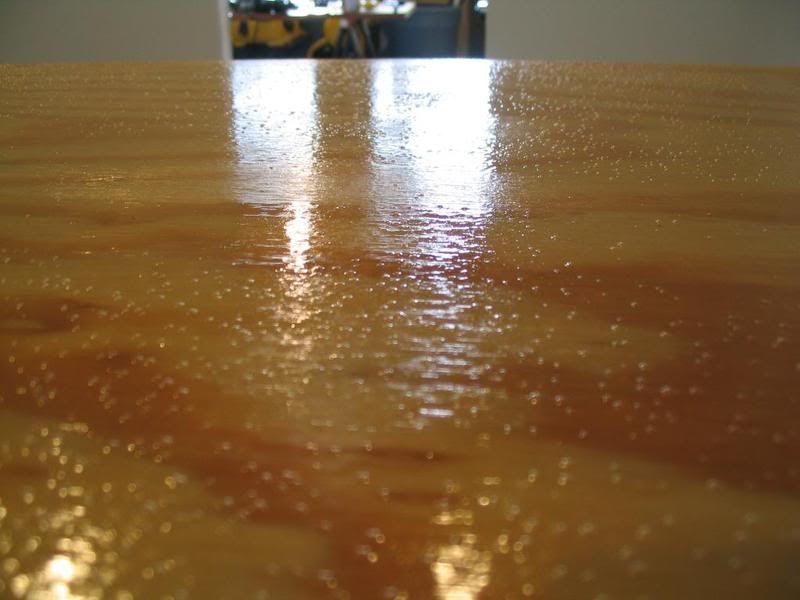
__________________
-Brett 180g Marineland Starfire In-Wall 278 gallon system Last edited by Misled; 04/02/2018 at 05:06 PM. |
|
|
|
|
03/28/2009, 12:21 AM
|
#71 |
|
Team RC Member
Join Date: Jul 2006
Location: STL
Posts: 14,754
|
This is where it gets a little scary. When using contact cement you get ONE shot. Once both glued sides touch it's permanent. Using some spare scraps of wood as spacers I carefully placed the laminate on the stand and lined it up with my guide marks. One by one I started removing the wood strips. Using firm pressure, I pressed the laminate against the plywood top.
 Once all the wood strips were removed I was ready to roll the surface. This is a laminate j-roller. They are readily available at the home center. Again using firm pressure I just rolled and rolled until I felt the two surfaces were completely bonded. 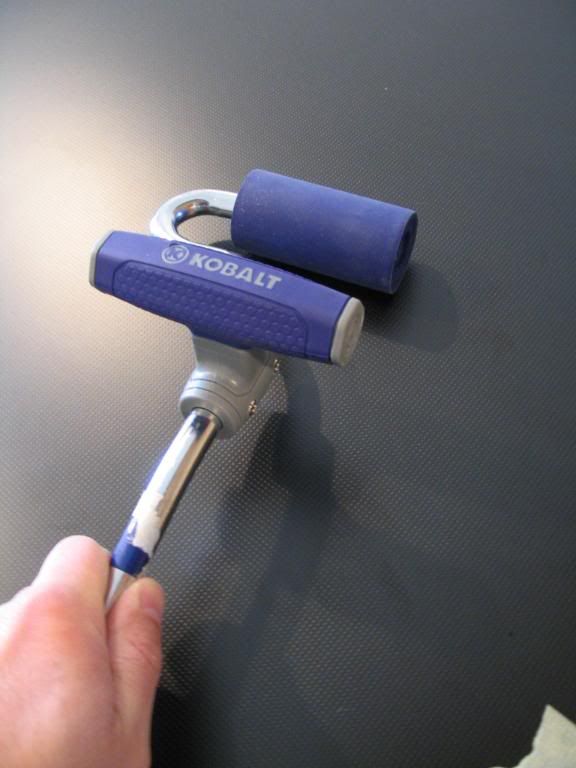 And there you have it! 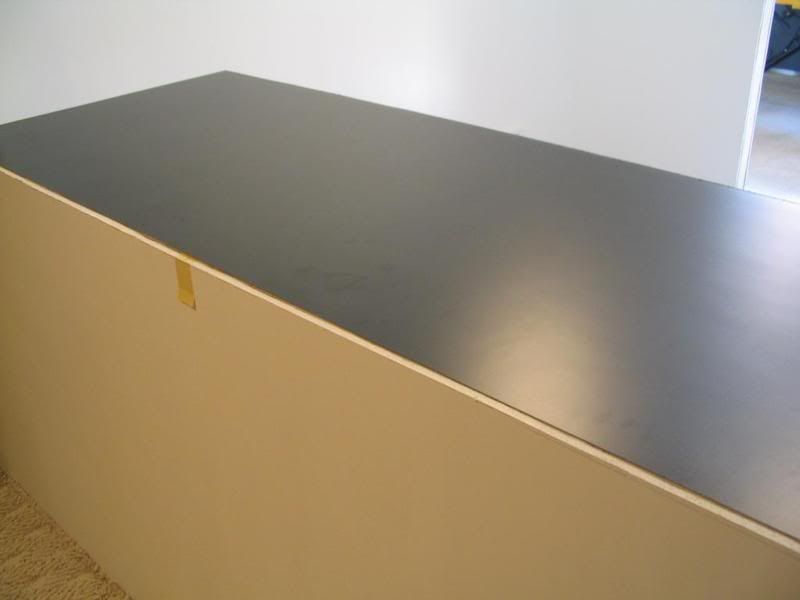
__________________
-Brett 180g Marineland Starfire In-Wall 278 gallon system Last edited by Misled; 04/02/2018 at 05:06 PM. |
|
|
|
|
03/28/2009, 12:27 AM
|
#72 |
|
Team RC Member
Join Date: Jul 2006
Location: STL
Posts: 14,754
|
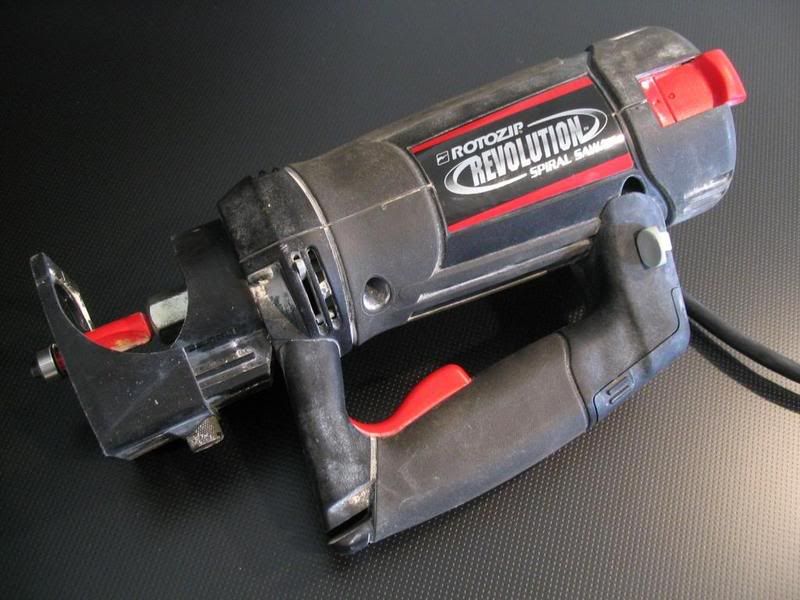
Next was to do a little trimming. The tool I used for this job was a RotoZip. It's handy for a variety of jobs from drywall to tile cutting, etc... It made a decent laminate trimmer for this job.
 Using the same flush cutting bit from an earlier project, I cut around the profile of the top. After gluing and trimming all edges I used a standard carpenters file to clean up any burrs and ease the edge. 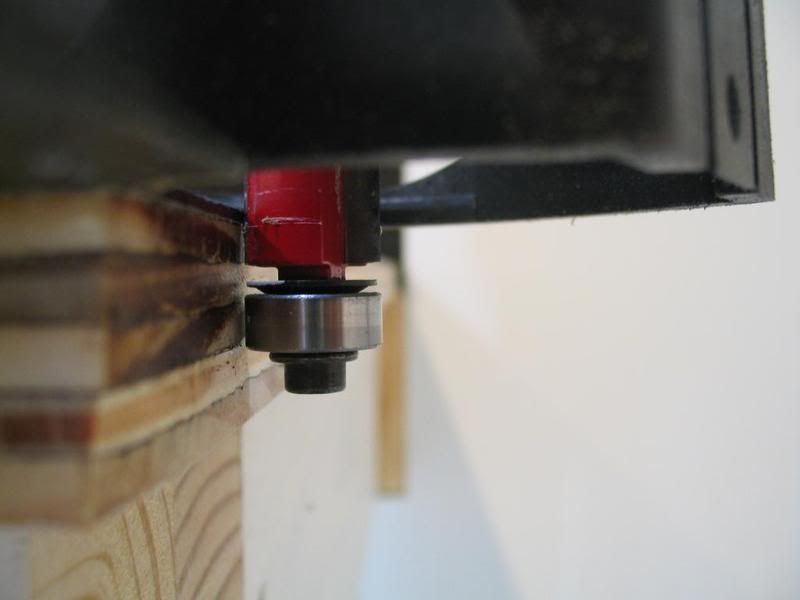 Detail of the plumbing access cut-outs... 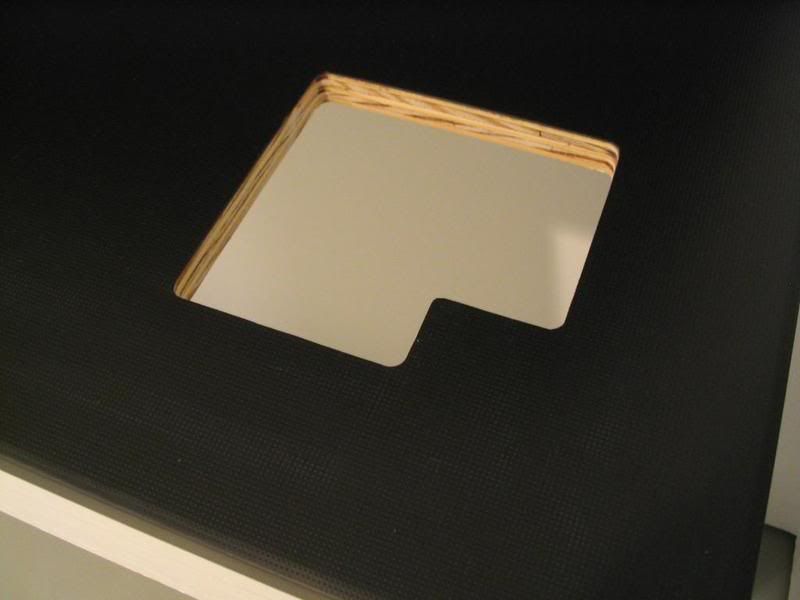
__________________
-Brett 180g Marineland Starfire In-Wall 278 gallon system Last edited by Misled; 04/02/2018 at 05:07 PM. |
|
|
|
|
03/28/2009, 12:29 AM
|
#73 |
|
Team RC Member
Join Date: Jul 2006
Location: STL
Posts: 14,754
|
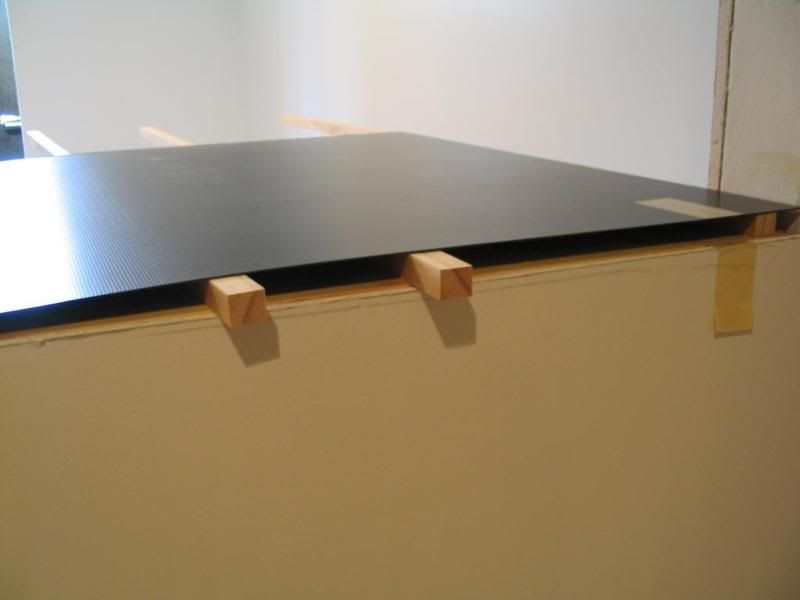
Voila! Finished surface.
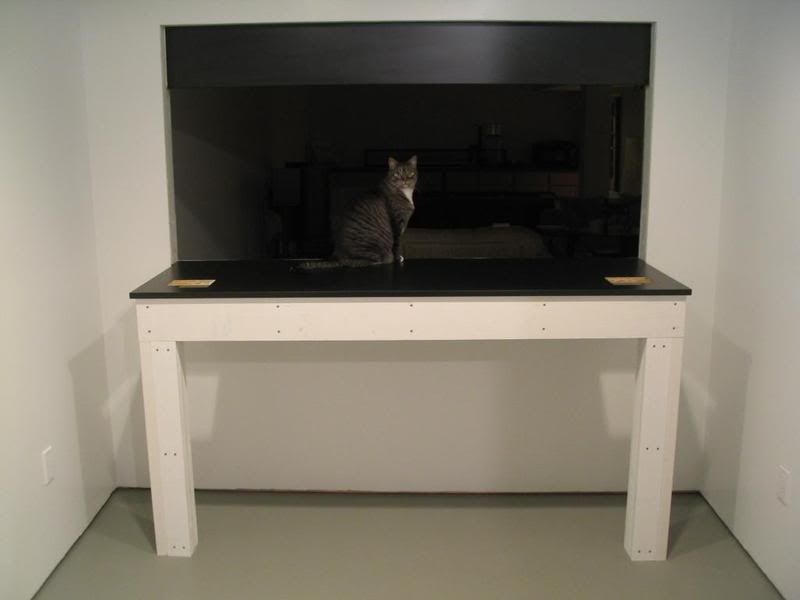 Corner detail. 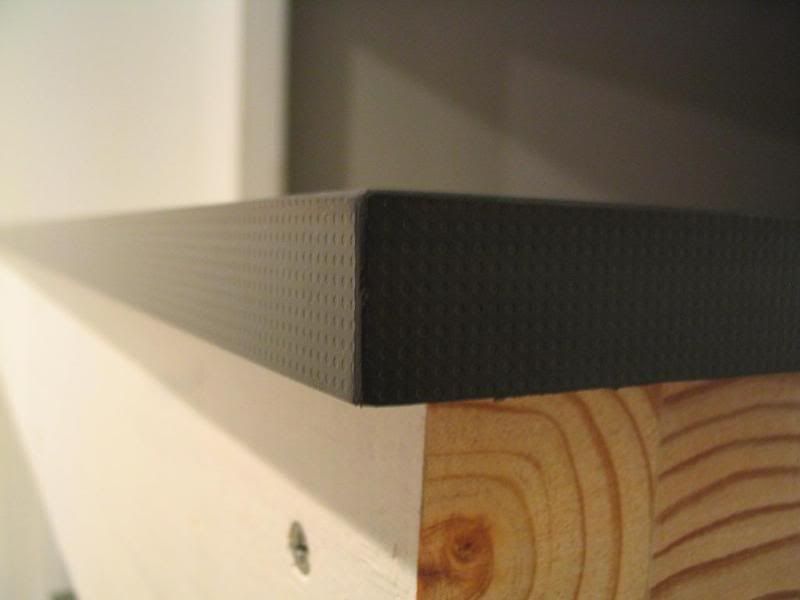 Detail of header above stand. 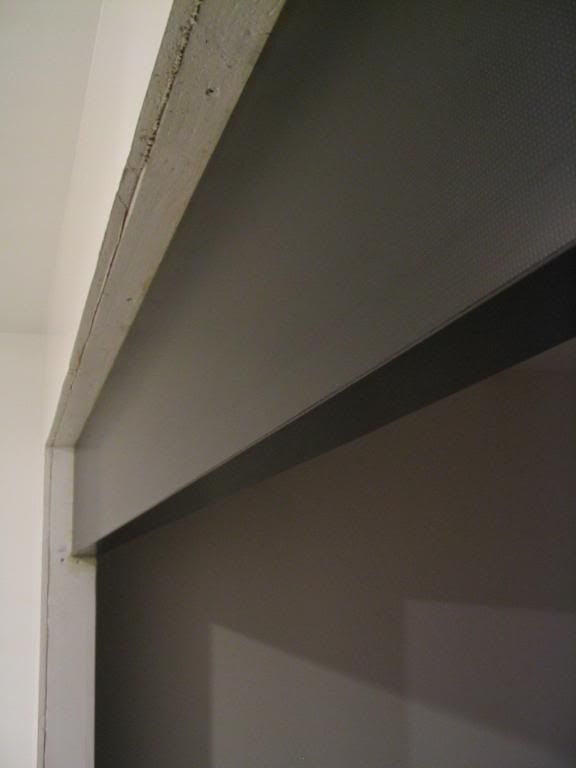
__________________
-Brett 180g Marineland Starfire In-Wall 278 gallon system Last edited by Misled; 04/02/2018 at 05:08 PM. |
|
|
|
|
03/28/2009, 12:45 AM
|
#74 |
|
Team RC Member
Join Date: Jul 2006
Location: STL
Posts: 14,754
|
I'll finish trimming around the rough opening and by next weekend the tank will be in place! Finally, woohoo!!!
__________________
-Brett 180g Marineland Starfire In-Wall 278 gallon system |
|
|
|
|
03/28/2009, 07:03 AM
|
#75 |
|
Team RC Member
Join Date: Jul 2005
Location: houstonia
Posts: 7,989
|
Wow, well done. Thanks for sharing all the details. I assume there's about zero worry in the texture of the laminate regarding tank support?
__________________
-Chris- You don't win friends with salad. "Look! They're trying to learn for free!" ... "Use your phony guns as clubs!" Current Tank Info: rectangluar? wet? |
|
|
|
 |
|
|


