|
|
 06/13/2012, 11:46 PM
|
#3851 |
|
Team RC Member
Join Date: Jul 2006
Location: STL
Posts: 14,754
|
OK Alex, I did some testing on the bio pellet reactor... I did a water change so most of the return section of the sump was drained during the change - the section where the reactor is placed. Amazingly, the reactor did not back siphon or drain, not even one drop. The entire reactor held water all the way to the lid. Even the bubbles on the intake screen stayed put. I'm guessing, since it's a closed system plumbed to the manifold, which is higher than the reactor that it was able to hold water without draining. Almost like when you hold your finger on a straw full of water. The effluent also was submerged since it's in the skimmer section that doesn't drain when I'm doing a water change. So no back-siphoning or burping at all.

__________________
-Brett 180g Marineland Starfire In-Wall 278 gallon system |

|

|
|
06/14/2012, 11:18 AM
|
#3852 |
|
Registered Member
Join Date: May 2008
Location: Durham, NC
Posts: 2,205
|
Cool! Do you get good fluidizing with that nozzle as well?
__________________
^ Click on my username and 'Visit Taqpol's Home Page!" to view my 220 gallon custom Miracles tank! -Alex |
|
|
|
|
06/14/2012, 11:26 AM
|
#3853 | |
|
Registered Member
Join Date: Jan 2006
Location: Toledo OH
Posts: 2,466
|
False advertising!!
Quote:
Those are some of the smoothest black'st NON cement material cinder bloacks I have ever seen!  Looking good!
__________________
Inwall Basement Setup w/ Growout Tank & Common Acrylic sump, SRO XP3000E, Neptune Apex, Bubble Magus Triple Doser, CLS- Super Dart Gold + OM 4way, 2-400w MH & 4-80w T-5, ROX .08 carbon... Last edited by Misled; 04/09/2018 at 07:03 PM. |
|
|
|
|
|
06/14/2012, 04:20 PM
|
#3854 |
|
Registered Member
Join Date: Aug 2000
Location: Lubbock Tx
Posts: 2,141
|
just started reading this thread a couple days ago, awesome journey, thanks for sharing.. and im just gonna let you know.. i will be stealing some of your ideas when setting up my new 75 gallon.
|
|
|
|
|
06/14/2012, 10:10 PM
|
#3855 |
|
A Reef In The Sky
Join Date: May 2009
Location: Hong Kong
Posts: 718
|
Hi Brett,
Great fish room!!! Wish I had something like that. Two questions, Have you got any pics of how you made the skimmer stand from egg crate? I might try using that method. Also, does your skimmer have little rubber legs on it or is the base completely flat? Just wondering how it sits on the egg crate? Thanks
__________________
'A Reef in the Sky' Zeovit Featured Tank 2012 Reef Central TOTM Nov 2013 Reef Hobbyist Magazine Featured Tank 2015 Current Tank Info: 'A Reef in the Sky' |
|
|
|
|
06/14/2012, 10:14 PM
|
#3856 |
|
Registered Member
Join Date: Apr 2006
Location: Bakersfield
Posts: 280
|
looks great, and no one who has followed this thread for more than one day believed you where going to put cinder blocks in that fish room lol. thanks for sharing
__________________
Each succeeding year of my life feels less free than the one before Current Tank Info: 125 g mixed reef with sump |
|
|
|
|
06/14/2012, 10:19 PM
|
#3857 |
|
Moved On
Join Date: Dec 2010
Location: League City, Texas
Posts: 3,974
|
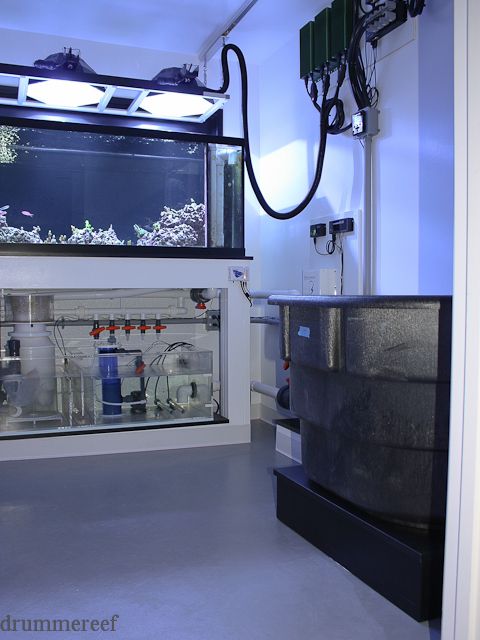
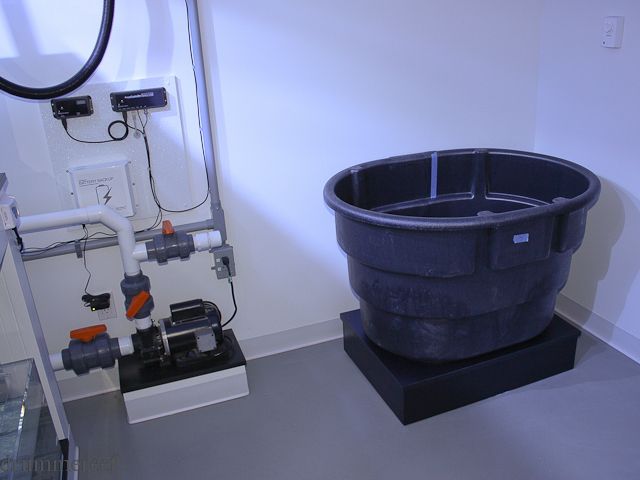
Brett, I love the new stock tank! Good looking base too.
I just noticed your Halides are on a rail system. Is it the same on both sides that way you can slide the lights back to get into the tank? If so, that is sweet! I seen one thing your missing in that fish room. One lazy boy recliner or a nice comfy computer chair on rollers! |
|
|
|
|
06/14/2012, 10:32 PM
|
#3858 |
|
Registered Member
Join Date: Jun 2012
Location: Fort Campbell, KY
Posts: 19
|
Very nice set up, I like the less is more look with the rock.
|
|
|
|
|
06/14/2012, 11:35 PM
|
#3859 | |||||||
|
Team RC Member
Join Date: Jul 2006
Location: STL
Posts: 14,754
|
Quote:
Quote:
Quote:
Quote:
I don't think I did a tutorial on how to make one but it's really simple. I just took some wire cutters and cut the eggcrate base and legs to size, sanded the rough edges, and used super glue to hold it all together. Very easy. The skimmer stand has a center leg for support as well, otherwise it would probably sag from the excess weight. My skimmer is just flat acrylic on the bottom, no rubber feet, so it sits very flat on the eggcrate. Here's the best pic I have so hopefully you'll get a better idea of what it looks like. 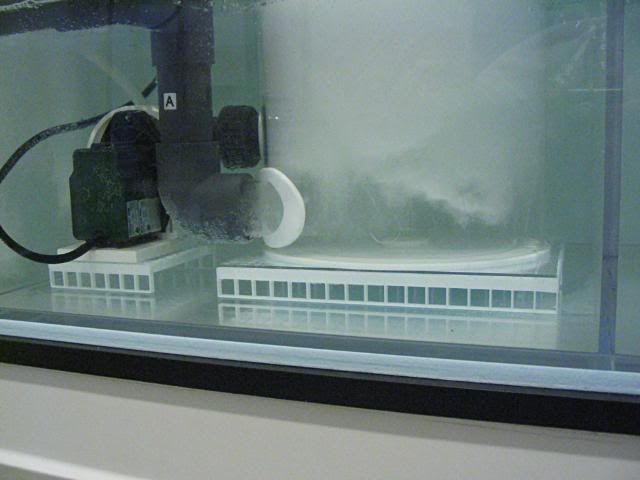 Quote:
 Quote:
Yes, the rail system is the same on both sides so I can slide the whole rack back when I need to have more access to the tank or doing am maintenance on the lights. Here's a pic from a while back so you can see the bigger picture.  Quote:
__________________
-Brett 180g Marineland Starfire In-Wall 278 gallon system Last edited by Misled; 04/09/2018 at 07:03 PM. |
|||||||
|
|
|
|
06/15/2012, 01:18 AM
|
#3860 |
|
Team RC Member
Join Date: Jul 2006
Location: STL
Posts: 14,754
|
Here's a quick video of the bio pellet reactor. Sorry for the video quality, just wanted to post something quick and easy so the iPhone was it. The pellets look like they are churning more than real life because the video is blurring them somewhat. It's more of a gentle stirring. But you can see there's a complete tumble from the bottom of the reactor to the top of the pellets.
__________________
-Brett 180g Marineland Starfire In-Wall 278 gallon system |
|
|
|
|
06/17/2012, 07:38 PM
|
#3861 |
|
Team RC Member
Join Date: Jul 2006
Location: STL
Posts: 14,754
|
UPDATE:
More progress made on the stock tank build out... Now that the stand was complete, I leveled it up and started to drill some holes in the tank. I used a hole saw to cut the drain bulkheads. 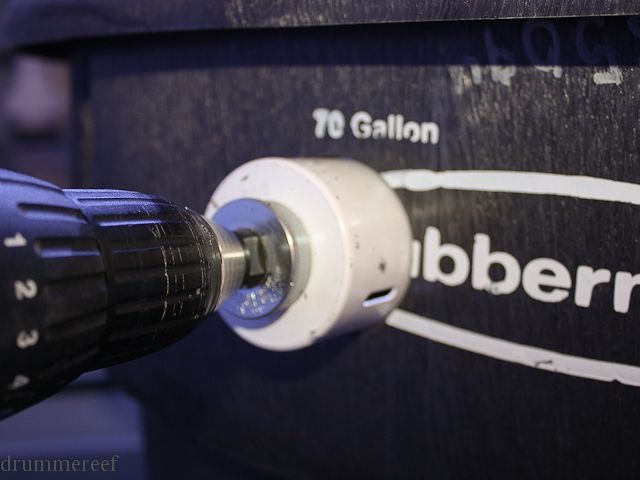 Both drains cut and ready for bulkheads. 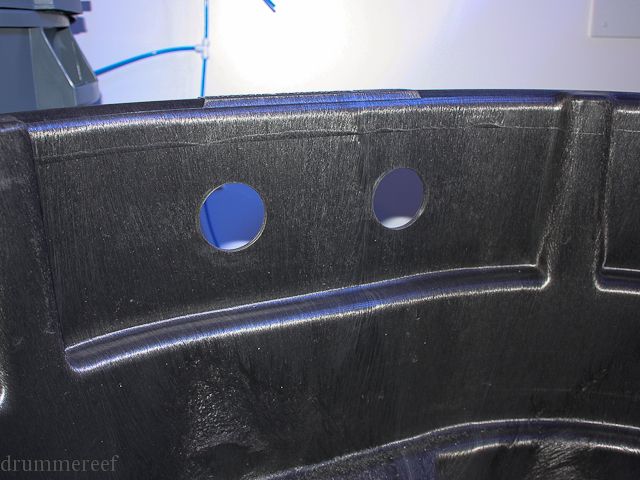 2x 1.5" Bulkheads installed. These bulkheads are threaded on the flange side, slip on the back.  Upturned elbows installed. 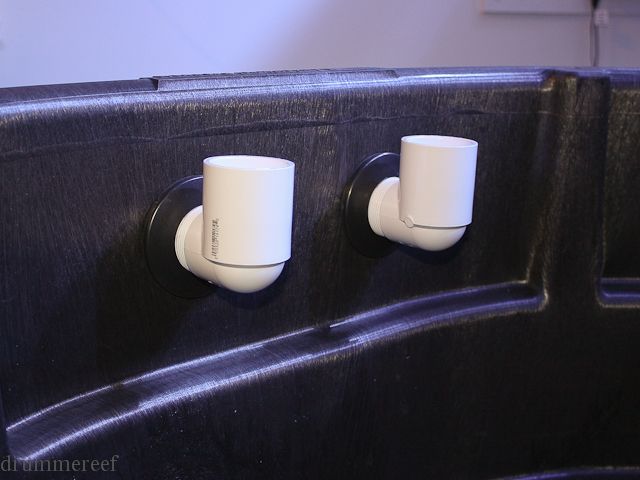 Next, I needed to enlarge the hole at the bottom of the tank to accommodate a 1.5" bulkhead. I added some blocking to be able to use a hole saw. This way the guide bit has something to drill into while cutting. 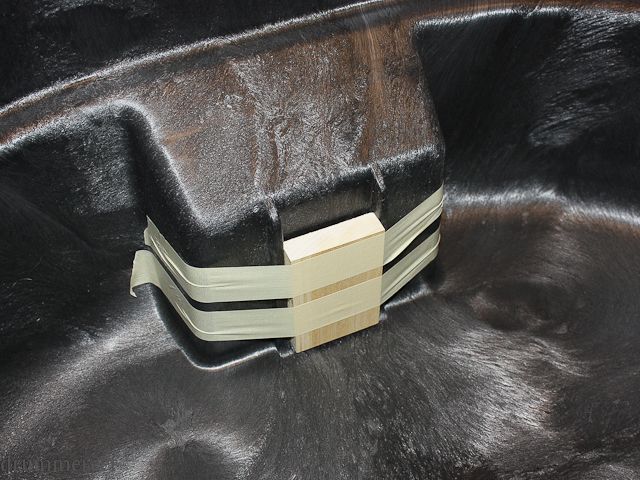 Here's the side that will be drilled. You can see the blocking against the tank. 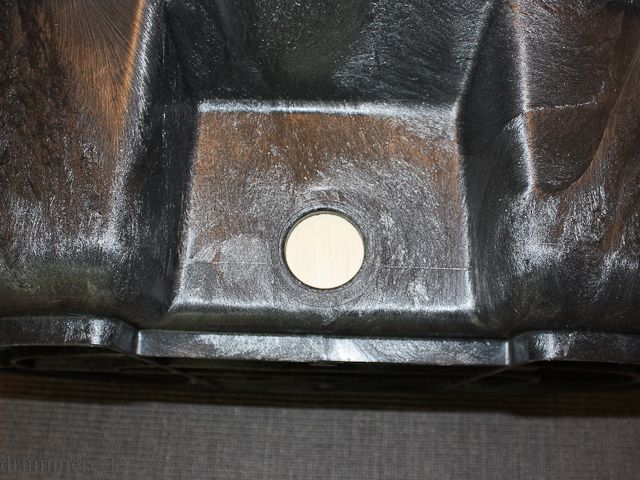 Using the same size hole saw as the drains, I drilled out the new hole and installed the bulkhead. 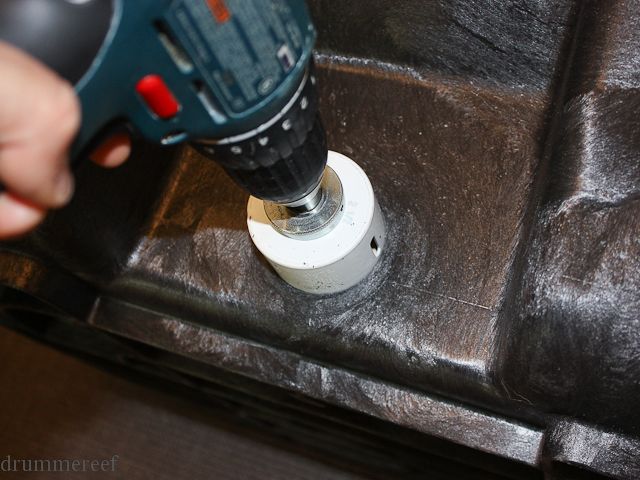 And finally... These 70 gallon tanks have two ribs on either side of the hole that need to be ground down enough for a bulkhead to seal properly. I used my angle grinder for most of it, followed by some hand sanding with a couple different grits of sandpaper to make the inside surface of the tank smooth. 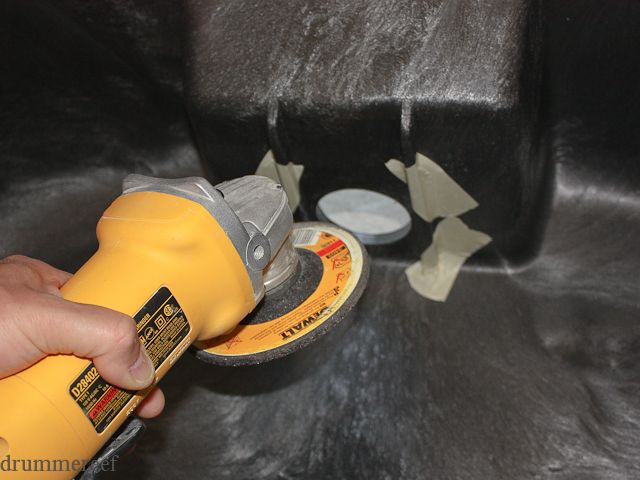 To be continued... 
__________________
-Brett 180g Marineland Starfire In-Wall 278 gallon system Last edited by Misled; 04/09/2018 at 07:04 PM. |
|
|
|
|
06/17/2012, 07:39 PM
|
#3862 |
|
Team RC Member
Join Date: Jul 2006
Location: STL
Posts: 14,754
|
Now that the tank was drilled I could move back to the room to complete some necessary details. I installed the FRP panel behind where the tank will sit.
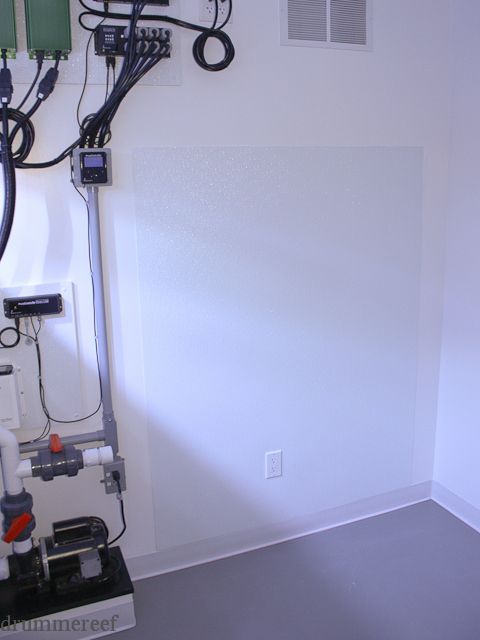 I put the tank back on the stand and did some very careful measuring for the two holes that needed to be drilled. 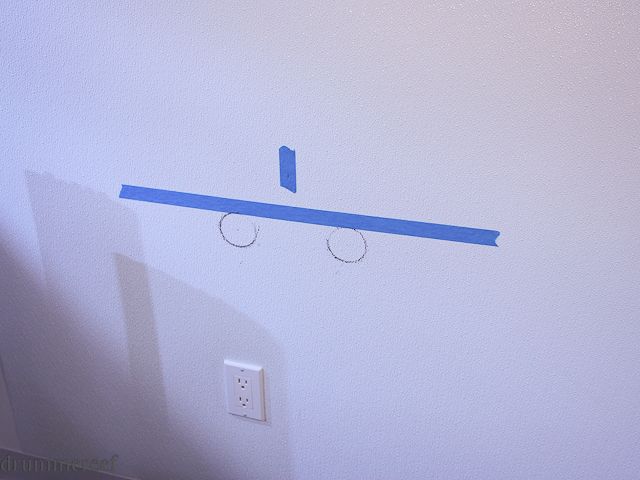 Holes drilled. I hope this is right!! 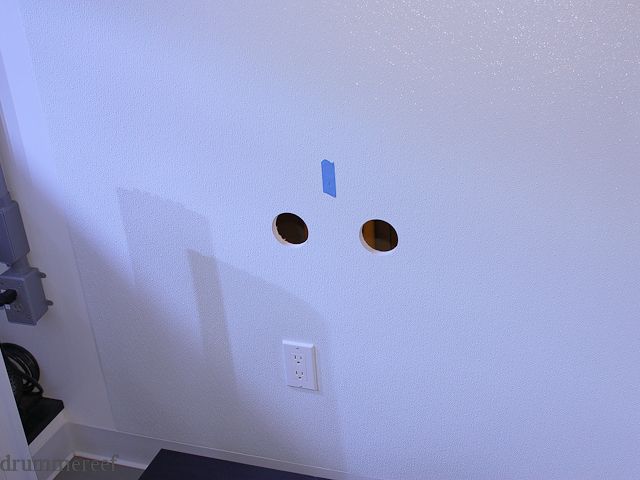 So I decided I could use Uniseals where the pipe transitions through the wall to give me a super clean look inside the room. 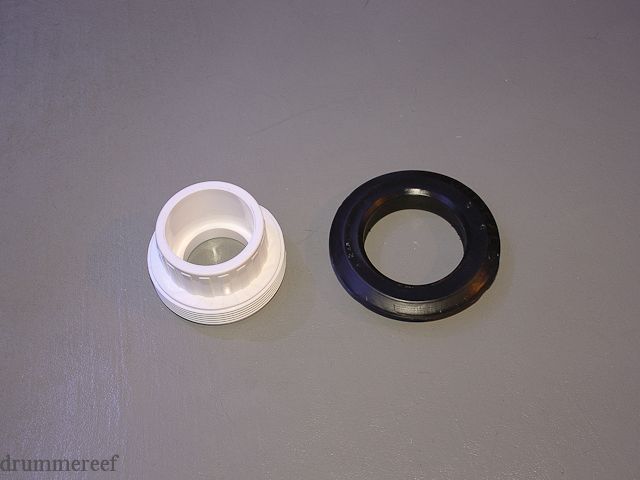 I was able to grind the I.D. of the Uniseal down just enough for it to slip over the threaded side of the union. As you can see the flange on the Uniseal is slightly larger in diameter than the threads on the union. 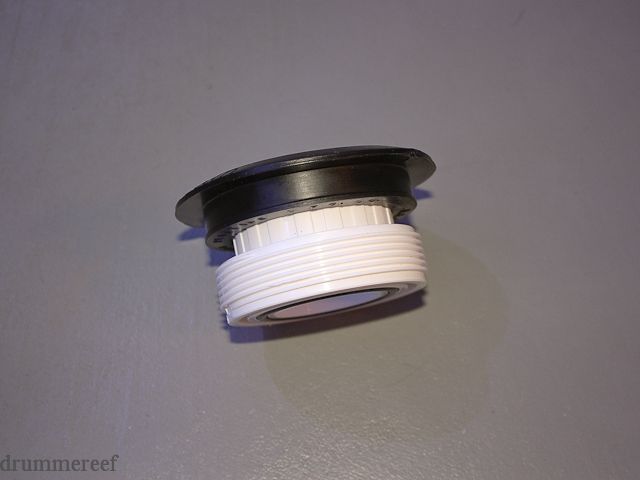 Here's a pic of the whole assembly. The threaded side of the union will slide through the wall and the Uniseal will give it a nice finished look.  And the finished product. 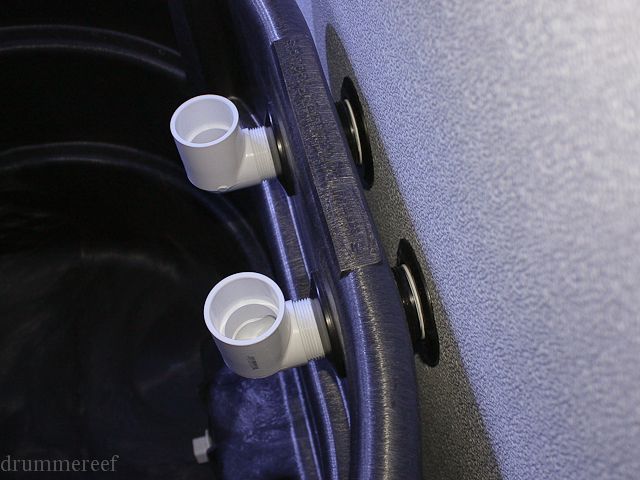 On the other side of the wall you can see the nut side of the union and a little rough-in of the fittings I will be using to complete the drain plumbing. 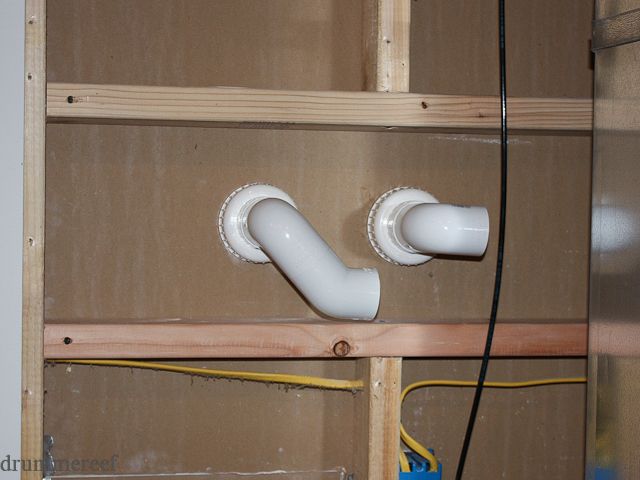
__________________
-Brett 180g Marineland Starfire In-Wall 278 gallon system Last edited by Misled; 04/09/2018 at 07:05 PM. |
|
|
|
|
06/17/2012, 07:52 PM
|
#3863 |
|
Registered Member
Join Date: Oct 2005
Location: DFW Texas
Posts: 5,249
|
great job!
when I first saw those uni-seals on the wall I was thinking; "what the heck are you up to now". After reading it made perfect sense and looks great
__________________
A smooth sea never made a skillful mariner Current Tank Info: 110g Mixed Reef, LED's & T5's |
|
|
|
|
06/17/2012, 07:54 PM
|
#3864 |
|
Registered Member
Join Date: Oct 2005
Location: DFW Texas
Posts: 5,249
|
will you have enough space to slope your lower of the two drain lines?
The lower line looks like it's right up against your horizontal in this picture, or does it only go a couple feet.
__________________
A smooth sea never made a skillful mariner Current Tank Info: 110g Mixed Reef, LED's & T5's Last edited by Misled; 04/09/2018 at 07:06 PM. |
|
|
|
|
06/17/2012, 08:05 PM
|
#3865 | |
|
Registered Member.
Join Date: Apr 2011
Location: Los Angeles, CA
Posts: 1,677
|
Quote:
|
|
|
|
|
|
06/17/2012, 08:25 PM
|
#3866 |
|
Moved On
Join Date: Dec 2010
Location: League City, Texas
Posts: 3,974
|
Looking great Brett!
How much of a slope are you trying to achieve anyway? Shouldn't take much to move the water to the sump. I would guess about 25-35 degree angle. I think if you had it sloped too much, you would create some water noise (splashing into the sump). I'm assuming you would terminate the pipe right at the waters surface or just below. |
|
|
|
|
06/17/2012, 08:31 PM
|
#3867 |
|
Registered Member
Join Date: Oct 2005
Location: DFW Texas
Posts: 5,249
|
per piping standards drain lines should slope 1/8 to 1/4" per foot. This slope provides not only a gravatational pull to keep the water moving and keeps it from becoming stagnate, it also acts as a way to allow the air to escape without being pushed down by the water. This second element of air/water seperation is critical to keeping a system quiet. Too much slope and you get turbidity and gurgling.
__________________
A smooth sea never made a skillful mariner Current Tank Info: 110g Mixed Reef, LED's & T5's |
|
|
|
|
06/17/2012, 08:54 PM
|
#3868 |
|
Love The Fish
Join Date: Jan 2003
Location: Tucson, AZ
Posts: 5,652
|
Love it, nice clean work. Im so jealous of your room.
__________________
Brett Current Tank Info: Leemar 60x36x24, 8x80 T5/LED Sfiligoi GENESIS Alpha 300 skimmer |
|
|
|
|
06/17/2012, 08:57 PM
|
#3869 | |
|
Moved On
Join Date: Dec 2010
Location: League City, Texas
Posts: 3,974
|
Quote:
I did not know that. Thanks for the info. How would you calculate that slope per foot equation? |
|
|
|
|
|
06/17/2012, 09:49 PM
|
#3870 | |
|
A Reef In The Sky
Join Date: May 2009
Location: Hong Kong
Posts: 718
|
Quote:
Thank you Brett for the info and picture. I will give it a try
__________________
'A Reef in the Sky' Zeovit Featured Tank 2012 Reef Central TOTM Nov 2013 Reef Hobbyist Magazine Featured Tank 2015 Current Tank Info: 'A Reef in the Sky' Last edited by Misled; 04/09/2018 at 07:06 PM. |
|
|
|
|
|
06/17/2012, 11:24 PM
|
#3871 | |||||||
|
Team RC Member
Join Date: Jul 2006
Location: STL
Posts: 14,754
|
Quote:
Quote:
I should have taken a better pic originally to show the perspective of the pipe against the wall. The pipes will sit on the outside of the stud wall and run down roughly 6 feet where they will enter back into the sump room. Here's a better shot for perspective. 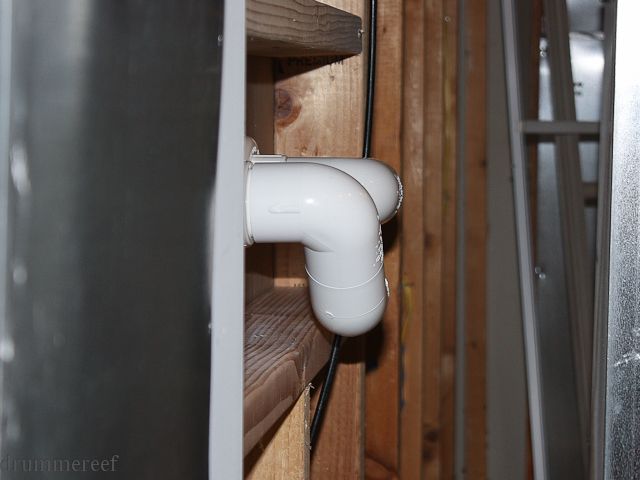 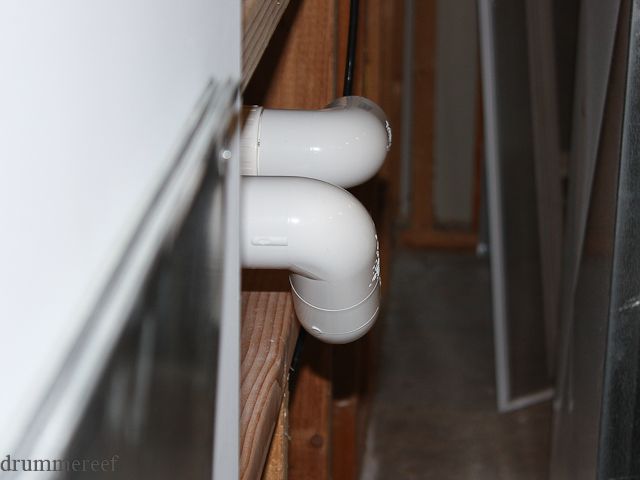 Quote:
Quote:
Quote:
Quote:

__________________
-Brett 180g Marineland Starfire In-Wall 278 gallon system Last edited by Misled; 04/09/2018 at 07:06 PM. |
|||||||
|
|
|
|
06/18/2012, 12:12 AM
|
#3872 |
|
Moved On
Join Date: Dec 2010
Location: League City, Texas
Posts: 3,974
|
Ok, thanks...can't wait to see it finished and hear how it's working for ya.
|
|
|
|
|
06/18/2012, 06:19 AM
|
#3873 | |
|
Registered Member
Join Date: Oct 2005
Location: DFW Texas
Posts: 5,249
|
Quote:
__________________
A smooth sea never made a skillful mariner Current Tank Info: 110g Mixed Reef, LED's & T5's |
|
|
|
|
|
06/18/2012, 11:08 AM
|
#3874 | ||
|
Team RC Member
Join Date: Jul 2006
Location: STL
Posts: 14,754
|
Quote:
Quote:
__________________
-Brett 180g Marineland Starfire In-Wall 278 gallon system |
||
|
|
|
|
06/21/2012, 10:40 PM
|
#3875 |
|
Team RC Member
Join Date: Jul 2006
Location: STL
Posts: 14,754
|
UPDATE:
Quick question then some updated pics of the fuge project... I want to use a 3/4" bulkhead on the stock tank to transition into some Loc-Line. I was considering installing the bulkhead on the side of the tank, which is rounded. When I put the nut up to the side you can see a small gap between the nut and the side of the tank due to the radius of the tank's side. The tank has a little flex to it so I'm on the fence whether the bulkhead will seal up OK. I'd rather use a bulkhead vs a Uniseal just because it seems like a safer option. What do you think?? 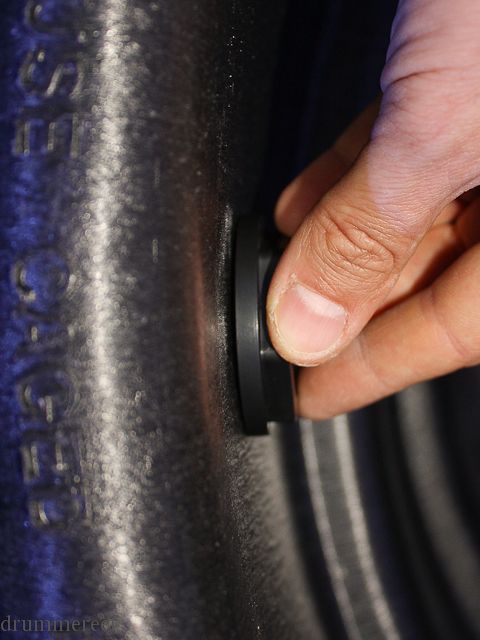 Here's some updates on the build-out... I re-framed the wall where the fuge drains will enter back into the sump room. My luck, there was another stud in the way so I needed to frame around it to accommodate the holes I would need to drill in the drywall. I also moved the electrical that was in the way as well. 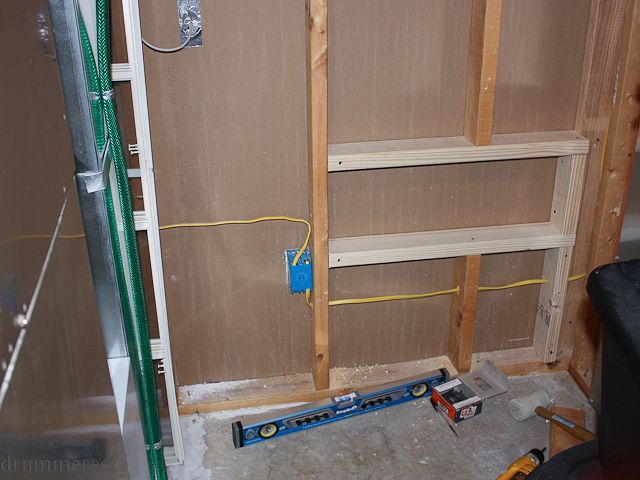 I also needed to build a support bracket for the pvc pipe. This will give the pipe a little extra support where it will hang over the side of the sump. 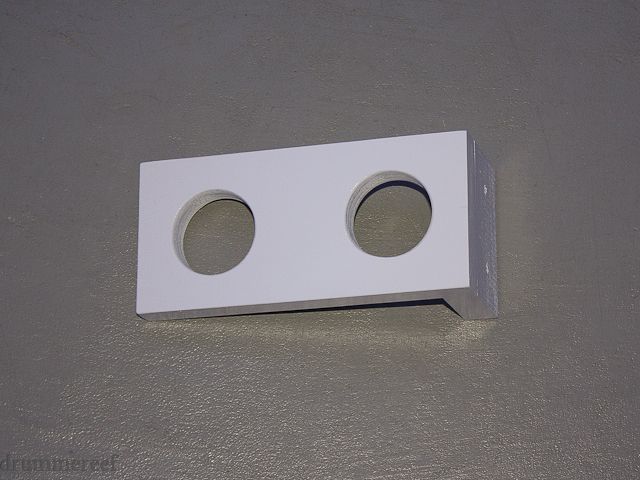 Here's the bracket installed and how the pipe will look once plumbed. 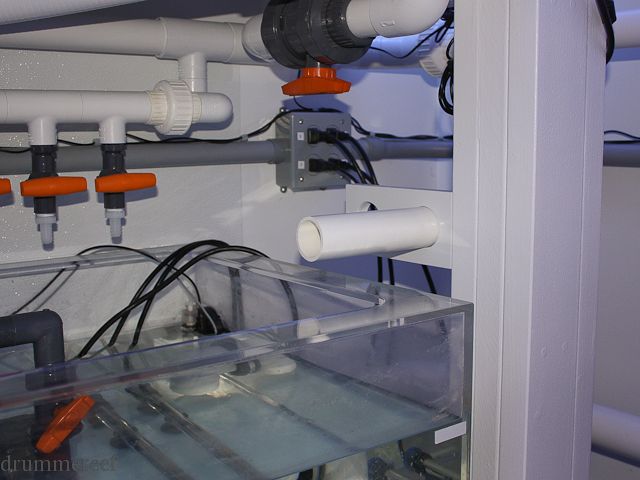 I then used some pipe to mark the wall where the necessary holes will be drilled. 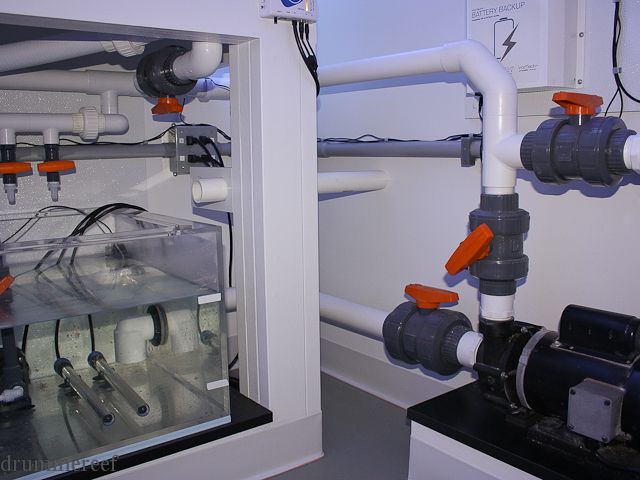 Using a hole saw, I drilled the holes to be able to plumb the pvc through the wall. 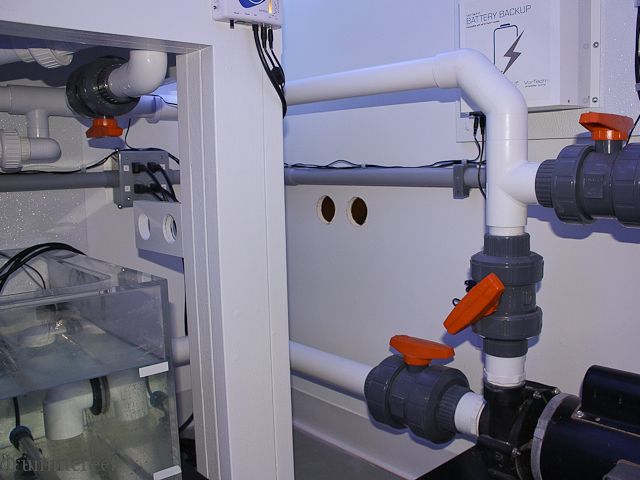 And finally, Uniseals provide a clean transition through the drywall. I need to pick up 2 more unions to plumb on the other side of the wall. But with this complete, I feel like I'm on the downhill with the project. Plumbing ahead!! 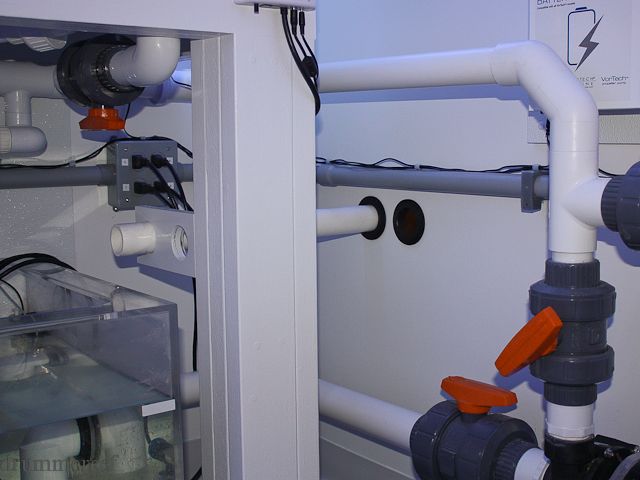
__________________
-Brett 180g Marineland Starfire In-Wall 278 gallon system Last edited by Misled; 04/09/2018 at 07:07 PM. |
|
|
|
 |
|
|