
|
|
 04/17/2012, 12:21 PM
|
#1 |
|
Registered Member
Join Date: Jun 2011
Location: South Texas
Posts: 2,159
|
DSA NEO 105 Rimless, Mixed Reef
For starters, if you are in this thread, you either came from my other build thread, or you have some catching up to do.
In a nutshell, I bought a new 210 non-RR, built a stand, had everything up and cycling for a month, and then CRACK! The 210 has been moved to the garage for future consideration and a DSA NEO 105 Rimless has replaced the 210. Here is my previous build thread, you may want to skim through it to see where we got to where we are. I decided to start a new thread for this build since it is a little different by nature. http://reefcentral.com/forums/showthread.php?t=2105493 Pics are coming shortly.
__________________
-You had me at PWM |

|

|
|
04/17/2012, 12:30 PM
|
#2 |
|
Registered Member
Join Date: Jun 2011
Location: South Texas
Posts: 2,159
|
I brought the tank home Friday, April 6th.
    
__________________
-You had me at PWM |
|
|
|
|
04/17/2012, 12:38 PM
|
#3 |
|
Registered Member
Join Date: Jun 2011
Location: South Texas
Posts: 2,159
|
    
__________________
-You had me at PWM |
|
|
|
|
04/17/2012, 12:43 PM
|
#4 |
|
Registered Member
Join Date: Jun 2011
Location: South Texas
Posts: 2,159
|
I installed a bean overflow system in this tank as well. The tank came RR with holes for two 1" drains and two 3/4" returns. I opted to use the 1" drains for the siphon and open channel while converting the 2nd 3/4" return to the dry emergency. I used the last 3/4" return for my return line. I originally had the standpipes with T's as shown in the first photo here, but in order to hide them that required the water level stayed too low in the overflow making it very loud overflowing from the DT to the overflow. I opted to use elbows instead to keep the standpipes profile much lower and hidden while raising the water level in the overflow to reduce splashing. It worked wonderfully and this system is EXTREMELY quiet. I have to put my ear over the overflow to hear anything. I am certainly happy in that regard.
Disregard the polyethelyne line in the second photo, I was filling the tank with RODI at that time, it was only temporary.  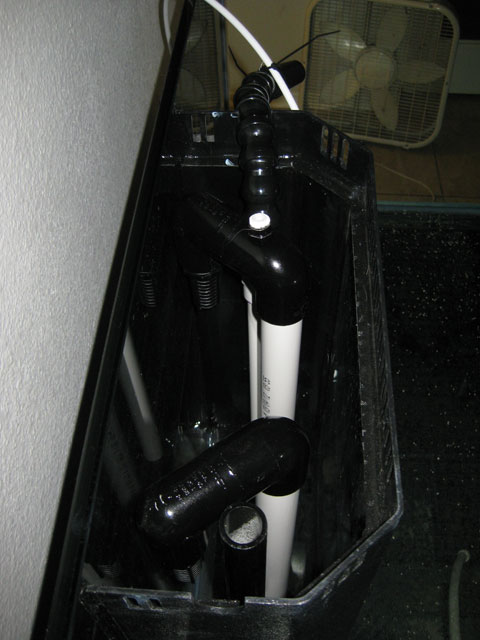
__________________
-You had me at PWM |
|
|
|
|
04/17/2012, 01:07 PM
|
#5 |
|
Premium Member
 
Join Date: Sep 2008
Location: PA
Posts: 125
|
tagging along on the new thread
__________________
Living and learning everyday. Current Tank Info: 54 gal reef tank |
|
|
|
|
04/17/2012, 02:18 PM
|
#6 |
|
Registered Member
Join Date: Apr 2011
Posts: 10
|
Good start so far

|
|
|
|
|
04/17/2012, 03:00 PM
|
#7 |
|
Registered Member
Join Date: Jan 2012
Location: U.S.A.
Posts: 324
|
Great start
__________________
Barroom Hero |
|
|
|
|
04/17/2012, 06:56 PM
|
#8 |
|
Reefaholic
Join Date: Sep 2007
Location: Carmel, IN
Posts: 5,135
|
Good start and I've jumped ship to the new thread and SUBSCRIBED! I love the rimless look and think I'll get the wife to approve a rimless tank after I get my 600 gallon DT up and running

__________________
INDMAS President Check out my tank in the Large Tank Forums, "A Reefaholic's 1000+ Gallon Mixed Reef System Build"! Current Tank Info: 600 Gallon DT, 140 Gallon Grow Out Tank, 125 Gallon Sump, 90 Gallon Fuge, 200 Gallon Fish QT, 15 Gallon Frag QT |
|
|
|
|
04/17/2012, 07:37 PM
|
#9 |
|
Registered Member
Join Date: Dec 2009
Location: The Salty D! Sandy let go of my eggo!
Posts: 1,962
|
This thing is sick!
__________________
Fish tanks and Chevys... And my cousin's Datsun too. Some call it paranoid. I call it prepared. You have more post than I do... You MUST be right then! |
|
|
|
|
04/18/2012, 07:10 PM
|
#10 |
|
Registered Member
Join Date: Jun 2009
Location: Goodlettsville, TN
Posts: 662
|
Awesome tank...the one at the LFS already sold this past weekend... I've requested quotes on the 65 and 105 (framed versions). I'll be follwing this... I bet 2 MP40s will push water over the edge... I'm going to use only gate values the next time too... Awesome, subscribed...
|
|
|
|
|
04/18/2012, 08:55 PM
|
#11 | |
|
Registered Member
Join Date: Jun 2011
Location: South Texas
Posts: 2,159
|
Thanks for the comments.
Quote:
__________________
-You had me at PWM |
|
|
|
|
|
04/27/2012, 05:19 PM
|
#12 |
|
Registered Member
Join Date: Jun 2011
Location: South Texas
Posts: 2,159
|
Not much to update yet, I am pushing to finish the LED fixtures (for the most part) this weekend. I built my EMT hangers and have everything to hang them. The only parts left are acrylic casing and splash guard along with the main power cable that will run from my LED drivers/power supply unit up the EMT to the fixtures themselves.
I modeled everything out so I could line it up correctly in real life the first time. 
__________________
-You had me at PWM |
|
|
|
|
04/28/2012, 01:46 PM
|
#13 |
|
Registered Member
Join Date: Jun 2011
Location: South Texas
Posts: 2,159
|
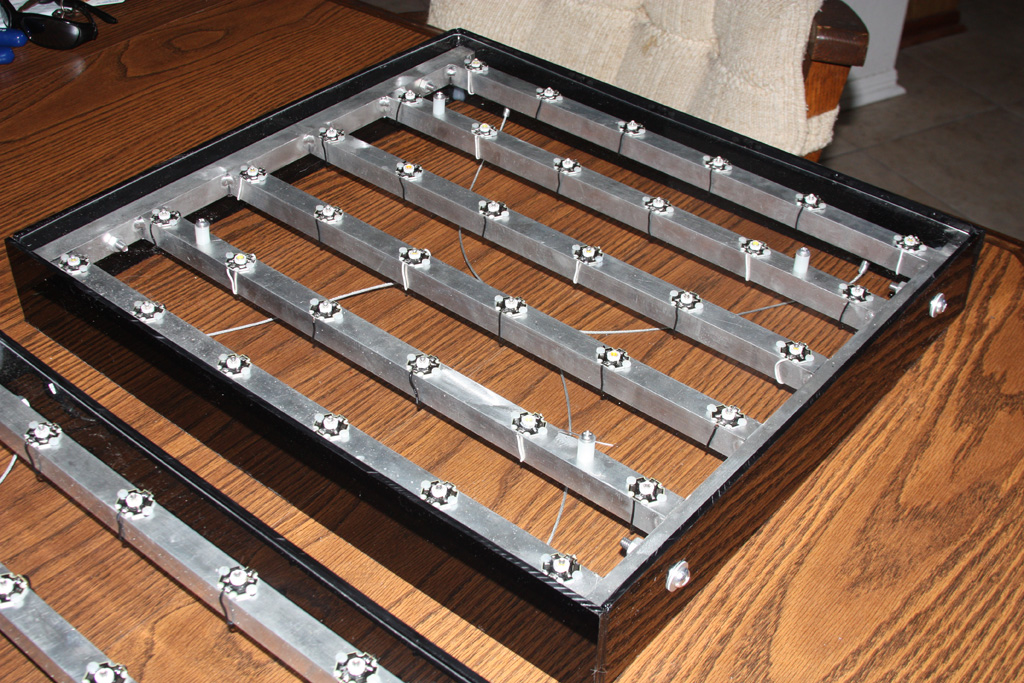
Light hangers are up. Looking to build the acrylic bodies today, fixtures should look totally different when I'm done. There is still too much rope on the hangers too, but this was a test so that will be trimmed down. I may even shorten the wire rope on the fixtures as well.

__________________
-You had me at PWM |
|
|
|
|
05/01/2012, 06:29 PM
|
#14 |
|
Registered Member
Join Date: Jun 2011
Location: South Texas
Posts: 2,159
|
LED fixture is complete. I still have to install the drivers and controller in the fish room and run power to them before I can light the tank though. Dang it!
__________________
-You had me at PWM |
|
|
|
|
05/12/2012, 06:58 PM
|
#15 |
|
Registered Member
Join Date: Jun 2011
Location: South Texas
Posts: 2,159
|
I decided to add these connectors to my setup so I could easily unplug a unit and take it down if I ever needed to. It added some work, but well worth it IMO. I've never terminated pins like this so I was happy to know it all worked first time around. The receptacle will be mounted in the fish room inside a project box where the power supply and drivers will be housed for easy access. That 'LED power box' will interface with my arduino controller.
  
__________________
-You had me at PWM |
|
|
|
|
05/12/2012, 07:52 PM
|
#16 |
|
Registered Member
Join Date: Jan 2012
Posts: 35
|
whered you get the connectors at?
|
|
|
|
|
05/12/2012, 08:31 PM
|
#17 | |
|
Registered Member
Join Date: Jun 2011
Location: South Texas
Posts: 2,159
|
Quote:
http://www.mouser.com/Search/Product...-RP1713R12SC71 http://www.mouser.com/Search/Product...17A-13P-12PC71
__________________
-You had me at PWM |
|
|
|
|
|
05/12/2012, 11:48 PM
|
#18 |
|
Registered Member
Join Date: Dec 2009
Location: The Salty D! Sandy let go of my eggo!
Posts: 1,962
|
That cats blind now!
__________________
Fish tanks and Chevys... And my cousin's Datsun too. Some call it paranoid. I call it prepared. You have more post than I do... You MUST be right then! |
|
|
|
|
05/13/2012, 12:31 AM
|
#19 |
|
Registered Member
Join Date: Jun 2011
Location: South Texas
Posts: 2,159
|
Haha...no, she is fine.
__________________
-You had me at PWM |
|
|
|
|
05/19/2012, 09:12 PM
|
#20 |
|
Registered Member
Join Date: Feb 2011
Location: Newington, CT
Posts: 1,076
|
Looks sweet! The water level that close to the top scares me a little though, def no wave action w/voretch's!
__________________
You get what you pay for. |
|
|
|
|
05/20/2012, 10:12 AM
|
#21 |
|
Registered Member
Join Date: Jun 2011
Location: South Texas
Posts: 2,159
|
I'm not worried about it. I have a koralia magnum 8 in there pushing 3000+ GPH and it's not even close to going over the top.
__________________
-You had me at PWM |
|
|
|
|
05/21/2012, 05:34 PM
|
#22 |
|
Registered Member
Join Date: Jun 2011
Location: South Texas
Posts: 2,159
|
There was a wall holding back my progress, literally. Thus, my solution. This pass-through is for an auto top off, water change system, and all electrical. This way I can have easy access to the control center I am building.
   
__________________
-You had me at PWM |
|
|
|
|
05/21/2012, 06:00 PM
|
#23 |
|
Registered Member
Join Date: May 2011
Posts: 97
|
Sick build/ love it. That tank size is perfect
|
|
|
|
|
05/25/2012, 11:41 PM
|
#24 |
|
Registered Member
Join Date: Jun 2011
Location: South Texas
Posts: 2,159
|
Finally, finally, finally....the tank is lit! I just finished wiring up my power control center and couldn't help but give it a try. I still have to cut holes for all the connections to the box and for the cooling fans, then mount it on the wall and run all the wiring for real. This was just a test run, but I'm excited. LEDs are on 100% here since I didn't want to mess with getting out the Arduino, I just jumped the 5v board supply to the PWM pins which cranked them to max power.
And here is a quick little video, sorry for the audio, TV was on, obviously. http://www.youtube.com/watch?v=O2crTJUhIBY  
__________________
-You had me at PWM |
|
|
|
|
05/26/2012, 04:52 AM
|
#25 |
|
Registered Member
Join Date: Jan 2008
Location: New Zealand
Posts: 317
|
Very nice.
|
|
|
|
 |
|
|


