
|
|
 03/01/2008, 04:31 PM
|
#76 |
|
Registered Member
Join Date: Apr 2003
Location: Cupertino, CA USA
Posts: 4,027
|
kcress. ezmet2u...
I see what you are saying about the angle iron. I know the guy who built my tank and stand has done many like this for a long time. He normally just puts foam on the angle iron like I showed in one of the first pics. I guess that would compensate for the slope of the angle iron. I ended up using ply in there anyways.. Now that I know what I do I'd have made had this tank built much differently, and no doubt I'd have done the stand with tube steel. the problem I had with the angle iron when I went to make the finish panels is that there's a gap between the edge of the wood panels and the tank glass; this is basically the width of the angle iron. Tyler |

|

|
|
03/01/2008, 04:41 PM
|
#77 |
|
Registered Member
Join Date: Dec 2007
Location: Central California Coast.
Posts: 5,383
|
eznet2u; Great visual! Thanks. Even putting plywood on that makes me wounder what the plywood thinks about it all, and deforms how??
Probably a moot point on 70g or less but on bigger, it might matter. Might not. I dunno. MeuserReef; That is nice art. Google SketchUp huh? Prices are looking pretty manageable. I don't know if you've cut much 1/8" steel.. It can be really daunting if you don' t have a cut-off tool. I would probably pay a buck a cut gladly. |
|
|
|
|
03/01/2008, 04:46 PM
|
#78 |
|
Registered Member
Join Date: Dec 2007
Location: Central California Coast.
Posts: 5,383
|
Thanks for that info (cross post) Tyler. It's those leetle details that whack up our projects... Live and learn.
Like MeuserReef probably no needing all the side gussets.. But leaving them out may make skinning the ends much, much harder later. |
|
|
|
|
03/01/2008, 07:52 PM
|
#79 |
|
Premium Member
 Join Date: Apr 2003
Location: Ohio
Posts: 2,739
|
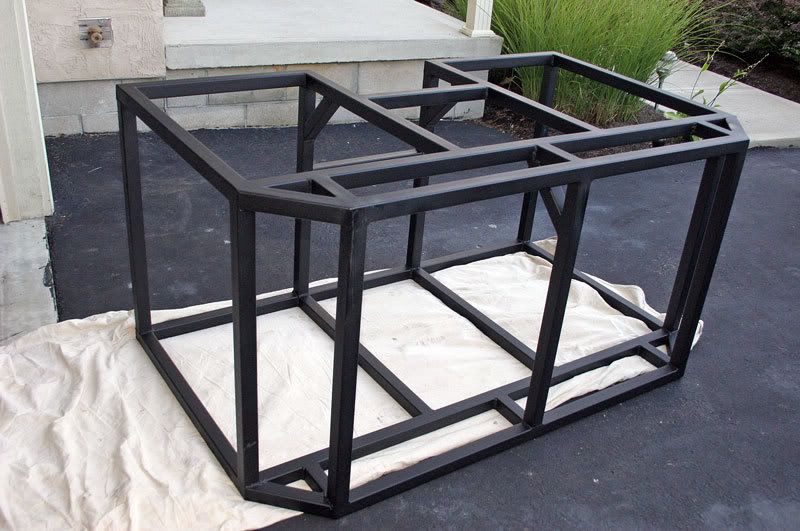
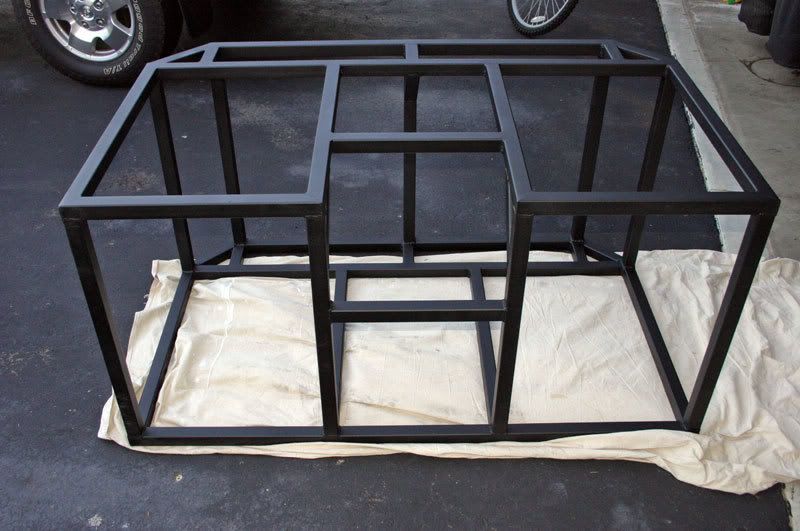
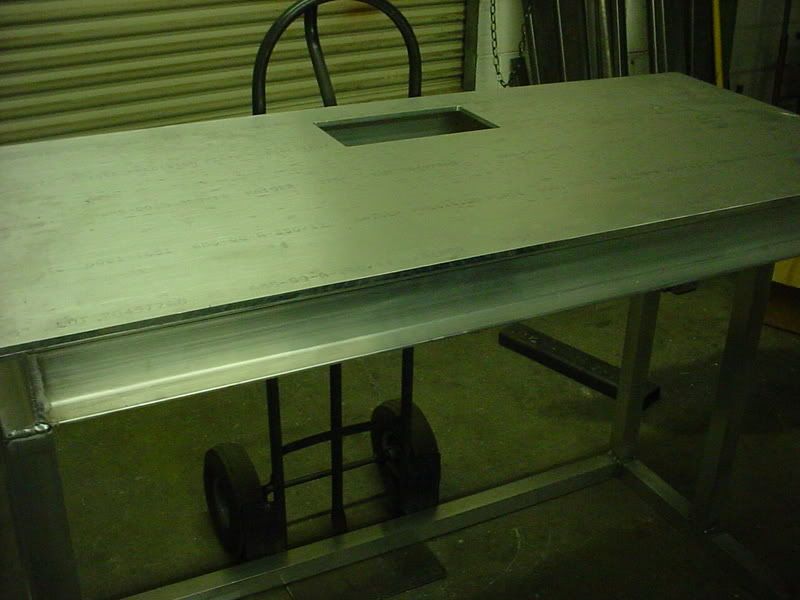
This is what I made for my 240g flat back hex tank.
|
|
|
|
|
03/01/2008, 10:18 PM
|
#80 | |
|
Welcome to the next level
Join Date: Aug 2005
Posts: 2,412
|
Quote:
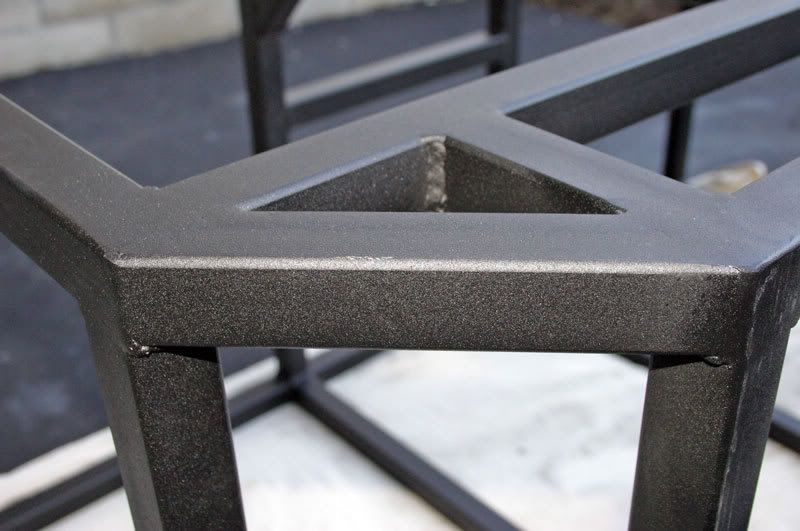
This project has been the first that I have used the Google SketchUp on. I really like it because it works with real-world measurements and is pretty easy to learn (IMO). Im glad you like the art  Treg... That stand is a M o N s T e R Very nice looking welds too. What did you finish it with?
__________________
"Never be afraid to do something new. Remember, amateurs built the ark; professionals built the titanic." -Anonymous Current Tank Info: tankless |
|
|
|
|
|
03/01/2008, 10:34 PM
|
#81 |
|
Premium Member
Join Date: Apr 2003
Location: Ohio
Posts: 2,739
|
You can probably rent a chop saw. I would imagine it would be worth it... like you said, if you want something done right...
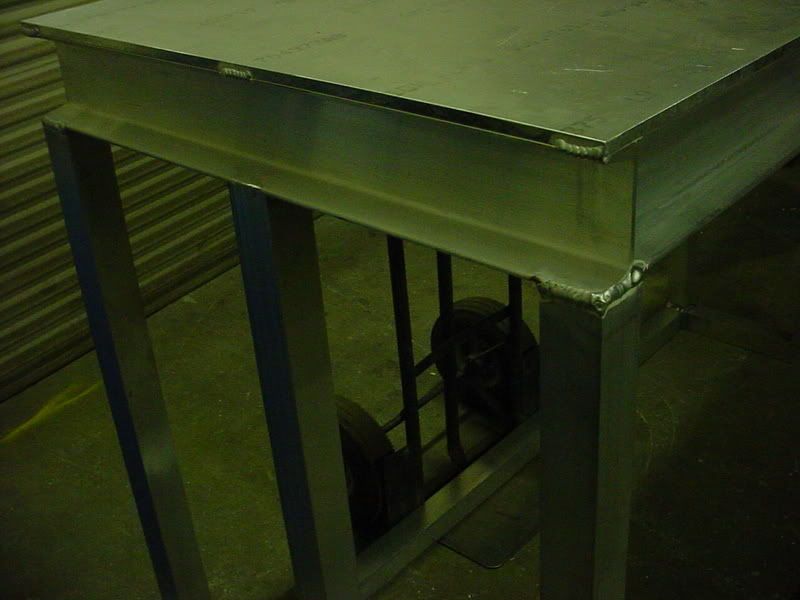
If you have any large plumbing projects coming up, it could be worth buying one. They make cutting PVC a breeze also! Thanks. I like to grind the outside welds flat. Most "Pro" stand makers dont do that. It makes the finish look nice. This finish was a textured Powder Coating. The texture finish helps hide any little blemishes in the metal. I made one for my basement sump and painted it. Paint looks nice but the powder coating looks a lot nicer. 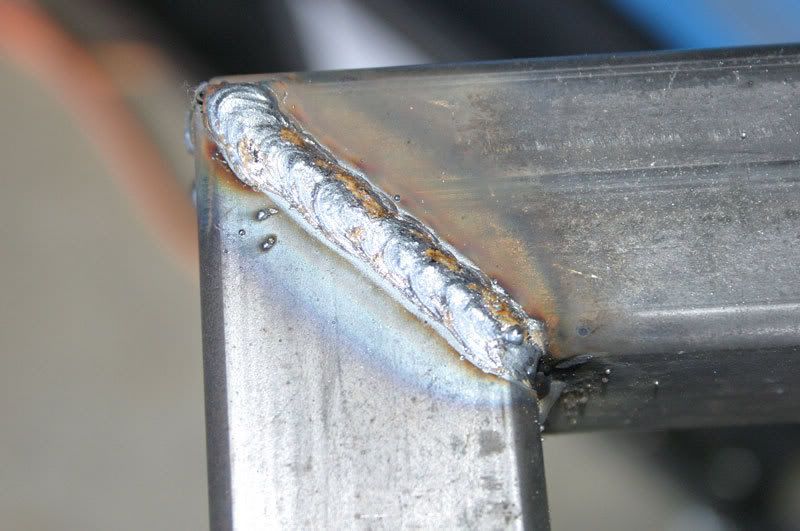 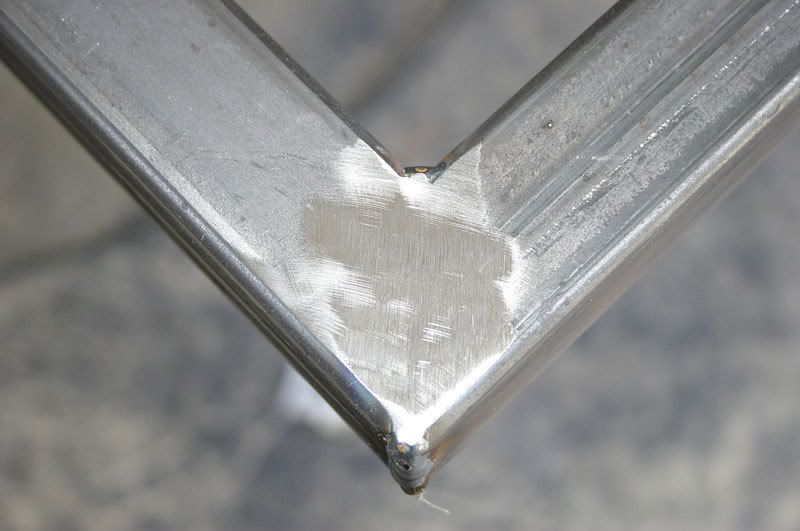
|
|
|
|
|
03/02/2008, 09:08 PM
|
#82 |
|
Registered Member
Join Date: Jan 2003
Location: Vancouver WA
Posts: 678
|
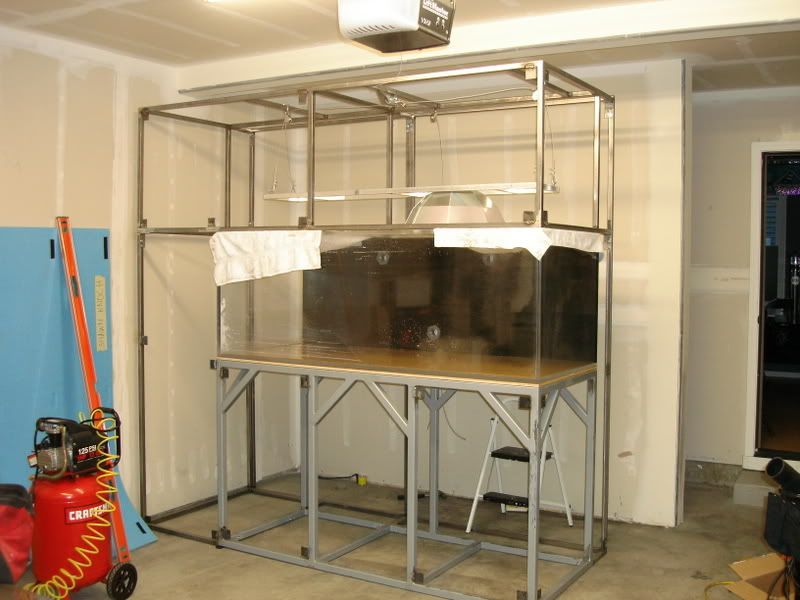
Here is a pic of the new stand and cabinet I have been building for my 225g tank. The tank will be viewable from the front and 1 side and will be covered on both the front and back with wood cabinetry as it will be a peninsula style room divider tank
|
|
|
|
|
03/02/2008, 11:45 PM
|
#83 |
|
Registered Member
Join Date: Dec 2007
Location: Central California Coast.
Posts: 5,383
|
Nice. Pretty complex..
|
|
|
|
|
03/03/2008, 08:14 AM
|
#84 |
|
Welcome to the next level
Join Date: Aug 2005
Posts: 2,412
|
 wow.... that thing is HUGE! It looks great. What are your plans for the cabinetry?
__________________
"Never be afraid to do something new. Remember, amateurs built the ark; professionals built the titanic." -Anonymous Current Tank Info: tankless |
|
|
|
|
03/03/2008, 09:19 AM
|
#85 |
|
Registered Member
Join Date: Jan 2003
Location: Vancouver WA
Posts: 678
|
I know, pretty large! But the cabinetry will go from ceiling to floor and all the way around. Just ordered doors for it online, a total of 14, 5 on the front, 1 on the top side, and 8 along the back so I get easy access. there will be nothing but a closed loop pump under the tank as all of the equip will be housed below the tank in the garage where the tank is sitting now, the tank will be directly above the wall you see in the picture. I had the wall placed by a structural engineer to hold a 600g tank, but have decided to go a little bit smaller to get started, I have been at school and haven't had a big tank for some years.
|
|
|
|
|
03/03/2008, 11:31 AM
|
#86 |
|
20 and over club
Join Date: Feb 2003
Location: Long Beach, CA.
Posts: 2,720
|
Line-X is the bomb when it comes to coating steel tank stands.
And if you are like me and you stumble across Ken's thread on the the stuff while your stand is out being powder coated you get the added bonus of of dual layer protection. I never did thank you properly Ken for that added cost     Regardless, it worked out for the best because my stand's floor and interior walls were already installed when it went out for Line-X so I got a sealed drip tray to contain any small water spills as well as seperate sections so my electornics can be housed away from the sump compartment. Brett
__________________
She ain't broke, but can we fix her more better? Current Tank Info: A big box of water with some stuff in it. Last edited by Putawaywet; 03/03/2008 at 11:37 AM. |
|
|
|
|
03/03/2008, 02:07 PM
|
#87 | |
|
Master of the 16 hour day
|
Quote:
 I still need to drop by now that you have the tank up and running.
__________________
Save the Reefs................................................................Save the world! -Ken Current Tank Info: Currently tankless, and loving it! |
|
|
|
|
|
03/03/2008, 02:24 PM
|
#88 |
|
Registered Member
Join Date: Dec 2007
Location: Central California Coast.
Posts: 5,383
|
madmike; Do tell! I was looking (casually) for cabinet doors online and couldn't see any. Where did you find yours?
|
|
|
|
|
03/03/2008, 02:57 PM
|
#89 |
|
Registered Member
Join Date: Jan 2003
Location: Vancouver WA
Posts: 678
|
http://www.cabinetdoorsandhardware.com/
Best prices I could find...cheaper than building. I spent about $300 total w/ shipping for 14 doors, and 8 of them are big...18X40"! |
|
|
|
|
03/03/2008, 03:06 PM
|
#90 |
|
Premium Member
Join Date: Aug 2004
Location: West-Central, Wisconsin (right on the Mississippi)
Posts: 438
|
Very nice all! Just in time, too. I'm starting a 180 build and am still deciding between wood and steel. Does anyone have a pic or description of one (steel) that was used for an in-wall build? My 180 will go into a wall and I would like to see how the stand incorporated into the wall for that nice flush look from the viewable side.
Great thread! Keep it going!!
__________________
A reef isn't just for oceans anymore... Current Tank Info: Gearing up for my 180 build! |
|
|
|
|
03/03/2008, 03:47 PM
|
#91 |
|
Welcome to the next level
Join Date: Aug 2005
Posts: 2,412
|
Well, I purchased my 1.5" steel tubing this afternoon. I ended up purchasing 48 feet, along with 2 cuts (so it would fit in my car
) and my total bill was $98. I found out that the "chop saw" that my buddy was going to lend me was actually just a carpentry mitre saw with a metal blade on it. Perhaps I will just suck it up and purchase the Harbor Freight saw that was linked above for $60. I didnt realize how thick the 1/8" wall tubing was. WOW. Im 100% set that I want the truck bed liner sprayed on this puppy when she's done! Putawaywet... Your stand is very nice with that dual-coat covering!
__________________
"Never be afraid to do something new. Remember, amateurs built the ark; professionals built the titanic." -Anonymous Current Tank Info: tankless |
|
|
|
|
03/03/2008, 04:06 PM
|
#92 | |
|
Master of the 16 hour day
|
Quote:
__________________
Save the Reefs................................................................Save the world! -Ken Current Tank Info: Currently tankless, and loving it! |
|
|
|
|
|
03/03/2008, 04:25 PM
|
#93 |
|
Master of the 16 hour day
|
OK, I found it, here is a pic of the stand:
 From this thread: Back in the Saddle Again!! My new 480g In-Wall thread
__________________
Save the Reefs................................................................Save the world! -Ken Current Tank Info: Currently tankless, and loving it! |
|
|
|
|
03/03/2008, 06:10 PM
|
#94 |
|
Premium Member
Join Date: Aug 2004
Location: West-Central, Wisconsin (right on the Mississippi)
Posts: 438
|
Anti-tipping device in the corner, or just an extra piece of scrap that was missed? We may never know
 ! That is what I was thinking, but most wood stands are attached to the wall and some don'e have the inside legs (against the wall). I really like that approach for sturdiness. Any other metal-to-wall stands out there? ! That is what I was thinking, but most wood stands are attached to the wall and some don'e have the inside legs (against the wall). I really like that approach for sturdiness. Any other metal-to-wall stands out there?Thanks. Again, great thread.
__________________
A reef isn't just for oceans anymore... Current Tank Info: Gearing up for my 180 build! |
|
|
|
|
03/03/2008, 06:20 PM
|
#95 |
|
Master of the 16 hour day
|
The ledge of the stand actually sits inside of the wall, with the legs against the wall. The picture is just after welding,painting, and top installation.
Piece in the back was just scrap. I think it may have been bolted to the floor too.
__________________
Save the Reefs................................................................Save the world! -Ken Current Tank Info: Currently tankless, and loving it! |
|
|
|
|
03/03/2008, 07:27 PM
|
#96 |
|
Registered Member
Join Date: Dec 2007
Location: Central California Coast.
Posts: 5,383
|
MeuserReef; Nice! Moving along aren't we.
1/8" thick? And some of these people are using 3/16". Half again heavier!! OldmillXxX; A couple of inches of hang over (4-1/2" wall) sure shouldn't cause a tip over hazard. |
|
|
|
|
03/03/2008, 08:41 PM
|
#97 | |
|
Welcome to the next level
Join Date: Aug 2005
Posts: 2,412
|
Quote:
I hope to start work on this thing soon. The way I see it.... until I have my 120 stand built... Im stuck with my 30 gallon! I took the advice to get the thicker tubing because I will be welding it myself and dont want to ruin my materials. I doubt I will take pictures while building (I always forget or get too involved to try to document along the way) but I will definetly be posting the stand once its finished! Im about to begin working on my overflow design and will be making a visit to the local plastic supply warehouse to see what kind of goodies they have in the "scrap bin"! Keep the pictures coming!
__________________
"Never be afraid to do something new. Remember, amateurs built the ark; professionals built the titanic." -Anonymous Current Tank Info: tankless |
|
|
|
|
|
03/06/2008, 09:52 PM
|
#98 |
|
Registered Member
Join Date: Apr 2003
Location: Mississippi
Posts: 452
|
Great stands guys! One question, did anybody consider using aluminum instead of steel? If so, why did you go with steel over Al? Price? Is steel easier to work with than aluminum?
thanks, -avp |
|
|
|
|
03/06/2008, 09:58 PM
|
#99 |
|
Master of the 16 hour day
|
You need a special welder for aluminum, much more expensive, or you have to bolt it together.
I do know someone who did his in aluminum, I'll go find a picture for you.
__________________
Save the Reefs................................................................Save the world! -Ken Current Tank Info: Currently tankless, and loving it! |
|
|
|
|
03/06/2008, 10:00 PM
|
#100 |
|
Master of the 16 hour day
|
Here you go:
__________________
Save the Reefs................................................................Save the world! -Ken Current Tank Info: Currently tankless, and loving it! |
|
|
|
 |
| Thread Tools | |
|
|


