
|
|
 04/26/2012, 08:05 AM
|
#3726 |
|
Registered Member
Join Date: May 2005
Location: Clermont ,Florida
Posts: 634
|
Plumbing
As a beginner here, thank you Brett for taking the time to post VERY well angled pictures of your plumbing. I have not figured yet what the multiple drain valves are lined up along the sump , but I will study it some more. This is a nice thread in helping understand what "larger" means in reality in effect too supply and care and success. Thank you...Subscribed.
|

|

|
|
04/26/2012, 11:17 AM
|
#3727 | |||
|
Team RC Member
Join Date: Jul 2006
Location: STL
Posts: 14,754
|
Quote:
Quote:
 I didn't see they were quick connect on both ends, that's perfect! Yeah, I'm really leaning towards getting a couple liquid drums - one for fresh water one for salt water. I'll have to do some investigating... Do any of the drums you use have a brand name stamped onto them? I constantly see ads for blue drums on Craigslist but have been a little concerned about contamination, especially petrol products having been stored in them. I didn't see they were quick connect on both ends, that's perfect! Yeah, I'm really leaning towards getting a couple liquid drums - one for fresh water one for salt water. I'll have to do some investigating... Do any of the drums you use have a brand name stamped onto them? I constantly see ads for blue drums on Craigslist but have been a little concerned about contamination, especially petrol products having been stored in them. Quote:
The multiple drain valves setup in the sump is called a manifold. This allows me to run multiple accessories off of one pump, my main return pump. I use a Reeflo Dart for my return. Cuts down on the need for individual small hobby pumps to run each device, like carbon/gfo reactors etc... Basically the return pump feeds the display and also TEEs off to the manifold to feed my accessories. 
__________________
-Brett 180g Marineland Starfire In-Wall 278 gallon system |
|||
|
|
|
|
04/27/2012, 07:26 AM
|
#3728 |
|
Registered Member
Join Date: Jan 2010
Location: Idaho, USA
Posts: 506
|
I did not upgrade to the ES version. I have one already that is ES version and I personally see no reason for the upgrade after playing around with them.
I have 2 of those 55g blue barrells that I too got off cragslist. They have the 2 small holes on top. Mine came from a local food distributor and one had vinegar and one had soy sauce in it. After some soap/vinegar and rinsing I'm using them with 0 side affects.
__________________
Josh Current Tank Info: 180G in-wall, 3x 250w MH radiums on M80 ballasts, Cree LED actinics, Deltec TC2560, Bubble Magus Doser, 4x Vortech Mp40, Dart return, Neptune Apex |
|
|
|
|
04/27/2012, 08:48 AM
|
#3729 |
|
Registered Member
Join Date: Jan 2006
Location: Toledo OH
Posts: 2,466
|
Brett,
look for drums from the food industry and you will be set. This i believe is pretty much what i have if you need to resort to buying a new one. http://www.uline.com/Product/Detail/...p-Plastic-Drum They also have a 55g version. Not sure how much shipping would be tho?
__________________
Inwall Basement Setup w/ Growout Tank & Common Acrylic sump, SRO XP3000E, Neptune Apex, Bubble Magus Triple Doser, CLS- Super Dart Gold + OM 4way, 2-400w MH & 4-80w T-5, ROX .08 carbon... |
|
|
|
|
04/28/2012, 12:21 AM
|
#3730 | ||
|
Team RC Member
Join Date: Jul 2006
Location: STL
Posts: 14,754
|
Quote:
BTW soy sauce is great with fish.   Quote:
__________________
-Brett 180g Marineland Starfire In-Wall 278 gallon system |
||
|
|
|
|
04/28/2012, 12:54 AM
|
#3731 |
|
Team RC Member
Join Date: Jul 2006
Location: STL
Posts: 14,754
|
UPDATE:
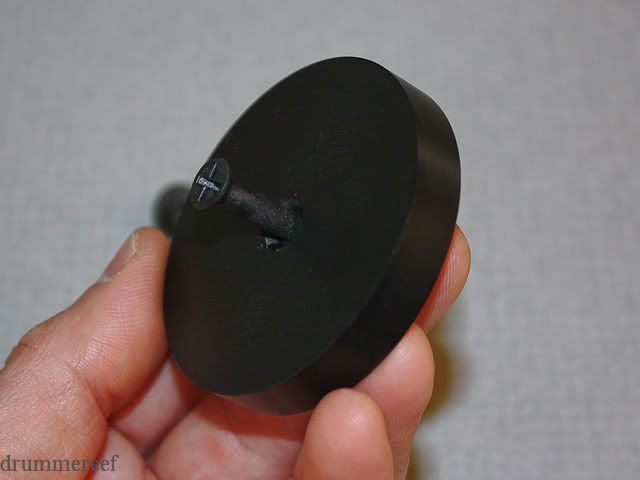
So I've been in maintenance mode lately. Both my Vortechs have been making some excess noise for the past couple months. A few days ago one decided to start falling off the glass. I figured it was time to take further action since vinegar soaking wasn't doing the trick. I know a lot of you use EcoTech products but for those who don't, here's a short tutorial about how to repair a sick MP40. I ordered all the necessary parts which came direct from EcoTech. I ordered enough parts to cover repairing both MP40s, which consists of a Ceramic Wet Bearing, Wet Drive Shaft, Propeller, Washer, Plastic Screw, and Plastic Nut. 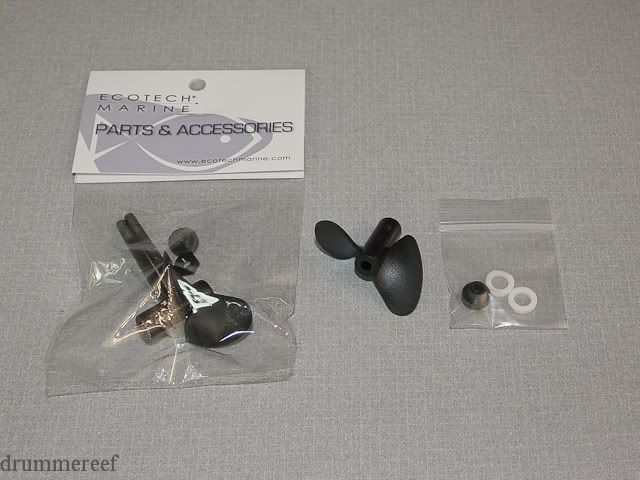 I soaked the core wet side components for a day to clean up all the parts in preparation for repair. These parts include the Nozzle, Wet Frame, Wet Frame Cover, and Magnet. 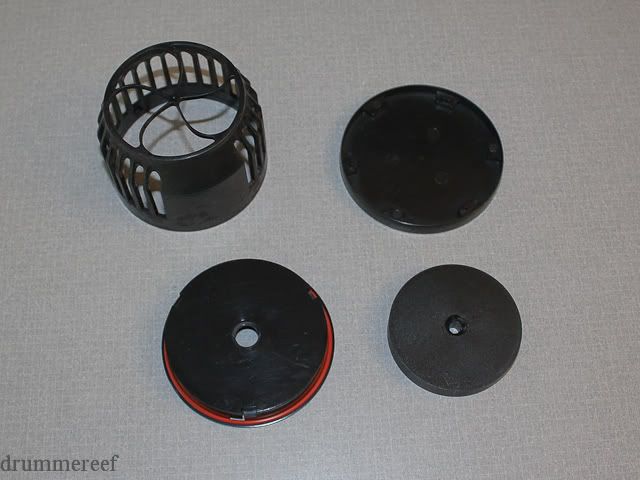 First step is to insert the new Ceramic Wet Bearing into the Wet Frame. 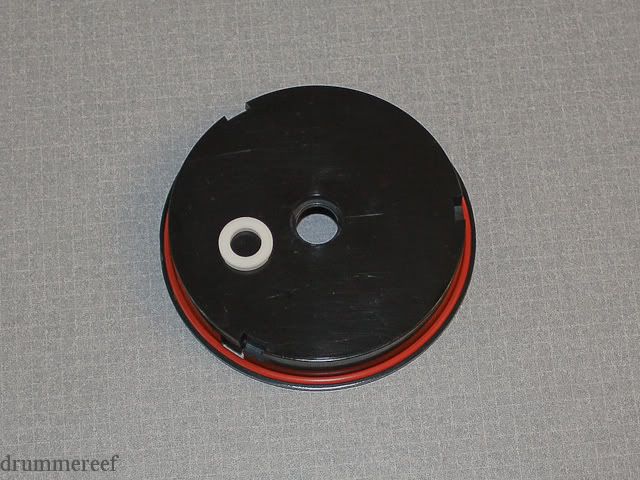 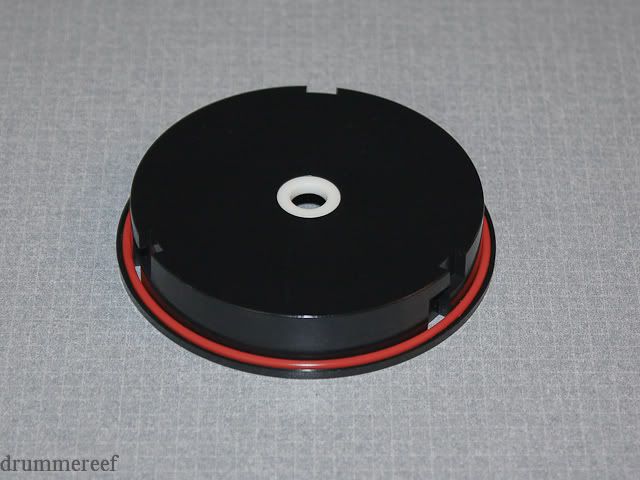 Next is to insert the Wet Drive Shaft into the Ceramic Wet Bearing. 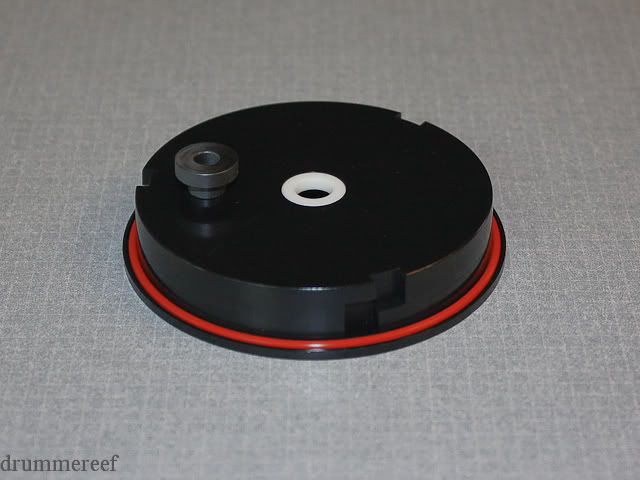  continued... 
__________________
-Brett 180g Marineland Starfire In-Wall 278 gallon system Last edited by Misled; 04/08/2018 at 08:50 PM. |
|
|
|
|
04/28/2012, 12:54 AM
|
#3732 |
|
Team RC Member
Join Date: Jul 2006
Location: STL
Posts: 14,754
|
Next step includes threading the Plastic Screw through the Magnet and install the Washer. Here you can see how the back side of the magnet is counter-sunk to accommodate the taper on screw.
 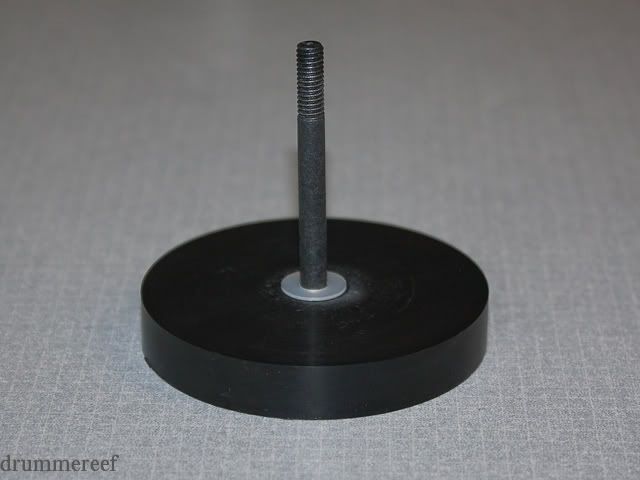 Next, slide the Wet Side Frame over the magnet assembly. 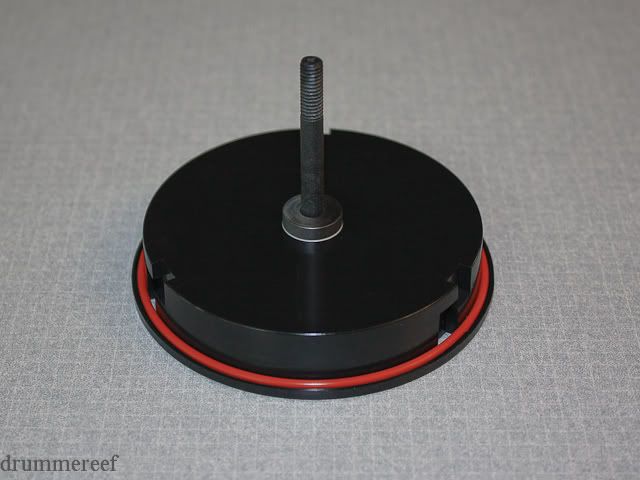 Install the Propeller over the Plastic Screw and hand tighten the Plastic Nut. 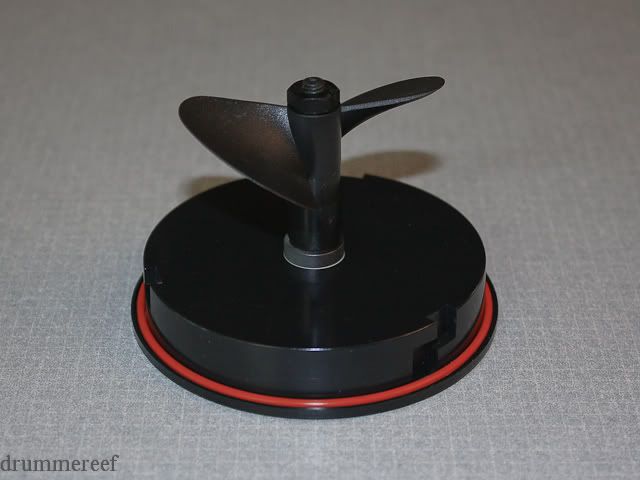 Finally, replace the Nozzle and Wet Side Cover and VOILA - A happy Vortech!! 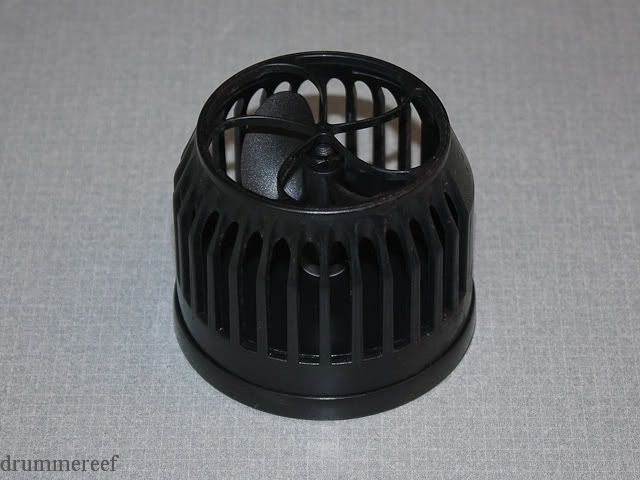
__________________
-Brett 180g Marineland Starfire In-Wall 278 gallon system Last edited by Misled; 04/08/2018 at 08:50 PM. |
|
|
|
|
04/28/2012, 08:55 AM
|
#3733 |
|
Registered Member
Join Date: Oct 2005
Location: DFW Texas
Posts: 5,249
|
well done Brett
perfect documentation, even thought I don't own a Vortech I feel like I could easily rebuild the wet side. question on the Vortech I see that red gasket but can't imagine it seals anythign so was wondering what it's for, maybe a vibration dampener fr the cover? thanks
__________________
A smooth sea never made a skillful mariner Current Tank Info: 110g Mixed Reef, LED's & T5's |
|
|
|
|
04/28/2012, 12:51 PM
|
#3734 | |
|
Team RC Member
Join Date: Jul 2006
Location: STL
Posts: 14,754
|
Quote:
I believe the reason for the gasket is more for friction than anything. The Nozzle turns and locks onto the Wet Side Frame as you can see by the key-style locking cutouts on the Wet Side Frame in the pics above. But, I believe the gasket give the Nozzle some friction so it doesn't back itself off due to vibration especially when the pump is frequently oscillating on and off.
__________________
-Brett 180g Marineland Starfire In-Wall 278 gallon system |
|
|
|
|
|
05/02/2012, 12:08 PM
|
#3735 |
|
Team RC Member
Join Date: Jul 2006
Location: STL
Posts: 14,754
|
Hey guys quick question... Should the effluent from my Kalk doser be submerged or does it not matter? Just wondering since I'm assuming it's the reaction of air causing the end of the tubing to encrust. Wondering if it would help keep the end of the tubing clean if it was under water?
__________________
-Brett 180g Marineland Starfire In-Wall 278 gallon system |
|
|
|
|
05/02/2012, 12:22 PM
|
#3736 | |
|
Registered Member
Join Date: Oct 2005
Location: DFW Texas
Posts: 5,249
|
Quote:
I wish I had a picture of the "dip stick" pipe I used on my 300g. It was a piece of 1" pvc about 3' long with a bunch of holes drilled in the bottom. My top off water and Kalc reactor effluent went into the dip stick, used mainly as a syphon break. After a couple years, when I pulled it out I found these long calcium deposit vents built up on the pipe around and extending from the holes. Some of them 5-6" long. The vents looked just like the ones you see at the bottom of the ocean at the mid atlantic rift, just smaller of course.
__________________
A smooth sea never made a skillful mariner Current Tank Info: 110g Mixed Reef, LED's & T5's |
|
|
|
|
|
05/02/2012, 09:27 PM
|
#3737 | |
|
Team RC Member
Join Date: Jul 2006
Location: STL
Posts: 14,754
|
Quote:
__________________
-Brett 180g Marineland Starfire In-Wall 278 gallon system |
|
|
|
|
|
05/03/2012, 10:43 PM
|
#3738 |
|
Team RC Member
Join Date: Jul 2006
Location: STL
Posts: 14,754
|
UPDATE:
So I did a mini-mod to my BRS reactor tonight. With the doser mounted straight to the drywall it was causing it to resonate through the wall and amplify the noise fairly significantly. In fact, when it was running it was the loudest piece of equipment in my setup. Here's what I used to fix it. I hit the craft store and picked up a foam sheet. This particular product is a semi-rigid, closed cell foam called "Foamies". It comes in various thicknesses, this particular one is 6mm. This stuff would also be perfect as an anti-vibration pad for lightweight external pumps. Best part, it costs a whopping $1 for a 9x12" sheet.  Here you can see how thick the foam sheet is. 6mm or ~1/4" in thickness. 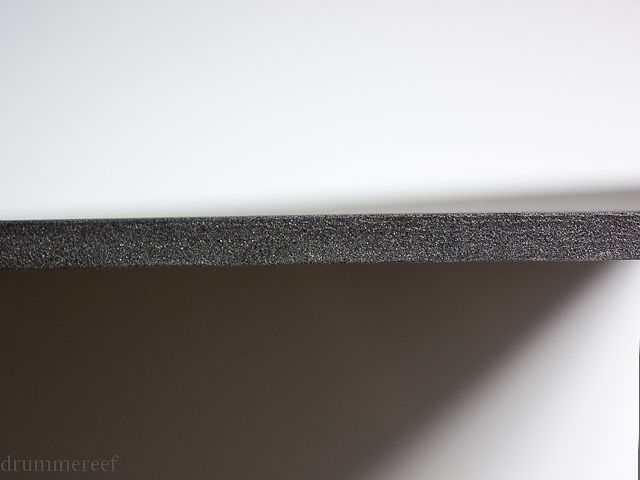 This is the bracket from the BRS doser that typically gets fastened directly to the wall. 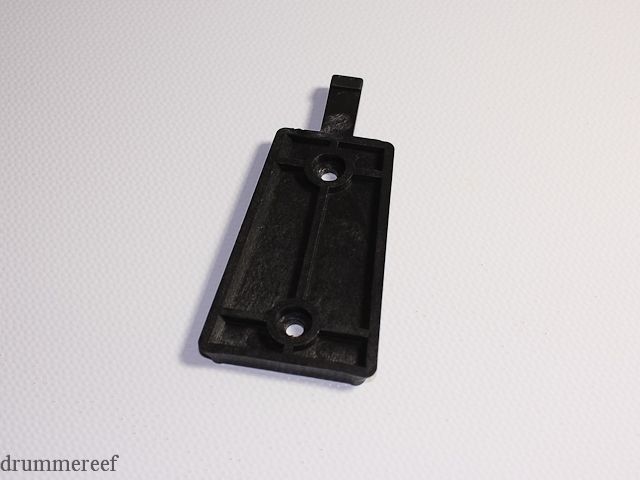 I traced around the bracket with a straight razor to cut a matching shape out of the foam sheet. 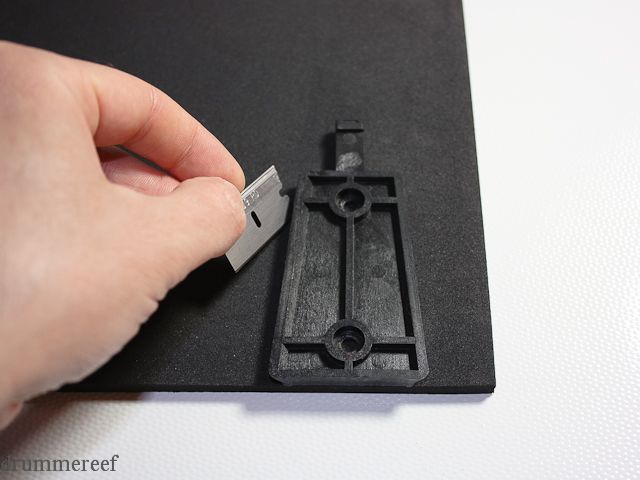 Finished cut. 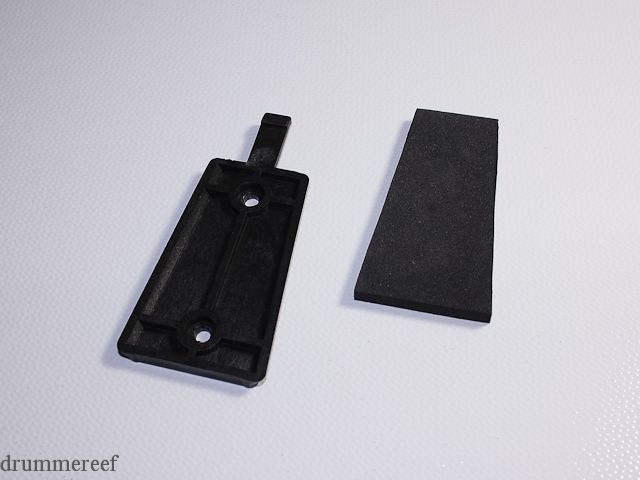 Here is the bracket mounted on the wall with the added foam backing installed between the bracket and drywall. 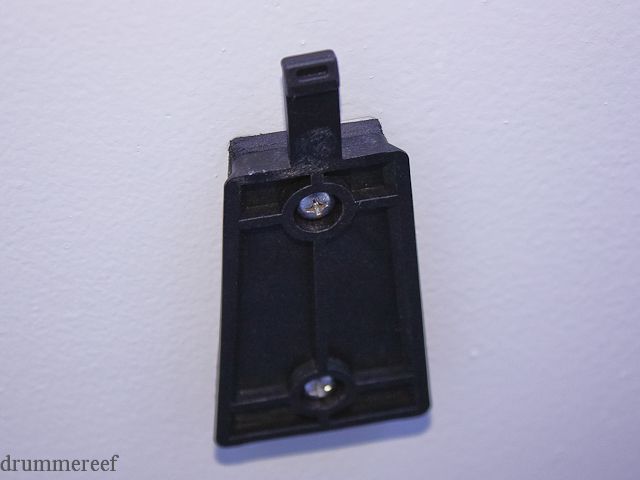 Here you can see how the dosing pump stands off the wall when clipped onto the bracket. The foam acts a barrier which eliminates the transfer of vibrations through the drywall.  All done! A simple, inexpensive, effective fix I recommend for anyone planning on mounting their BRS pumps to their walls or even under cabinetry to eliminate excess noise from your dosing pumps. 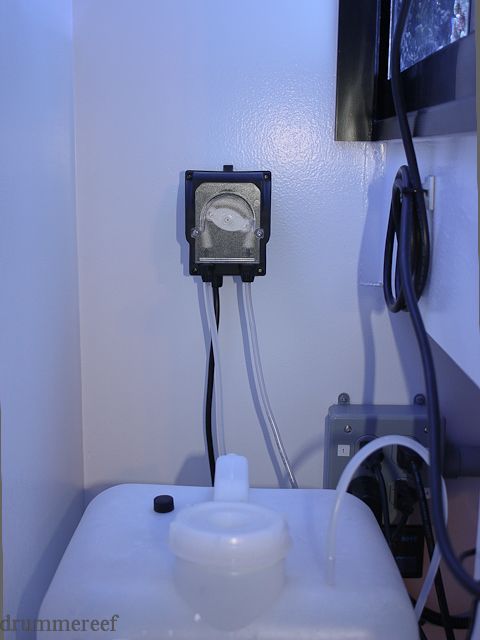
__________________
-Brett 180g Marineland Starfire In-Wall 278 gallon system Last edited by Misled; 04/08/2018 at 08:52 PM. |
|
|
|
|
05/03/2012, 10:47 PM
|
#3739 |
|
Registered Member
Join Date: Oct 2005
Location: DFW Texas
Posts: 5,249
|
nice - I'll need to try that on my ozone reactor mounted to the inside of the wood door on my stand
__________________
A smooth sea never made a skillful mariner Current Tank Info: 110g Mixed Reef, LED's & T5's |
|
|
|
|
05/03/2012, 10:55 PM
|
#3740 | |
|
Team RC Member
Join Date: Jul 2006
Location: STL
Posts: 14,754
|
Quote:
__________________
-Brett 180g Marineland Starfire In-Wall 278 gallon system |
|
|
|
|
|
05/10/2012, 10:47 PM
|
#3741 |
|
Team RC Member
Join Date: Jul 2006
Location: STL
Posts: 14,754
|
UPDATE:
Sorry for the lack of updates lately... I've been busy but had enough time to finish some long overdue reef projects. A week or so ago my Lawnmower Blenny jumped.  I took the hint and moved forward with making mesh tops for the tank. I'm also expecting some new arrivals so it was imperative I get this project done in preparation for my new fishy friends. Mesh tops have been documented in detail over the years but here's how I built mine. I took the hint and moved forward with making mesh tops for the tank. I'm also expecting some new arrivals so it was imperative I get this project done in preparation for my new fishy friends. Mesh tops have been documented in detail over the years but here's how I built mine. First I gathered the parts for the frames. My tank has 3 openings between the 2 cross braces so I needed enough frame material and corners to make 3 tops. I went with raw aluminum frames so I could paint them to match the tank. 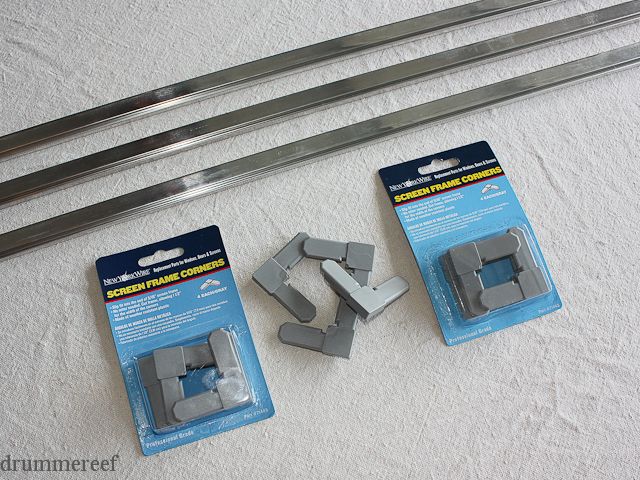 I broke out the Diablo blade on the mitre saw which I also used to make my light rack. It does a great job cutting aluminum. 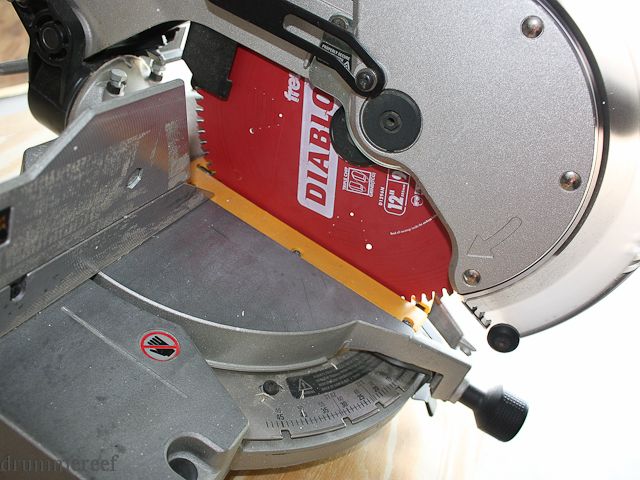 I measured and cut all the necessary pieces for the frames. 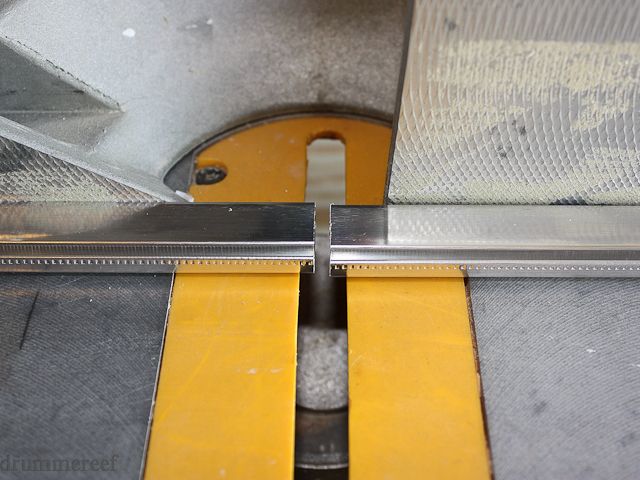 After cutting, I used a flat file to deburr the cut edges.  Clean edge after filing. 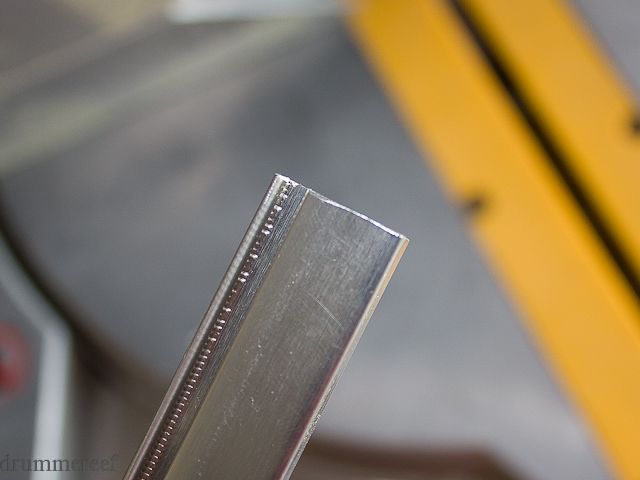 Next I gave all the pieces a scrub with a Scotch-Brite pad to remove any manufacturing gunk that was on the frame material. 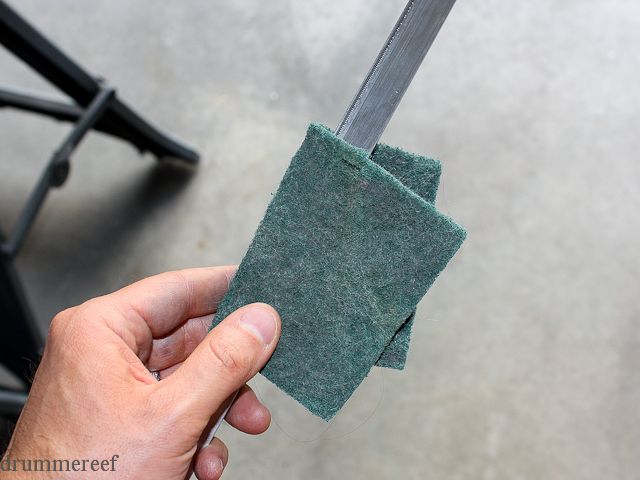 Lastly I used some Acetone to remove any adhesive and oils to prep for paint. 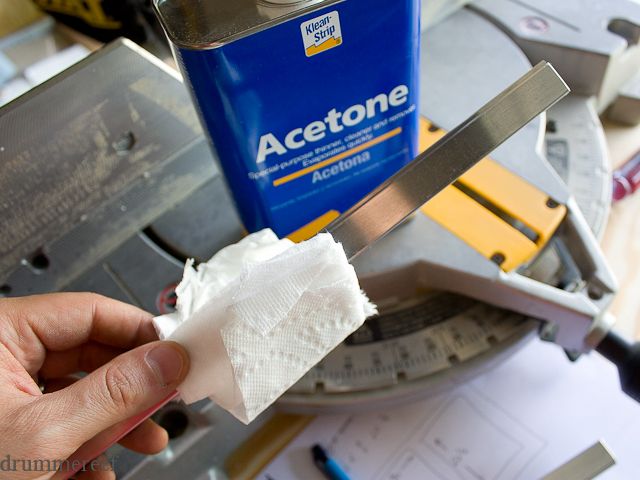 To be continued...
__________________
-Brett 180g Marineland Starfire In-Wall 278 gallon system Last edited by Misled; 04/08/2018 at 08:52 PM. |
|
|
|
|
05/10/2012, 10:53 PM
|
#3742 |
|
Team RC Member
Join Date: Jul 2006
Location: STL
Posts: 14,754
|
Next up was paint...
I used Rustoleum Self Etching Primer to undercoat the frame pieces. 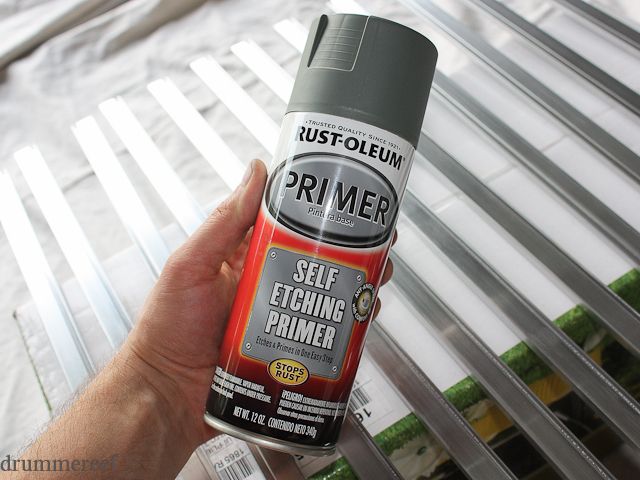 The Self Etching Primer lays flat and bonds to the aluminum very well. 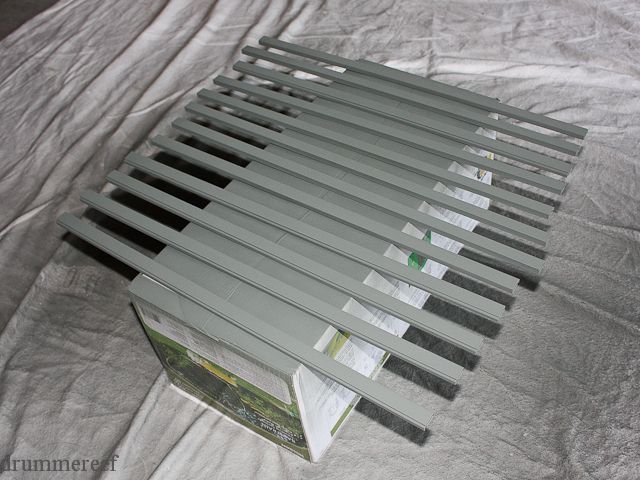 Once dry I used the appropriate frame corners to assemble the frames. 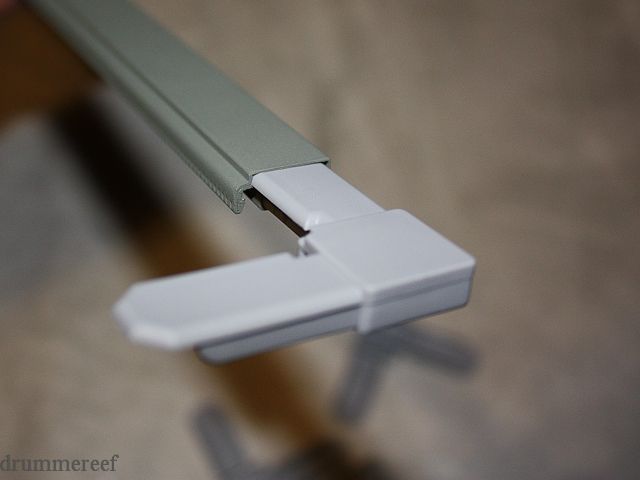 Assembled frame ready for finish paint. 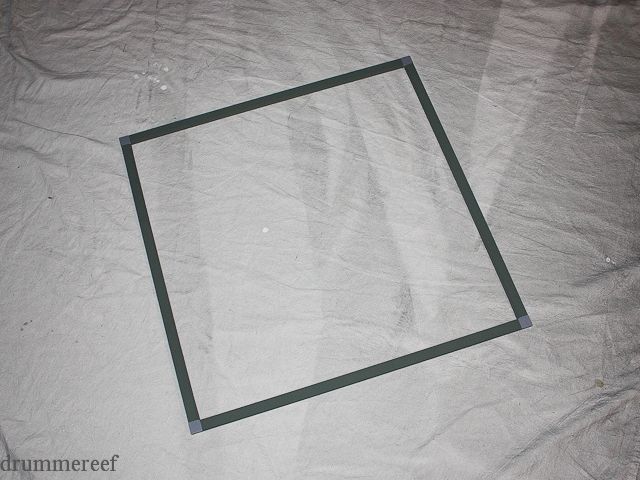 For the top coats I first sprayed a few coats of Matte Black Krylon Fusion paint to build up the color. 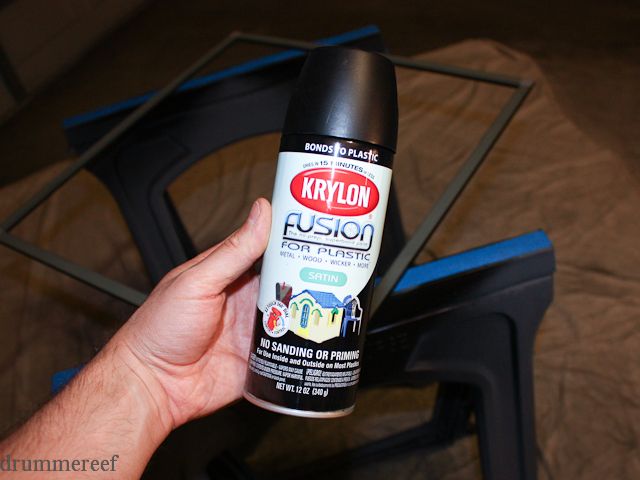 Once dry, I buffed with a Scotch-Brite pad to prep for the top coat. I then sprayed a couple coats of Gloss Black Krylon Fusion to finish up the painting. 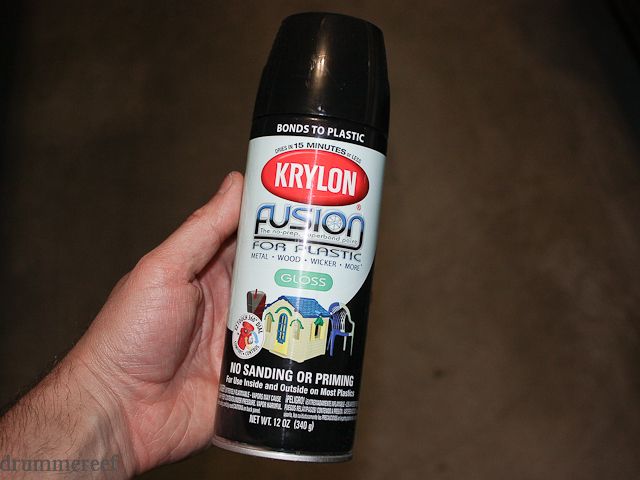 Finished product. 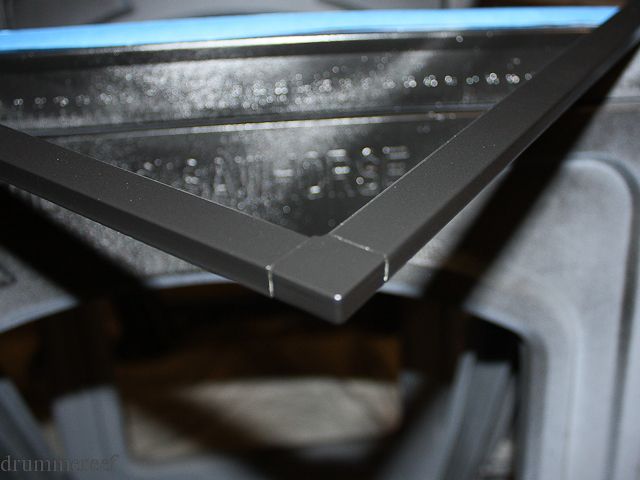 To be continued...
__________________
-Brett 180g Marineland Starfire In-Wall 278 gallon system Last edited by Misled; 04/08/2018 at 08:53 PM. |
|
|
|
|
05/10/2012, 11:01 PM
|
#3743 |
|
Team RC Member
Join Date: Jul 2006
Location: STL
Posts: 14,754
|
Next, I gathered the materials to screen the frames. I used 1/4" clear mesh from BRS, .125 gauge black spine, and a spline roller.
 First I cut the mesh material to a rough size leaving enough excess to be able to pull the mesh tight while seating the spline. 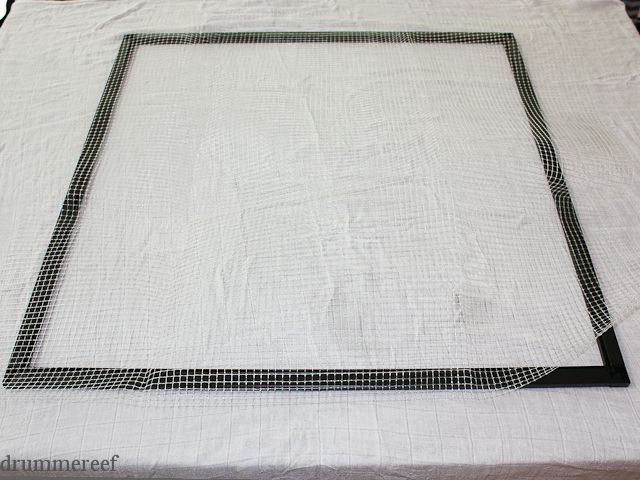 Starting in one corner, I used the grooved side of the roller to press the spline into the channel on the frame. Moving slowly I made sure to keep a straight line so the mesh would look even when stretched. After seating the spline I used the flat side of the roller to completely seat the spline into the channel. 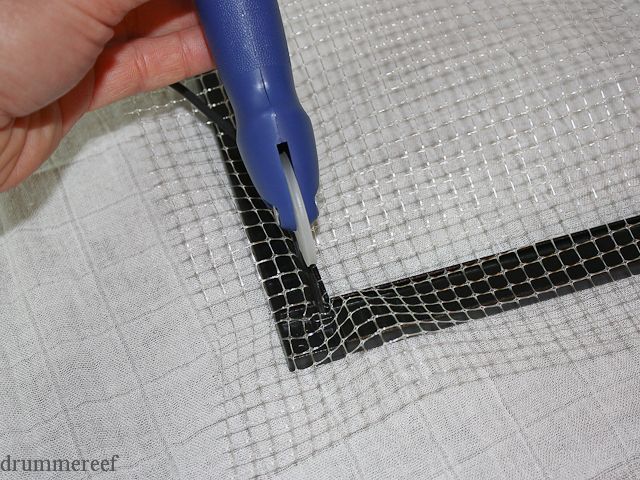 Once I rolled out the entire length of frame I cut the end of the spline with a utility knife.  I then used a flat head screw driver to seat the end into the corner. The screwdriver also works well to tuck the spline into the corners where the roller can't get to. 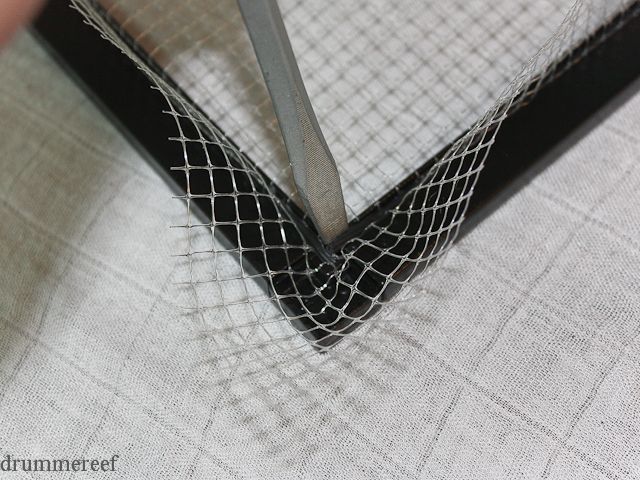 Using a flat razor blade, I cut the excess mesh from the frame. 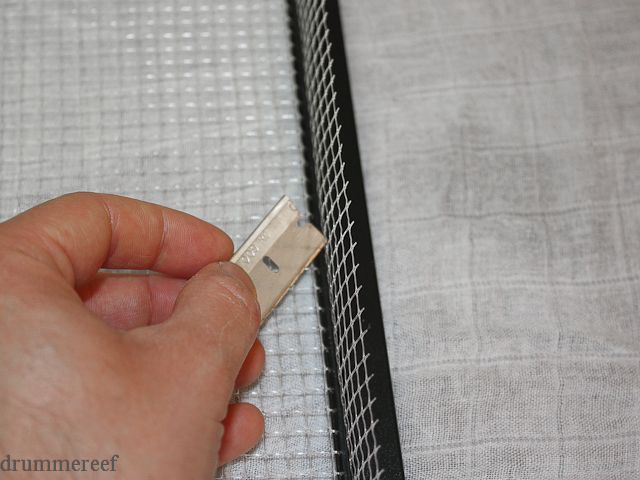 Finished panel. 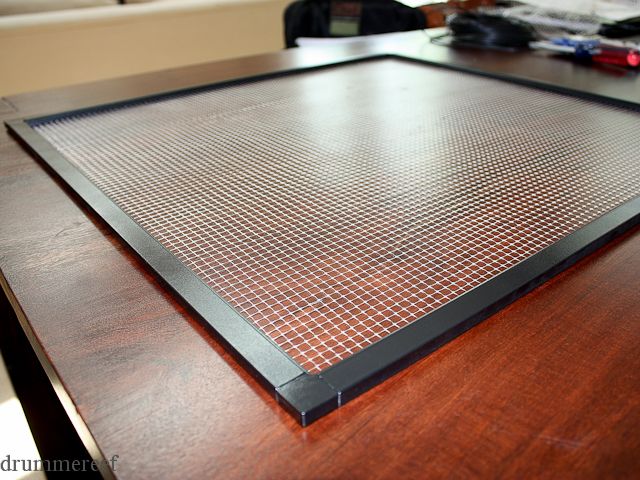 Here's all 3 panels installed on the tank. All in all, the project was fairly simple but took a few days since I opted to paint the frames. I feel confident I won't have any more jumpers now that the tops are in place. 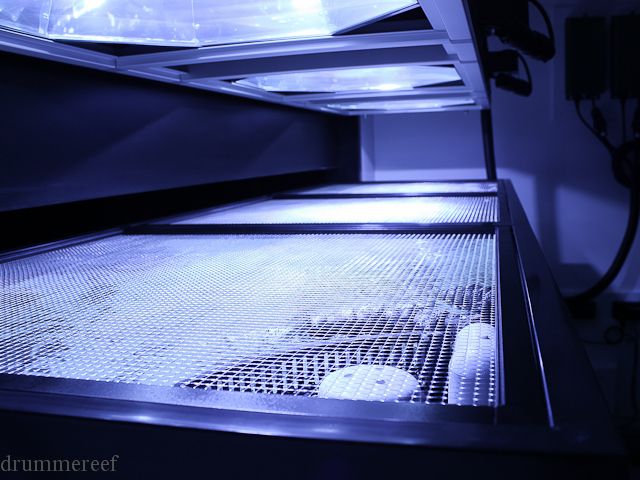
__________________
-Brett 180g Marineland Starfire In-Wall 278 gallon system Last edited by Misled; 04/08/2018 at 08:54 PM. |
|
|
|
|
05/10/2012, 11:24 PM
|
#3744 |
|
Registered Member
Join Date: Oct 2005
Location: DFW Texas
Posts: 5,249
|
Great documentary

__________________
A smooth sea never made a skillful mariner Current Tank Info: 110g Mixed Reef, LED's & T5's |
|
|
|
|
05/11/2012, 04:30 AM
|
#3745 |
|
Registered Member
Join Date: Jul 2008
Location: Seattle, WA
Posts: 291
|
A great work no fish jumping after today
|
|
|
|
|
05/11/2012, 08:55 AM
|
#3746 |
|
Registered Member
Join Date: May 2008
Location: Durham, NC
Posts: 2,205
|
Your attention to detail is astounding. There is NO WAY I would ever go to that much work painting the non-visible tops of an in-wall tank, but I have to say the finished product looks so clean and professional you might just yet make me a believer.
Will you give as any hints as to the new fish you might be adding?
__________________
^ Click on my username and 'Visit Taqpol's Home Page!" to view my 220 gallon custom Miracles tank! -Alex |
|
|
|
|
05/11/2012, 09:31 AM
|
#3747 |
|
Team RC Member
Join Date: Jul 2005
Location: houstonia
Posts: 7,989
|
Thanks for sharing this, Brett. Are there plastic frame alternatives to the aluminum that you are aware of? And are you confident than the aluminum painted will be fine (particularly inside portion where the spline lays which may have not gotten painted)?
__________________
-Chris- You don't win friends with salad. "Look! They're trying to learn for free!" ... "Use your phony guns as clubs!" Current Tank Info: rectangluar? wet? |
|
|
|
|
05/11/2012, 10:04 AM
|
#3748 |
|
Registered Member
 Join Date: Apr 2012
Posts: 2,258
|
Looking very nice! I love the attention to detail on those.
|
|
|
|
|
05/11/2012, 11:58 AM
|
#3749 | |||||
|
Team RC Member
Join Date: Jul 2006
Location: STL
Posts: 14,754
|
Quote:
Quote:
Quote:
I'll update everyone on the new arrivals, just want to get them home first. I'll give you a tiny hint though, there are 4 of them. Quote:
Quote:
__________________
-Brett 180g Marineland Starfire In-Wall 278 gallon system |
|||||
|
|
|
|
05/12/2012, 09:02 AM
|
#3750 |
|
Premium Member
Join Date: Nov 1999
Location: Texas/Arkansas
Posts: 295
|
Great job on the covers. I really need to do that too.
__________________
180g RR, SRO 3000-int skimmer w/neck cleaner, Avast Skimmer Locker, 2x Reefbreeders Proton32's, Apex Controller, Tunze ATO, BRS 6 stage Deluxe RO/DI, Ehiem 1262 return pump, Reef Crystals salt, 2-part |
|
|
|
 |
|
|


