
|
|
 01/23/2009, 08:06 PM
|
#251 |
|
Registered Member
Join Date: Aug 2004
Location: Austin, Texas
Posts: 4,200
|
wait no, 1 hour... duh

__________________
Marine Aquarists Association of South Texas Austin Reef Club PBITAWA... Current Tank Info: 14g bio cube |

|

|
|
02/02/2009, 12:36 PM
|
#252 |
|
Clown Hoarder
Join Date: Apr 2001
Location: Wixom, MI
Posts: 1,603
|
Anyone that is still experimenting with the bushing method, I have found a wonderful 'lube' for the bushing. I'll keep everyone informed of the longevity of the lube. I was having problems with a reoccurring squeek after about 2 weeks with the silicone faucet grease from Lowe's. So pondering lubricants this weekend and using some chap stick at the same time I had an epiphany.........
Why not clean the silicone grease completely from the shaft and coat a generous layer a chap stick on the downtube???? Well there are no noises yet and the downtube spun with a little more resistance than the grease but only time will tell. DW302
__________________
-Frank Save 'Wild' Nemo and his Nem.! Would you transplant a Redwood b/c it looks good with birds in the backyard??? Buy CB fish and Captive-Cloned nems. Current Tank Info: 175gal. 3-tier Reef, 400W/250W Radiums, LED/CFL Par38 Mangrove Lagoon 12g Aquapod GBTA 'sterile' tank w/ DIY LED Lighting |
|
|
|
|
02/02/2009, 02:16 PM
|
#253 |
|
Registered Member
Join Date: May 2004
Location: Longmont, CO
Posts: 1,365
|
Instead of a piece of PVC for the outer bushing, try cutting a piece of delrin or nylon (an old cutting board maybe). You'll just want the inner circle to be perfect, so a drill/holesaw would be best. Because of the material, you shouldn't even need lubrication.
__________________
Jason http://www.jasonhight.net Current Tank Info: Nothing right now. When I stop being poor, I'll set up another. |
|
|
|
|
02/02/2009, 03:16 PM
|
#254 |
|
Baby Fish Wrangler
Join Date: Apr 2007
Location: Greenville, NC
Posts: 1,237
|
If you wanted to persue the 12hr simulate for a lighting cycle using the same principle demonstrated here a drawer bearing track and some gears would do the same thing. the 3 rpm would have to be reduced to .0042 RPM. A couple of big nylon gears from mcmaster would make that possible. Havent worked all of the math out though as far as gears needed.
On a more post dedicated note, I have completed my 1 gen and am working on the second gen. I'm not binding but the direction change makes some noise that I dont care for. I'll try to get some pictures up since I used a different motor than everyone else. I ordered 120V 2 RPM motors and used bearings from a set of bicycle cranks.
__________________
Put Wings on it and Let it Fly!!! PBITAWA !!! Current Tank Info: 180 Cube 3x3x3. 29Gallon Sump 20 Gallon Fuge (1) Lumenarc Reflector w. 250W ARO Ballast and - Modded GS1 Skimmer - Eheim 1262 Return - Vortech MP40W and Swirler Stein |
|
|
|
|
02/02/2009, 03:53 PM
|
#255 | |
|
Clown Hoarder
Join Date: Apr 2001
Location: Wixom, MI
Posts: 1,603
|
Quote:
Too much DIY and only 24hrs in a day........  DW302 |
|
|
|
|
|
02/02/2009, 03:57 PM
|
#256 | |
|
Clown Hoarder
Join Date: Apr 2001
Location: Wixom, MI
Posts: 1,603
|
Quote:
DW302 |
|
|
|
|
|
03/16/2009, 08:52 AM
|
#257 |
|
Registered Member

Join Date: Feb 2005
Location: Seymour, WI
Posts: 364
|
Giving this a bump until I can post some pictures of what I have going. I plan on mounting it with a hing point so the pump can be services whithout disconnecting the whole apparatus from the hood.
__________________
Digger Current Tank Info: 200G Tot, 165 NET trying Zeo |
|
|
|
|
03/16/2009, 09:13 AM
|
#258 |
|
Premium Member
 Join Date: Jun 2005
Location: Kansas
Posts: 851
|
I will be interested in seeing what you are going to do with that hinge.
__________________
A real man builds it... Then his wife shows him what he did wrong. Current Tank Info: 210 RR, 75G sump, 350lbs DIY rock, DIY dual chamber calcium reactor, 7500 gph flow |
|
|
|
|
03/18/2009, 08:42 PM
|
#259 |
|
Registered Member
Join Date: Aug 2004
Location: Austin, Texas
Posts: 4,200
|
i need to re-build my SS in black acrylic. after i built the first one to fit under the stock hood of my bio cube, i got a new light and removed the hood permanently. now i have a somewhat unsightly contraption sitting in plain sight. its not too bad because its pretty small, but it would look better in black.
every once in a while my SS makes a bit of noise coming from the motor. you can hear the gears in the motor turning when the link arm transitions from push to pull. its not all the time and its not the noisy, but since ive removed the hood i actually notice it once in a while. when i had the hood on the tank i never head it at all. i think i want to put two into my bio cube though. i really like the flow pattern i get from the one, so two of them would obviously be twice as great! 
__________________
Marine Aquarists Association of South Texas Austin Reef Club PBITAWA... Current Tank Info: 14g bio cube |
|
|
|
|
03/18/2009, 08:42 PM
|
#260 |
|
Registered Member
Join Date: Aug 2004
Location: Austin, Texas
Posts: 4,200
|
hello double post
__________________
Marine Aquarists Association of South Texas Austin Reef Club PBITAWA... Current Tank Info: 14g bio cube |
|
|
|
|
03/19/2009, 06:11 AM
|
#261 |
|
Registered Member
Join Date: Feb 2005
Location: Seymour, WI
Posts: 364
|
I'll be using what I call PVC pipe clamps that can be attatched anywhere really and then the pipe is pressed into them and it snaps onto the pipe more or less. Best part you can rotate the PVC after its clamped in but there is friction to prevent it from flopping around. I figure a total of 4 would be perfect. It would also alow fairly quick removal of the box all together if needed. My light setup has a similar hinge
__________________
Digger Current Tank Info: 200G Tot, 165 NET trying Zeo |
|
|
|
|
03/19/2009, 03:19 PM
|
#262 |
|
Registered Member
Join Date: Jul 2008
Location: New York
Posts: 134
|
|
|
|
|
|
03/19/2009, 03:56 PM
|
#263 |
|
Premium Member
Join Date: Oct 1999
Location: Gananoque,ON
Posts: 845
|
Possibly but not likely. The first one is 2rpm but at 230 vac, the second is 2/3(.66) rpm at 9 vac. I would look for something else.
|
|
|
|
|
03/19/2009, 08:01 PM
|
#264 |
|
Premium Member
Join Date: Jun 2005
Location: Kansas
Posts: 851
|
It has been December since I installed the last upgrade to my Swirlers. The bearing is the best thing since sliced bread. I have had no problem with these things and they have been running 24/7. The wife thinks it is the coolest thing that I have built for the display. Corals and fish love the random flow. Wish I would have done this sooner.
__________________
A real man builds it... Then his wife shows him what he did wrong. Current Tank Info: 210 RR, 75G sump, 350lbs DIY rock, DIY dual chamber calcium reactor, 7500 gph flow |
|
|
|
|
03/19/2009, 10:44 PM
|
#265 |
|
Registered Member
Join Date: Feb 2005
Location: Seymour, WI
Posts: 364
|
Say I am having a really hard time both with center drilling out the props that are ever so slightly undersized and also the impeller assembly any suggestions on how to go about it. I do have a drill press. I really don't want to destroy any more stuff.
I plan on running mine in the day only. And the MJ and the Swirlstien will be running the same circut. I will likely not wire common in the box but rather a split of the timer. Oh and I do plan on installing a on off button. Just in case.
__________________
Digger Current Tank Info: 200G Tot, 165 NET trying Zeo |
|
|
|
|
03/20/2009, 05:53 AM
|
#266 |
|
Premium Member
Join Date: Jun 2005
Location: Kansas
Posts: 851
|
My props were oversized I used Dumas 3004 props; they were actually oversized I had to build a bushing to keep it on the shaft. Try drilling with small drills and stepping up to the larger one.
__________________
A real man builds it... Then his wife shows him what he did wrong. Current Tank Info: 210 RR, 75G sump, 350lbs DIY rock, DIY dual chamber calcium reactor, 7500 gph flow |
|
|
|
|
03/20/2009, 06:01 AM
|
#267 |
|
Registered Member
Join Date: Feb 2005
Location: Seymour, WI
Posts: 364
|
Yes I tried that. Trying to hold the bugger square proved a real challenge as I stepped through the bits. Also I found some very interesting 3 blade Props I'll post pitches of soon. I've went to 2" Couplings just to make sure I don't choke the thing. I'll post all of this tonight.
__________________
Digger Current Tank Info: 200G Tot, 165 NET trying Zeo |
|
|
|
|
03/20/2009, 10:01 AM
|
#268 | |
|
Registered Member
Join Date: Jul 2008
Location: New York
Posts: 134
|
Quote:
The cheapest on Ebay is like $15. Please help. Thanks. |
|
|
|
|
|
03/20/2009, 11:31 AM
|
#269 | |
|
Clown Hoarder
Join Date: Apr 2001
Location: Wixom, MI
Posts: 1,603
|
Quote:
Search '6004 ZZ Z 2Z Ball Bearing Free Ship 20mm Shielded' for a bearing on Ebay for less than $4. I'm using this one with no problems. DW302 Last edited by DeathWish302; 03/20/2009 at 11:42 AM. |
|
|
|
|
|
03/20/2009, 06:24 PM
|
#270 |
|
Registered Member
Join Date: Jul 2008
Location: New York
Posts: 134
|
ok. Cool thanks a lot.
Still wondering where you get the tie rod and the pieces of plastic that holds that down tube. Sorry, I am not too good at visualizing. If someone can do a youtube video, that would help out a lot, especially for someone who can't follow instructions too well. 
|
|
|
|
|
03/21/2009, 07:02 AM
|
#271 |
|
Premium Member
Join Date: Jun 2005
Location: Kansas
Posts: 851
|
The down tube is pressed into the I.D. of the bearing. The bearing is held in place by two screws that go through the bottom of the box. A fabricated piece is held in place by the screws, this piece holds the bearing in place.
The piece that is attached to the tie rod and is also attached to the down tube is also fabricated and is pressed onto the down tube. There is one more fabricated piece and that is the arm on the motor. The tie rod was found at a RC Airplane shop. It is a 4-40 tie rod. To make them I used these http://www3.towerhobbies.com/cgi-bin...?&I=LXD610&P=7 and http://www3.towerhobbies.com/cgi-bin...?&I=LXFV03&P=7 To make all of the fabricated pieces I use a dremel tool. For the dremel tool I use two attachments, one is a sanding disk, the other is a round gouging tool. I use the gouging tool to cut the cross on one end for the motor shaft.  The rest of the tools are a drill and hole saw. I also use a miter saw to cut the down tube. With the bearing I used, I had to cut down the tube O.D. to accept the bearing I.D. I did this with a lathe but I did the test with the sanding drum and slowly trimmed off material until the bearing would fit. It does not look as neat as the lathe work but, it does work and really is not visible anyway. The bearing can be found here. http://cgi.ebay.com/6203-2RS-3-4-LAW...4.c0.m14.l1262
__________________
A real man builds it... Then his wife shows him what he did wrong. Current Tank Info: 210 RR, 75G sump, 350lbs DIY rock, DIY dual chamber calcium reactor, 7500 gph flow |
|
|
|
|
03/21/2009, 12:49 PM
|
#272 |
|
Registered Member
Join Date: Jul 2008
Location: New York
Posts: 134
|
Oh, ok.
Thanks for the clear explanations. Where can you get the plastic used the fabricated parts? Can they be found at a home depot? Thanks again for taking the time to explain. |
|
|
|
|
03/21/2009, 03:50 PM
|
#273 |
|
Registered Member
Join Date: Aug 2004
Location: Austin, Texas
Posts: 4,200
|
i did mine totally different from everybody else because i had to fit mine into a tiny little all-in-one tank. instead of using the project box, i had to make a custom housing using 1/8" clear acrylic sheet. i got it from regal plastic for like $13.oo for 4- 12"x12" sheets. my down tube was made using 3/8" clear acrylic rod instead of a pvc pipe. it was $6.oo for 6'. im unable to pass the electrical cord through the down tube since its solid core. i also had to mill down the o.d. of my down tube to fit the i.d. of the bearing. since i used a smaller down tube i was able to use a smaller bearing. i used a bearing out of my skateboard, you can find them at any skate shop. they're about $10.oo for a pack of 8 bearings.
i used the same microwave turntable motor from e-bay, and the same tie rods from tower hobbies. 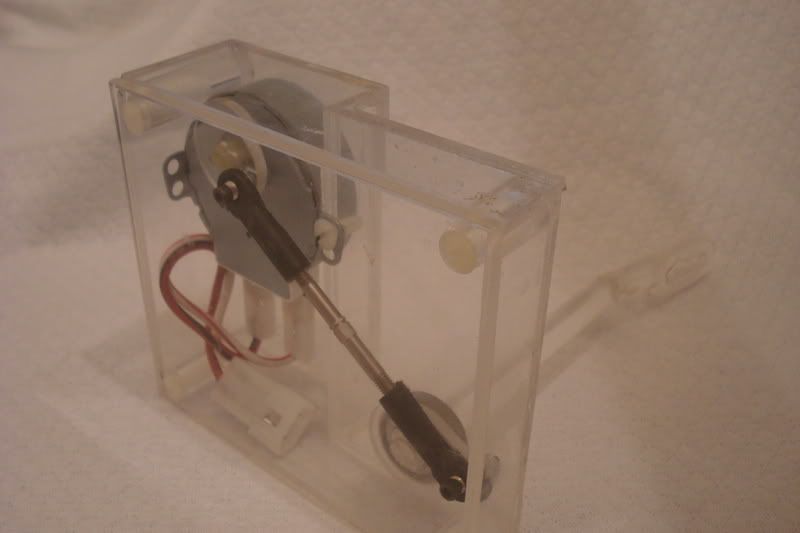 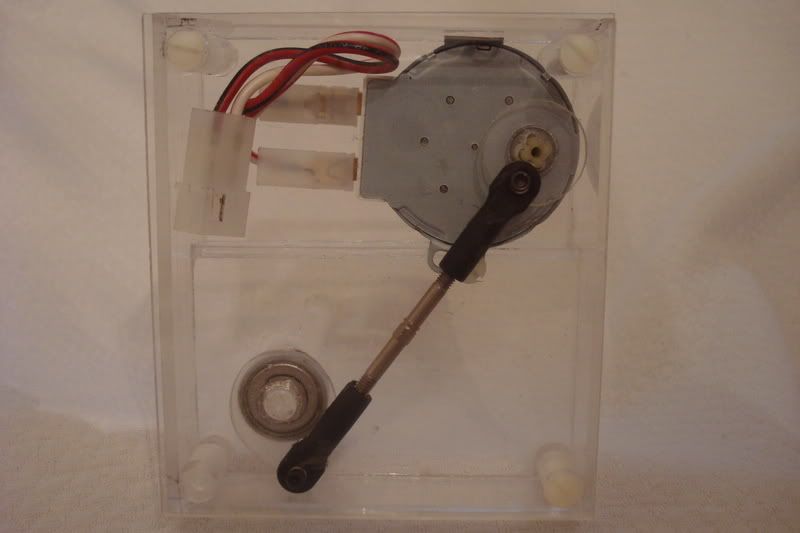 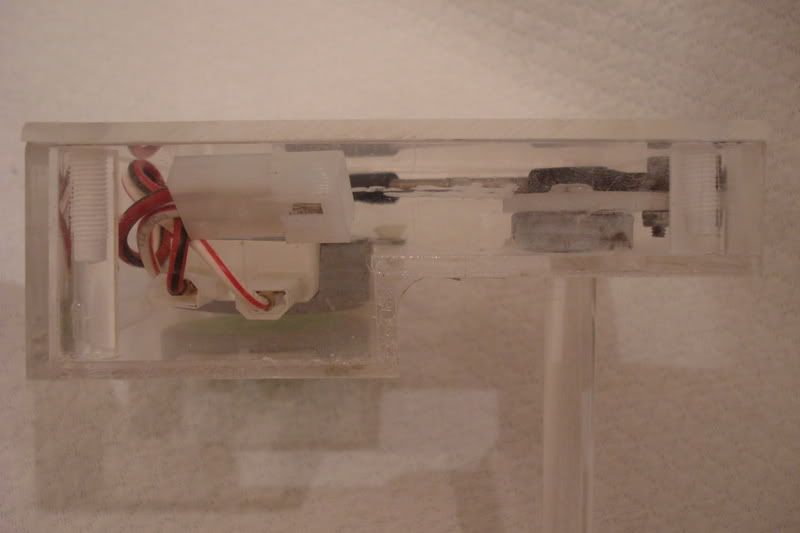 somewhere in this video you can see it in action... 
__________________
Marine Aquarists Association of South Texas Austin Reef Club PBITAWA... Current Tank Info: 14g bio cube |
|
|
|
|
03/21/2009, 08:34 PM
|
#274 |
|
Registered Member
Join Date: Feb 2005
Location: Seymour, WI
Posts: 364
|
Finally some pictures.
SOme Pics http://<a href="http://s374.photobuc...o put on"></a> http://<a href="http://s374.photobuc...lt="Top3"></a> http://<a href="http://s374.photobuc... PVC Cap"></a>
__________________
Digger Current Tank Info: 200G Tot, 165 NET trying Zeo |
|
|
|
|
03/21/2009, 08:38 PM
|
#275 |
|
Registered Member
Join Date: Feb 2005
Location: Seymour, WI
Posts: 364
|
http://<a href="http://s374.photobuc...ide view"></a>
  I'll get some video together tomorrow and I did install a switch for the power head and the motor. That is just really sweet. Dan
__________________
Digger Current Tank Info: 200G Tot, 165 NET trying Zeo |
|
|
|
 |
|
|


