
|
|
 10/02/2012, 10:32 PM
|
#1 |
|
Registered Member
Join Date: Sep 2012
Location: San Jose, CA
Posts: 250
|
Jerone's 155 gallon reef tank
After having been out of the aquarium hobby for over 8 years, I am about to jump back in. At first I was thinking about taking up where I left off with a Discus tank. Then I happen to wander into Neptune Aquatics in Milpitas, which turns out to be one of the best aquarium stores in the region. Here's a quick story on how that went and how I ended up with a reef setup... Married people, pay attention:
So, my wife and I wander into the store and are immediately approached by the very helpful staff asking us if we need anything. I explain my potential return to the hobby and am asked the inevitable question: salt or fresh? I know good and well that I have a lot of experience with freshwater setups and that reef setups are a lot more expensive. I explain this to my wife, who agrees I should probably stick with fresh water. We walk through the store and the following conversation between me and my wife takes place: Her: "Oooh, look at that fish, that's pretty." Me: "Yeah, that's saltwater though, would not be able to keep it." Her: "Ooh, look at all those colors" (pointing at a well maintained reef tank) Me: "Looks great.. Saltwater though. Here look at this freshwater tank" Her: (looks confused). That's all green and brown.. how boring.." Me: "It's a lot cheaper though." Her: "Yeah, well.. It's going to clash with the wall color in the living room. We can't have a blue themed room and a green tank." Me: "Good point" Her: "Salt water it is." I swear I heard the sales people high-five eachother somewhere behind us. It gets even better. The sales people walk us to the back of the store where they build and store their tanks and in a corner sits a 200 gallon 72"x24"x27" tank. The wife runs over to it and proclaims it is awesome and the stand will match well with the room. I had my mind set on a 60" at most, but she states we need a bigger tank to fill the entire wall. In the end I settled on a 155 gallon 72"x24"x21", giving up some height, but retaining the depth. It is a bit of an unusual dimension, but it will make lighting easier and keeps the total weight down to an acceptable level. 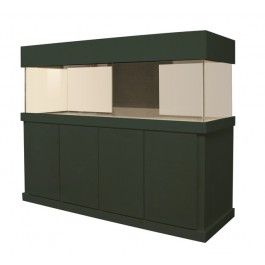 That all happened about four weeks ago. The tank is supposedly on its way (I hope) and many trips to Home Depot later I am ready to start installing. In the next couple of posts I will walk through my setup. This will be the location of the tank. Our living room has a little alcove about 76" wide and 24" deep, which fits the tank perfectly. 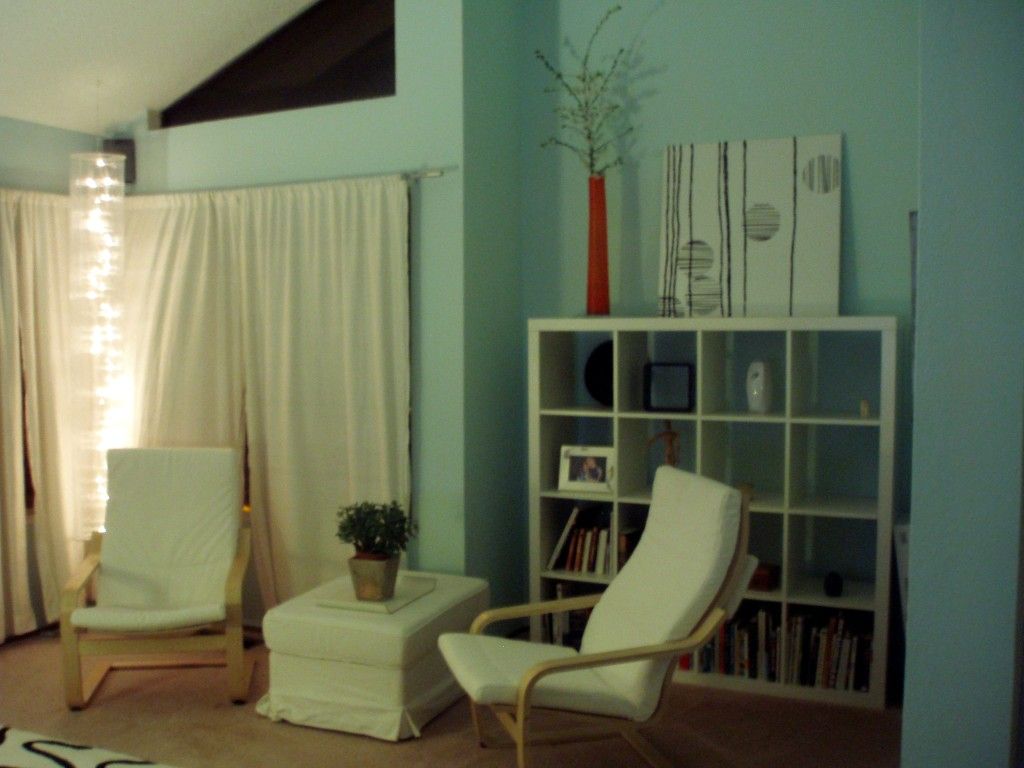 I am a little concerned about the lack of space on either side of the tank, but I have done this before without too many problems. It also will not have much room for equipment, but I either had to choose between a good location for the tank and less room to work with, or a lot of room but poor location. |

|

|
|
10/02/2012, 11:11 PM
|
#2 |
|
Registered Member
Join Date: Sep 2012
Location: San Jose, CA
Posts: 250
|
First the basics and first batch of purchases:
Tank is a Deep Sea Aquatics Model 155 with stand and canopy. First order of business is the RO/DI water. I purchased a AquaticLife 60 gpd Deluxe RO/DI System. I like their setup because I intend to install the system outside of the house rather than inside. 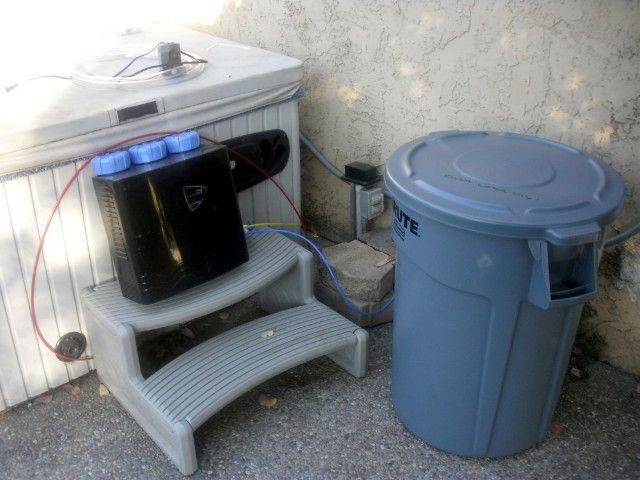 The reason for this is that we have easy access to water and electricity in the backyard and I can run my waste water directly into the pool. Because we live in the Bay Area, I do not have to worry about frost (save one or two days a year) and the unit is in the shade all day due to trees. I store the water in a 55g Brute container and will probably add a second one, so I can store 100g of water. I intend to run a water line under the house to the aquarium so I can pump water from the container straight to the tank. The tank will have a 35g refugium with a Marineland Pro 300 skimmer, which I managed to pick up for $150. I know this is not the best skimmer money can buy, but that price was hard to pass up. I'll try it out and if it fails, it will become my backup unit. 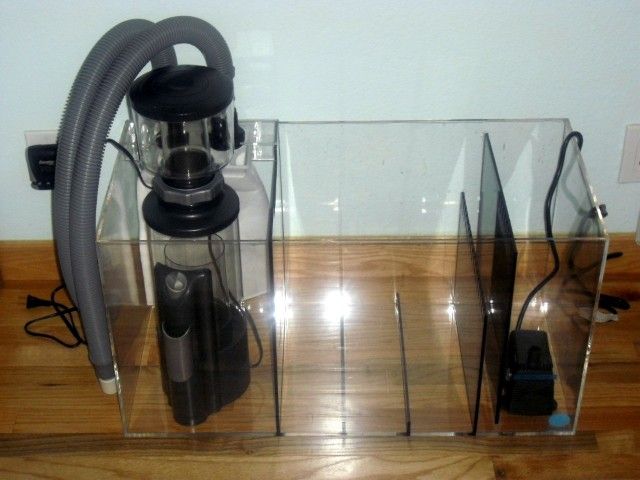 Finally, to get a head start on the cycle, I bought a very basic 20g tank setup to act as my future quarantine tank. It comes with very basic LEDs and even moonlights which is pretty cool. For now it will function as a pre-cycle unit. 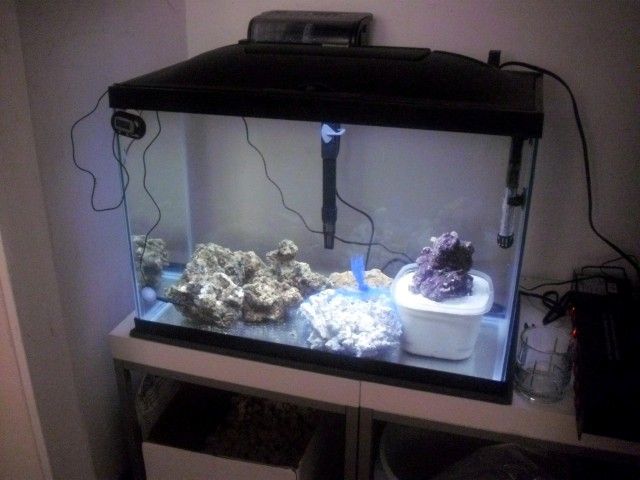 This little tank was filled with 10lbs of sand and 10lbs of live rock from the LFS together with some dry rock rubble. No bad hitchhikers have been detected yet, just a colony of nice bright-red serpulids and what seems to be a sponge that I will keep my eye on. Once this tank is through its cycle, I will add the sand to the display tank and hang the filter on the sump to get it started. It will also help me get used to maintaining reef tank water parameters and give me something to look at while I am waiting for the big tank to arrive. I am seven days in with that tank and am in the nitrite spike. It will take me at least three to four weeks to get the display tank going, so I have plenty of time left. |
|
|
|
|
10/03/2012, 06:50 AM
|
#3 |
|
Registered Member
Join Date: Oct 2011
Location: Huntington, wv
Posts: 675
|
Awesome wife! Good luck on the build it appears you are already in the right direction. My only opinion right now is that your shouldn't have wasted money on that skimmer.
What direction are you going with the tank? Fish only or reef?
__________________
Enthusiasm without knowledge is no good. Haste makes waste. WINTER IS COMING |
|
|
|
|
10/03/2012, 09:36 AM
|
#4 |
|
Registered Member
Join Date: Sep 2012
Location: San Jose, CA
Posts: 250
|
I have read mixed reviews on the skimmer. Some people love it, some hate it. The compartment in the sump it will be installed in will have a very stable water level and I read most people have trouble getting it to settle when they put it in the return compartment. I would not have bought it for the full price, that's for sure. I might end up with a different, better skimmer down the road. Any suggestions? I read good things about Reef Octopus.
It will be a reef tank. Haven't thought too much about which corals to keep, but will start with the easy ones to get my feet wet and try out an SPS or two to see if they will grow. I have my lighting setup worked out, will post about that when I get home. |
|
|
|
|
10/03/2012, 10:18 AM
|
#5 |
|
Registered Member
Join Date: Oct 2011
Location: Huntington, wv
Posts: 675
|
I love my reef octo. They have a large variety to choose from. I hear vertex are good skimmers too but I don't have experience with those. Looking forward to hearing about the lighting! I love seeing other people's lights.
__________________
Enthusiasm without knowledge is no good. Haste makes waste. WINTER IS COMING |
|
|
|
|
10/03/2012, 07:40 PM
|
#6 |
|
Registered Member
Join Date: Sep 2012
Location: San Jose, CA
Posts: 250
|
First off, great news: The tank will arrive tomorrow.. Let me just say that I am a grown-*** man, but feel like I am 8 years old again on the eve before Sinterklaas (a Dutch holiday.. you go to bed and the next morning there's presents at the fireplace)
Ok, lighting. After a bunch of research I decided to go with an LED system. I have a degree in electrical engineering and am not afraid to build something myself, so I decided to go with a DIY kit. I went with RapidLed because of their price and the fact that the company is local. I am going to start with a 72xCREE dimmable kit from RapidLed at a Cool White : Royal Blue ration of 1:2. I created four rails with 16 LED's each. 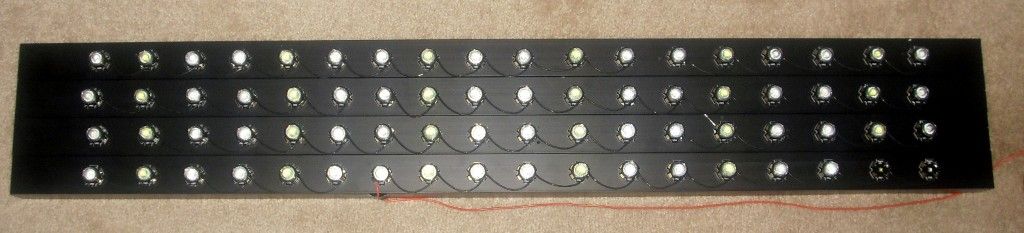 I used thermal adhesive instead of screws so I do not have to worry about tapping, dirt behind or under screws, rust and whatnot. I found out, by trying, that thermal adhesive is very strong yet relatively easy to remove if you try. I am planning to have fans run air along the rail throughout the canopy and out. I went with 80 degree lenses for a special reason which I will explain later. I attached these reflectors with small dabs thermal adhesive that I had left over and have covered the solder connections with silicone to protect them. 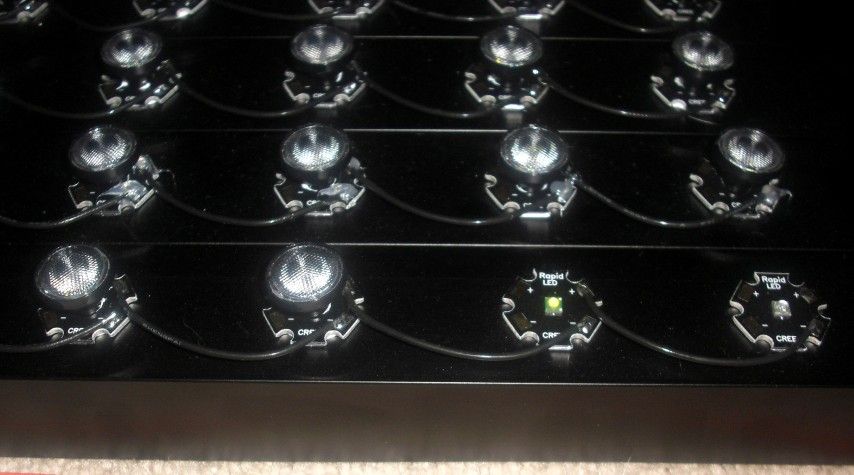 All LED's will be controlled by a BoostLED Typhon controller with 36 LED's per dim channel. I really like the flexibility of this controller and how easy it is to work with. 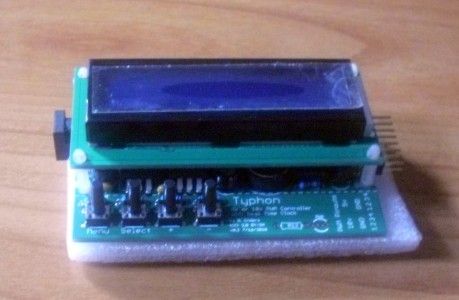 I will be running 12 LED's in one string per driver, which means I am going to run a total of 6 drivers. This should enable every LED to run at max power (~5W) for a total of 360W, which will probably not be needed. The tank will have a closed canopy. I do not like the idea of the LED's lighting up the entire living room and neither does my wife. This, of course, requires some additional cooling and something to battle humidity. Once the tank arrives, I will set up a test and check temperatures to see how much cooling will be required at max output. I was told that the canopy has an internal working space of 72.5" and is divided in three sections across the width of the tank. With that in mind I intend to run two tank-wide rails in the front-most and middle section with the LED's rotated at a slight angle for maximum coverage. The next picture is a rendering of the canopy with the front being at the top of the picture.  In the following drawing I explain why I angle the LED's and use 80 degree lenses. With the front-most rail angled at between 10 and 20 degrees, this allows the least amount of light to "waste" from the tank. The sharper the angle of the light to the glass, the more will be reflected, so moving the rail to the front of the canopy makes it more efficient. Angling it allows more of the light to reach the back of the tank. I always run the majority of the lights in the front of the tank to avoid shadows from higher structures in the back. Had I gone without lenses, a large chunk would have hit the inside front of the canopy (which is black) be absorbed and turned into heat. 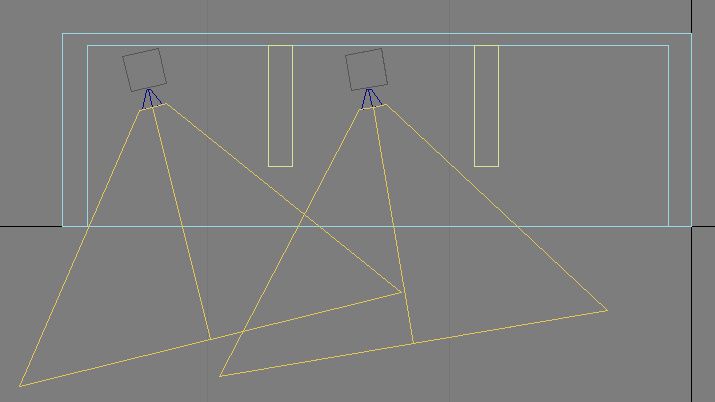 I think these LED's will be enough for this tank, considering it is only 21" high, but I may put in a third rail if needed. I am also toying with the idea to add a second rail to the middle section with a couple of UV lights for some extra oomph in the low 400nm range. Finally, I might have misunderstood the explanation of the sales person who explained the layout of the canopy... I have this nagging feeling it is not divided length wise, but width wise. If that's the case I will simply cut the rails into half (18") and rewire between halves.. not a big deal. |
|
|
|
|
10/03/2012, 09:20 PM
|
#7 |
|
Registered Member
Join Date: Sep 2012
Location: San Jose, CA
Posts: 250
|
On to rocks.
I ordered 150lbs of Key Largo Rock from MarcoRocks which arrived a couple of weeks ago. This gave me plenty of time to play with various aquascapes. I used to be a fan of the wall-of-rock aquascape, but after having read through a large number of aquascape threads on various forums I realized that the more open aquascape looks a lot better to me and leaves more room for growth. I was especially interested in creating depth and wanted to avoid symmetry at all cost. First off I created a number of pillars that I could move around. Due to the rock being quite brittle due to it being very light and porous (MarcoRocks truly is great quality), I shied away from drilling big holes in it. Instead I found that cable-ties and a little bit of epoxy was all I needed. Tools that I used to build these: Schedule 40 PVC, 1/2" Black Nylon Wire Ties J-B Waterweld Gorilla Glue This is the front and back of one of the pillars. It consists of three pieces or rock all tied together. For this one I did not even need to epoxy anything. I prefer not to use epoxy just so I can take everything apart later if I want to. The PVC stand is a very simple stand made out of only three T-sections. I drilled a hole through the PVC for the topmost cable tie to make sure every rock below is held in place, other than that I simple wrapped the tie around the pipe. The rock is so porous, it is not hard to find a hole you can go through. Just make sure you go deep enough through the rock so it does not break off a piece when you tighten everything. As I started building I started to give the pieces names. The piece on the left I call the "devil's horns" (though it looks a lot like a Disney character from certain angles) and the piece on the right is one of the "Two Towers" 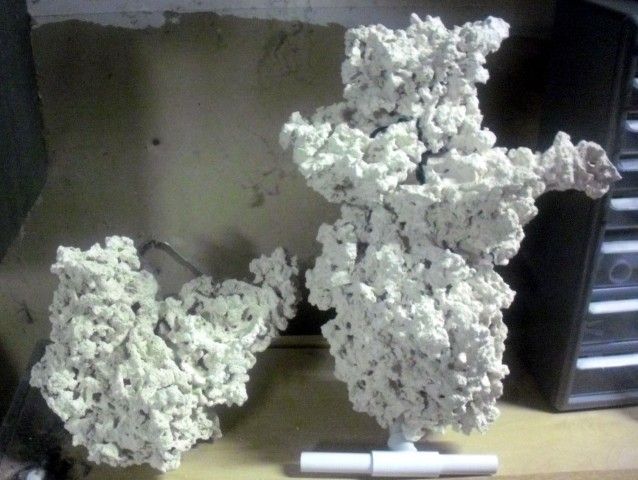 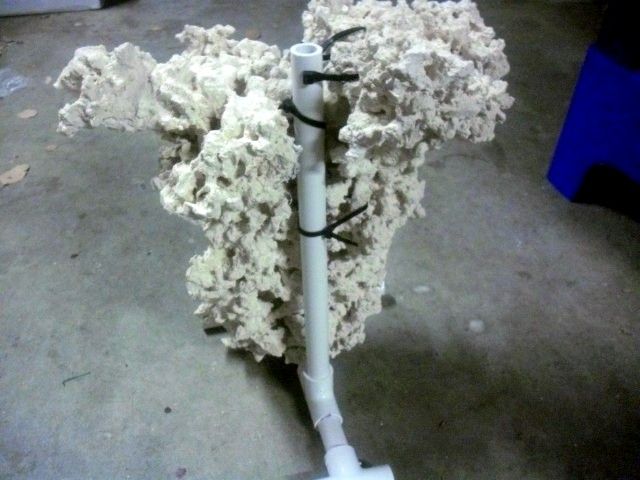 Here is the other one of the "Two Towers". This consists of four pieces of rock. In this case I had to epoxy the bottom two pieces together because of instability issues. I used the technique as show in this video to glue the rock together. It is surprisingly easy and the bond is stronger than the rock itself, as in: I'd break the rock itself before I'd break the bond. 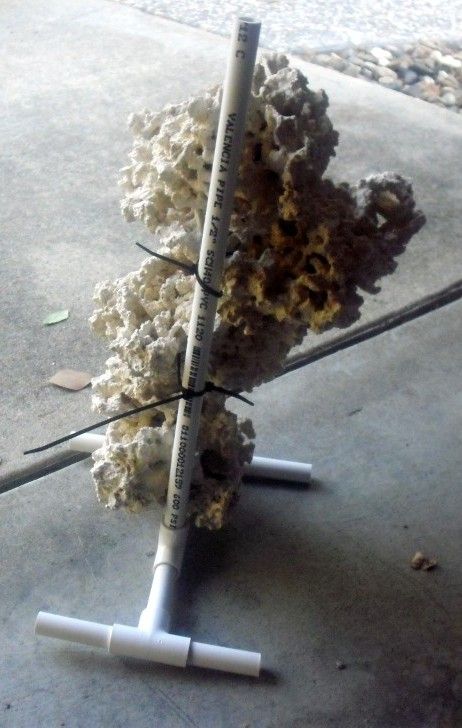 The final glued piece is what I call the "Laser Tower" 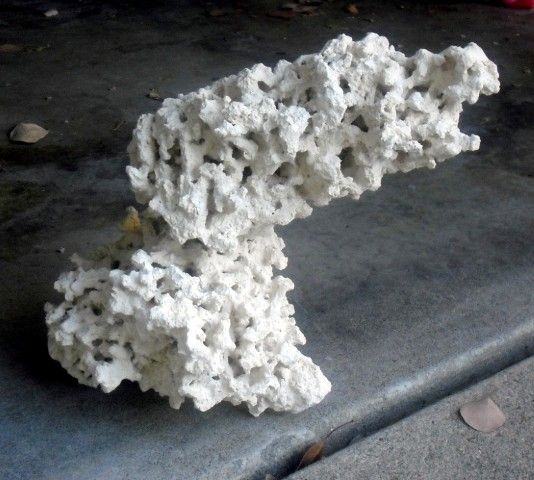 I laid out two sheets of eggcrate to a 72"x24" dimension and stacked on that. This is the layout I intend to go with: 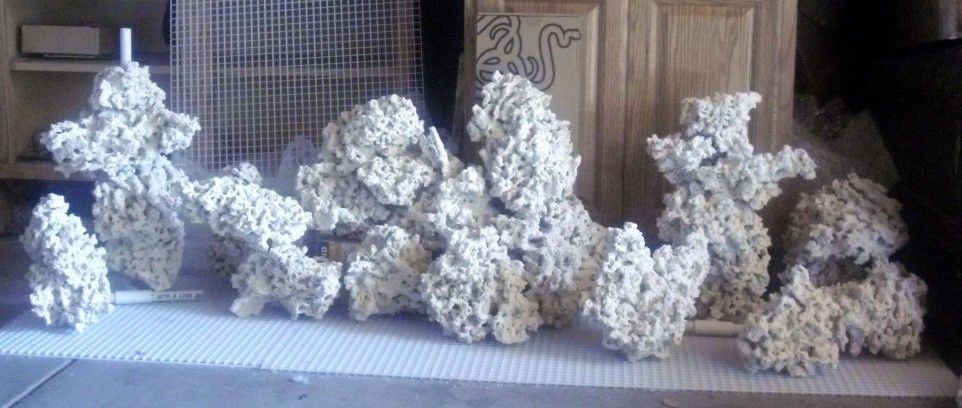 The only rock touching a wall will be the middle one that lays against the overflow (indicated by the cardboard box with the funky pattern on it). Everything else will be 2" from the glass. The mound in the middle will raised by a PVC 'table' to allow for water flow below the rocks (explained later). In this setup I used two empty boxes of grout as a placeholder. From the above angle the aquascape may still look massive and full, but when looked from different angles, it really opens up. Left side:  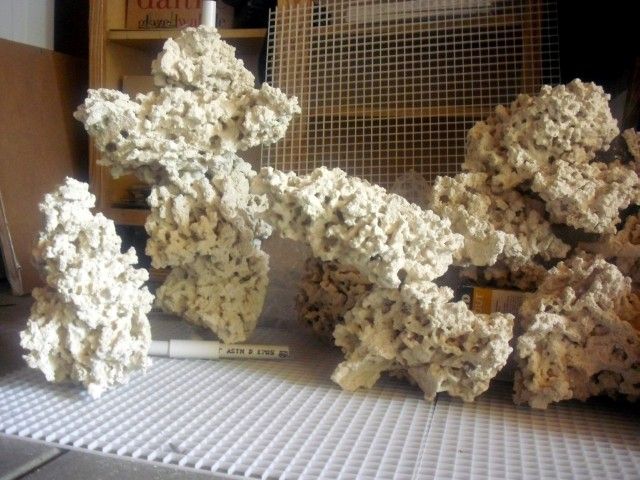 Right side: 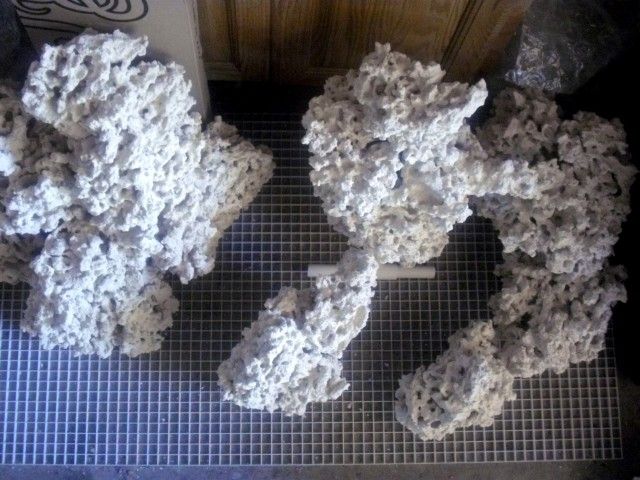 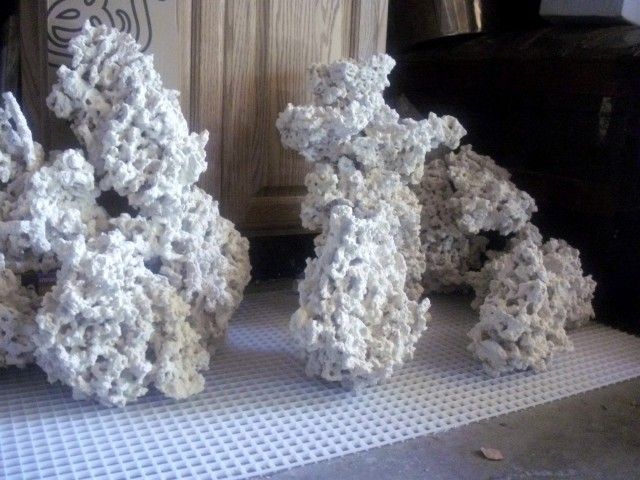
|
|
|
|
|
10/03/2012, 09:20 PM
|
#8 |
|
Registered Member
Join Date: Sep 2012
Location: San Jose, CA
Posts: 250
|
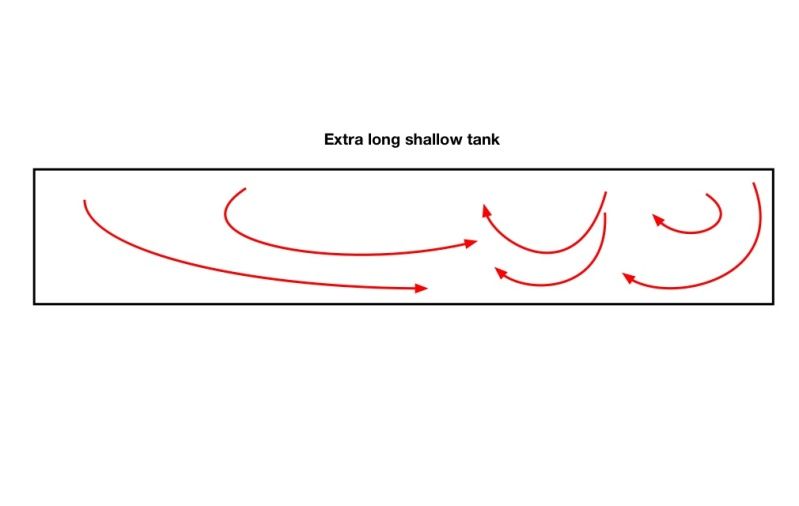
What's interesting is that the flow of this layout is a pretty close match to the picture from this great thread from Veganbrian. I read that thread, saw the picture and then walked to my garage to look at the aquascape I laid out two days earlier.
|
|
|
|
|
10/03/2012, 10:01 PM
|
#9 |
|
Registered Member
Join Date: Sep 2012
Location: San Jose, CA
Posts: 250
|
Aside from the normal refugium return lines, I intend to run a close loop system. I want to run a flow through the rock-channels/canyons I created on the left and right side of the tank.
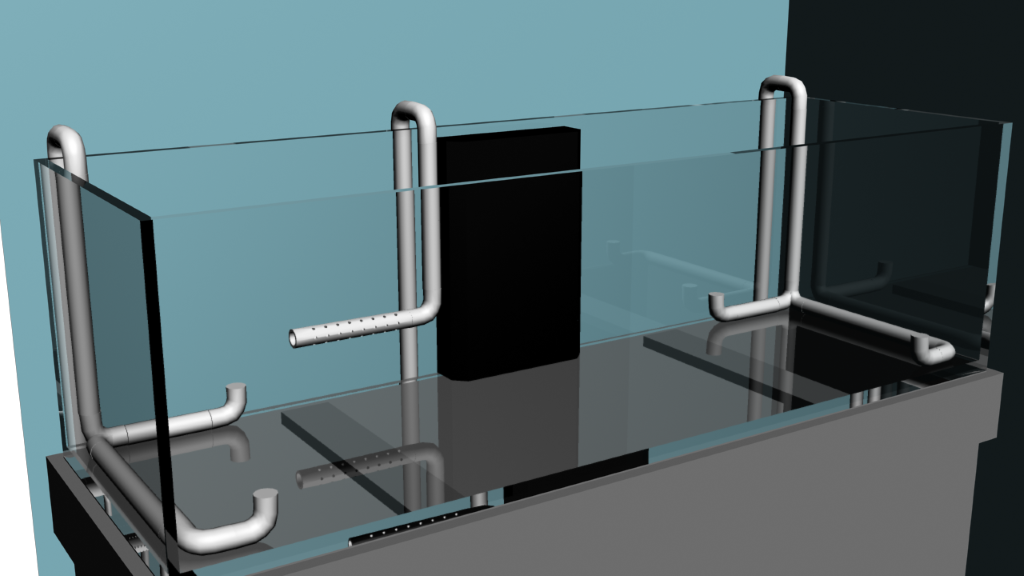 Here's the tank with intended waterflow. Blue = Closed Loop In Red = Closed Loop Out (Locline) Orange = Sump In Yellow = Sump Out Green = Powerheads 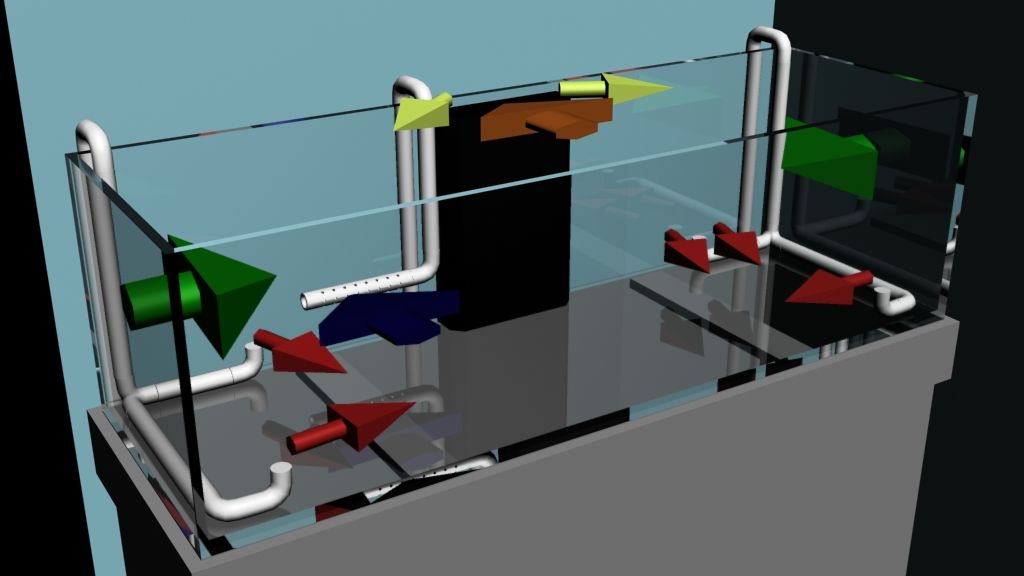 The closed loop in will be a perforated PVC pipe behind the main rock mound and under the PVC "table". This will ensure proper water flow through the rocks I am thinking about putting a SQWD in the closed loop to alternate between left and right, but am not sure if this is necessary and I have not ordered it yet. I do want to put the two powerheads on alternating power to create a shifting current. I am leaning towards getting the Tunze 7092 wavemaker. |
|
|
|
|
10/04/2012, 01:24 PM
|
#10 |
|
Registered Member
Join Date: Sep 2012
Location: San Jose, CA
Posts: 250
|
So I found out this morning that the scheduled delivery indicated a local freight terminal, not my house. It will take another five days to be delivered to my driveway.. Ugh. I guess that's what I get for going with a website that offers free delivery on all standard tanks. What was supposed to be a three week process has turned into over six weeks, two weeks of which the tank will sit in a terminal less than an hour from my house (it has been sitting in a terminal since 9/28 and just got moved to a different one today).
In the meantime, does anyone have suggestions/concerns about the aquascape and the proposed closed loop system? What kind of pump should I be running on a 155g with a ~4 feet head? |
|
|
|
|
10/05/2012, 09:00 PM
|
#11 |
|
Registered Member
Join Date: Sep 2012
Location: San Jose, CA
Posts: 250
|
The substrate arrived. My local petstores did not carry this brand and MarineDepot (L.A.) charged a lot more for transport, so I had to have this transported cross-country from Florida... It's Seaflor special grade aragonite.
200lbs of sand.. I bet my UPS guy loves me! 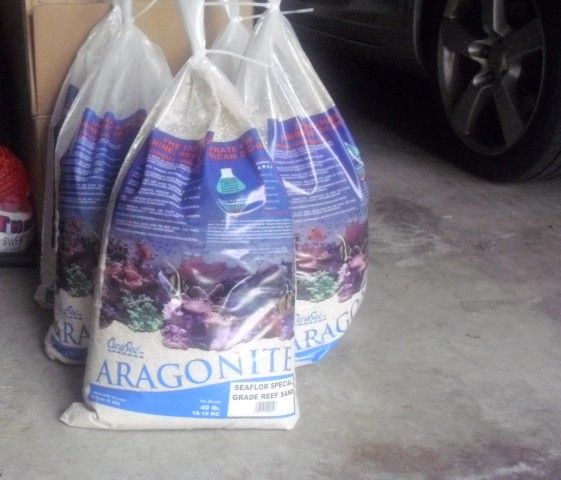 Also, I did some more tweaking on my proposed lighting and calculated, what I think is, the best angle for both rails. The following picture illustrates what I am working on. On the left side is my proposed setup, to the right a standard setup a lot of factory tanks come with. This is a side shot of the tank with the green arrow indicating the normal line of sight of the viewer (front of tank). I use a combination of CREE Cool White and Royal Blue with 80 degree lenses in two rails that go along the entire length of the tank. 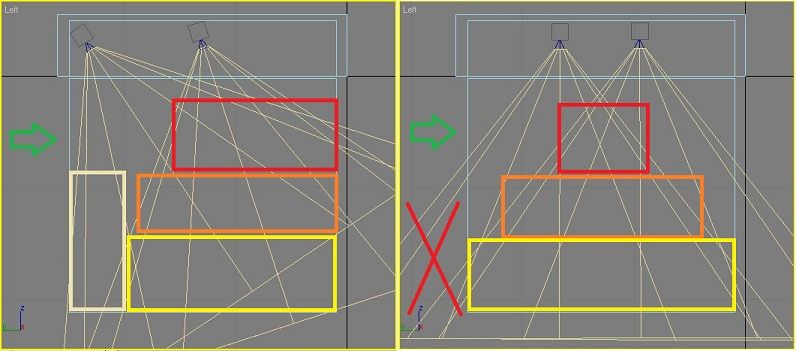 Red indicates the hot zone with the most light (most lights hitting target at shortest distance), then orange, then yellow and light yellow. My philosophy is to have as much light in places where I intend to grow stuff and no light where I don't want stuff to grow. First order of business is to keep the light off the front pane, so dirt is less visible and algae slower to grow. I do not intent to grow anything in the first two inches of the front-bottom, so there's no need to light it up. Therefore the second light-rail will be rotated so it does not hit the first inches at all. Notice how the red X marks 'wasted' light in the default setup. This light does nothing for growth, in fact, it decreases visibility for the viewer by lighting up the front pane. You may think that a lot of light is wasted to the back of the tank in my proposed setup, but there will be rocks and corals blocking it before it ever gets there. Second order of business is to increase the size of the red hot zone as much as possible. By rotating the front rail, the region of overlap nearly doubles in size. However, I will say that the shallow angle will lead to more light being reflected off the water. Finally, it may also help create a better sense of depth by creating more shadows at the back of the tank. Imagine the following two setups: 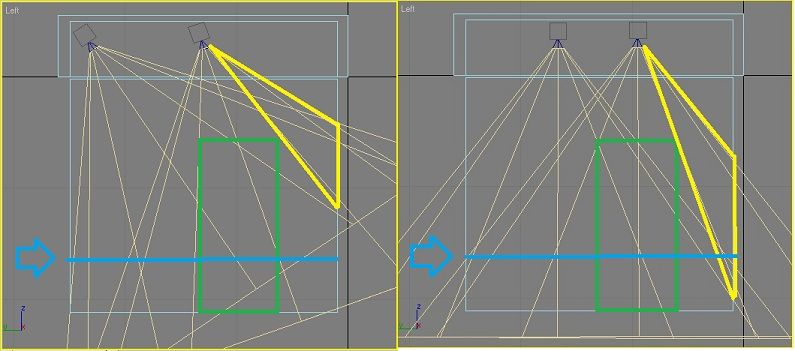 The green box is a rock formation with a hole through it at the blue line. The yellow triangle illustrates the light reaching the back of the tank. If the viewer looks through the hole in the left setup, it will see darkness. In the right setup it will see the lit up back of the tank. With the size of my tank and the lenses I use, I calculated I need about a 30 degree angle for the front row and 20 degrees for the back row. Now, once I get my tank I will obviously test out this theory of angles (which it pretty much is, a theory) and show the results. I am by no means an expert on light and its effect on aquascaping. Right now I am a guy with too much time on his hands waiting for the tank to arrive. |
|
|
|
|
10/10/2012, 06:23 PM
|
#12 |
|
Registered Member
Join Date: Sep 2012
Location: San Jose, CA
Posts: 250
|
The tank arrived today.Despite all the problems with the transport, at least it was crated well and no major damage was detected.
It is a Deep Sea Aquatics Model 155, all glass. 72"x24"x21", long and low. The stand and canopy are also from DSA. 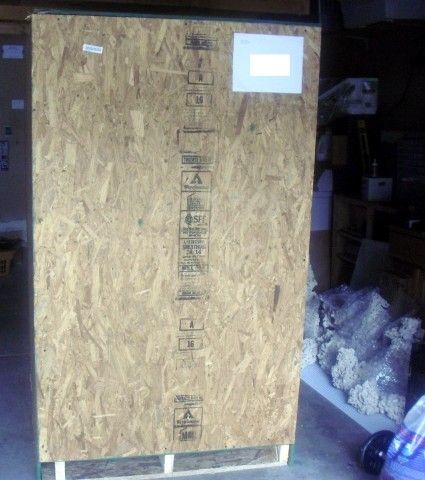 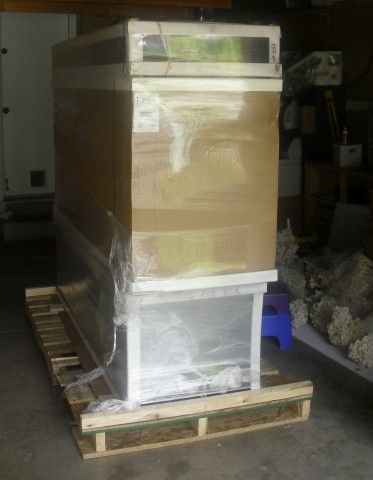 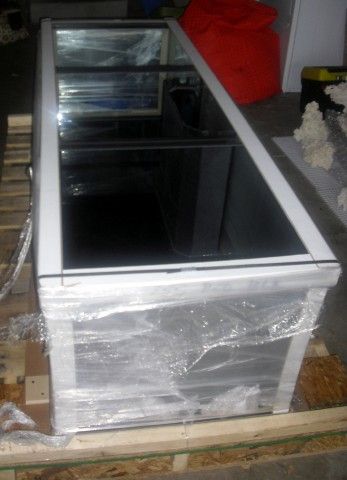 Next up is painting the stand and canopy. We want to go with white to match the room better and I noticed some minor scratches on the existing paint, so it can't hurt to put a fresh layer on it. I will also paint the back of the tank black. Lighting is going to require some minor rework in the canopy. The front lid has 45 degree trusses running along the front to stiffen and strengthen the front lid. I'm thinking about cutting a little bit out of this to fit the front light rail at the 30 degree angle mentioned above. Then I can stiffen it with some steel If I absolutely need to (which I doubt). By the way, if anyone is interested in how the DSA tank/stand and/or canopy is constructed, now is the time to ask. I can take pictures of any piece you want to look at while it is still fresh from the factory. Last edited by jbfloor; 10/10/2012 at 06:32 PM. |
|
|
|
|
10/10/2012, 08:35 PM
|
#13 |
|
Registered Member
Join Date: Jul 2011
Location: Brooklyn, NY
Posts: 81
|
Nice! Looking forward to seeing the progress on your tank!
|
|
|
|
|
10/10/2012, 09:22 PM
|
#14 |
|
Registered Member
Join Date: Sep 2012
Location: San Jose, CA
Posts: 250
|
@ReefShrink, thanks.
Small lighting update. Ignore the dust.. I guess not many people buy the closed canopy at DSA. From the color of the sticker on it, it had been sitting somewhere in the back of the warehouse for a while. 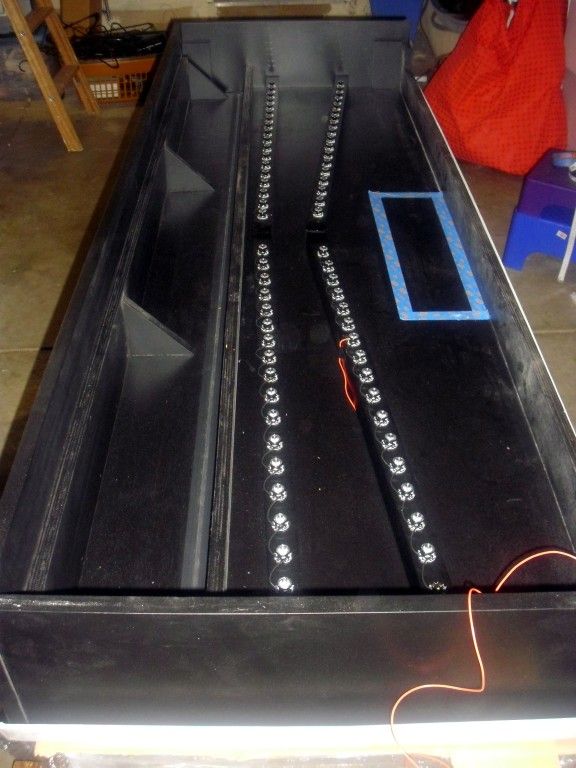 Cutting the trusses probably is not going to be as easy as it looks. Also, the 3" beam running right behind the hinge is going to block most of the light from the front most rail if I put it there. So, instead I may buy 24 extra LED's and add three 20" rails with 8 LED's each between the trusses, slightly angled. Then I can moved the other two rails back a bit and still have enough light to cover the entire tank. I needed some moonlights anyway so I can put those on the front rail. I'm thinking 6 moonlights, 6 Cool White and 12 Royal Blue for a total of 24. That would push the total LED's for the tank to 96, which is closer to the recommended 17 inches^2 surface area per LED. I taped off the dimensions of the overflow box on the inside of the canopy. No need to light up the inside of that box like a Christmas tree, so I am going to set up the rails in a slight V shape. That should get more light where it needs to be. Last edited by jbfloor; 10/10/2012 at 09:45 PM. |
|
|
|
|
10/11/2012, 04:42 AM
|
#15 |
|
Montipora type guy
Join Date: Dec 2003
Location: Fort Myers, FL
Posts: 2,945
|
You've got my attention, great work!
__________________
Christian Current Tank Info: 100G Half Cylinder |
|
|
|
|
10/11/2012, 07:56 AM
|
#16 |
|
Registered Member
Join Date: Jan 2012
Location: Ahwatukee
Posts: 601
|
Everything looks good, very well planned and you have an amazing wife too! I am lucky as well as my wife is a big supporter. I am just about finished with my upgrade, to a 180 6x2x2, and now that I have seen 2.5 deth tanks.... I wish I would have got a tank that was a little deeper, oh well I am still excited.
You aquascape looks really good. Keep it up
__________________
180 DT peninsula with 90 gallon sump. Three Radion Pro's and two Tunze 6105's. bubble magus curve7 and two Jager 300 watt heaters. Temp probe, PH probe and ORP probe. ATS. Mag5 return. BRS dose for CA |
|
|
|
|
10/13/2012, 01:51 PM
|
#17 |
|
Registered Member
Join Date: Sep 2012
Location: San Jose, CA
Posts: 250
|
Quick update. Lights wiring and testing is going well so far.
 This is one rail at 11% using three drivers and the BoostLED Typhon controller. You can clearly see the difference between having 80 degree lenses and no lens. The last LED in the rail does not have a lens installed (yet) and light scatters all over the place. A lot of this light is wasted this way. Going to watch some college football and then it's back to install the second rail. |
|
|
|
|
10/13/2012, 02:13 PM
|
#18 |
|
Registered Member
Join Date: Sep 2009
Location: Texas
Posts: 50
|
Im really impressed with the work that has gone into planning this thing out. Should be a nice looking tank with that attention to detail.
|
|
|
|
|
10/14/2012, 02:44 PM
|
#19 |
|
Registered Member
Join Date: Sep 2012
Location: San Jose, CA
Posts: 250
|
Thanks for the kind words. One of the reasons I am doing this log is to keep motivated to pay attention to the details. I can't start cutting corners with people watching
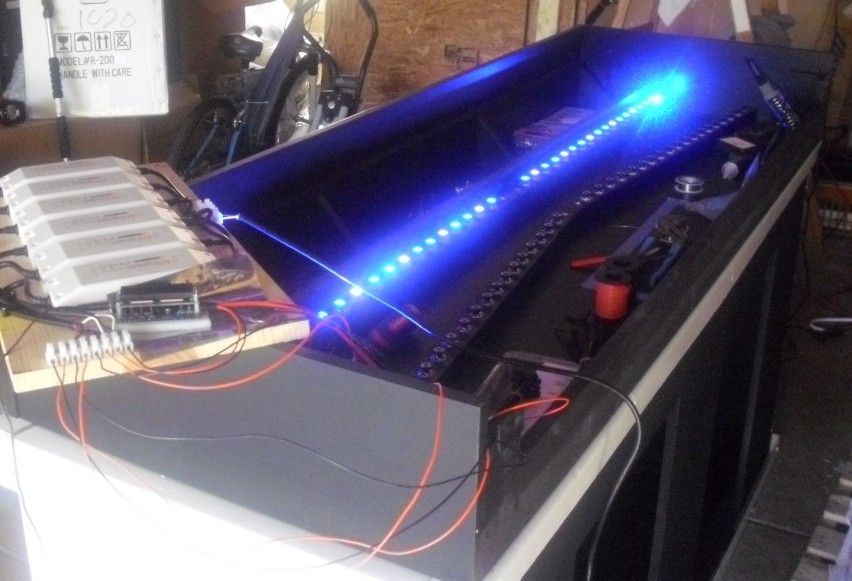
Lighting is pretty much done. Second rail is installed, connectors are put in place and all cables are tied together properly. The drivers are ready to be installed in the stand. I am currently running both rails on 50% for at least an hour to check on temperature. So far the heatsinks are cool to the touch. I felt some heat first and saw a bit of smoke, but then realized the soldering iron was still switched on... false alarm. 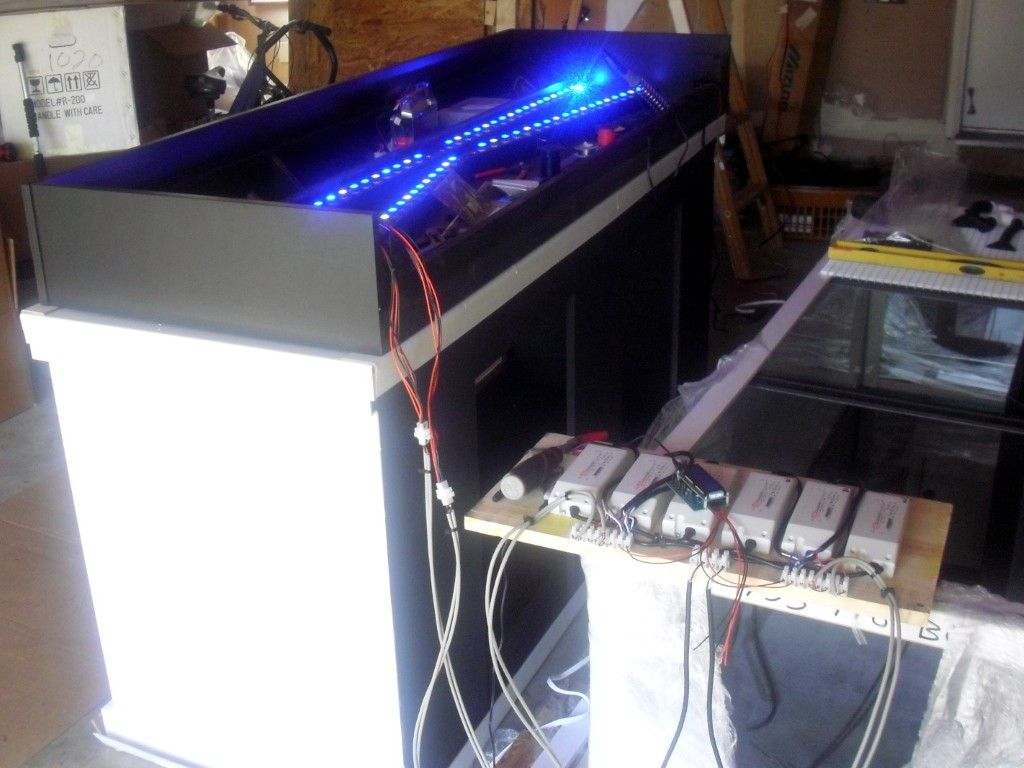
|
|
|
|
|
10/15/2012, 09:34 PM
|
#20 |
|
Registered Member
Join Date: Sep 2012
Location: San Jose, CA
Posts: 250
|
We are about ready to move the stand and tank into the living room. Once that is done I can install the electrical components and then move the tank on top.
Everything inside the tank is pretty much done with the exception of painting the back. After reading many thread about which background color is better and after looking at many pictures, I decided to go with black. The following picture shows the closed loop on the right side of the tank. Due to the fact that I did not decide to do a closed loop system until after the tank was ordered, the tank was not drilled. Also, the pipes will not be very intrusive, especially not after I paint them black with some Krylon Fusion. 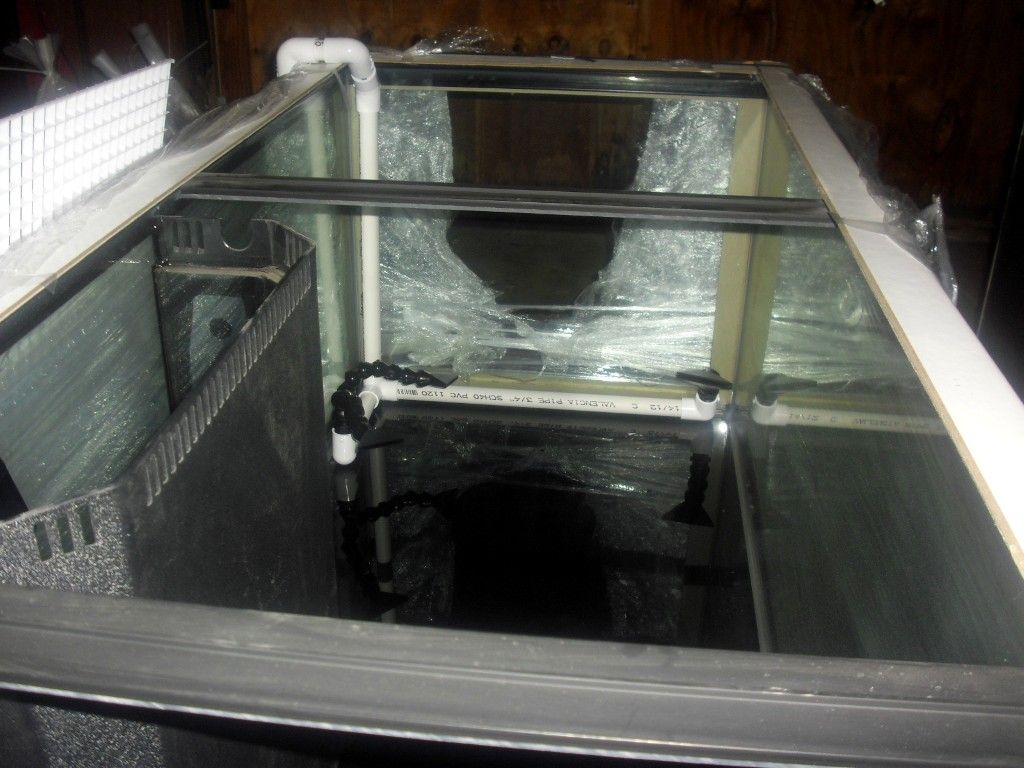 This picture shows the little PVC table that I intend to build. This will lift the rocks at the back of the tank and leave space for the closed loop intake to pull water through all the rocks and eliminate the biggest potential dead spot in the tank. Rocks will be stacked in front of the table to block the pvc as much as possible. 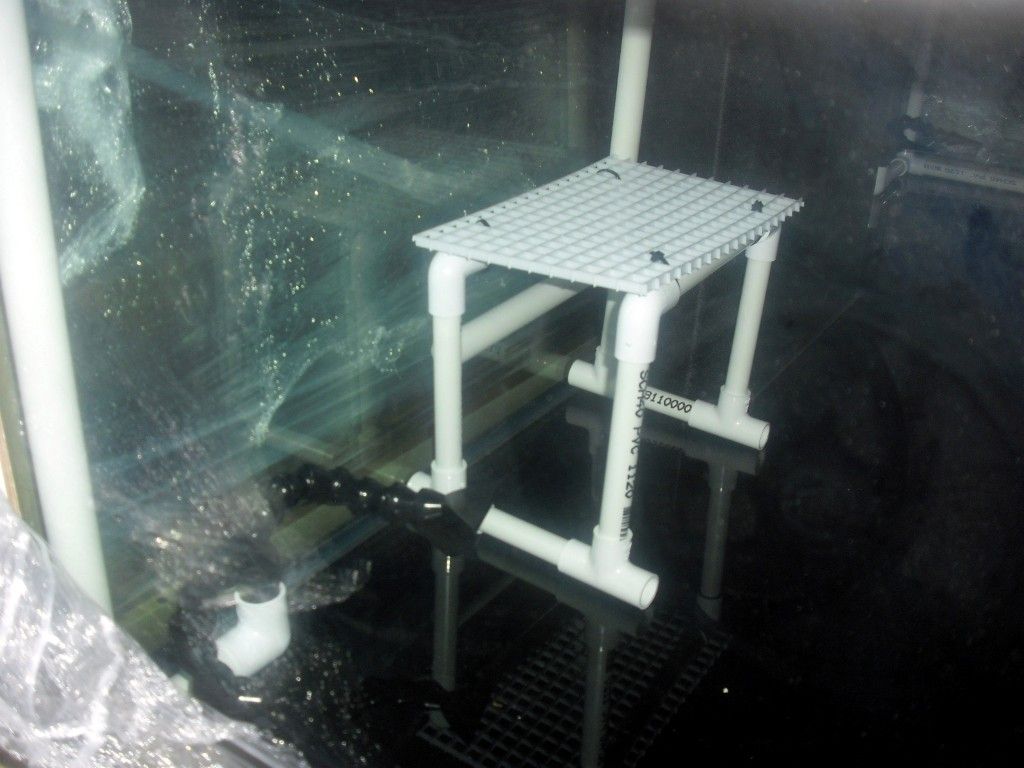
|
|
|
|
|
10/15/2012, 10:03 PM
|
#21 |
|
Registered Member
Join Date: Sep 2011
Location: Bay Area, California
Posts: 69
|
sweet tank and build man! neptunes is a great store, the guys there are awesome
|
|
|
|
|
10/17/2012, 06:47 PM
|
#22 |
|
Registered Member
Join Date: Sep 2012
Location: San Jose, CA
Posts: 250
|
The wife was nice and adventurous enough (and small enough
) to climb under the house to check the foundation and support beams. Fortunately we have to main support beams running perpendicular to the tank right below the hinges on both sides of the middle door. Pretty much the ideal situation. The house was built to withstand earthquakes, so the beams are massive.Stand is in place and leveled, at least until the next earthquake. The tank itself still needs to be painted and moved to the living room 
|
|
|
|
|
10/17/2012, 07:19 PM
|
#23 |
|
Premium Member
 Join Date: Jul 2007
Location: Staten Island
Posts: 2,414
|
After reviewing your plans, schematics, aquascaping, and LED build, I feel very inadequate. I'd appreciate it if you could do something wrong or sloppy so I can feel better about myself. Thanks.
__________________
Current tank info: 180 mixed reef |
|
|
|
|
10/18/2012, 09:26 AM
|
#24 |
|
Registered Member
Join Date: Sep 2012
Location: San Jose, CA
Posts: 250
|
Ha!.. thanks
. It's the same way I feel about some of the other build threads, especially the ones on the big tank forums. Many of those builds put mine to shame.If I did not have to wait for six weeks for the tank to arrive, most of this would not have happened.. If there's one thing I learned from this experience so far, it's that patience is a virtue and preparation is everything. We're preparing to get the tank placed on the stand this Friday evening with a "tank moving party" for some friends. Only one rule: first we move the tank, then we drink beer. Once the tank is on the stand I will plumb the rest of the closed loop system, glue it all together and move the aquascape into the tank. |
|
|
|
|
10/18/2012, 06:44 PM
|
#25 |
|
Registered Member
Join Date: Sep 2012
Location: San Jose, CA
Posts: 250
|
My wife, Indiana Jen, wanted me to post a picture of her crawl-space adventure of yesterday. So, here it is.. I'm proud of you!
These are the two beams directly under the tank. 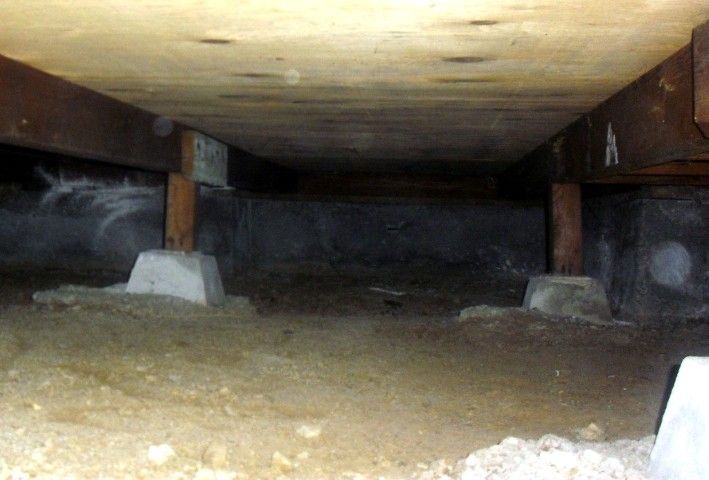 Most of the garage work is done. The first layer of paint is on the back as well as the PVC pipes for the closed loop sytem. I am really impressed with the Krylon Fusion paint. 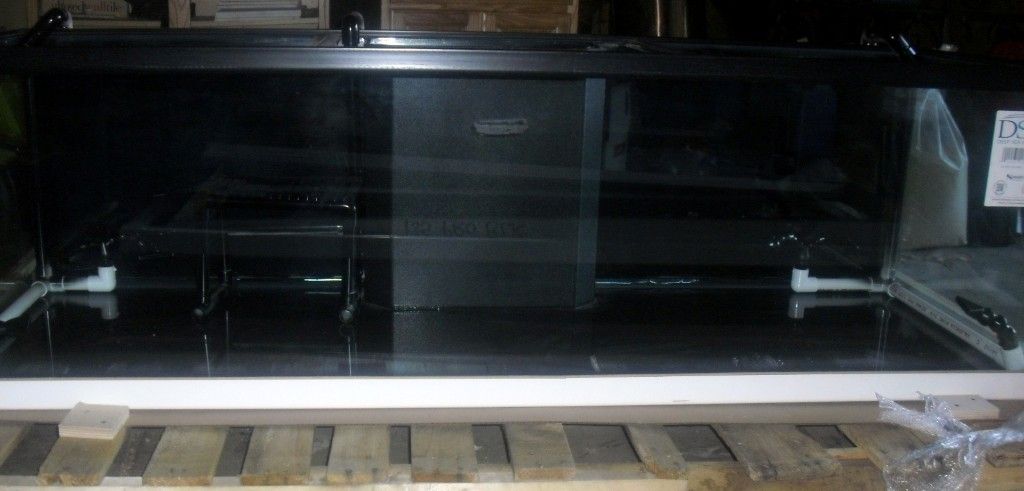 I'm hoping to move the tank tomorrow, depending on how many people we can persuade to come help move it. |
|
|
|
 |
|
|


