
|
|
 12/03/2011, 09:53 AM
|
#1 |
|
Registered Member
Join Date: Dec 2011
Location: Saint Petersburg, FL
Posts: 136
|
Avast CS 1.5 External Skimmer (pending) on a budget
I have/had a CS-1, when the recirc kit came out I bought the recirc plate. My stand is TINY, its a 54 corner so an external skimmer made the most sense in terms of saving space in my sump. The following thread will be trials and tribulations of making my CS-1 into a CS-1.5 external skimmer.
|

|

|
|
12/03/2011, 10:00 AM
|
#2 |
|
Registered Member
Join Date: Dec 2011
Location: Saint Petersburg, FL
Posts: 136
|
Alright so I bought the recirc upgrade for the avast CS-1 skimmer. I want to make the skimmer external though. So any help would be great. esp if anyone else has this skimmer you'll have better insight hopefully.
Stock in these first two pics  
|
|
|
|
|
12/03/2011, 10:02 AM
|
#3 |
|
Registered Member
Join Date: Dec 2011
Location: Saint Petersburg, FL
Posts: 136
|
Heres what it looks like stock underneath the base plate, it doesn't fit well or at all under my stand.
 With thin sched 40 I can re-route the output behind a support leg which reduces the foot print and allows it to fit in a good place under the stand, Next the output riser was too short, so I again sched 40 an make the riser higher.  Before I glue everything I'm going to use grey sched 40 instead of white. |
|
|
|
|
12/03/2011, 10:05 AM
|
#4 |
|
Registered Member
Join Date: Dec 2011
Location: Saint Petersburg, FL
Posts: 136
|
This is the space where it needs to fit in... like I said TINY!
 But with a reduced foot print, it fits! Wooo Now avast cs-1 owners how do I make it water proof? What I can see being the issues is the black input barb which is a not tapped(threaded) hole, (can I get a tap that big, should I glue it?) same with the two long black threaded rods that hold the bubble concentrating chamber on, they're not threaded though the base plate. How can I make them water proof. I've already figured out how to make the flange water proof. Look it fits! Woo (again) Note: This thread is a transplant from one I started on a local reefing forum, though I've made progress I haven't figured everything out. SO PLEASE FEEL FREE TO GIVE INPUT. 
|
|
|
|
|
12/03/2011, 10:09 AM
|
#5 |
|
Registered Member
Join Date: Oct 2005
Location: DFW Texas
Posts: 5,249
|
I'd start by considering making a custom sump to hold the skimmer
IMO the skimmer is not suited to be external, starting with the bottom flange not having a seal. Try to run it outside the tank using tap water and check to see where there may be issues. I'm sure you can make a seal for the bottom flange but there may be issues with the friction fit pipe connections also. The fix on the pipe would be to add some unions and glue the joints but space may be an issue If you can take care of the potential leaks you would need to either raise the skimmer so the outlet is above the sump or drill a hole in the sump to take the skimmer return at the height it is by design. If you drill the hole you also need to make sure the water level in the sump is below it.
__________________
A smooth sea never made a skillful mariner Current Tank Info: 110g Mixed Reef, LED's & T5's |
|
|
|
|
12/03/2011, 10:13 AM
|
#6 |
|
Registered Member
Join Date: Oct 2005
Location: DFW Texas
Posts: 5,249
|
sorry - you added more pictures as I was typing. Elevating the skimer outlet won't work as it will keep the skimmer flooded leaving no space for the bubble column in the cone.
__________________
A smooth sea never made a skillful mariner Current Tank Info: 110g Mixed Reef, LED's & T5's |
|
|
|
|
12/03/2011, 10:14 AM
|
#7 | |
|
Registered Member
Join Date: Dec 2011
Location: Saint Petersburg, FL
Posts: 136
|
Quote:
The riser pipes on the old turboflotor came right to the skimmer neck. Here's an updated pic, am I good now? 
|
|
|
|
|
|
12/03/2011, 10:16 AM
|
#8 | |
|
Registered Member
Join Date: Dec 2011
Location: Saint Petersburg, FL
Posts: 136
|
Quote:
Thanks for the input 
|
|
|
|
|
|
12/03/2011, 10:17 AM
|
#9 |
|
Registered Member
Join Date: Dec 2011
Location: Saint Petersburg, FL
Posts: 136
|
Sooo weeee! 4 holes tapped and 5/16 now replaces the 1/4 stock. The base plate is now threaded and ready for a good seal. As soon as I get grey for the riser pipe, glue and silicone everything together I'll start wet testing.
Difference in size  Sched 40 feed for the riser pipe, now I just need the riser pipe to be grey. 
|
|
|
|
|
12/03/2011, 10:22 AM
|
#10 | |
|
Registered Member
Join Date: Oct 2005
Location: DFW Texas
Posts: 5,249
|
Quote:
like Jason and I indicated you will need to use the original lenght pipe and cut a hole in the sump or elevate the skimmer
__________________
A smooth sea never made a skillful mariner Current Tank Info: 110g Mixed Reef, LED's & T5's |
|
|
|
|
|
12/03/2011, 10:23 AM
|
#11 | ||
|
Registered Member
Join Date: Dec 2011
Location: Saint Petersburg, FL
Posts: 136
|
Quote:
Quote:
|
||
|
|
|
|
12/03/2011, 10:28 AM
|
#12 |
|
Registered Member
Join Date: Oct 2005
Location: DFW Texas
Posts: 5,249
|
I'd just get some gasket material and cut it to fit
the silicone may work - I'd put a bead on there but don't tighten it all the way, leave a 1/16" gap until it drys, then tighten it up glueing would be an aboslute last effort as it may or may not work and then your stuck with it
__________________
A smooth sea never made a skillful mariner Current Tank Info: 110g Mixed Reef, LED's & T5's |
|
|
|
|
12/03/2011, 10:38 AM
|
#13 | |
|
Registered Member
Join Date: Dec 2011
Location: Saint Petersburg, FL
Posts: 136
|
Quote:

|
|
|
|
|
|
12/13/2011, 12:41 PM
|
#14 |
|
Registered Member
Join Date: Dec 2011
Location: Saint Petersburg, FL
Posts: 136
|
Worked with the silicone, I couldn't do the compression with the silicone, but I did it by cranking it down from the get go. So its water proof, or at least no longer leaking, I've got to test it under normal operating conditions this week end.
|
|
|
|
|
12/19/2011, 12:54 PM
|
#15 |
|
Registered Member
Join Date: Dec 2011
Location: Saint Petersburg, FL
Posts: 136
|
Well it holds, leaks slightly but I think I can get that fixed. Look at the before and after bubble production.
Bad @$$  Creamy whiteout  The output height works perfectly as is, woo!  Now the problem  The airline silencer floods when the power is cut, how do I fix this? |
|
|
|
|
12/30/2011, 07:02 AM
|
#16 |
|
Registered Member

Join Date: Dec 2007
Location: Hong Kong
Posts: 457
|
i have the same problem. the silencer is overflowing with water when i turn off the skimmer pump and the feed pump is still running
|
|
|
|
|
12/31/2011, 10:26 AM
|
#17 |
|
RC Sponsor
Join Date: Feb 2006
Location: Northern VA
Posts: 2,446
|
Since the CS1 was designed as an internal skimmer, silencer location was not an integral part of the original design. A quick solution if it is causing a problem, would be to attach a short piece of tubing to the top of the silencer and run it into the lid of the collection cup.
__________________
Dan Don't rush art, you get bad art. |
|
|
|
|
01/02/2012, 09:20 PM
|
#18 |
|
Registered Member
Join Date: Dec 2007
Location: Hong Kong
Posts: 457
|
sorry necessary_evil for highjacking your thread...
The problem I have with the silencer is no matter what the configuration is, internal or external, with recirculation mod, the silencer will always be filled up with water when the skimmer is turned off. The water level inside the skimmer is higher than the silencer there according to physics, water will be pushed through the air tube and into the silencer filling it with water. Ive sent an email to you regarding the issue but I have yet to hear back from you. With what you suggested, running a tubing into the collection cup, will only stop it from flooding the floor, but does not solve the issue of the silencer being filled with water. The only real solution is to rise the silencer higher than the water level inside the skimmer when its off. |
|
|
|
|
01/03/2012, 07:41 AM
|
#19 |
|
RC Sponsor
Join Date: Feb 2006
Location: Northern VA
Posts: 2,446
|
Disaster999, if you drill a small 1/8" hole in the bottom of the silencer it will solve your problem. Sorry i misunderstood the first time.
__________________
Dan Don't rush art, you get bad art. |
|
|
|
|
01/03/2012, 10:51 PM
|
#20 |
|
Registered Member
Join Date: Feb 2011
Posts: 380
|
Several ways to get around this.
1. Move the silencer above the water line. 2. Make sure your skimmer output is open enough not to allow the water line to the silencer. 3. Move the silencer to hang over your sump and drill a small hole in the bottom of it. 4. Add extra tube from silencer to the collection cup. 5. Add extra tube from silencer to the sump. I like #4 because it keeps the stink from the skimmate down. 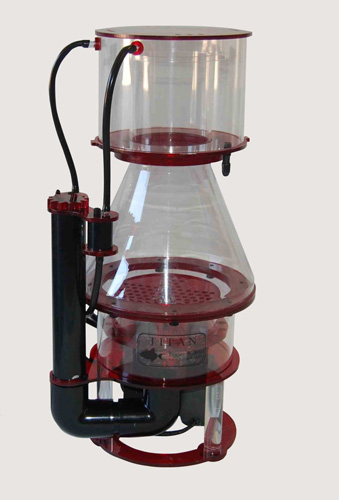
|
|
|
|
 |
|
|
 Similar Threads
|
||||
| Thread | Thread Starter | Forum | Replies | Last Post |
| Mesh mod "break in" time on skimmer? | VengefulNemesis | Tampa Bay Reef Club | 4 | 12/03/2011 01:04 PM |
| SOLD! - FS: Frag Pack | Bandomo | Florida Marine Aquarium Society (FMAS) - Miami/Ft. Lauderdale | 4 | 12/03/2011 02:19 AM |


