
|
|
 02/17/2017, 01:37 PM
|
#1 |
|
Registered Member
 Join Date: Jul 2009
Location: Iowa
Posts: 9,671
|
Little review and getting it setup!
http://www.buckeyehydro.com/the-gapp...ial-ro-system/ PRODUCT DESCRIPTION Residential-scale systems too slow, and commercial systems too expensive for your application? Meet The Gapper - an RO system that utilizes the best of both worlds to deliver up to 400 gpd at an incredibly affordable price! True to its name, the Gapper fills the gap between traditional residential scale RO's that produce up to 200 gpd, and commercial RO's that typically begin at 500 gpd. The Gapper features three 20" x 2.5" standard-sized prefilters - one sediment filter and two carbon blocks; an extra low energy, made-in-the-USA commercial RO membrane; liquid-filled pressure gauge; high pressure pump; auto flush valve; feed water solenoid valve; housing wrench; and an incredible 1:1 waste water to purified water ratio! Includes 10 feet of 3/8" feedwater tube (blue) and permeate tube (white), and 10 feet of 1/4" concentrate tubing (yellow). With 98.5% rejection, The Gapper is an excellent choice to purify your water before its delivered to a deionization stage. For chlorinated feedwater, the standard filter package can be selected. For addressing feedwater with chloramines, or for enhanced chlorine removal, choose the Chloramine Filter Package. This package features a 1 micron sediment filter, and two best-in-class 20" x 2.5" Chloraguard Carbon Blocks. I thought this "light" RO unit should get a little thread of it's own. I just replaced a basic 5 stage RO/DI system I started with back in 2009 and have slowly over time upgraded various components of it. From adding more DI stages to rotate though, adding additional membrane to boost production rate, adding more TDS meters, etc. This was my current setup just before this last upgrade. 1 micron sediment, 1 micron carbon, .5 micron carbon, dual 150 GPD membranes, and 3 DI stages. I was getting between 200-300gpd and rotating DI stages helped increase it's life.  Normally I swap out the carbon filters every 6 months preventively. Mainly because I'm to lazy to test for total chlorine which would indicate when the carbon blocks actually need to be replaced. So, I was looking at upgrading the carbon blocks to 20" x 2.5" from the standard 10"x2.5" and only swap them out once a year. That's when I ran across the Gapper! A lot of features I didn't have but wanted and the 20" housings I was wanting to get anyway. Went from upgrade to total replacement. I found buckeye hydro had a thread on here for The Gapper when they released it which was late last year. http://www.reefcentral.com/forums/sh....php?t=2610131 So, I started asking questions and Buckeye Hydro was very helpful in answering questions and getting me going into the right direction. First thing I found out I had to do was change out how my water supply was feeding into my RO/DI system. The Gapper uses 3/8" tubing instead of the 1/4" most standard home ro/di systems use. Plus it uses a booster pump to make sure the PSI into the membrane is right which the membrane has a considerably higher PSI requirement. Buckeye Hyder also does NOT recommend using a saddle valve especially for those using booster pumps and definitely NOT for the Gapper. I found out why very quickly after doing this change out. For my single and dual 75gpd to 150gpd membranes I've been using my pressure has been good enough but for some people a saddle valve may be hurting a lot more. I went from this  74psi  To this  92psi  Almost 20PSI increase in pressure just from switching out from a saddle valve. Crazy. But still not high enough for the Gapper which is good it comes with a booster pump. So, While I was waiting for the Gapper to get in I decided to change everything out to 3/8" tubing which was recommended and decided to change out the DI stages I had to also use 20"x2.5" housings. Replaced 3x 10" housings with 2x 20" housings. I found out a single 20" refillable cartridge holds more by about a quarter pound or so then 2x 10" refillable cartridges. This should last quite a long time time as I swap the 2nd cartridge to the first rotation like I was doing with the 3x 10" stages. Plus the Gapper has a pretty high rejection rate over 98.5% which I was getting around 96-98% before. Which will also help increase the life of the DI.  Last leg to my rodi reservoir upgraded to 3/8" tubing and float valve. Ready for the Gapper!  Which I got the Gapper in yesterday. It was packaged really well and comes with everything needed to get the RO unit up and running which is awesome. I started looking at other commercial type units and there was always something missing like the booster pump, solenoid valves, pressure switches, and even pre filter stages (housing not just the filters). The Gapper has everything and the manual was very helpful in getting it all together. Plus the price for it all was well under a grand which when looking at a complete commercial setup I was seeing $2,000 and up and way up like $10k and more.  There is one modification I did do which is to replace an elbow and put in a T with a valve. Which will be fore whenever I replace the carbon prefilters I can run the water down to the drain to rinse them off with out fouling the membrane.  It took me about an hour to get it all setup which included moving my DI stages over a bit and putting in a new 2x4 so the Gapper could be mounted with the bracketing being fully supported and up higher then the DI stages so I could remove or add a membrane. Be warned when flushing the filters with out the RO membrane that membrane chamber has quite a bit of water in it which all came out when I opened up the end cap. Getting that cap back in took some pushing for sure. Then it's secured with a ring clip. Nice setup. Here it is all setup which everything there besides the TDS meters, the micro ball valves I added, and the DI stages ALL came with the Gapper.  There's several reason's I went with this unit. Water volume used monthly is one which is around 230 gallons. The big things I'm looking forward to is the auto flush, 1 to 1 waste ratio, and the very high rejection rate. My old basic 5 stage is about 4:1 waste and about 96-98 rejection rate. That will be a big savings in water usage and DI usage. The DI being the bigger of the cost but the water reduction will be good environmentally. The next big pluses to me will be that I will only need to swap out a single membrane and reduce the pre filter change out to once a year. The cost on the prefilters is a wash but the single membrane will be slightly cheaper and easier. Also, I have a larger volume of water if there's ever another bad emergency where I need to make a lot of quick water changes the faster production speed is of great benefit. Like a couple years ago mildew remover got into my tank and wiped out all corals and other inverts and ammonia spikes were starting to kill off my fish. After a quick water change with what I had on hand in my saltmix reservoir I was waiting for it to fill and mix again which I did several times. 400GPD will help speed that up. Plus, miscellaneous and smaller gallon stuff stuff I'm always wishing the RO output was faster.
__________________
rebuild and recovery log: No more red house, you'll have to click on my name and visit my homepage! You can check out my parameters at reeftronics dot net website and look for my username. Current Tank Info: 180g mixed reef w/ a beananimal overflow to a dolomite RRUGF. | 20g long G. Smithii Mantis Tank Last edited by jason2459; 02/17/2017 at 02:07 PM. |

|

|
|
02/22/2017, 11:20 PM
|
#2 |
|
Registered Member
Join Date: Jul 2009
Location: Iowa
Posts: 9,671
|
It's been unseasonably warm here recently but tap temp is still sub 60F. I was hoping for over 60. I'll have to test the rejection rate and waste ratio when I can get the water supply temp up.
But even with very sub-optimal temp I'm getting right about 320gpd, 98.4% rejection still and about 1.5:1 waste to permeate ratio. Very awesome. Much better then what I Was getting before. I have the booster pump dialed in to the recommended running pressure and I bet if I increased that some I could get better numbers but I'm happy with the results with out doing anything like that. So, compared to my old 300gpd setup I'm easily at 100gpd production increase, 2% higher on the rejection rate, and over 2.5x better waste water ratio and not far off from the rated specs which is for much warmer waters. Otherwise everything with the system has been running flawlessly. I am so loving the autoflush system! Now I can be even more lazy. 
__________________
rebuild and recovery log: No more red house, you'll have to click on my name and visit my homepage! You can check out my parameters at reeftronics dot net website and look for my username. Current Tank Info: 180g mixed reef w/ a beananimal overflow to a dolomite RRUGF. | 20g long G. Smithii Mantis Tank |
|
|
|
|
03/08/2017, 08:26 PM
|
#3 |
|
Registered Member
Join Date: Jul 2009
Location: Iowa
Posts: 9,671
|
I just got done calibrating both my dual in line TDS meters. I could have been just fine with a single triple but I wanted to double up in the middle right after RO and just before first DI stage. I could have kept my old inline TDS meters too but these were much nicer and easily calibrated which my old ones were not. They also line up well with my hand held tds meter. Only complaint is the dang LED that shows if you're reading in or out is really bright so I put a couple layers of painters tape over them.
So with the two dual in line meters I get pre prefilter TAP TDS, post RO TDS, Pre-DI TDS, post both DI stages TDS. So, if calibrated properly both the post-RO TDS and Pre-DI TDS should be exactly the same. If they aren't I know I need to recalibrate. I've been absolutely loving this whole setup. Still waiting to check production rate again until the tap temp goes up more. But after calibrating the TDS meters... Both post-RO and pre-DI line up perfectly.  And my rejection rate Tap in vs Pre-DI  Over 99%!! Really freaking awesome. No wonder it barely looks like I've used any DI. And FYI, I have always ran post-RO filter water to the drain for a bit until the TDS drops removing the TDS creep from eating up the DI. The TDS meter is helpful in know when its ready to go.
__________________
rebuild and recovery log: No more red house, you'll have to click on my name and visit my homepage! You can check out my parameters at reeftronics dot net website and look for my username. Current Tank Info: 180g mixed reef w/ a beananimal overflow to a dolomite RRUGF. | 20g long G. Smithii Mantis Tank |
|
|
|
|
03/09/2017, 03:46 PM
|
#4 |
|
Registered Member
Join Date: Jul 2010
Location: Wooster, OH
Posts: 1,862
|
You must have a massive tank or water volume! Wow, thats a lot of RO/DI
__________________
60x36x24 mixed reef. 40b sump. Regal 250int Varios. 4xHydra26HDs+t5s. 4xMp40wes. Apex2016. |
|
|
|
|
03/09/2017, 03:52 PM
|
#5 | |
|
Registered Member
Join Date: Jul 2009
Location: Iowa
Posts: 9,671
|
Quote:
Otherwise for my main DT I have a 65gallon brute I fill up every week or so and production rate doesn't mater so much as I turn it on and just leave it and if it takes over night or all day no big deal. The ASO before and now the pressure solenoid will just turn if off once full. Now if, or more like when, I have another major tank issue and need to change out large amounts of water at once or quickly the faster flow rate will be a huge help in filling the 65 gallon brute or my 55g saltmix brute up.
__________________
rebuild and recovery log: No more red house, you'll have to click on my name and visit my homepage! You can check out my parameters at reeftronics dot net website and look for my username. Current Tank Info: 180g mixed reef w/ a beananimal overflow to a dolomite RRUGF. | 20g long G. Smithii Mantis Tank |
|
|
|
|
|
04/02/2017, 06:19 AM
|
#6 |
|
.Registered Member

Join Date: Sep 2006
Location: Cincinnati, Ohio
Posts: 4,857
|
In answer to a number of questions we've received...
If you are routing the RO water produced by the system to an unpressurized ("atmospheric") storage tank, we like to control the system with a tether float switch rather than a float valve and a pressure switch. The tether float switch (and pivot weight if needed) do a great job of not allowing the RO system to short cycle. This decreases the impact of TDS creep, and limits wear and tear on the pump. Russ |
|
|
|
|
04/02/2017, 06:45 AM
|
#7 |
|
Registered Member
Join Date: Jul 2009
Location: Iowa
Posts: 9,671
|
If those are generated by the use of my float valve then I should point out what I wrote above on how I use my setup.
I do not leave mine on 24/7. I manually turn on the water supply and then power before each use and then manually turn off power and then water supply after each use. I have a 20amp heavy duty surge protector power strip that the Gapper is plugged into over head of it on a shelf. I switch it on and off. The 60 gallon brute I'm using also has no automatic way to supply any of my other reservoirs either. I use that container to fill up a 23 gallon brute slimjim for ATO, 50 gallon brute for new saltmixing, and a 29 gallon Rubbermaid tote for limewater dosing. I do this manually by plugging in a power switch and have a mag1800 sitting on the bottom of the 60gallon rodi holding brute and a 3/4" vinyl tubing I hold and fill up which ever container I need to fill. Turn off and unplug the power strip the mag 18 is plugged into. Then go and turn on the water supply to the Gapper and power on the 20amp strip the Gapper is plugged into. It then does a quick backflush. Then I open up a valve that goes to my drain and it then does another quick backflush and continues to run RO water to the drain before DI. I let that go a couple minutes and then look at my post RO and pre DI TDS meter looking for it to settle down usually hitting 4 to 6 before closing that valve that runs to the drain which some places sell a anti tds creep kit that is the same thing. Then I open up the valve that goes to the 60 gallon rodi brute (it does another backflush again). Once that brute is filled I close that valve supplying rodi to that 60 gallon brute. I turn off the power to the Gapper and then finally turning off the water supply to the Gapper. Sent from my SM-G930V using Tapatalk
__________________
rebuild and recovery log: No more red house, you'll have to click on my name and visit my homepage! You can check out my parameters at reeftronics dot net website and look for my username. Current Tank Info: 180g mixed reef w/ a beananimal overflow to a dolomite RRUGF. | 20g long G. Smithii Mantis Tank |
|
|
|
|
04/02/2017, 06:54 AM
|
#8 |
|
Registered Member
Join Date: Jul 2009
Location: Iowa
Posts: 9,671
|
Blue valve bottom left manually turns on and off water supply to the Gapper. Blue valve in the middle before DI drains the TDS creep to the floor drain. Check TDS meters for TDS post RO to settle down
 Blue valve on right to supply 60 gallon brute 
__________________
rebuild and recovery log: No more red house, you'll have to click on my name and visit my homepage! You can check out my parameters at reeftronics dot net website and look for my username. Current Tank Info: 180g mixed reef w/ a beananimal overflow to a dolomite RRUGF. | 20g long G. Smithii Mantis Tank |
|
|
|
|
04/02/2017, 06:55 AM
|
#9 |
|
.Registered Member
Join Date: Sep 2006
Location: Cincinnati, Ohio
Posts: 4,857
|
Perfect - There's a 100 ways to skin this cat!
With the inline TDS meters you have installed, it would be easy for you to figure out how long your Gapper takes to clear out the TDS Creep water. If you turn the system on, and then take a TDS reading of the permeate every 10 seconds, you'll end up with data that let's you create a graph like this: 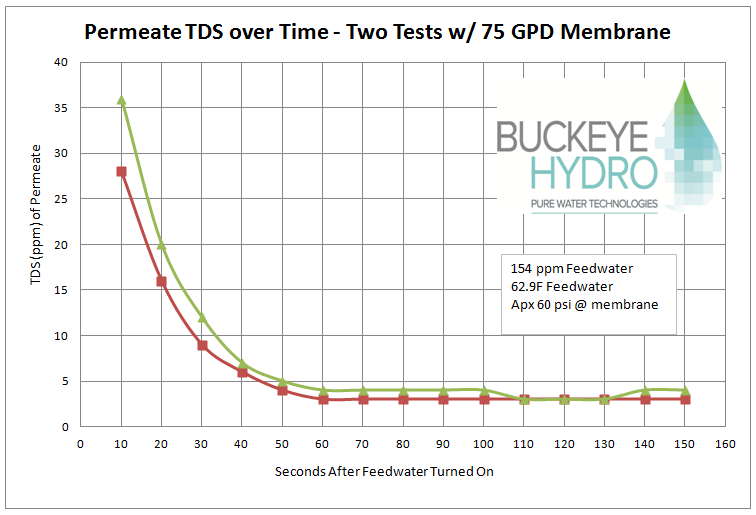
|
|
|
|
|
04/02/2017, 07:18 AM
|
#10 |
|
Registered Member
Join Date: Jul 2009
Location: Iowa
Posts: 9,671
|
Thanks. Don't know why I didn't think of this before as I can control the Gapper now with power.
I think I will get the float and weight though as a failsafe incase yhe float valve fails. I like redundancy. In my 55g brute I have one for my AWC as the main shutdown and a float switch as a backup.* I would need the pump up for this I think http://www.buckeyehydro.com/tether-float-switch/ http://www.buckeyehydro.com/float-switch-weight/ Sent from my SM-G930V using Tapatalk
__________________
rebuild and recovery log: No more red house, you'll have to click on my name and visit my homepage! You can check out my parameters at reeftronics dot net website and look for my username. Current Tank Info: 180g mixed reef w/ a beananimal overflow to a dolomite RRUGF. | 20g long G. Smithii Mantis Tank |
|
|
|
|
04/02/2017, 07:20 AM
|
#11 |
|
.Registered Member
Join Date: Sep 2006
Location: Cincinnati, Ohio
Posts: 4,857
|
Right - the "Pump Up" switch is a normally closed switch - meaning that when the float and water level is down, the switch turns on, the RO turns on, and the barrel is filled... until the float is up.
|
|
|
|
|
04/02/2017, 09:09 AM
|
#12 |
|
Registered Member
Join Date: Jan 2012
Location: Long Island, New York
Posts: 1,742
|
Very nice Jason! Awesome unit.
__________________
Rimless 150 Gal Sps System: Giesemann Spectra/New Apex/2x MP40qd's+ 2x Gyre XF250's/Cor20/Custom Stand, Sump and Algae Scrubber/2x DOS dosing/Skimz Octa 205i Skimmer |
|
|
|
|
04/02/2017, 06:20 PM
|
#13 | |
|
Registered Member
Join Date: Jul 2009
Location: Iowa
Posts: 9,671
|
Quote:
I was already looking for the next upgrade when I ran across this setup and I'm finally fully content with my rodi system and don't feel like I need to do a darn thing to it besides change out filters for maintenance. It is awesome. I can't recommend the gapper enough. I love it. Sent from my SM-G930V using Tapatalk
__________________
rebuild and recovery log: No more red house, you'll have to click on my name and visit my homepage! You can check out my parameters at reeftronics dot net website and look for my username. Current Tank Info: 180g mixed reef w/ a beananimal overflow to a dolomite RRUGF. | 20g long G. Smithii Mantis Tank |
|
|
|
|
|
04/02/2017, 08:03 PM
|
#14 |
|
.Registered Member
Join Date: Sep 2006
Location: Cincinnati, Ohio
Posts: 4,857
|
Jason - we liked your idea of the rinse up valve so much, we incorporated, along with a strainer, in the system. We have one coming your way at no charge!
|
|
|
|
|
04/03/2017, 08:38 AM
|
#15 |
|
Registered Member
Join Date: Jul 2009
Location: Iowa
Posts: 9,671
|
That's awesome. Thanks.
__________________
rebuild and recovery log: No more red house, you'll have to click on my name and visit my homepage! You can check out my parameters at reeftronics dot net website and look for my username. Current Tank Info: 180g mixed reef w/ a beananimal overflow to a dolomite RRUGF. | 20g long G. Smithii Mantis Tank |
|
|
|
|
04/15/2017, 07:51 PM
|
#16 |
|
Registered Member
Join Date: Jul 2009
Location: Iowa
Posts: 9,671
|
The big float switch is installed and just needs adjusted to fill level but it's working. Float valve is the backup to the float switch.
 Next room over the piggy back plug plugged into the surge protector and the Gapper pluges into the piggy back plug which will switch it off once full. Then I will manually turn of the surge protector and the water supply. ] 
__________________
rebuild and recovery log: No more red house, you'll have to click on my name and visit my homepage! You can check out my parameters at reeftronics dot net website and look for my username. Current Tank Info: 180g mixed reef w/ a beananimal overflow to a dolomite RRUGF. | 20g long G. Smithii Mantis Tank |
|
|
|
|
04/27/2017, 10:05 PM
|
#17 | |
|
Registered Member
Join Date: Jul 2009
Location: Iowa
Posts: 9,671
|
Quote:
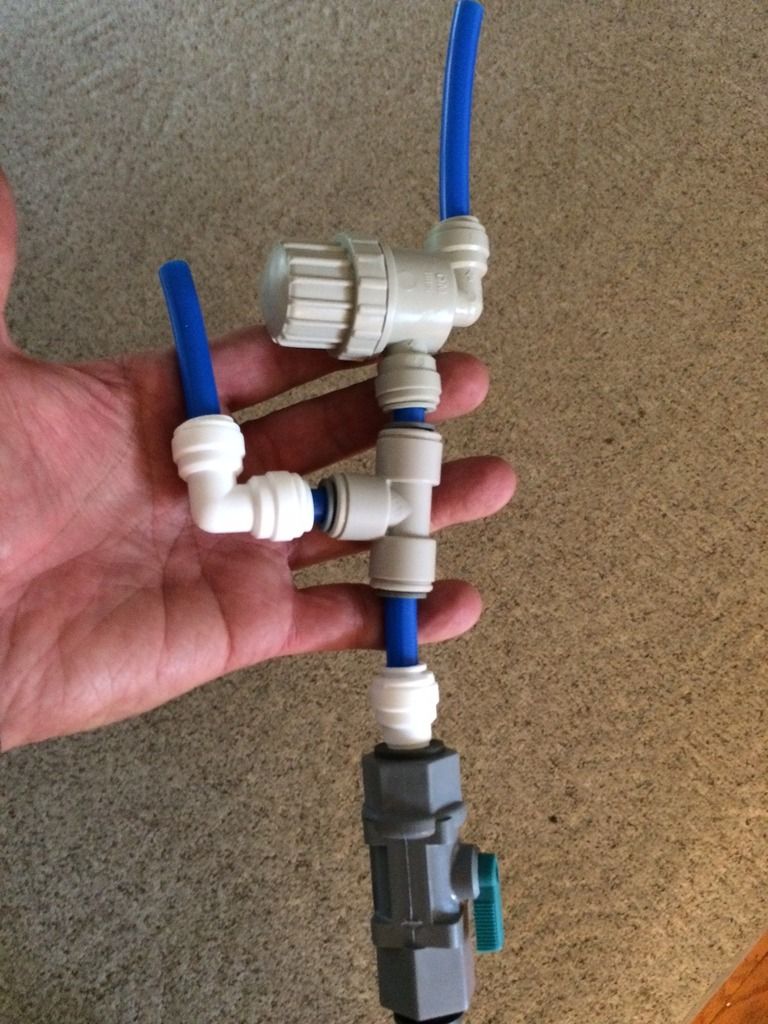
I assume that strainer is to go pre-booster pump? It just fits in there resting on that solenoid. That's right and ok? Nice safety net.  Then I liked the 1/2" valve better then the 3/8" one I had. Nice touch. I liked it going down for my setup as its in the corner on that side. So still used the T  But then I tested it and had one issue... the selenoid wont open up unless I open up a post RO valve and even then its like the booster pump then runs dry. Unless I have this all in the wrong spot? If so, no problem and I can move it all around. But in the mean time I made a little adjustment to how my feed water goes to the prefilters. Basically a bypass system just for flushing or I can also use it for testing my prefilters for chlorine to see if the carbon blocks need replaced if I ever was curious or desired. First a T before the valve I normally use to manually turn on and off the water supply to tge unit. And another valve just for flushing/prefilter testing purposes.  Then that bottom valve goes to another T that goes post booster pump and pre first stage sediment filter. With the bottom valve opened water bypasses the booster pump and selenoid and feeds directly to the prefilters no power needed.    Then open up the post prefilter valve installed shown up above first and the prefilters when changed gets flushed with no booster pump/power needed and with out fouling the membrane. Thanks again to Buckeye Hydro for sending the kit now just hope I didn't put it all in the wrong spot. 
__________________
rebuild and recovery log: No more red house, you'll have to click on my name and visit my homepage! You can check out my parameters at reeftronics dot net website and look for my username. Current Tank Info: 180g mixed reef w/ a beananimal overflow to a dolomite RRUGF. | 20g long G. Smithii Mantis Tank |
|
|
|
|
|
04/28/2017, 01:16 AM
|
#18 |
|
.Registered Member
Join Date: Sep 2006
Location: Cincinnati, Ohio
Posts: 4,857
|
Here's where it goes:
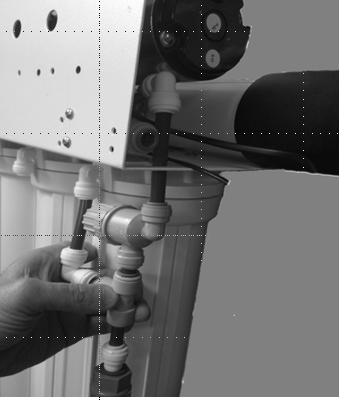 Because the rinse up valve is pre-solenoid, there is no need for the solenoid to be open or the pump to be on in order to rinse the carbon block(s). Russ |
|
|
|
|
04/28/2017, 06:16 AM
|
#19 |
|
Registered Member
Join Date: Jul 2009
Location: Iowa
Posts: 9,671
|
Ah, that looks much better then how I crammed it in. Easy rearrangement I'll get to tonight. Thanks!
__________________
rebuild and recovery log: No more red house, you'll have to click on my name and visit my homepage! You can check out my parameters at reeftronics dot net website and look for my username. Current Tank Info: 180g mixed reef w/ a beananimal overflow to a dolomite RRUGF. | 20g long G. Smithii Mantis Tank |
|
|
|
|
04/28/2017, 06:08 PM
|
#20 |
|
Registered Member
Join Date: Jul 2009
Location: Iowa
Posts: 9,671
|
Here we go, now it's straightened out and makes a lot more sense. Now it's much easier to get to the strainer to clean out. Like once a year or so when swapping out the prefilter?

__________________
rebuild and recovery log: No more red house, you'll have to click on my name and visit my homepage! You can check out my parameters at reeftronics dot net website and look for my username. Current Tank Info: 180g mixed reef w/ a beananimal overflow to a dolomite RRUGF. | 20g long G. Smithii Mantis Tank |
|
|
|
|
04/29/2017, 01:42 AM
|
#21 |
|
.Registered Member
Join Date: Sep 2006
Location: Cincinnati, Ohio
Posts: 4,857
|
I'd check the screen in the strainer every six months, and a week after installing new carbon blocks. You can change that schedule based upon what you see.
Russ |
|
|
|
|
04/29/2017, 02:58 PM
|
#22 |
|
Registered Member
Join Date: Jul 2009
Location: Iowa
Posts: 9,671
|
Will do.
This system just gets better and better. The TAP water temp is close to 60F now. I didn't get a chance to check production and waste water rates yet but the rejection rate is ridiculous. lol 325 TDS tap  2 TDS after RO before DI! 
__________________
rebuild and recovery log: No more red house, you'll have to click on my name and visit my homepage! You can check out my parameters at reeftronics dot net website and look for my username. Current Tank Info: 180g mixed reef w/ a beananimal overflow to a dolomite RRUGF. | 20g long G. Smithii Mantis Tank |
|
|
|
|
04/29/2017, 03:11 PM
|
#23 |
|
.Registered Member
Join Date: Sep 2006
Location: Cincinnati, Ohio
Posts: 4,857
|
99.4% rejection. Gotta love it!
|
|
|
|
|
04/29/2017, 03:50 PM
|
#24 |
|
Registered Member
Join Date: Mar 2015
Location: Upstate NY
Posts: 5,313
|
I have those same TDS meters Jason2459, put a piece of black tape(electrical tape) over the lights, it helps immensely.
That is one serious RO/DI unit!!
__________________
80G SCA Build: http://reefcentral.com/forums/showthread.php?t=2560256 Originally posted by der_wille_zur_macht: "He's just taking his lunch to work" |
|
|
|
|
04/29/2017, 03:52 PM
|
#25 |
|
.Registered Member
Join Date: Sep 2006
Location: Cincinnati, Ohio
Posts: 4,857
|
What's the issue with the meter lights?
|
|
|
|
 |
|
|


