
|
|
 03/09/2009, 08:51 PM
|
#226 |
|
Registered Member
Join Date: Mar 2008
Location: Encinitas, CA
Posts: 104
|
I am having a 60 X 24 X 24 built and up till today was going to use a herbie with overflow boxes. I now want to have an external coast to coast overflow with bean's set up. A few questions. I will be using a dart (4300 gph) that will feed the tank and a frag tank (probably herbie here)
1) How deep / wide should the external overflow be? Bulkheads in the bottom or side of the overflow box? (would prefer the bottom to keep width down) 2) Should I use 2" piping to ensure plenty of water for the dart to push or will 1.5 be sufficient? 3) How can I set up my sump so that my internal venturi skimmer will have a slow enough flow rate? Dedicate the siphon to the skimmer the other drain to another portion of the sump? (I want as much return flow as possible {sps dominated} yet still provide the skimmer with adequate contact time with passing water. 4) Any way to hide the return lines (rimless tank)? i.e. cut holes for the return or just pipe them over the top? Thank you so much in advance for any help.
__________________
Mike momento mori Click the house for my build thread |

|

|
|
03/10/2009, 02:59 PM
|
#227 |
|
Registered Member
Join Date: Sep 2003
Location: Cary, NC
Posts: 449
|
2 All-Glass Overflow boxes
beanAnimal,
I've read most of this and the old Herbie thread in search for a good overflow solution for my system. I have a 210 gal display, 75 gal sump, and 40gal fuge. My display is an AGA with 2 built-in overflow boxes, each contains (1) 3/4" bulkhead & (1) 1" bulkhead. I just purchased a Reeflo BlackFin 3500 and expect it will be pushing between 1800gph and 2000gph after head pressure loss and tapping off the return to feed my fuge. If I set up all 4 pipes (2 in each overflow box) as standard durso pipes, I fear I may not have enough buffer room to handle the amount of flow I want to push through my tank; hence the searching for and reading of this thread. 2 questions: 1. Can I accomplish your design given my current overflow boxes (I don't have 3 bulkheads per overflow)? If not do you have any recommendations for a modified version of your design? 2. The focus of this thread has been on âquieting the overflowâ. This is nice, but my focus is drainage capacity. Do you think this method provides me the best drainage capacity for my setup, or would I be better off with 4 durso (regardless if it is louder or not). Also, I drop my water into a filter sock, and the end of the pipe is above the water level in my sump. The filter sock dampens the noise and it is in a closet in an adjacent room anyways... Thanks in advance for the help. |
|
|
|
|
03/11/2009, 12:08 AM
|
#228 |
|
Registered Member
Join Date: Oct 2002
Posts: 4,338
|
Just a quick question, how much higher should the secondary drain (the one with the air opening on top) be compare to the primary drain?
__________________
One of the most frustrating thing about this hobby? The blind leading the blind. |
|
|
|
|
03/11/2009, 08:07 AM
|
#229 |
|
Moved On

Join Date: Sep 2006
Location: Phila.,Pa.
Posts: 88
|
Hey Bean, I will be receiving today a new 260g.(84"x30"x25 h") and was planning on copying your design for the drains. I had planned to use the calfo-style overflow going across one of the 30" ends, but it recently dawned on me that the 3" euro-bracing would be a problem for the internal calfo overflow. Can you or someone who has had to deal with this type of situation suggest a way to incorporate this type of overflow without going external? The tank has not been drilled and has no overflows so I will be starting with a clean slate. Thanks.
|
|
|
|
|
03/11/2009, 08:58 AM
|
#230 |
|
Registered Member
Join Date: Feb 2005
Location: Greenville NC
Posts: 11
|
Bean, First off awsome work. I saw you post and it got my wheels turning. I was thinking of doing a 75 like you. Do you think 2 set of the calfo overflows will work on a 75. I wanna try to set up a 75 without having to use power heads. I know a big pump is needed. My plan was to use 2 of the reeflo balck fin 6000. So each calfo would have approx. 4000 GPH. Any input or have I lost my mind.
__________________
Have a happy day everyone. Current Tank Info: 270 acrylic in wall |
|
|
|
|
03/11/2009, 09:05 AM
|
#231 |
|
Registered Member
Join Date: Feb 2005
Location: Greenville NC
Posts: 11
|
mkarston just saw your post. I run a small pet store in eastern NC.(greenville) Good too see local folks.
I was thinking if you could drill the tank and add a calfo overflow in there and use the AGA overflos as returns. Just an idea.
__________________
Have a happy day everyone. Current Tank Info: 270 acrylic in wall |
|
|
|
|
03/11/2009, 11:47 AM
|
#232 |
|
Registered Member
Join Date: Sep 2003
Location: Cary, NC
Posts: 449
|
Hey Thomas, how are you. Yeah, drilling would be too much work for me to take on right now. I would have to tear down my whole reef.
|
|
|
|
|
03/11/2009, 11:53 PM
|
#233 |
|
Registered Member
Join Date: Oct 2002
Posts: 4,338
|
Anyone think this is similar to Bean's design and should work as well?
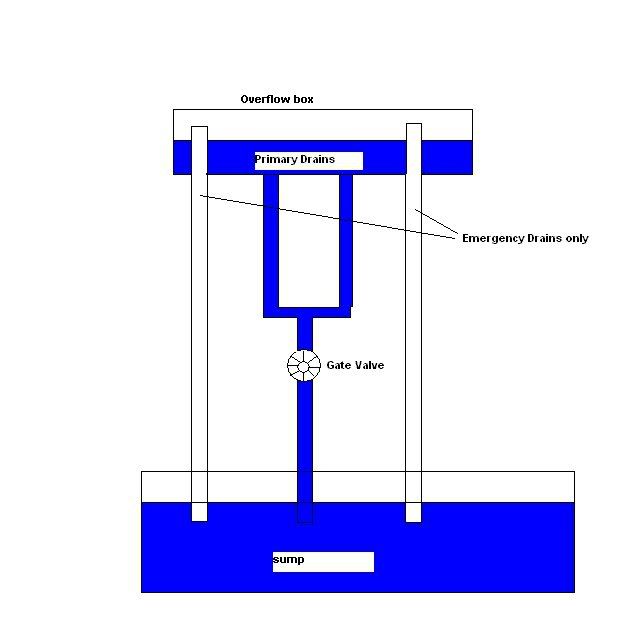 From the owner of this image, here is how it works: BEGIN QUOTE Once things get flowing, you dial the gate valve back until the water begins to back up into the overflow box. At a magic point, the water level in the overflow box begins to generate enough head pressure to precisely match the amount of flow you are putting in. At that point, water flows silently into the sump because no air is drawn into the drains...No air, no sound, no bubbles, no splashing in the sump..silence. END QUOTE It seems to me this is very similar to Bean's design and might actually work better ?
__________________
One of the most frustrating thing about this hobby? The blind leading the blind. Last edited by Misled; 10/30/2017 at 06:53 PM. |
|
|
|
|
03/12/2009, 12:02 AM
|
#234 | ||||
|
Registered Member
Join Date: Feb 2003
Location: Pittsburgh
Posts: 20,772
|
Quote:
 Quote:
Quote:
|
||||
|
|
|
|
03/12/2009, 12:05 AM
|
#235 | |
|
Registered Member
Join Date: Feb 2003
Location: Pittsburgh
Posts: 20,772
|
Quote:
|
|
|
|
|
|
03/12/2009, 12:08 AM
|
#236 | |
|
Registered Member
Join Date: Feb 2003
Location: Pittsburgh
Posts: 20,772
|
Quote:
canting the pipe to the side... slide a bit of airline tubing into it.... etc... |
|
|
|
|
|
03/12/2009, 12:10 AM
|
#237 | |
|
Registered Member
Join Date: Feb 2003
Location: Pittsburgh
Posts: 20,772
|
Quote:
I do drink Iron City beer... I used self leveling "table top" epoxy. (US Composites is a supplier) |
|
|
|
|
|
03/12/2009, 12:16 AM
|
#238 | ||||
|
Registered Member
Join Date: Feb 2003
Location: Pittsburgh
Posts: 20,772
|
Quote:
Quote:
Quote:
Quote:
|
||||
|
|
|
|
03/12/2009, 12:21 AM
|
#239 | ||
|
Registered Member
Join Date: Feb 2003
Location: Pittsburgh
Posts: 20,772
|
Re: 2 All-Glass Overflow boxes
Quote:
Quote:
|
||
|
|
|
|
03/12/2009, 12:22 AM
|
#240 | |
|
Registered Member
Join Date: Feb 2003
Location: Pittsburgh
Posts: 20,772
|
Quote:
|
|
|
|
|
|
03/12/2009, 12:25 AM
|
#241 | |
|
Registered Member
Join Date: Feb 2003
Location: Pittsburgh
Posts: 20,772
|
Quote:
|
|
|
|
|
|
03/12/2009, 12:27 AM
|
#242 | |
|
Registered Member
Join Date: Feb 2003
Location: Pittsburgh
Posts: 20,772
|
Quote:
|
|
|
|
|
|
03/12/2009, 12:33 AM
|
#243 | |
|
Registered Member
Join Date: Feb 2003
Location: Pittsburgh
Posts: 20,772
|
Quote:
Last edited by Misled; 10/30/2017 at 06:53 PM. |
|
|
|
|
|
03/12/2009, 12:41 AM
|
#244 |
|
Registered Member
Join Date: Oct 2002
Posts: 4,338
|
Sorry Bean, not mean to "insult" your design or anything. Just so you know, I am completely new to plumbing and when I say "better", I just mean the look of it (mostly) and I can understand the design behind it simply by looking at the picture alone.
With this herbie design, all 4 drains are standpipe and requires very little fittings, connecting, sealing, plumbing which is important for newbie like myself. What's the significant fail safe your design has over this herbie design? It seems like 2 emergency drain are better than one? Also, will the herbie be as silent as your design? One last question, I only have a 150g and I am planning to use Ehiem 1262 as my return, will the return by enough for either your or the herbie design? btw, I did read your thread (to like page 20 or so) and will keep reading it ....
__________________
One of the most frustrating thing about this hobby? The blind leading the blind. |
|
|
|
|
03/12/2009, 12:55 AM
|
#245 | |||||
|
Registered Member
Join Date: Feb 2003
Location: Pittsburgh
Posts: 20,772
|
Quote:
Quote:
I responded to "better" in terms of function, not look Quote:
Quote:
Quote:
|
|||||
|
|
|
|
03/12/2009, 01:48 PM
|
#246 | |
|
Registered Member
Join Date: Oct 2002
Posts: 4,338
|
Hey Bean,
Would this herbie design work with a single emergency drain? I actually have my tank drilled for 3 holes thinking I am going to use your design but then I figure, for some reason, I thought this herbie design is easier for me to install but the problem is now that I only have 3 holes instead of 4. I was thinking 2 holes will be used as primary and the other one will be emergency. Will this work? Quote:
 It seems like a lot of stuff to buy and connect, etc... The herbie only has a bulkhead and then a single standpipe.
__________________
One of the most frustrating thing about this hobby? The blind leading the blind. |
|
|
|
|
|
03/12/2009, 03:05 PM
|
#247 |
|
Registered Member

Join Date: Feb 2003
Location: South Jersey
Posts: 73
|
First off, BeAn, great thread and plan, I've enjoyed reading the whole thread, though it has taken a week.
 I would appreciate your input or any others who can tell me if this plan has merit. I've seen the topic mentioned and a few photos of versions but due to my future confines I wanted to propose this setup. Constraints: 1) Use as little inner space as possible but get the best surface skim 2) Limit the protrusion into the room for the tank as a whole (just due to positioning in the room) I have a window behind the tank with very large molding which sticks out 2~2.5" from the wall. I'd like to avoid cutting it or accommodating it in order to do a coast to coast externally. So this plan places a smaller external box on 1 side of the molding which I would like to shrink to whatever length allows me to squeeze in the 3 pipes and have room to tweak them. Here for speed of getting something together, i put 22" length.  Thanks, Matt |
|
|
|
|
03/12/2009, 03:33 PM
|
#248 |
|
Registered Member
Join Date: Mar 2009
Location: Las Vegasish
Posts: 43
|
Bean, super thead
i am a newb and have read most all of this thread, wow, amazing.
can you give me your thoughts on this, 100g cube, will have a sump. just trying to get the drains worked out, i see the driller tomorrow with my plan so any help is appreciated. viewed from back thanks for the great reading. 
Last edited by Misled; 10/30/2017 at 06:53 PM. |
|
|
|
|
03/12/2009, 04:34 PM
|
#249 | ||
|
Registered Member
Join Date: Feb 2003
Location: Pittsburgh
Posts: 20,772
|
Quote:
Let me try though: You said you think the other design with (4) standpipes is "easier" but you have 3 holes. If you go back and read the plans my design uses (3) holes setup in a specific way. Quote:
I don't think you are getting the differences and similarities betwee this setup and others. They are all standard PVC fittings. ANY overflow plumbed through the back wall of the tank (or overflow box) is going to need the same basic fittings. The TEES can be replaced with elbows. I added the "cleanout" capability as an extra feature. It is optional. The shallow overflow box requires down turned elbows for my setup AND for a 'herbie' setup. They both require bulkheads and gaskets. They both require elbow and couplers. In a DEEP overflow box, you don't need the downturned elbows becuase the depth of the water prevents air from entering the standpipe. My setup adds an "open channel" that helps with self tuning. The added airline is also an option but adds a very robust "fail-safe" feature to the setup. This is all clearly explained here and in the long thread and at my website. You may want to spend a little more time looking at oveflows and understanding how they work before you decide on what suits your setup best
|
||
|
|
|
|
03/12/2009, 04:36 PM
|
#250 | |
|
Registered Member
Join Date: Feb 2003
Location: Pittsburgh
Posts: 20,772
|
Quote:
|
|
|
|
|
 |
| Tags |
| beananimal, plumbing |
|
|


