
|
|
|
|||||||
 |
| Thread Tools |
 03/14/2012, 07:23 AM
|
#1001 |
|
Registered Member
Join Date: Jul 2011
Posts: 118
|
I would like to be able to chose between 5 or 10 volt pwm out.
6 pwm channels would be my chioce. 1 wire buttons same height as LCD, or maybe a small joystick I2C LCD screw terminals instead of pins Next software $.02 worth |

|

|
|
03/14/2012, 07:57 AM
|
#1002 | |
|
Registered Member
Join Date: Feb 2009
Location: Middle River, MD
Posts: 272
|
Quote:
2) I use only 5v pwm so that too would ideal. 3) Those pin headers are a pain. Screw terminals or another more readily available connection is more than welcome. 4) The buttons only really pose a problem for mounting the controller or putting it in an enclosure, which I would love to do. Soldering the LCD to PCB doesn't seem like a good idea to me because I have already experienced one LCD failure and trying to remove and remount one would seem like a huge pain. Mounting the LCD remotely is a good idea but I would love to keep it all together. |
|
|
|
|
|
03/14/2012, 07:58 AM
|
#1003 |
|
Team RC Member
Join Date: Sep 2003
Location: NY
Posts: 17,749
|
How about surface mount components, at least for super-easy things like resistors and capacitors? Would that be a turn-off for people?
I know many newcomers like through hole but IMHO surface mount is easier and faster once you get used to it. It also takes up way less space which means layout of the board is easier. I'd still leave hard stuff (the ICs) as through hole if people wanted...
__________________
Inconveniencing marine life since 1992 "It is my personal belief that reef aquaria should be thriving communities of biodiversity, representative of their wild counterparts, and not merely collections of pretty specimens growing on tidy clean rock shelves covered in purple coralline algae." (Eric Borneman) |
|
|
|
|
03/14/2012, 08:11 AM
|
#1004 |
|
Registered Member
Join Date: Feb 2009
Location: Middle River, MD
Posts: 272
|
No issue here with surface mount.
|
|
|
|
|
03/14/2012, 11:32 AM
|
#1005 |
|
Registered Member
Join Date: Jan 2009
Location: Palmdale
Posts: 2,556
|
Well i know alot of us have or will attempt your 4101 design, that is surface mount and not tooo horrible.
__________________
~SFVR Member~ 125 Gal Long/50 Gal sump, 2xMP40QD,Aquamax CONES CO-03/Speed Wave dc return 4x AI Sol Blues/Director + 2 80w T5 retrofit/Apex Controller Current Tank Info: 125 gal 72X18X22 |
|
|
|
|
03/14/2012, 01:55 PM
|
#1006 |
|
Registered Member
Join Date: Aug 2011
Location: "The Land of Fruits & Nuts"
Posts: 879
|
Another vote for surface mount. Just keep the package sizes to 1206 or larger. Even soldering the SMD version of the ATMEGA328p is easy after you've done a few LM3409's.
|
|
|
|
|
03/14/2012, 08:41 PM
|
#1007 | |
|
Registered Member
Join Date: Aug 2007
Location: Gurabo, PR USA
Posts: 75
|
Quote:
1) PWM Outputs: I would go with 6 PWM's, I dont see why to limit the Typhon on this. Just remember to include a jumper to select between one of the PWM pins or a 5v + resistor for LCD backlight control. 2)5v and 10v outputs: Yes, BOTH are important. Support for newer Mean Well drivers is very welcome! 3).1" pins: I'm ok with them. I love the idea of the screw terminals, but the resulting pcb size may be too big??? 4) Buttons: Include .1" pins to use wired buttons. Push button remotely installed on the case are more practical. Extras: 5)If possible, design the new Typhon pcb around a particular project box or pcb case, where it can be bolted directly without modifications and the LCD can be easily installed and seen from the outside. 6) Include .1" pins for Vin. This can be used to output 12v for an external pcb like the Hydra Relay board. (I think you already included this in the v1.0 pcb, not sure  ???) ???)7)Surface mount components are nice to have, especially for saving space for the screw terminals. |
|
|
|
|
|
03/14/2012, 09:09 PM
|
#1008 |
|
Registered Member
Join Date: Mar 2012
Location: Kingwood, Texas
Posts: 32
|
^ +1
It does make more sense to have more PWM available, it's just not necessary for my current application, though it could be in the future. IR does sound like a neat idea (and my wife already suggested the remote control RapidLED dimmer over the regular one), but I already have 4 remotes in my livingroom. 5 if you count the Wii. What remote would we use to control it? Or would that be another component to assemble? I have never used SMT components, but I'm not afraid to try. I definitely think wired buttons and project box intentions should be considered to make it more installation friendly, and more presentable. The wife asked what this controller was going to look like and how I was going to install it. So, I showed her some pictures and some ideas, and she decided that it needed to go in the stand so you couldn't see it, which was my reason for wanting to wire the buttons.. Last edited by Loonytic; 03/14/2012 at 09:12 PM. Reason: typos |
|
|
|
|
03/15/2012, 06:54 AM
|
#1009 | ||||||
|
Team RC Member
Join Date: Sep 2003
Location: NY
Posts: 17,749
|
Quote:
Not sure if that's a big deal to anyone or not. 2)5v and 10v outputs: Yes, BOTH are important. Support for newer Mean Well drivers is very welcome![/quote] To be clear, I wouldn't permanently ditch one or the other. My idea is to have only ONE set of output headers, and you'd make a decision at build time to determine if a given output channel was 5v or 10v (i.e. solder a different resistor on or something like that). If you wanted to switch a channel you'd have to modify the hardware. I'm considering this because I don't know of anyone (besides me) who is using some channels at 5v and others at 10v and needs to be able to swap easily. Having only one set of output headers would take up a LOT less space once we go to screw terminals or something else more robust than pin headers. Quote:
 It is going to be a struggle to make all these changes and keep the board size this small but I'm gonna try my best. It is going to be a struggle to make all these changes and keep the board size this small but I'm gonna try my best.Quote:
Ideally I'd design the new board so it can function "standalone" as with the current design, plus in a box. That's gonna be a challenge, though that's part of the fun. Quote:
Quote:
Quote:
Unfortunately, Wii remotes won't work with this because they communicate over bluetooth, not IR (though they have IR receivers in them that pick up signals from the bar you put over the TV). I'd really love to link a Wii remote to a fish tank some day, though. Maybe version 3. Thanks again everyone for the feedback and keep it coming. I'm working on the design right now but am still open to ideas.
__________________
Inconveniencing marine life since 1992 "It is my personal belief that reef aquaria should be thriving communities of biodiversity, representative of their wild counterparts, and not merely collections of pretty specimens growing on tidy clean rock shelves covered in purple coralline algae." (Eric Borneman) |
||||||
|
|
|
|
03/15/2012, 07:28 AM
|
#1010 |
|
Registered Member
Join Date: Aug 2009
Location: France
Posts: 14
|
Hello i'm working on a new version too, with the feedback of friends on the first version.
PWM: a few guys wants more than 6 channel (for fun 'left to right' sunrise, of for refugium, multiple colors), in my version the channel can be used pour moonlight, but with a lot of led on the channel 2-3% on the pwm is too much light solution: PCA9685, 12 bits 16 channels. 4 channel reserved for servo  5-10v: jumper to choose voltage, no direct pwm with arduino pin because some fried the arduino pwm. Screw Terminal block connector for the vIn, more easy to use if the power supply is not connected to typhon, or on small tank to use same power supply for led & typhon No LCD: bluetooth with pc/android interface, the lcd was hard to include, and the menu take too much memory: more space for weather or season variation of light. buttons: has on my first version 1 wire deported buttons, but programmable (ex: button 1 to cycle all channel off, 1-2-3-4..., all off) |
|
|
|
|
03/15/2012, 08:27 AM
|
#1011 | ||
|
Registered Member
Join Date: Mar 2012
Location: Kingwood, Texas
Posts: 32
|
Quote:
Quote:
 Edit: BTW, I'm still hoping someone has a left over v1.0 board I could aquire. Wanna get these lights going (without looking like a rats nest)! I could go and order the boards, but I'd rather not go that route just yet, especially if someone out there ordered 10 boards and only used 1 or 2. Last edited by Loonytic; 03/15/2012 at 08:35 AM. |
||
|
|
|
|
03/15/2012, 07:18 PM
|
#1012 |
|
Registered Member
Join Date: Nov 2011
Location: Russellville Alabama
Posts: 67
|
Could somebody please point me to the DIY for Dumbies Arduino led controller? I am getting ready to purchase my leds and drivers. All I want to do is dim them dusk-dawn. Nothing fancy or way over my head. I will need to know what and where to purchase everything I'll need for a simple set-up and then I'll need to know how to put everything together. As you can see there are more than a thousand posts in this thread and I'm not getting any younger. Thanks a bunch!
|
|
|
|
|
03/16/2012, 06:57 AM
|
#1013 |
|
Team RC Member
Join Date: Sep 2003
Location: NY
Posts: 17,749
|
If you're referring to the Typhon, this is the thread for it.
The design files are here: http://code.google.com/p/typhon-reef/ There's a schematic and board file in EAGLE format. You will need to download the EAGLE software and convert these to gerbers (search google if you don't know how to do that) and then send the gerbers to a board manufacturer (iteadstudio, seeedstudio, batchpcb, etc) to get the pcbs made. Here are those two files: http://typhon-reef.googlecode.com/sv...hon/typhon.brd http://typhon-reef.googlecode.com/sv...hon/typhon.sch Then you will need to order the parts on the BOM (bill of materials) which is here: http://typhon-reef.googlecode.com/sv...typhon_bom.xls Then, solder it up. Then, you will need to put the Arduino IDE on your PC, and get a way for the PC to talk to the controller. Typically this is with a USB-TTL converter from FTDI, like one of these: http://www.sparkfun.com/products/9718 Then, get the Typhon firmware from the repo: http://typhon-reef.googlecode.com/sv...hon/typhon.pde And upload it to the board.
__________________
Inconveniencing marine life since 1992 "It is my personal belief that reef aquaria should be thriving communities of biodiversity, representative of their wild counterparts, and not merely collections of pretty specimens growing on tidy clean rock shelves covered in purple coralline algae." (Eric Borneman) |
|
|
|
|
03/16/2012, 12:12 PM
|
#1014 |
|
Team RC Member
Join Date: Sep 2003
Location: NY
Posts: 17,749
|
Edit. Was going to ask another question but I think I'll just take a leap of faith and decide on my own.
__________________
Inconveniencing marine life since 1992 "It is my personal belief that reef aquaria should be thriving communities of biodiversity, representative of their wild counterparts, and not merely collections of pretty specimens growing on tidy clean rock shelves covered in purple coralline algae." (Eric Borneman) |
|
|
|
|
03/16/2012, 12:26 PM
|
#1015 | |
|
Registered Member
Join Date: Nov 2011
Location: Russellville Alabama
Posts: 67
|
HOLY CRAP!!!!! I think this may be a little over my head.... Do you know of anyone who is willing to make me one? and how much$$$$
Quote:
|
|
|
|
|
|
03/16/2012, 12:35 PM
|
#1016 |
|
Team RC Member
Join Date: Sep 2003
Location: NY
Posts: 17,749
|
To be clear, the point of this project is to get people to engage in DIY themselves, not to provide an off the shelf controller you can buy commercially. If that's what you're interested in, there are a handful of vendors that sell such controllers, and many reef controllers have optional modules that provide 10v analog outputs usable with many dimmable drivers.
Remember though, we all started where you are today at some point in our past.  It's definitely something an average handy reefkeeper can accomplish with a little time and effort. It's definitely something an average handy reefkeeper can accomplish with a little time and effort.
__________________
Inconveniencing marine life since 1992 "It is my personal belief that reef aquaria should be thriving communities of biodiversity, representative of their wild counterparts, and not merely collections of pretty specimens growing on tidy clean rock shelves covered in purple coralline algae." (Eric Borneman) |
|
|
|
|
03/16/2012, 02:54 PM
|
#1017 | |
|
Registered Member
Join Date: Oct 2007
Location: Sweden
Posts: 169
|
Quote:
|
|
|
|
|
|
03/16/2012, 03:41 PM
|
#1018 | |
|
Registered Member
Join Date: Nov 2011
Location: Russellville Alabama
Posts: 67
|
I would be willing to take this project on but I'm not sure where to get all the parts. Can most of this be purchased at your local Radio Shack?
Quote:
|
|
|
|
|
|
03/16/2012, 04:24 PM
|
#1019 |
|
Registered Member
Join Date: Jan 2009
Location: Palmdale
Posts: 2,556
|
you can get most of the parts from mouser/modern devices.
__________________
~SFVR Member~ 125 Gal Long/50 Gal sump, 2xMP40QD,Aquamax CONES CO-03/Speed Wave dc return 4x AI Sol Blues/Director + 2 80w T5 retrofit/Apex Controller Current Tank Info: 125 gal 72X18X22 |
|
|
|
|
03/16/2012, 06:12 PM
|
#1020 | |
|
Registered Member
Join Date: Jul 2007
Location: Puerto Rico
Posts: 673
|
Quote:
Here's what I came up with. Acrylic box with acrylic rod button extensions. In the inside has a wider piece just like those rubber extensions to keep them in place 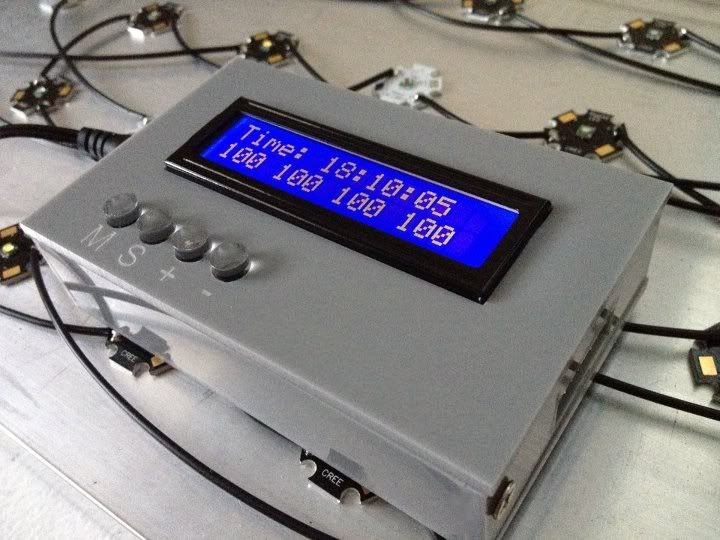
|
|
|
|
|
|
03/16/2012, 06:31 PM
|
#1021 |
|
Registered Member
Join Date: Jun 2009
Location: Wethersfield, CT
Posts: 375
|
I just downloaded newest code v0.3 alpha 2011-16-11
and did a quick "verify" in Ardunio and it gives me pulldown error. Is it just me or does anyone else has the same error. |
|
|
|
|
03/16/2012, 06:37 PM
|
#1022 |
|
Team RC Member
Join Date: Sep 2003
Location: NY
Posts: 17,749
|
See the comments made by davidpesce a few pages back. You need to be sure you're using the correct version of the Button library.
__________________
Inconveniencing marine life since 1992 "It is my personal belief that reef aquaria should be thriving communities of biodiversity, representative of their wild counterparts, and not merely collections of pretty specimens growing on tidy clean rock shelves covered in purple coralline algae." (Eric Borneman) |
|
|
|
|
03/16/2012, 06:43 PM
|
#1023 | |
|
Registered Member
Join Date: Jun 2009
Location: Wethersfield, CT
Posts: 375
|
Quote:
Ah 1.0 for me, so i'll wait a little Thanks! |
|
|
|
|
|
03/16/2012, 06:53 PM
|
#1024 |
|
Team RC Member
Join Date: Sep 2003
Location: NY
Posts: 17,749
|
sammy, that is really slick!
__________________
Inconveniencing marine life since 1992 "It is my personal belief that reef aquaria should be thriving communities of biodiversity, representative of their wild counterparts, and not merely collections of pretty specimens growing on tidy clean rock shelves covered in purple coralline algae." (Eric Borneman) |
|
|
|
|
03/16/2012, 11:51 PM
|
#1025 |
|
Registered Member
Join Date: Aug 2007
Location: Gurabo, PR USA
Posts: 75
|
Sam,
Hey, you little devil!!! I bet you used the laser cutter at the university to do that enclosure. It looks so square and clean, especially the fonts!!! Sweet!!! 
|
|
|
|
|
|
|
 Similar Threads
|
||||
| Thread | Thread Starter | Forum | Replies | Last Post |
| Cheap Moonlight | ticklesworth | New to the Hobby | 3 | 04/04/2010 04:09 PM |
| Cheap Moonlight | ticklesworth | Do It Yourself |
0 | 04/03/2010 08:52 AM |
| Arduino base controller - power pack ONLY TODAY | MaLi | Do It Yourself |
0 | 03/07/2010 05:56 AM |
| Sumps 101: Cheap, simple and effective for small tanks | cody6766 | Central Oklahoma Marine Aquarium Society | 8 | 01/06/2009 10:57 AM |


