
|
|
 03/19/2018, 03:16 PM
|
#1 |
|
Registered Member
Join Date: Jun 2015
Location: Australia
Posts: 446
|
Your plumbing effort
Thought this would be an interesting thread.
How much effort/money/design have you put into your plumbing. Show us your plumbing, explain it or share any other details. Show how rich you are with your multiple gate valves! Last edited by Joke; 03/19/2018 at 09:02 PM. |

|

|
|
03/19/2018, 07:12 PM
|
#2 |
|
Registered Member
Join Date: Sep 2015
Location: Mesa Az
Posts: 771
|
In for this as well. Im about to plumb my 75g. Open to ideas and will post a pic of mine when its done.
__________________
Tank history 29g tropical ,55g cichlid tank, 20H softy reef, 29g mixed reef, 20H brackish goby & puffer tank, 55g mixed reef, 6g Nanocube softy lps reef, 40B sps reef, 75g sps reef, 75g sps reef in bu Current Tank Info: 75g sps reef build in the works. |
|
|
|
|
03/19/2018, 10:17 PM
|
#3 |
|
Registered Member
Join Date: Jan 2006
Location: Westminster, CO
Posts: 17,289
|
I had to modify a set of steps, lap a bathroom, run down about 8ft behind the furnace, build a landing to cross a staircase, and spent over $1000 in the process
 Post bomb from my build thread......... enjoy This doorway... 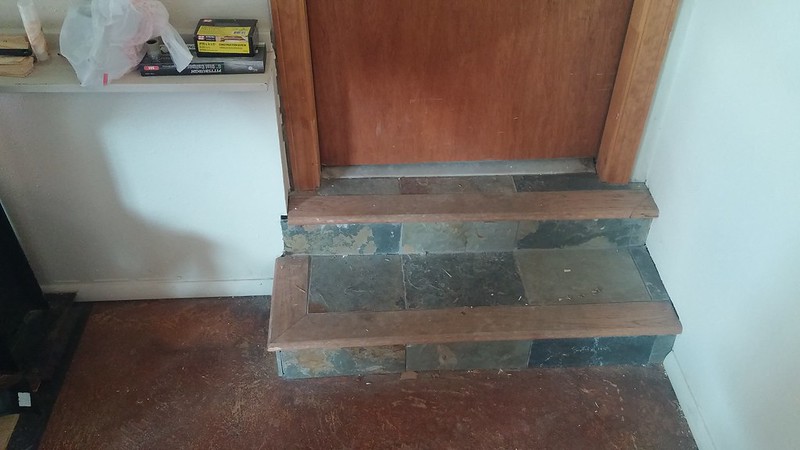 This door is in the way. I thought about moving it to the left side of the tank but the stairs are made of concrete. and I would have had to clean out my garage and move all kinds of stuff. I don't want to open that can of worms right now. Going to have to go around this... I stripped the stone and wood off of the stairs, cleaned them up, and cut a chunk of drywall out. 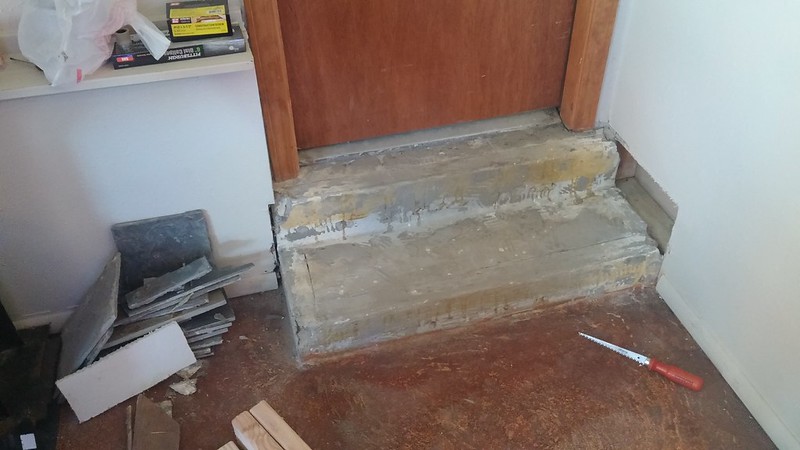 The plan is to run the piping over the top step and extend the stairs out. They aren't equal drops per step so I plan on fixing that as well. I need to run three 1.5" and one 2" schedule 40 pvc pipes. 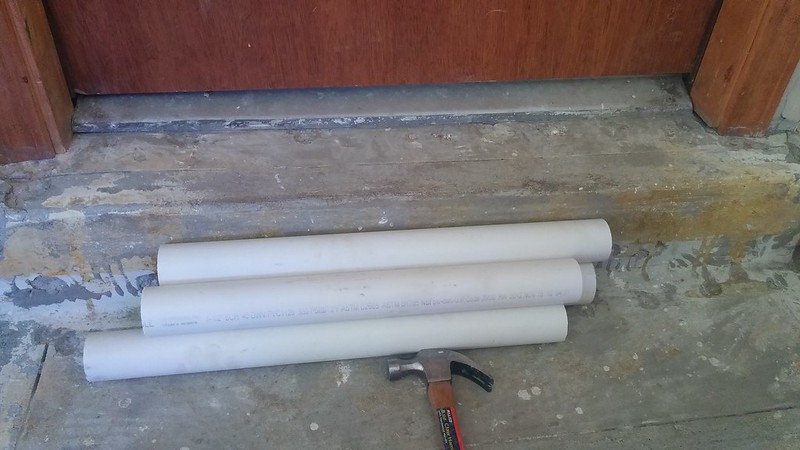 Started cutting materials... I chose the same ply I made the BTA and QT racks from. 3/4 11 layer ply. 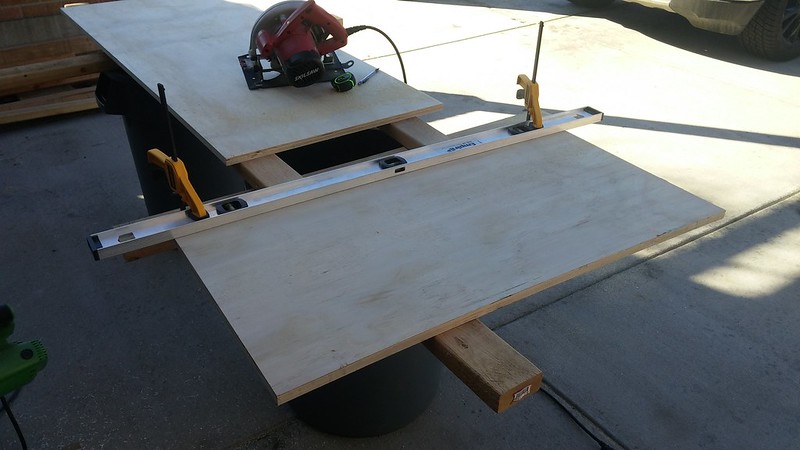 The first step is to anchor some plywood strips to the back of the concrete. Since the concrete isn't very flat I made temporary jigs and had my GF stand on them to set the strip so the top of the board was secure as well as positioned lower the same distance as the thickness of the ply. I then used a hammer drill to drill the holes for the anchors. 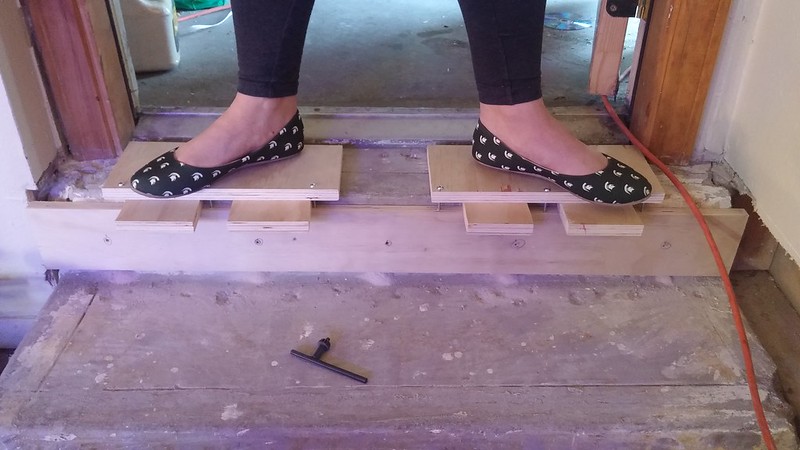 Repeat for the bottom step. 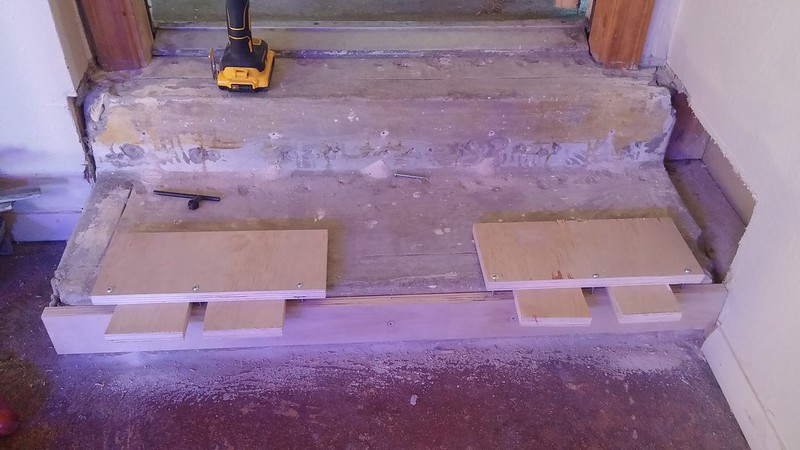 After vacuuming and wiping off the concrete I used a wood/concrete construction adhesive on the backs of the strips and 5 minute two part epoxy in the holes.  I used 3/16" x 2-1/4" TapCon Concrete Screws to anchor the strips to the concrete. I used my impact driver to shoot them in. 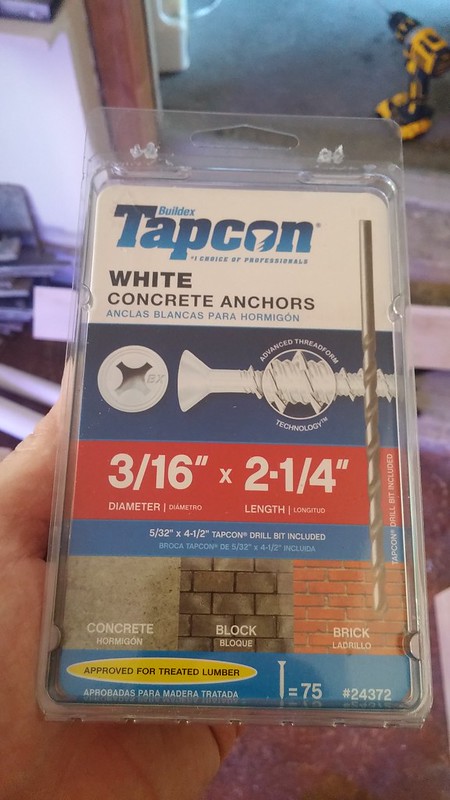 The strips are secured... time for a break. 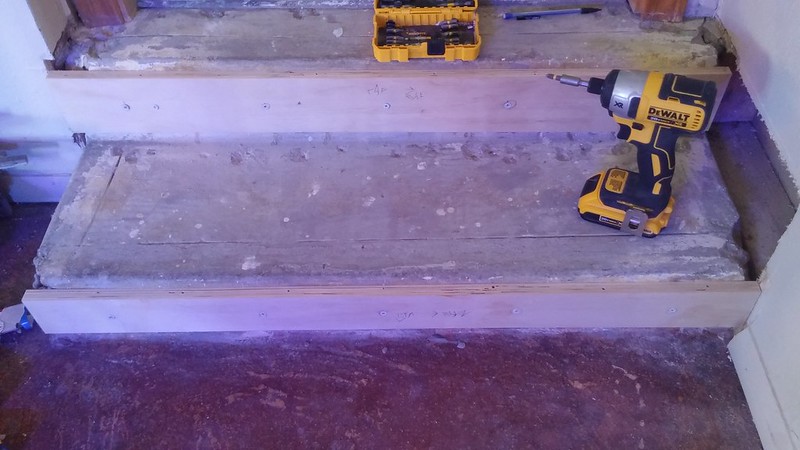
__________________
Hobby Experience: 9200ish gallons, 26 skimmers, and a handful of Kent Scrapers. Current Tank: Vortech Powered 600G SPS Tank w/ 100gal frag tank & 100g Sump. RK2-RK10 Skimmer. ReefAngel. Radium 20k. Last edited by tkeracer619; 03/19/2018 at 10:24 PM. |
|
|
|
|
03/19/2018, 10:17 PM
|
#4 |
|
Registered Member
Join Date: Jan 2006
Location: Westminster, CO
Posts: 17,289
|
I didn't actually take a break... I worked on this solid from 10am to about 6:45pm. I'm exhausted and also fighting a sinus infection... been sick for 3 weeks
 . .I cut out the two boards to be used for the top step. Secured the two boards together with some dewalt bar clamps. Glued, screwed, and then pocket screwed from the back side. I love Kreg pocket screws but in a application like this it is nice to screw from the other side, the Kregs like to move around on the final tighten, and screwing from the other side keeps them from moving. It's overkill but only took a few more minutes so imo it's worth it. 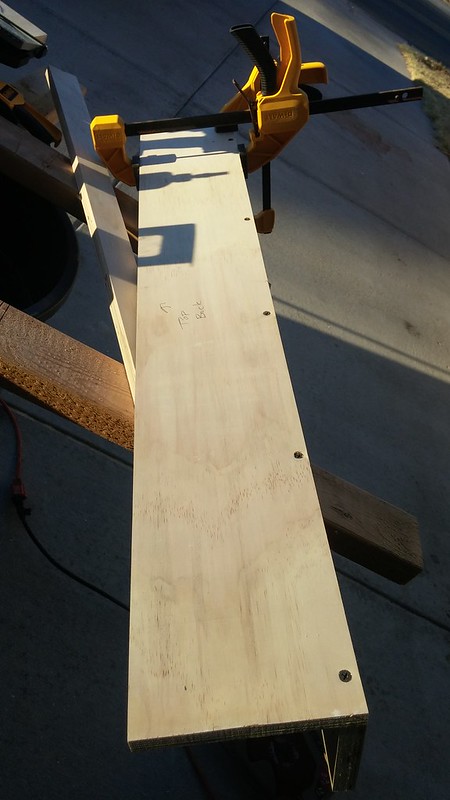 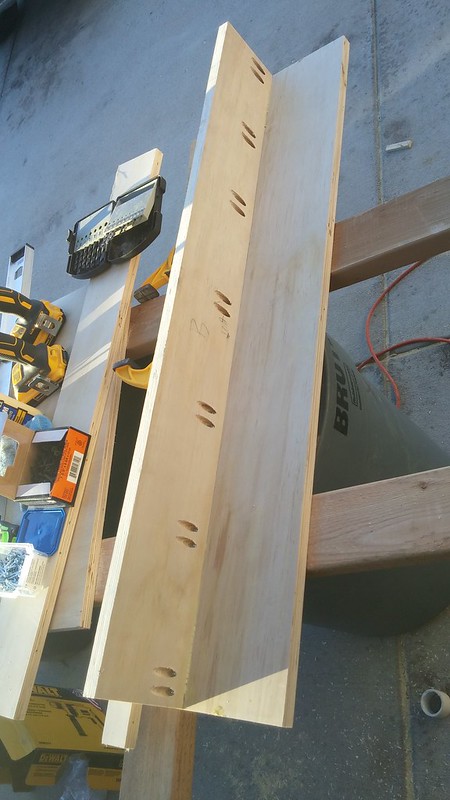 I used the same construction concrete on the edge that will be in contact with the top of the bottom step and wood glue on the edge of the top strip. 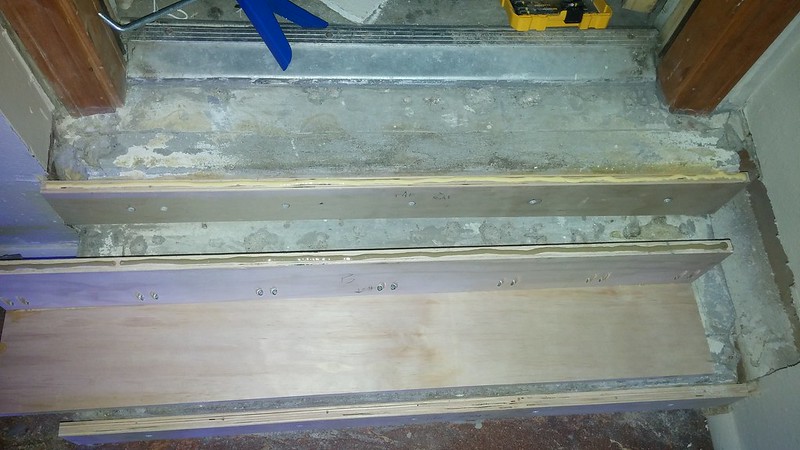 Put the top step in place and then used screws to secure it to the strip. 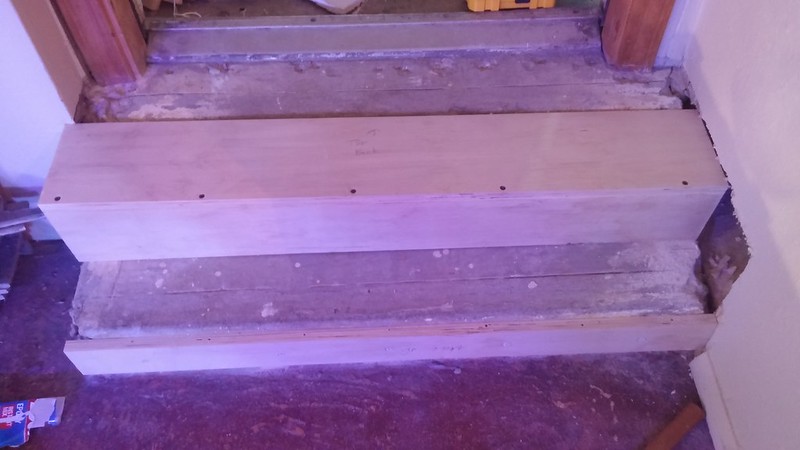 Check it out, it holds the bundle of pipes!  Repeat for the bottom step but since no plumbing is needed to go through the bottom step it got square edge reinforcements. 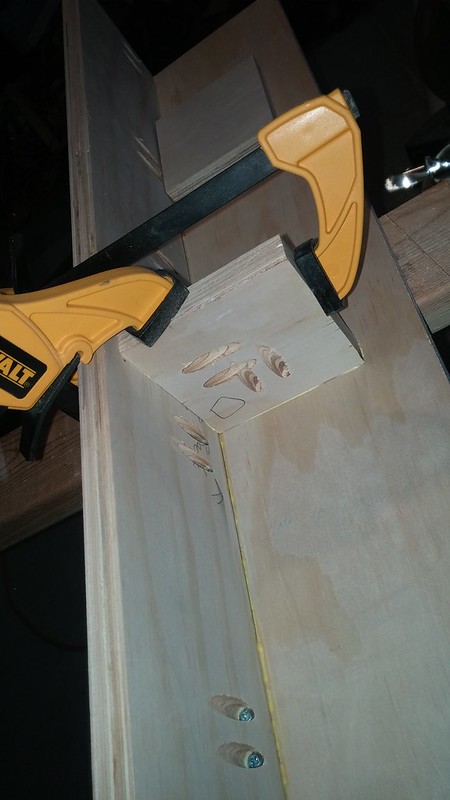 I used a Dovetail Saw to trim the baseboard to the right length. 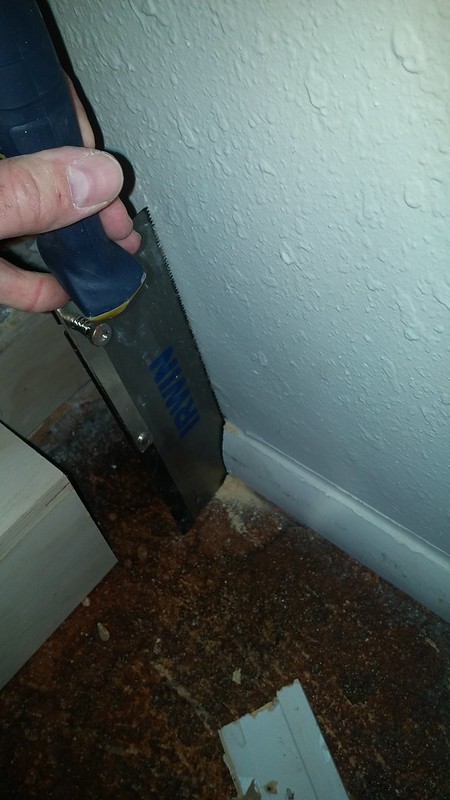 I installed the adhesives on this step, put the stair into place, and fired screws into the anchored strip. The concrete isn't very even so I took up the gaps with some wood shims. 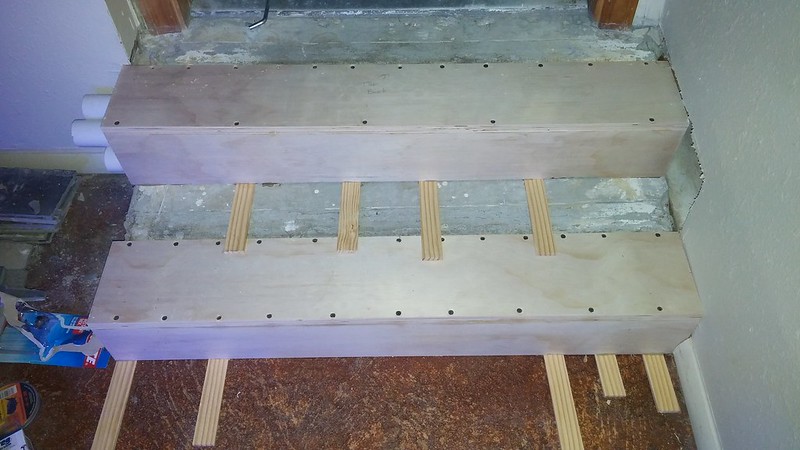 I marked the shims then pulled them out, smeared the construction adhesive on them, and put them back into place. They're strong as an ox. I'll finish them with the same 3/4" hardwood that is in the rest of the house. The bottom step will get a sheet of 1/2" subfloor and the top will get a 1/4" sheet of subfloor.
__________________
Hobby Experience: 9200ish gallons, 26 skimmers, and a handful of Kent Scrapers. Current Tank: Vortech Powered 600G SPS Tank w/ 100gal frag tank & 100g Sump. RK2-RK10 Skimmer. ReefAngel. Radium 20k. |
|
|
|
|
03/19/2018, 10:18 PM
|
#5 |
|
Registered Member
Join Date: Jan 2006
Location: Westminster, CO
Posts: 17,289
|
The 2nd obstacle in the plumbing challenge is this bathroom. It's tiny, has a free standing sink that is directly in the way of plumbing, has drywall slapped directly onto concrete, and is the only way without cutting the concrete slab to route the plumbing into the basement. Dig my trash can!
 Cut a hole to see exactly where the plumbing from Obstacle One comes through. 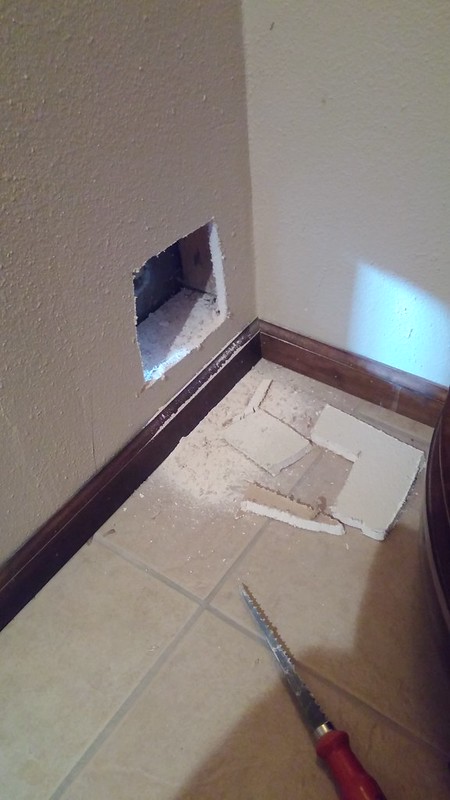 Cut out and disconnect the sink plumbing. 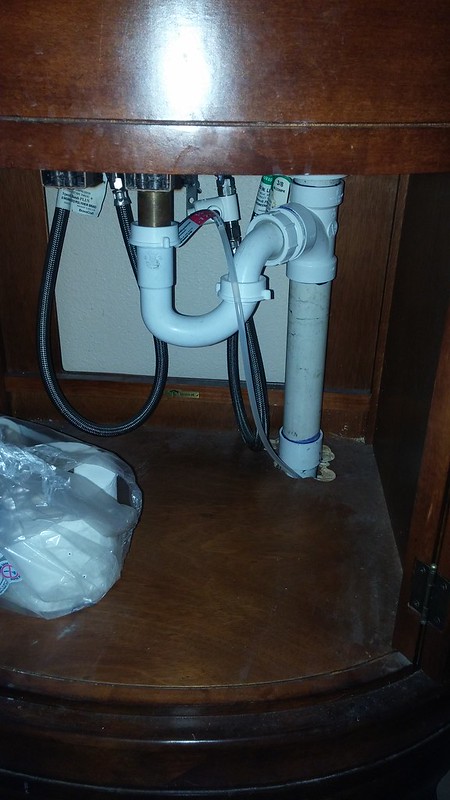 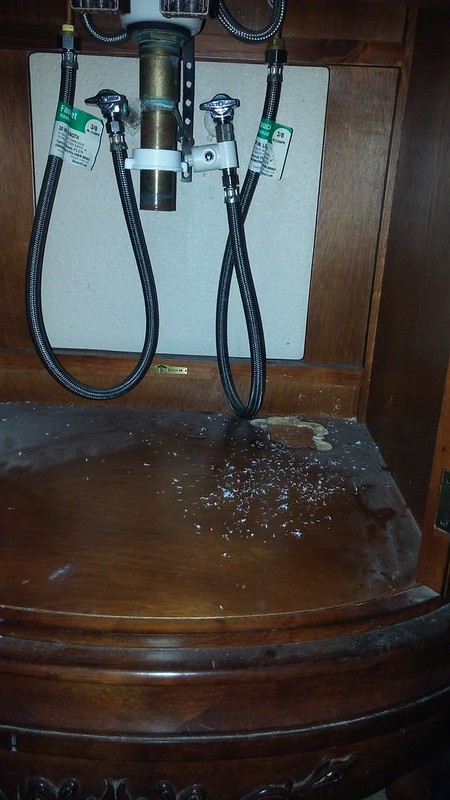 Move the sink out of the room and cover the floor drain. 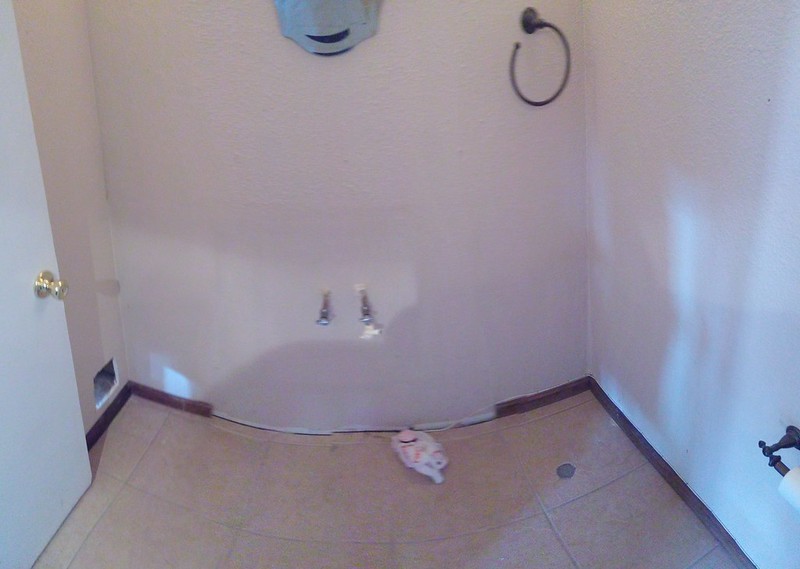 Cut the hole where the plumbing shall flow into Obstacle Number Three! 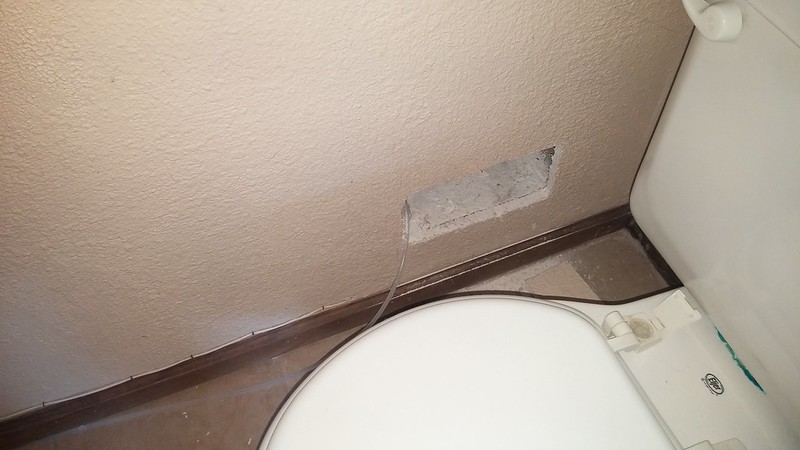 Use a level, mark the cut lines, sawsall! 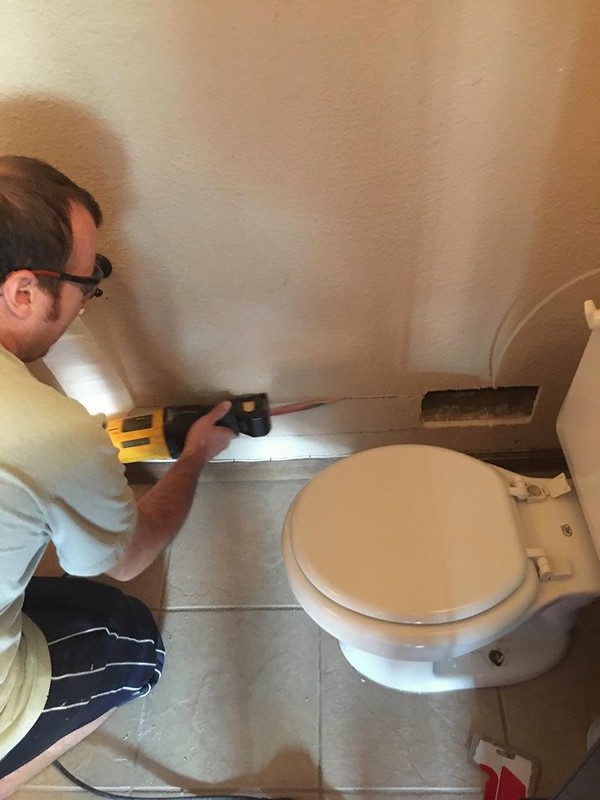 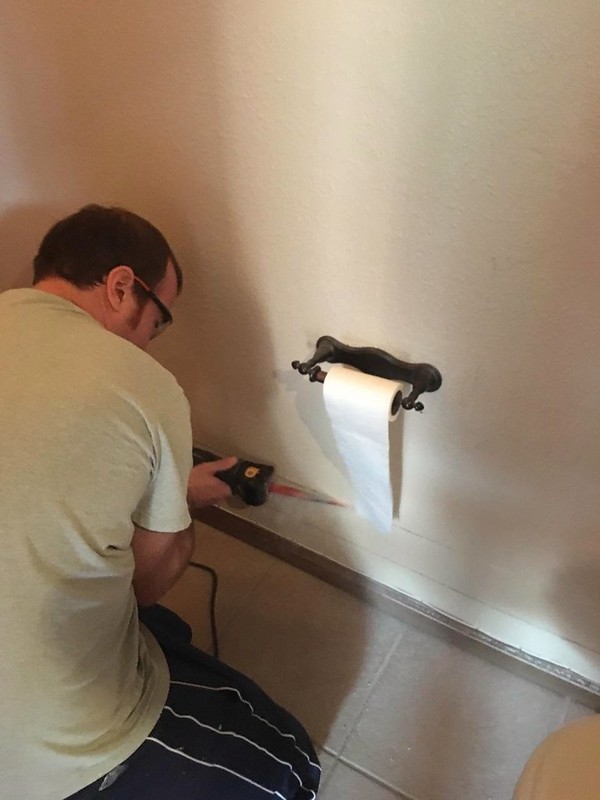 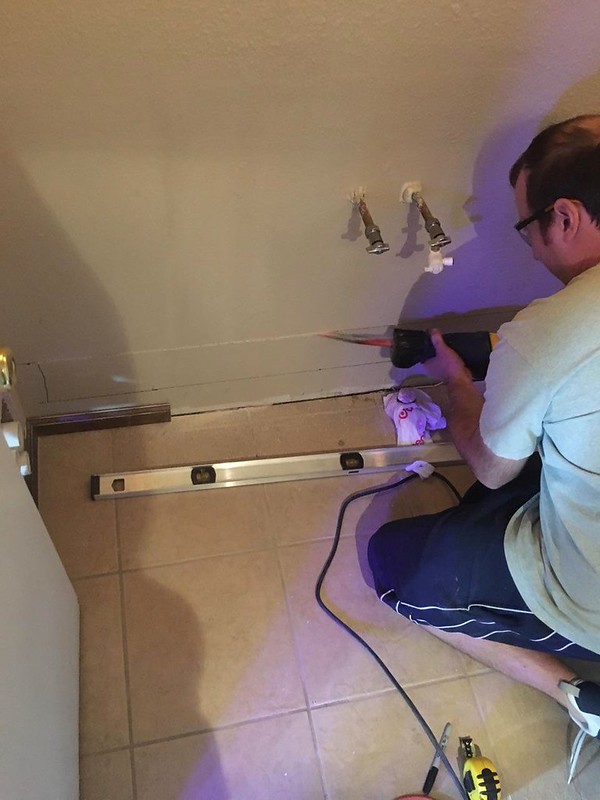 Pull out the chunks of drywall and clean up the concrete. The reason I cut all of this drywall out is because the plumbing cannot be recessed into the wall. I will need to make a ledge around the already small room to cover the piping and any bit of space I can gain is welcome. This of course will be done immediately... within a month or two. 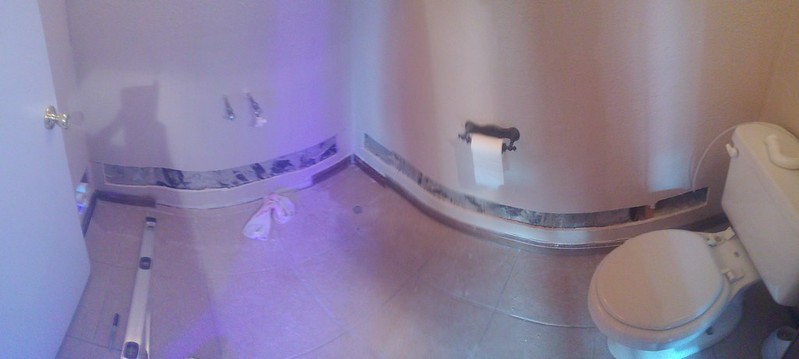 Onward to Obstacle Number Three! I'd like to give a big shout out to local hobbyist and most dedicated newbie Atul aka BigBlueTang. He came over and worked on this for 8 solid hours this past Sunday. Didn't complain once! Thanks bud, I appreciate all the help you have put into this project!
__________________
Hobby Experience: 9200ish gallons, 26 skimmers, and a handful of Kent Scrapers. Current Tank: Vortech Powered 600G SPS Tank w/ 100gal frag tank & 100g Sump. RK2-RK10 Skimmer. ReefAngel. Radium 20k. |
|
|
|
|
03/19/2018, 10:19 PM
|
#6 |
|
Registered Member
Join Date: Jan 2006
Location: Westminster, CO
Posts: 17,289
|
The final obstacle is this staircase and the wall going into the filtration room!
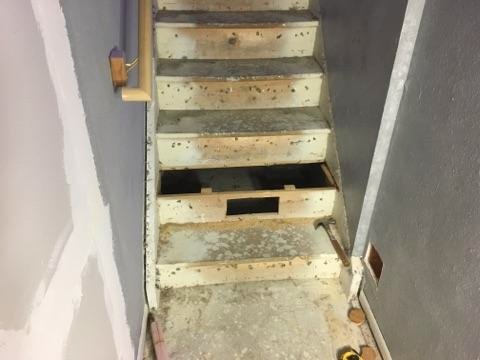 We tore out the second step, cut a hole to pass two pipes through, and took a lot of precaution from then on out using the staircase. I've almost fallen in twice, the cat got stuck in there, and i've dumped a bit of water a few times since trying to mind the gap with a 5gal bucket full of water. Remember when I had to move the doorway? This is why. To cross this staircase I need to make a landing at the top of step two and to be to code it is going to need to be at least 36" long. I wish we could have gone higher up but no go unless you want to duck every time you walk down the stairs. Trying to make everyone happy, stair two gets the landing. We sized up the location of the sump and where the plumbing should go through the wall. Cut out a bit of drywall which I will cover then cover with FRP before plumbing. Using a long bit I marked and piloted the hole saw locations from the sump side. The sump is a spectacular 3/4" thick acrylic sump custom with museum grade seams made by AGE for a buddy of mine who is no longer in the hobby. It was a gift to the build! Thank you dude, it's going to good use!!  Using the pilots I used the correct size hole saw to drill from the step side. From bottom to top we have... The Emergency drain, full siphon 1, full siphon 2, and the return. These are just test pipes we used throughout the process to make sure stuff would fit. 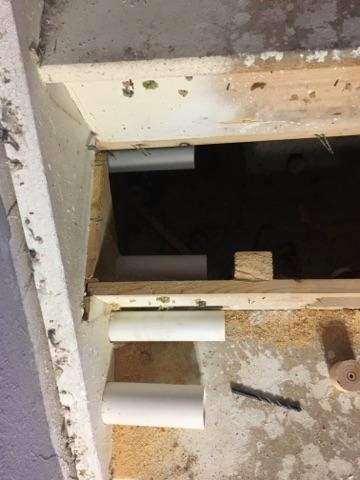 Plumbing will have to wait for another day. We were tired and beat up from the day of work. We did however source about 90% of the plumbing parts as the day went by. We only had to make 2 trips to 5 separate stores to make it happen  . .Something exciting is showing up today  ! I'm like a dog staring out the front window waiting for their owner to show up! Eta is within 3 hours ! I'm like a dog staring out the front window waiting for their owner to show up! Eta is within 3 hours 
__________________
Hobby Experience: 9200ish gallons, 26 skimmers, and a handful of Kent Scrapers. Current Tank: Vortech Powered 600G SPS Tank w/ 100gal frag tank & 100g Sump. RK2-RK10 Skimmer. ReefAngel. Radium 20k. |
|
|
|
|
03/19/2018, 10:20 PM
|
#7 |
|
Registered Member
Join Date: Jan 2006
Location: Westminster, CO
Posts: 17,289
|
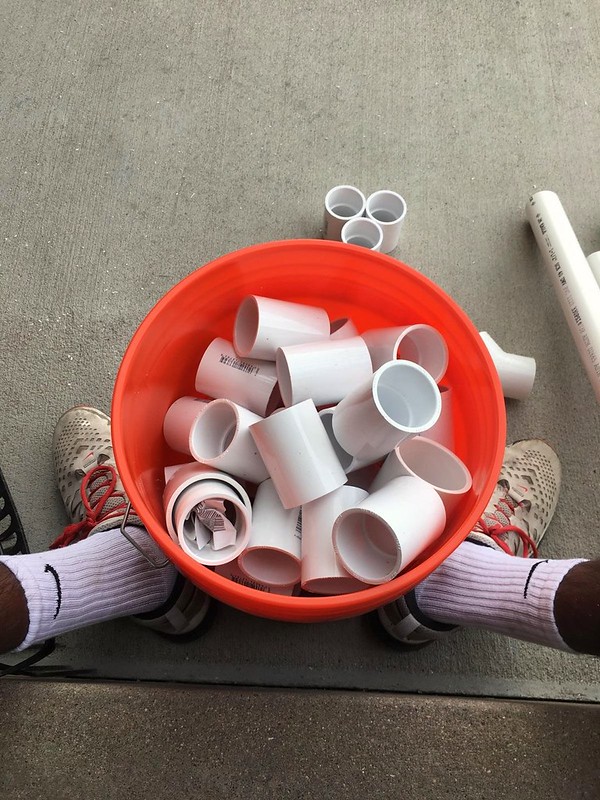
Two weekends ago BigBlueTang and I made three trips to Home Depot, two trips to Lowes, and a trip to a spa supply store. We picked up roughly 120ft of 1.5in PVC, 40ft of 2in PVC, 25ft of 1.5in SpaFlex, 20ft of 2in SpaFlex, some strapping, a couple screws, some pipe mounting bracket, and a bucket of fittings.
 We thought we may actually get in a fair amount of plumbing but demolition, driving, planning, and eating took up a good part of the day. We did get four pipes behind the furnace. It was a PITA and as of this past Saturday I realized the 45deg fittings we put on the bottom end of the pipes the weekend before were not going to work  . I ended up having to cut off the ends in a space that is about as skinny as I am fat. . I ended up having to cut off the ends in a space that is about as skinny as I am fat.This past Saturday I devoted my efforts to getting the sump in it's final resting place. I put up FRP back splashes, drilled the sump, installed the bulkheads, glued in the pvc, and slid the sump into place. The sump is custom made by AGE out of 3/4 inch acrylic. 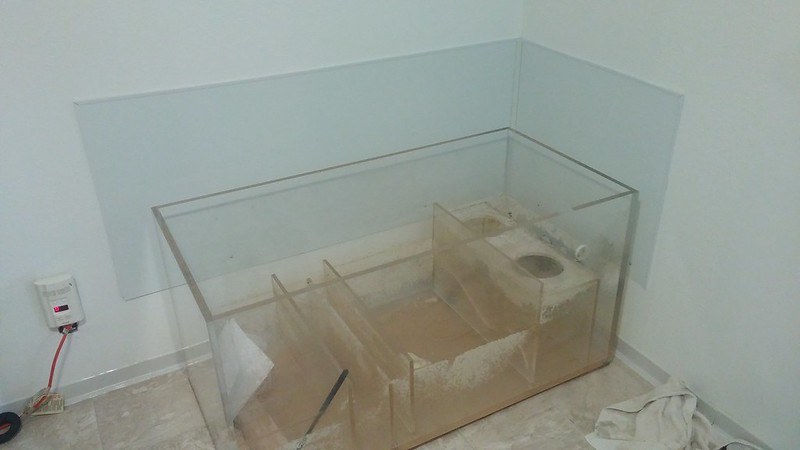 There isn't much room to spare here... 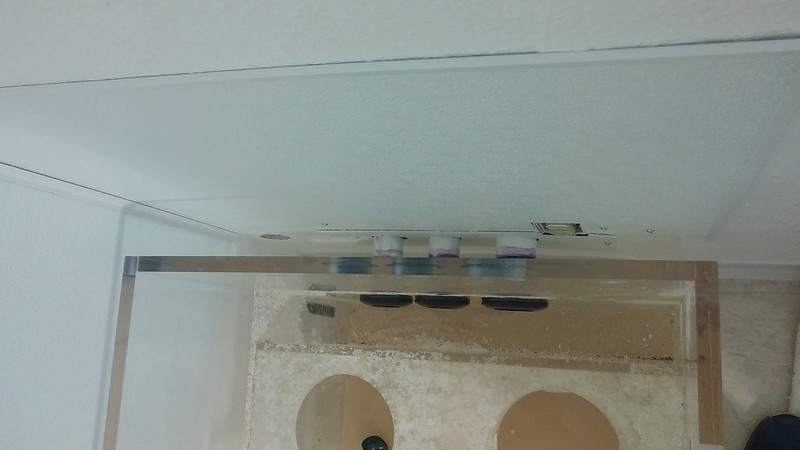 I wrapped up on Saturday with 3 pipes through the wall. 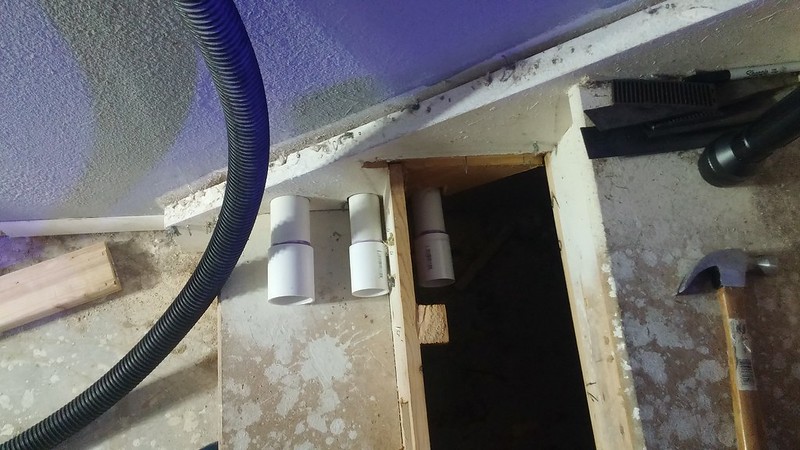 Between Sunday night and tonight (Monday) I finished linking the pipes we had in place behind the furnace and the sump. It's really satisfying seeing these pipes in place. I've been thinking about this for almost 4 years. 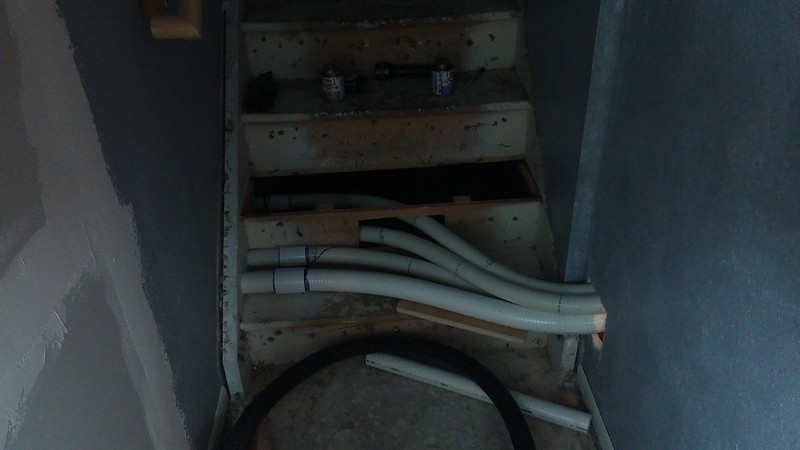 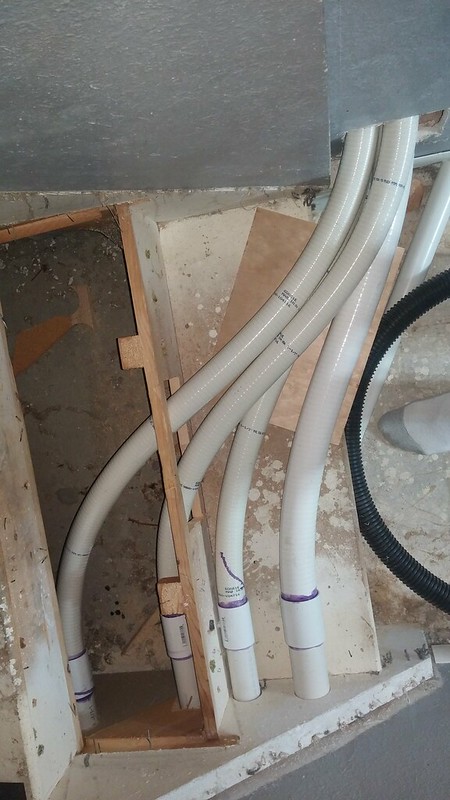 Since I am running two full siphons I needed some valves. I wish they could have been closer to the sump but there just wasn't enough room. They have to be located in the mechanical room. You can see signs of a struggle (45deg elbows and PVC primer on the ground). 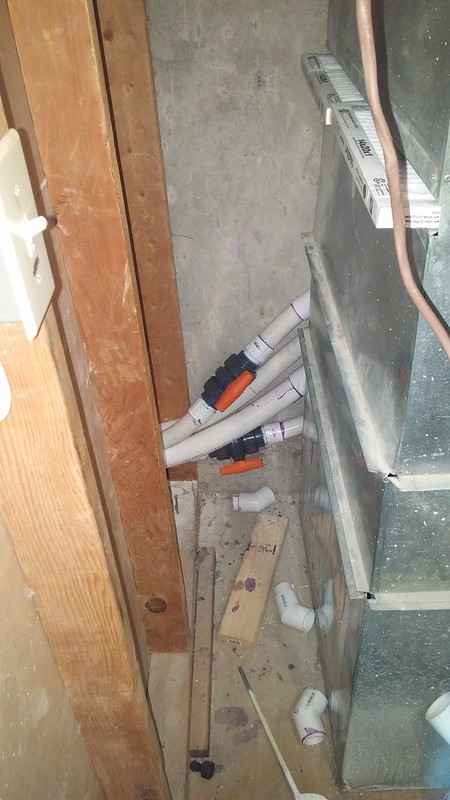 I'll secure the plumbing once it is completely dry and I get the first run in the bathroom complete. Should happen tomorrow. I'll need more SpaFlex to complete the bathroom and the run to the tank but we're getting close to water!!!!
__________________
Hobby Experience: 9200ish gallons, 26 skimmers, and a handful of Kent Scrapers. Current Tank: Vortech Powered 600G SPS Tank w/ 100gal frag tank & 100g Sump. RK2-RK10 Skimmer. ReefAngel. Radium 20k. |
|
|
|
|
03/19/2018, 10:21 PM
|
#8 |
|
Registered Member
Join Date: Jan 2006
Location: Westminster, CO
Posts: 17,289
|
I had time to myself this weekend so I tried to crank out some loose ends.
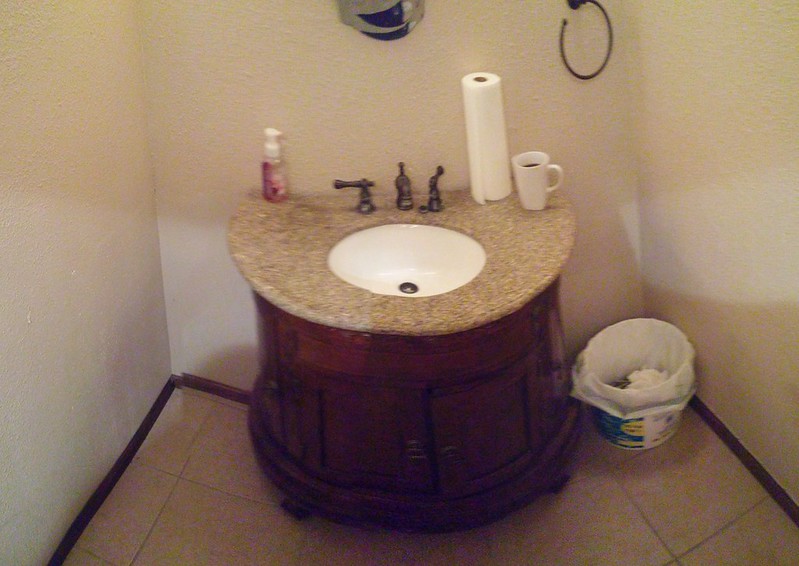
I finished the plumbing through the bathroom and re-installed the sink. I'll hide the plumbing later and make it all look like it was meant to be. I have a pretty good idea that will give a bit more counter space. While I wasn't able to get as steep of an angle as I would have liked I was able to get all of the plumbing to slant down the entire route. Its obviously not an ideal setup but it's the best option given the situation at hand! 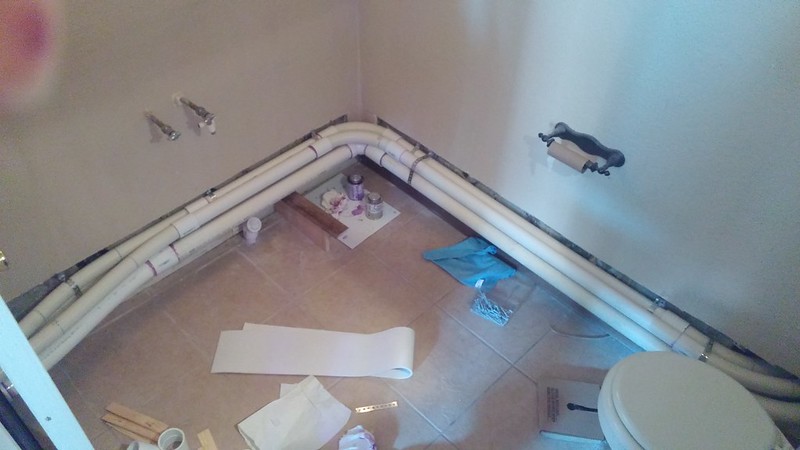 The sink was pretty easy to get back into place. I did have to modify the drain with a pair of 45deg elbows to move the whole drain forward. 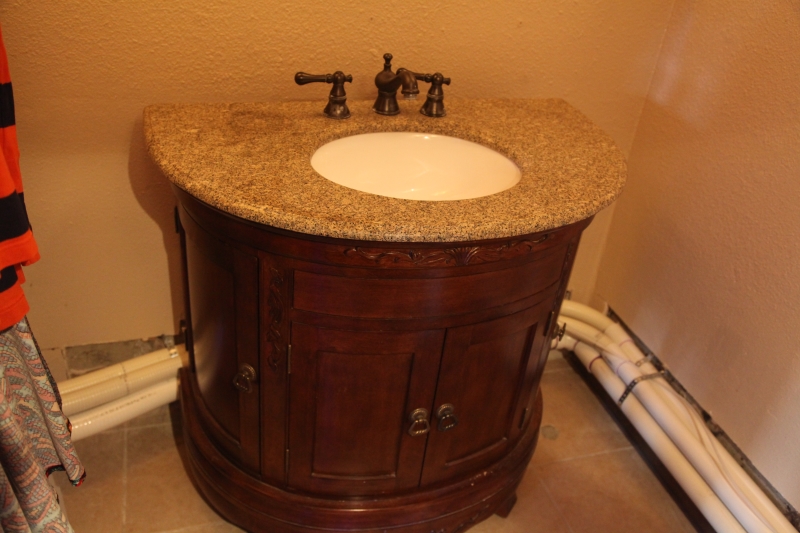 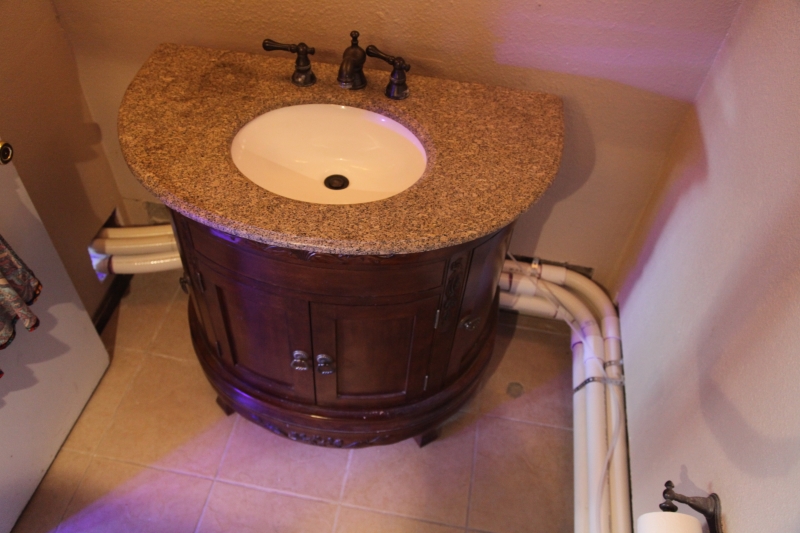 I was getting pretty tired and instead of doing the tank plumbing I decided to install the return pump and skimmer. I replaced the rubber seals on the skimmer, the originals were worn out. The manufacturer was awesome and shipped two free of charge! I also re-did all of the PVC connections since I don't trust anyone elses plumbing. That was a good choice because there were some questionable connections . I decided to go with the Sequence 4600 for the return pump. I can swap for a Hammerhead at any time and I have backup pumps for either setup. After this plumbing the only thing left before a fresh water test is the under tank plumbing. It will take me a good couple hours but it is cake compared to the rest of the plumbing job!The Skimmer and Return Pump. 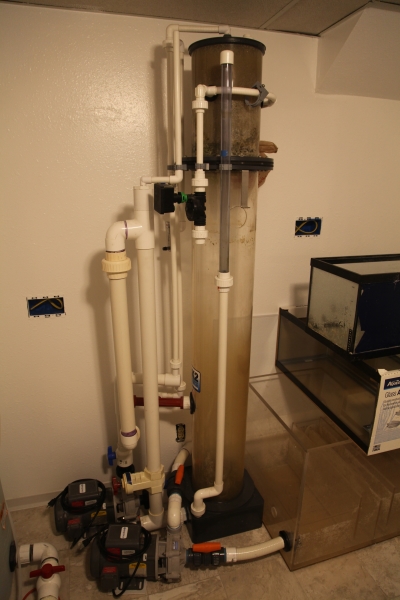 This morning my big challenge was to get the shop sink in the filtration room hooked up. The first step was to figure out the drain. Before I put FRP on the wall I modified the house drain to accept the shop sink. I'll be using the valves that were purposed for the washing machines but had to replace them due to the cold side being stuck in the off position. The bad valves. I went ahead and replaced both since the other one looked like it was corroding just like the one that was locked up. Better safe than sorry. 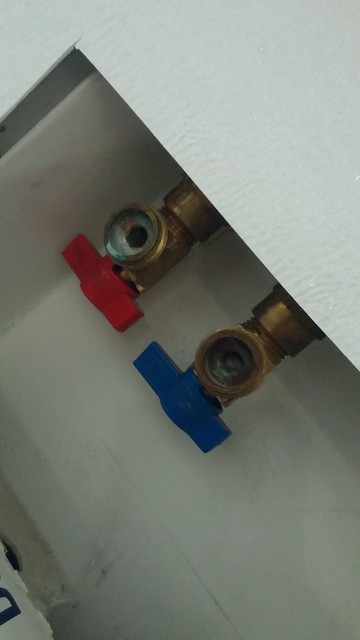 Once that was done I used 8ft braided lines and adapters to get the sink hooked up. I installed a new trap and cut the drain pipes to size. This sink is going to be a real blessing once this is all done. 11 years of reefing and I've never had a shop sink... #superexcited A shot of the east wall QT tanks, shop sink, storage, and water change system. I plan on using the space under the QT for spare pumps and salt. Still work left to be done but it's functional now!  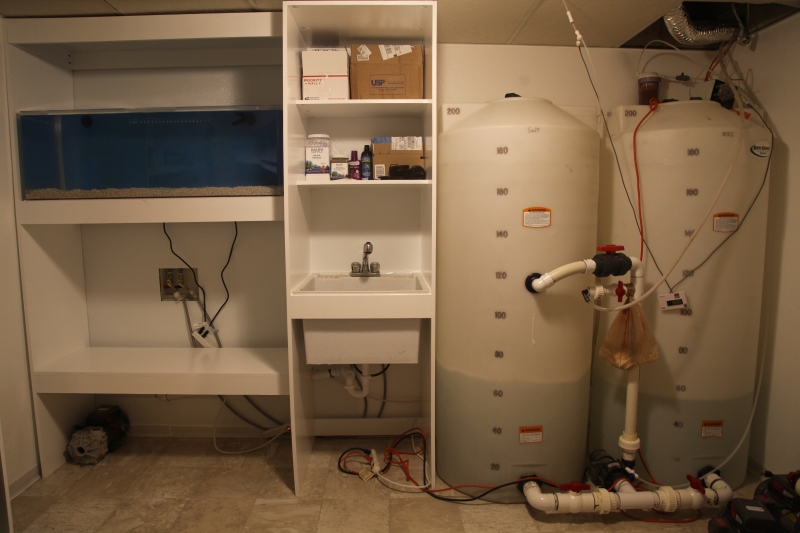 A shot of the south wall. 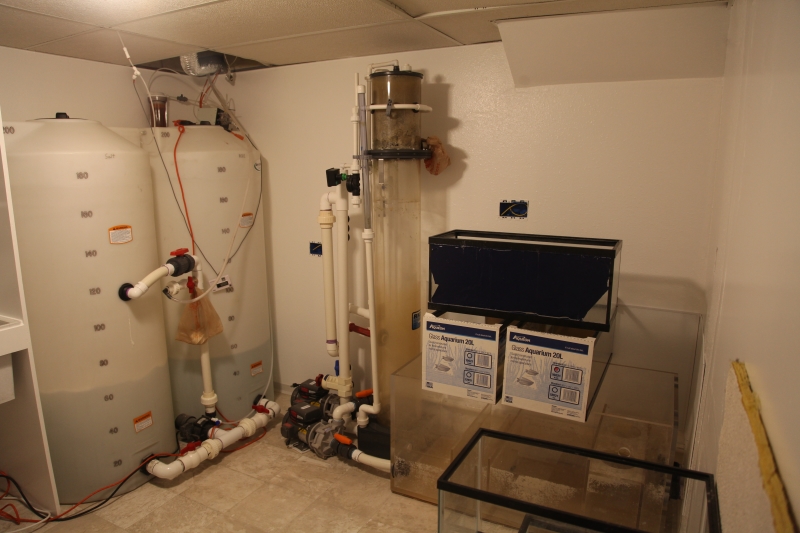 A shot of the BTA racks. After the fresh water test finishing these and the electrical will be the primary focus. 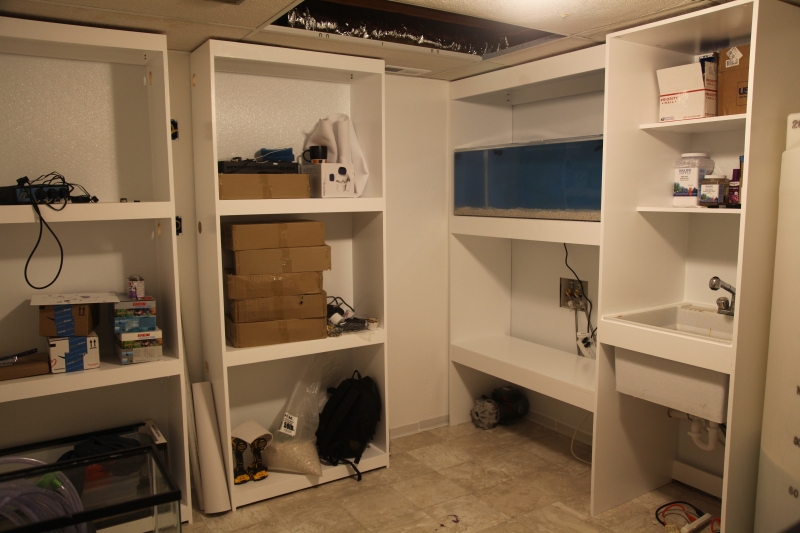
__________________
Hobby Experience: 9200ish gallons, 26 skimmers, and a handful of Kent Scrapers. Current Tank: Vortech Powered 600G SPS Tank w/ 100gal frag tank & 100g Sump. RK2-RK10 Skimmer. ReefAngel. Radium 20k. |
|
|
|
|
03/19/2018, 10:22 PM
|
#9 |
|
Registered Member
Join Date: Jan 2006
Location: Westminster, CO
Posts: 17,289
|
 The plumbing loop is done. All that is left is the plumbing internal to the overflows. I'll make them but won't glue anything in until the final parts arrive sometime this week. It should be sufficient for a freshwater test this evening! Next step is climbing in the tank once more to give it a good cleaning before the test and supporting the plumbing under the tank. Wish me luck!! Here are two shots of the pumbing under the tank and into the stair pass through. In this plumbing job I used as much spa flex as I could (70ft of it) to minimize losses in the plumbing. Everything has a smooth transition. Overall I am pleased with the results and was able to keep the space under the tank free for storage.  
__________________
Hobby Experience: 9200ish gallons, 26 skimmers, and a handful of Kent Scrapers. Current Tank: Vortech Powered 600G SPS Tank w/ 100gal frag tank & 100g Sump. RK2-RK10 Skimmer. ReefAngel. Radium 20k. |
|
|
|
|
03/19/2018, 10:23 PM
|
#10 |
|
Registered Member
Join Date: Jan 2006
Location: Westminster, CO
Posts: 17,289
|
It took a lot of effort, time, and money to get to this point! I am thankful for all of those who helped and followed along. It is appreciated!
Overflows are balanced and quiet! Emergency drain works as advertised. Everything is flowing nicely    I think I'm going to mix up a drink!
__________________
Hobby Experience: 9200ish gallons, 26 skimmers, and a handful of Kent Scrapers. Current Tank: Vortech Powered 600G SPS Tank w/ 100gal frag tank & 100g Sump. RK2-RK10 Skimmer. ReefAngel. Radium 20k. |
|
|
|
|
03/20/2018, 01:11 AM
|
#11 |
|
Registered Member
Join Date: Jun 2015
Location: Australia
Posts: 446
|
^^^Wow that's something!
|
|
|
|
|
03/20/2018, 01:37 PM
|
#12 | |
|
Registered Member
Join Date: Jan 2006
Location: Westminster, CO
Posts: 17,289
|
Quote:
Whole different level...
__________________
Hobby Experience: 9200ish gallons, 26 skimmers, and a handful of Kent Scrapers. Current Tank: Vortech Powered 600G SPS Tank w/ 100gal frag tank & 100g Sump. RK2-RK10 Skimmer. ReefAngel. Radium 20k. |
|
|
|
|
|
03/20/2018, 02:26 PM
|
#13 |
|
Registered Member
Join Date: Mar 2018
Location: Chicago
Posts: 97
|
Awesome set up!
Sent from my iPhone using Tapatalk |
|
|
|
|
03/24/2018, 04:27 PM
|
#14 |
|
Registered Member
Join Date: Jun 2015
Location: Australia
Posts: 446
|
Can we see any more?
|
|
|
|
 |
| Thread Tools | |
|
|


