
|
|
 11/22/2013, 07:35 PM
|
#1 |
|
Registered Member
Join Date: Nov 2013
Location: Denver, CO
Posts: 33
|
20G Nano Tank sump and refugium drawings
Hi guys!
I am building a new sump and refugium. Since I am dealing with a space issue, I have decided to split them both up ad connect via plumbing. The tank and sump both contain an overflow to prevent overflowing of the last stage, the refugium. Please share any thoughts, advice and comments to help improve this system before I build it. Thank you so much, see pictures below for the drawings. 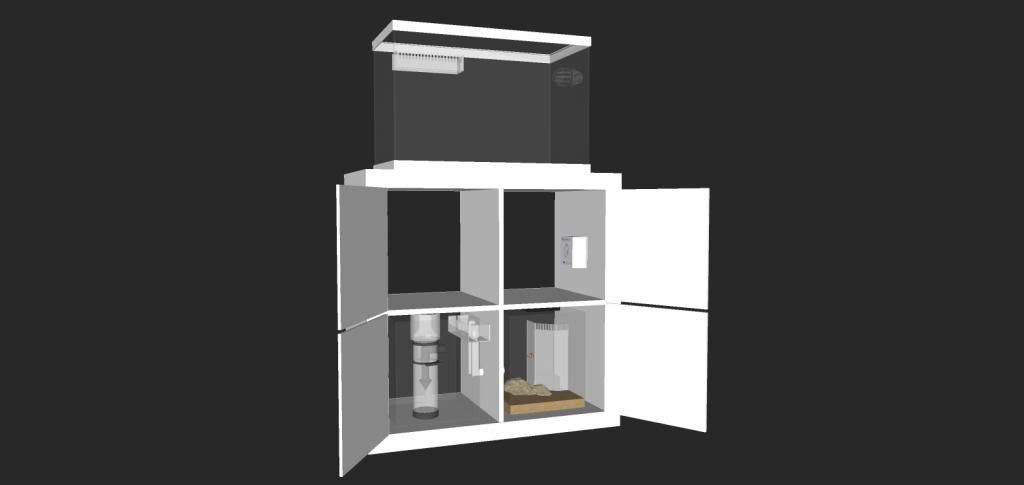 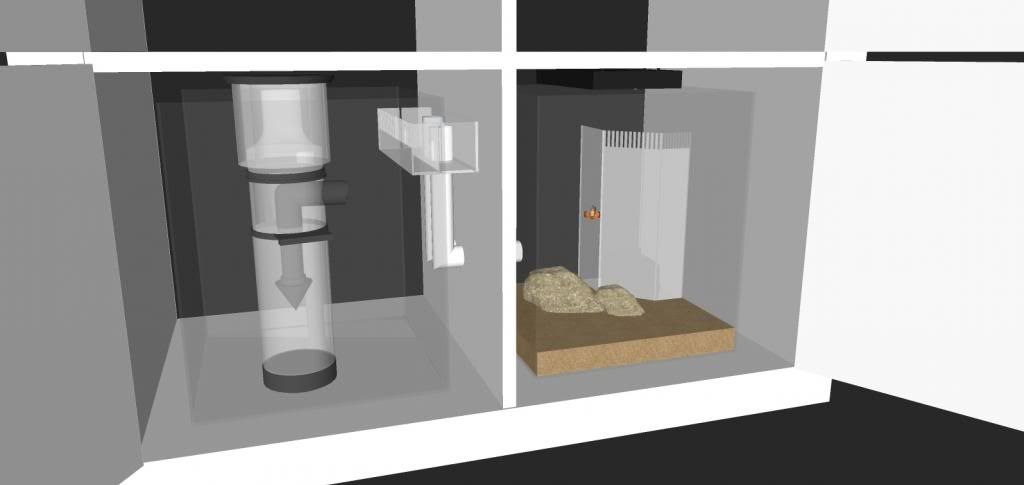 
|

|

|
|
11/22/2013, 08:25 PM
|
#2 |
|
Registered Member
Join Date: Sep 2013
Posts: 83
|
Me like
__________________
Constant Evolution |
|
|
|
|
11/22/2013, 08:25 PM
|
#3 |
|
Registered Member
Join Date: Nov 2013
Location: Silverdale, WA
Posts: 15
|
that looks sick. So the refugium is going to overflow and then return water to your main display?
|
|
|
|
|
11/22/2013, 09:28 PM
|
#4 |
|
Registered Member
Join Date: Nov 2013
Location: Denver, CO
Posts: 33
|
That is correct l_wayne83. The water overflows from the display tank into the sump, from there on overflows into the refugium where I located another overflow with the return pump behind it.
The only concern I have is that the water overflowing from the sump into the refugium is not going to have enough downward pressure because the pipes are located too low in the refugium. If you have any advice for me on this, it would greatly help me out. |
|
|
|
|
11/22/2013, 10:17 PM
|
#5 |
|
Registered Member
Join Date: Nov 2013
Location: Denver, CO
Posts: 33
|
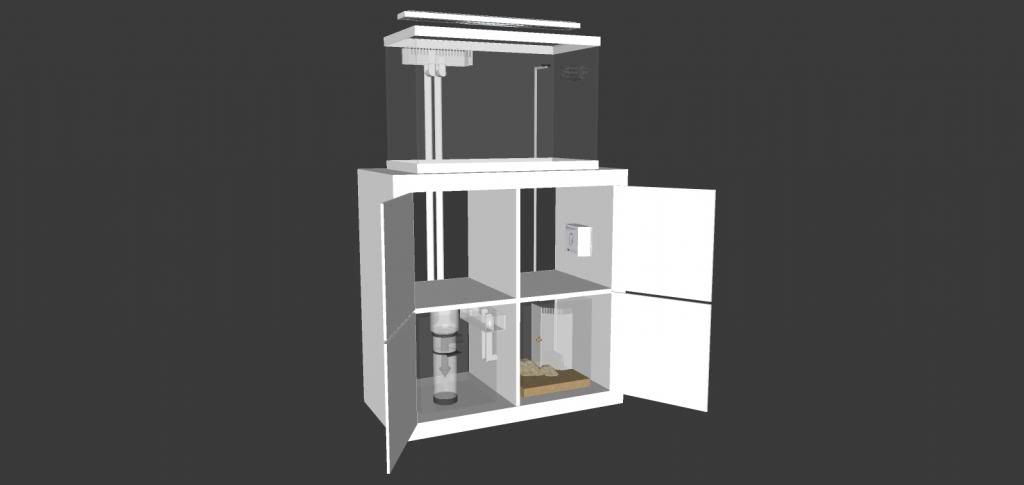
This is an update on the build and the plumbing / lighting fixture. I will be using the Orbit Marine Led fixture.
|
|
|
|
|
11/23/2013, 12:04 AM
|
#6 |
|
Registered Member
Join Date: Nov 2013
Location: Silverdale, WA
Posts: 15
|
yeah i think that would be a small problem. I do feel however that you would not have a lot of current in the refugium coming from the sump which is great because you want to be able to pick up those nutrients and pods to be delivered into the dispay for your fish and corals to eat. im thinking if you could ensure that the water being pulled from the sump into the refugium was higher than the overflow on the refugium than you should be ok. If that makes sense. then again as i think about it as long as you have a beast of a return pump it should be enough to draw that water through this whole filtration system without having to change anything. Regardless even if things go south im sure raising that drain into the refugium would fix things. Great idea for sure. I love this idea.
|
|
|
|
|
11/23/2013, 01:16 AM
|
#7 |
|
Registered Member
Join Date: Sep 2013
Location: Ohio
Posts: 256
|
dont know if these pics are to scale, but if they are, you are going to have a helluva time trying to get your skimmer out for maintenance. other than that, I cant wait to see how this build turns out! please post pics when you start!
|
|
|
|
|
11/23/2013, 01:59 AM
|
#8 |
|
Registered Member
Join Date: Apr 2013
Location: Ypsilanti, MI
Posts: 452
|
Honestly, if your going to put this much time into a 20 Gallon you really should up the size and just go bigger and do something similar as it wouldn't cost much more to build (other then lights, and initial glass purchase) I went with a custom 20 gallon with sump and overflow and all that..... after 7 months I want a 55-75 gallon, I think thats just how it works. I dont want to smash anyones dream's, but we all dream of going bigger so with something that has this much planning into it, I'd say GO BIG OR GO HOME! Happy reefing =]
EDIT: Working in a small tank really suck's, atleast for me. I'd love to have a massive tank I could dip my gloves into instead of having to inch my way around all my frags lol.
__________________
Currently Running: 10G Pico AIO 20G High Mixed Reef - ASM Mini G, Taotronics 120W, 10G Sump, Mag 7 R-Pump, 200W Heater, Purigen, Carbon, ESHOPPs Float Valve, Apex Jr, Smart Wave |
|
|
|
|
11/23/2013, 03:15 AM
|
#9 |
|
Registered Member
Join Date: Nov 2013
Location: Denver, CO
Posts: 33
|
Thank you for all the feedback and positive responses on this design. I am really excited to start building it anywhere soon. Regarding the skimmer: this is not the actual skimmer I will use but after the advice on it I will definitely buy a smaller one for ease of maintenance purpose. I will also move the plumbing from the sump to the Refugium up to above the Refugium its overflow, just to make sure there will be no issue with downwards pressure.
I will post the adjusted and updated drawings tomorrow! |
|
|
|
|
11/23/2013, 03:19 AM
|
#10 |
|
Registered Member
Join Date: Nov 2013
Location: Denver, CO
Posts: 33
|
Thank you Boston21 for the advice on an upgrade. I was planning on starting a 125G somewhere in march next to this current tank. I can then use this set up as a small frag tank.
Last edited by rickvanduin; 11/23/2013 at 03:26 AM. |
|
|
|
|
11/23/2013, 02:09 PM
|
#11 |
|
Registered Member
Join Date: Apr 2013
Location: Ypsilanti, MI
Posts: 452
|
 cool. Glad I could help out in some way, I really wish I could have a 125G cool. Glad I could help out in some way, I really wish I could have a 125G  Apartments.... Apartments....
__________________
Currently Running: 10G Pico AIO 20G High Mixed Reef - ASM Mini G, Taotronics 120W, 10G Sump, Mag 7 R-Pump, 200W Heater, Purigen, Carbon, ESHOPPs Float Valve, Apex Jr, Smart Wave |
|
|
|
|
11/23/2013, 09:08 PM
|
#12 |
|
Registered Member
Join Date: Nov 2013
Location: Denver, CO
Posts: 33
|
Same problem here. I am moving somewhere next year so that will give new opportunities for larger aquariums.
|
|
|
|
|
11/25/2013, 04:46 PM
|
#13 |
|
Registered Member
Join Date: Nov 2013
Location: Denver, CO
Posts: 33
|
Hi Guys!!
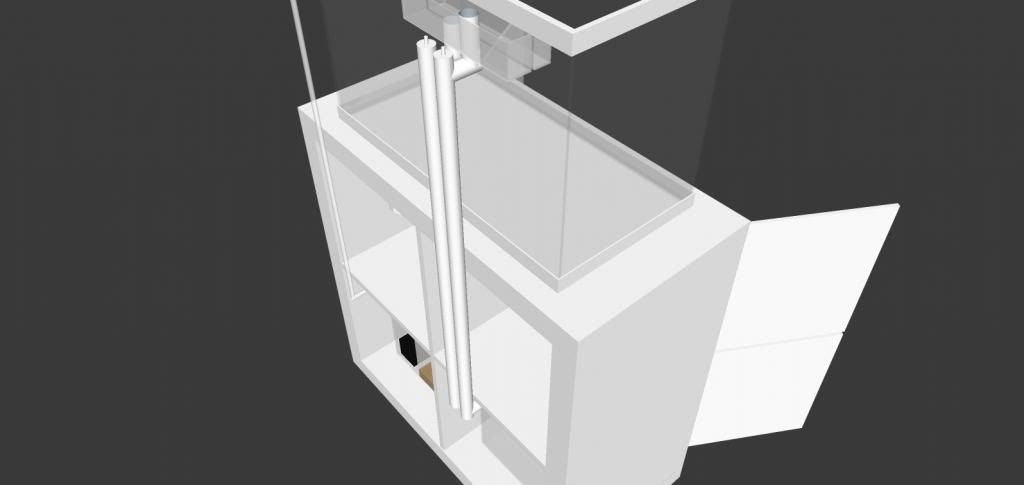
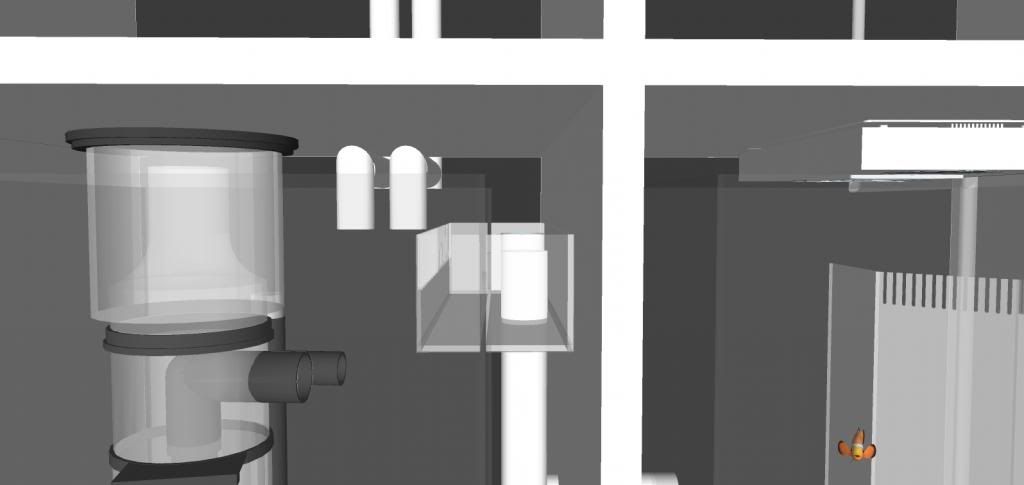
Today, I updated the construction and drawings of this Nano setup. Thank you Boston21 for your advice. It got me thinking and I am now going to build a 30G trimless tank that exactly fits on the aquarium. I like the look of these tank and the volume is a little larger. Also better for future coral growing plans. Next to this update, I added another chamber to the sump/refugium so that I have more water volume for the 30G tank and more chambers to serve equipment such as carbon/GFO reactors or a Kalkwasser stirrer. I am going for an external protein skimmer regarding ease of maintenance. Still have to come up with a way to easily connect and disconnect it. Any suggestions? Next to all of this I lowered the height of the chambers, again regarding ease of maintenance and I raised the overflow plumbing from my refugium to the third and last chamber where the pump is located to make sure there is not too much downwards pressure going on. I hope I gave you all enough information. Again: I would love any advice or comments to improve this build. Enjoy! Thanks! |
|
|
|
|
11/25/2013, 04:46 PM
|
#14 |
|
Registered Member
Join Date: Nov 2013
Location: Denver, CO
Posts: 33
|
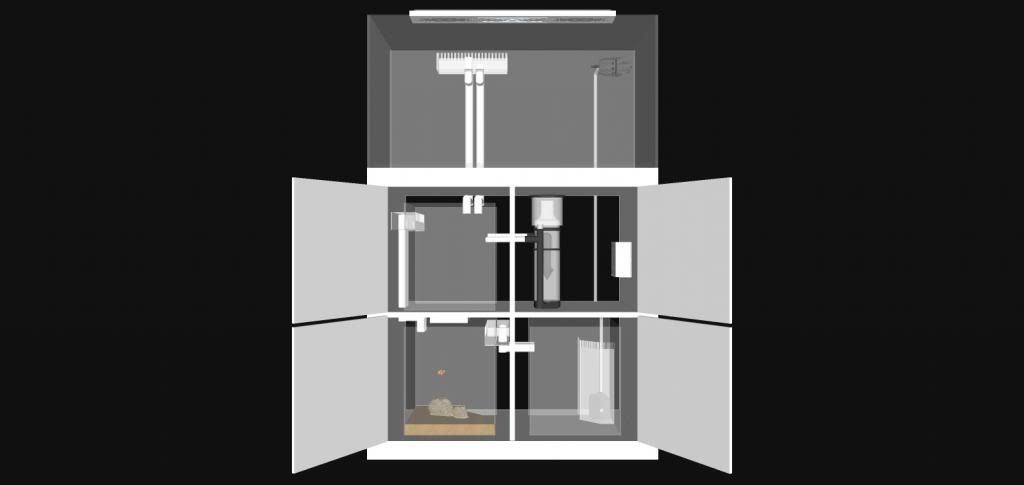
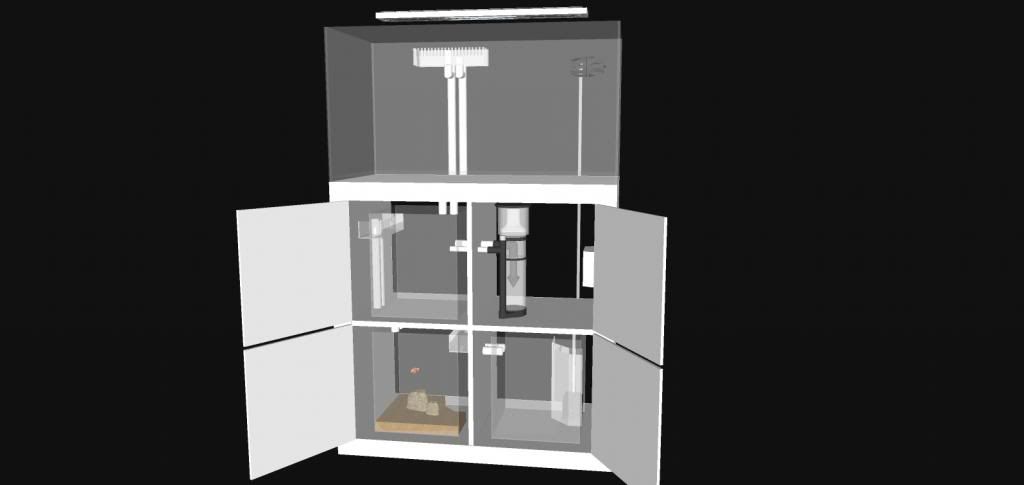
Front view Nano 30G display setup
|
|
|
|
|
11/25/2013, 04:47 PM
|
#15 |
|
Registered Member
Join Date: Nov 2013
Location: Denver, CO
Posts: 33
|
Isometric view 30G Nano setup
|
|
|
|
|
11/25/2013, 09:46 PM
|
#16 | |
|
Registered Member
Join Date: Apr 2013
Location: Ypsilanti, MI
Posts: 452
|
Quote:
__________________
Currently Running: 10G Pico AIO 20G High Mixed Reef - ASM Mini G, Taotronics 120W, 10G Sump, Mag 7 R-Pump, 200W Heater, Purigen, Carbon, ESHOPPs Float Valve, Apex Jr, Smart Wave |
|
|
|
|
|
11/25/2013, 10:03 PM
|
#17 |
|
Registered Member
Join Date: Nov 2013
Location: Denver, CO
Posts: 33
|
Do you have any advice on external protein skimmers and the way I am planning to set it up?
|
|
|
|
|
11/25/2013, 10:42 PM
|
#18 |
|
Registered Member
Join Date: May 2010
Posts: 581
|
It looks to me like you are really over building this. Unless that stand is very tall doing any kind of work in the tanks below is going to be really hard. You will save a lot of head aches and money to put it all in one sump. Plumbing the 2 together is wasting space in an already tight area. If the stand is extending a little on the sides you could slap a 20 long with some baffles in their and be done. Im not really aware of an external skimmer that would work in such a small spot. If that stands 3ft tall that only 1.5 for the skimmer and clearance to get the cup off. You can find internals in smaller sizes but most externals are larger. Not trying to rip your plan down just looking to give some insight. Tight fitting seems okay on paper but when you are trying to slide both your arms through a 6 inch gap to reattach a hose its a nightmare. This set up also has to many points of failure for my liking.
If i was doing this i would Remove the center brace as you wont need it on a tank this size if the stand is built right. Put a 20L for a sump with baffles for the return pump area. Scrap the refugium and later on down the road if reactor seem necessary you will still have room for them in the sump. I have not seen a refugium pay off when space was at a premium on smaller systems but if you really want it just add a second baffle to the 20L so it goes skimmer/refugium/return. good luck |
|
|
|
|
11/25/2013, 11:45 PM
|
#19 |
|
Registered Member
Join Date: Apr 2013
Location: Ypsilanti, MI
Posts: 452
|
Nah, I have no experience with external skimmers.
__________________
Currently Running: 10G Pico AIO 20G High Mixed Reef - ASM Mini G, Taotronics 120W, 10G Sump, Mag 7 R-Pump, 200W Heater, Purigen, Carbon, ESHOPPs Float Valve, Apex Jr, Smart Wave |
|
|
|
|
11/26/2013, 08:03 PM
|
#20 |
|
Registered Member
Join Date: Nov 2013
Location: Denver, CO
Posts: 33
|
Thank you so much for your advice jinks! I am going for a single sump but will be integrating a Refugium. Like you stated, it will save me a lot of hassle with space issues and plumbing. I definitely see what you are saying. Going back to the drawing table and will be back here soon with an update on the design.
|
|
|
|
 |
| Tags |
| build, nano, overflow, refugium, sump |
|
|


