
|
|
|
|||||||
 |
| Thread Tools |
 02/17/2018, 12:46 PM
|
#326 |
|
Registered Member
Join Date: Oct 2014
Location: Toronto GTA,Canada
Posts: 1,763
|
TANK Move ( 8 PM Sunday) Finally
Got everyone at the same time available. CONFIRMED. Tank will be in place tomorrow 
|

|

|
|
02/17/2018, 04:12 PM
|
#327 |
|
Registered Member
Join Date: Oct 2014
Location: Toronto GTA,Canada
Posts: 1,763
|
Found something to do (While Waiting for Tomorrow's Tank) MORE FUN THAN a BARREL OF MONKEYS
I made a mistake during my Early Learning Stage of the WPC install. 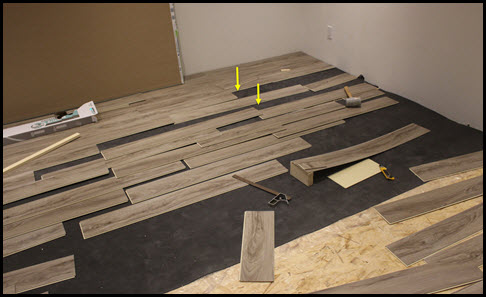 Upon CLOSE INSPECTION.... A couple of tiles (Didn't Fully CLICK into place) leaving a Protruding Ridge. They had minor damage so two had to be replaced. You can't remove the planks without working backwards......Bad luck that the One mistake was in ROW #3  But it went fairly fast since all pieces were pre-cut to proper sizes. Still it wasn't fun (Reverse Progress)
|
|
|
|
|
02/17/2018, 07:08 PM
|
#328 |
|
Registered Member
Join Date: Apr 2003
Location: Mtl. Canada
Posts: 7,824
|
Tank install!! Woohoo!!!
Can’t wait!
__________________
Matt. Current Tank Info: 53x32.5x26 190g dt 60g of sumps 3 tank-100 gal frag system 6xAI prime 8xt5. 4x maxspect gyre. Skimz Dual internal sicce pump skimmer Deltec PF601s ca rx+Kalk stirrer |
|
|
|
|
02/17/2018, 08:52 PM
|
#329 | |
|
Registered Member
Join Date: Oct 2014
Location: Toronto GTA,Canada
Posts: 1,763
|
Quote:
Wasting Time....I learned this from Reading T5 Ballast Label.... T5 Dimmable Ballast (Must run 100% for 100 Hrs) BEFORE Dimming 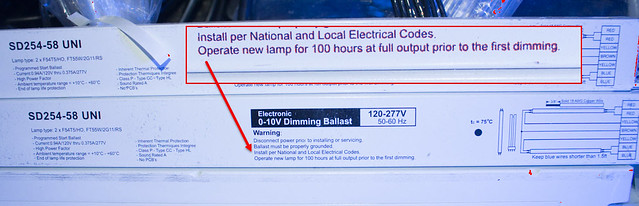 Makes sense that your have to Burn in the T5 before dimming. I never did this on my Other Tank Dimmable Ballast for Years. Never knew this. Kind of a hassle but not a big deal since only when installing a NEW BULB every six months. |
|
|
|
|
|
02/18/2018, 11:28 AM
|
#330 |
|
Registered Member
Join Date: Oct 2014
Location: Toronto GTA,Canada
Posts: 1,763
|
Fish Tank COUNTDOWN ( 8 Hours and Counting)
 It's going to be a long day........ |
|
|
|
|
02/18/2018, 12:36 PM
|
#331 |
|
Registered Member
Join Date: Apr 2003
Location: Mtl. Canada
Posts: 7,824
|

__________________
Matt. Current Tank Info: 53x32.5x26 190g dt 60g of sumps 3 tank-100 gal frag system 6xAI prime 8xt5. 4x maxspect gyre. Skimz Dual internal sicce pump skimmer Deltec PF601s ca rx+Kalk stirrer |
|
|
|
|
02/18/2018, 12:43 PM
|
#332 |
|
Registered Member
Join Date: Oct 2014
Location: Toronto GTA,Canada
Posts: 1,763
|
Final Pre-Check (Tank Bottom Trim - STAND TOP Overhang) NO-FOAM Center Needed
Was thinking of putting foam under tank (where trim is not [Drywall overhanging plywood area which is not colored on Sticks) to distribute weight more evenly. 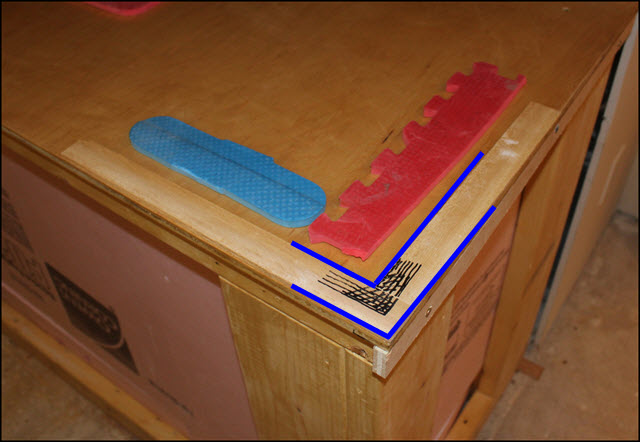 Not needed since a good portion of Tank Bottom Trim will be on THE SOLID part of STAND. (The Black Striped marking) I did test the foam under Tank sitting on 2x4" now. Although foam does compress a lot, it still raises the tank a for mm (so unstable). ALL GOOD TO GO!!! |
|
|
|
|
02/18/2018, 01:12 PM
|
#333 |
|
Registered Member
Join Date: Oct 2014
Location: Toronto GTA,Canada
Posts: 1,763
|
Sump Room (Waterproofing) Chalking VS BlueSkin
Before I put up the Final Drywall, I sealed the stud Framing. 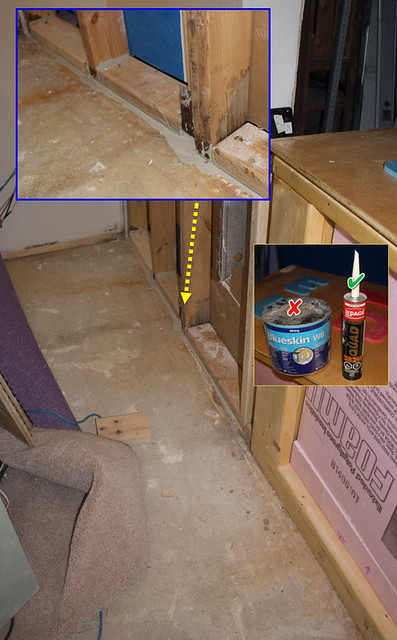 After reading the BlueSkin Instructions I decided not to use it (more for flat smooth surfaces, NOT Rough Concrete, Stud Cracks) Used High Quality Window Chalking instead. (Both sides of Sump Room Wall) The stuff is liquidly/runny but filled and sealed everything nicely. After Curing if feels like it will hold/seal for a long time (for rare sump room spills) This is the area where water flows (Floor leveling towards basement drain), since all the Metal Studs were corroded (which I replaced with Wood 2x4's) |
|
|
|
|
02/18/2018, 01:18 PM
|
#334 | |
|
Registered Member
Join Date: Oct 2014
Location: Toronto GTA,Canada
Posts: 1,763
|
Quote:
You promised you would drive down from Montreal I promised to feed all the helpers (Pizza and Lasagna). No Alcohol before tank move
|
|
|
|
|
|
02/18/2018, 08:10 PM
|
#335 |
|
Registered Member
Join Date: Oct 2014
Location: Toronto GTA,Canada
Posts: 1,763
|
★★ TANK IS at HOME ★★ (Brought in) Not Carried [PLAN B]
So things were a challenge. 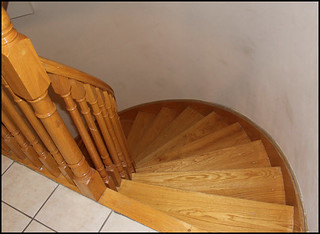 The curve stairway was tough for 4 people. PLUS THE TANK Felt Awkward and HEAVY. Came up with a PLAN-B to get it downstairs. Make a SLED and SLIDE it down..... Cardboard Wrapped....Plywood Bottom....SyroFoam Padding. 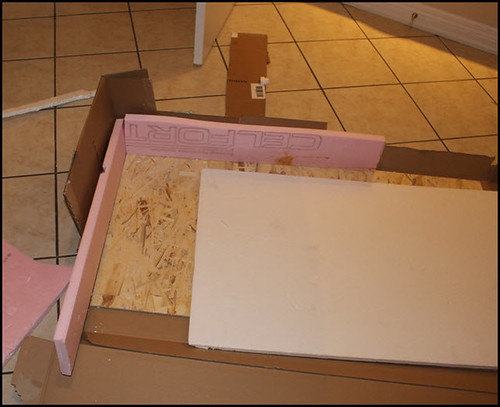 Once wrapped up.....It was safe to slide down stairs (Two people at bottom, and 1 at Top to Guide tank). 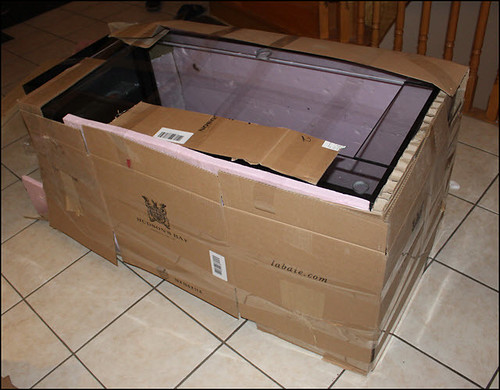 IT WORKED. And Glad we did it this way (Since we could feel the awkwardness and weight doing this way). 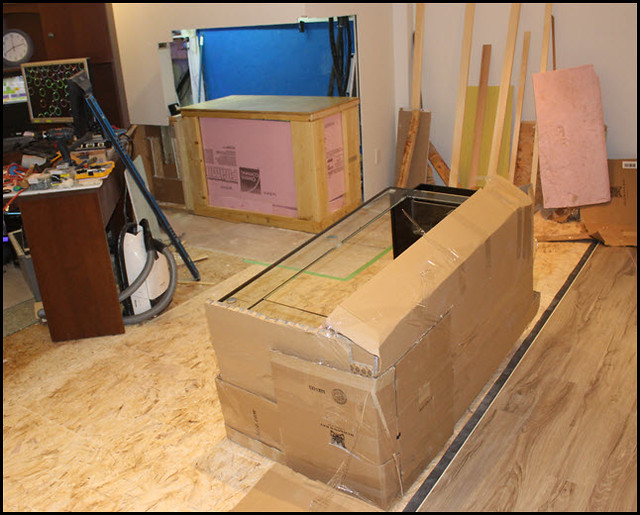
|
|
|
|
|
02/18/2018, 08:14 PM
|
#336 |
|
Registered Member
Join Date: Oct 2014
Location: Toronto GTA,Canada
Posts: 1,763
|
HERE IS IT (TANK ON STAND) ** PERFECT FIT, LEVEL and FLUSH (AMAZING!!!)
Everything Lines up!!! 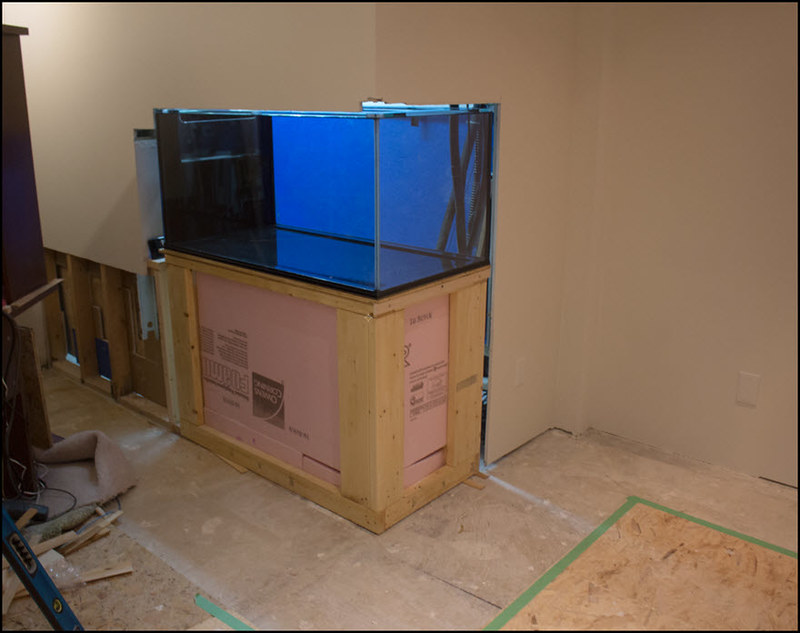 Can't believe it. Ready for Framing.  I'm really Happy Beyond my Greatest Expectations. I EVEN LIKE THE CLEAR SILICONE EDGE The BUILD IS GOING TO Be Fun!!!!! |
|
|
|
|
02/18/2018, 08:31 PM
|
#337 |
|
Registered Member
Join Date: Mar 2016
Location: Florida
Posts: 782
|
Looks awesome!!
__________________
"I chop up animals and glue them to rocks" Current Tank Info: System 1 Mixed Reef: 180g DT,180g Fuge, 120g Sump http://www.reefcentral.com/forums/showthread.php?t=2611735 |
|
|
|
|
02/18/2018, 08:40 PM
|
#338 |
|
Registered Member
Join Date: Apr 2003
Location: Mtl. Canada
Posts: 7,824
|
Congrats Wally! It’s in!!
Too bad I missed the pre move drinking. Anyways, you said you had two at bottom and two at top.. I would have been that guy going ‘weeeeeeeeee!!!’ While sitting in the tank.
__________________
Matt. Current Tank Info: 53x32.5x26 190g dt 60g of sumps 3 tank-100 gal frag system 6xAI prime 8xt5. 4x maxspect gyre. Skimz Dual internal sicce pump skimmer Deltec PF601s ca rx+Kalk stirrer |
|
|
|
|
02/18/2018, 10:04 PM
|
#339 |
|
Registered Member
Join Date: Oct 2014
Location: Toronto GTA,Canada
Posts: 1,763
|
Thanks Guys.
Sorry Matt, two daughters already thought of your "Weeeeeee idea". Wasn't much room left So here is the TANK on the SUMP room Side 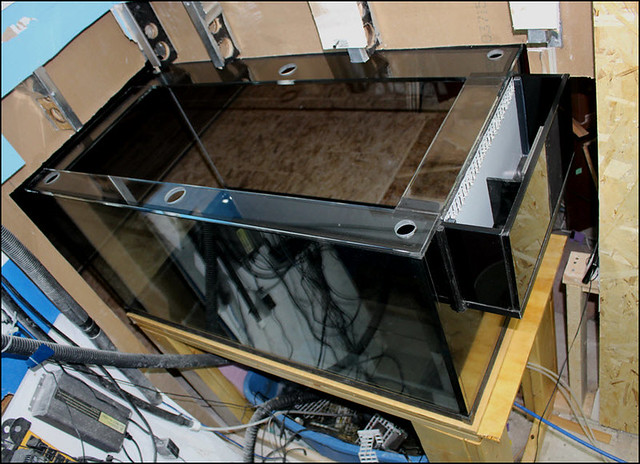 Things appear to fit without any SIGNIFICANT adjustments. Lot's of thinking to do when the build start. RIGHT NOW, I want to finished the DRYWALL, The Flooring around the Tank and get that Rec room/Office done. It will help me daydream what to do next on for the Sump Room (I....mean....Deluxe MAN CAVE). |
|
|
|
|
02/18/2018, 10:26 PM
|
#340 | |
|
Registered Member
Join Date: Jul 2015
Posts: 227
|
Quote:
 Sent from my iPhone using Tapatalk |
|
|
|
|
|
02/19/2018, 12:10 AM
|
#341 |
|
Registered Member
Join Date: Oct 2014
Location: Toronto GTA,Canada
Posts: 1,763
|
TANK Sealed/Protected (For Next Phase) Meticulous Work Coming Soon
Thanks Tenurpro....Really glad I got to this point. As much as I've achieved a Major Milestone, the Journey isn't quite over, it's actually just begining....(Groan) At least I'm at the Creative stage of this project...And I can't wait to the really fun stage...Sump Room, and The Tank ALIVE (Fish wish the same). 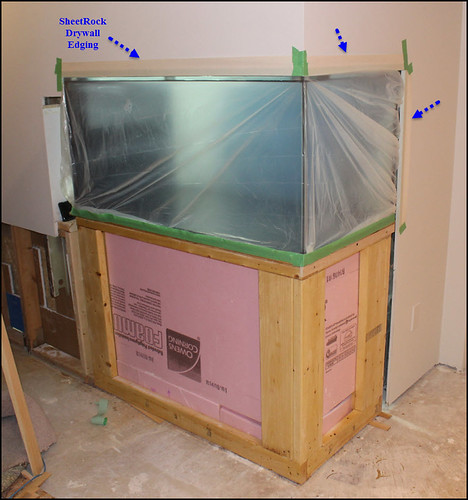 Plenty to do, but for now tank is covered with protective sheet. I also roughly put on the SheetRock Edging since the Edge-Drywall can crumble with GRITTY dust/debris. Edging does fit nice, and I have ideas for how to seal/install it for a perfect Wall Finish. |
|
|
|
|
02/19/2018, 10:45 AM
|
#342 |
|
Registered Member
Join Date: Oct 2014
Location: Toronto GTA,Canada
Posts: 1,763
|
TANK SHIMMY Time [B](For Ultra Leveling and Stability) Before Dri-Cor is Wrapped around tank.[/B]
I have to finished the Dri-Core around Tank, but once installed I will no longer have access to the TWO Front SIDES of tank STand Bottom.  Ideally I should fill tank with water and let it settle a while. However I still will have access to Sump Room Side, if any later adjustments are needed. These shimmys will be Cut Flush with Stand and then I'll seal the bottom with the Chalking to seal the Sump room further. |
|
|
|
|
02/19/2018, 03:04 PM
|
#343 |
|
Registered Member
Join Date: Mar 2016
Location: Florida
Posts: 782
|
Now is when the true fun begins. The amount of forethought on this project is amazing.
I cant wait to watch this all unfold.
__________________
"I chop up animals and glue them to rocks" Current Tank Info: System 1 Mixed Reef: 180g DT,180g Fuge, 120g Sump http://www.reefcentral.com/forums/showthread.php?t=2611735 |
|
|
|
|
02/19/2018, 05:22 PM
|
#344 |
|
Registered Member
Join Date: Oct 2000
Posts: 2,661
|
Wellitsabouttimealready! Nice job Wally.
Try hauling a tank that size up three flights of stairs. Not fun. I'm looking forward to finally seeing some water in that thing.
__________________
Advice is like a firehose. Be careful how you drink. |
|
|
|
|
02/19/2018, 05:41 PM
|
#345 |
|
Registered Member
Join Date: Oct 2014
Location: Toronto GTA,Canada
Posts: 1,763
|
Well Guys,
...First Thanks for cheering me on. However I've run into a problem! The Plywood Stand Top OR The tank trim isn't a perfect flush match. I don't feel comfortable with the tank not fully resting across the full trim. Perhaps if I filled tank with water things might flatten out. But what if not since the plywood is very hard after I sealed with with the Eurothane sealer. I need to at least place a very thin layer of foam under the tank. Or something else. Too bad for this small setback. |
|
|
|
|
02/19/2018, 07:42 PM
|
#346 |
|
Registered Member
Join Date: Oct 2000
Posts: 2,661
|
How big is the gap? I suspect that if it is very small, say 1/16th the foam would level it no problem. I've used bondo to level out a 40 breeder where the gap was almost 1/4".
__________________
Advice is like a firehose. Be careful how you drink. |
|
|
|
|
02/19/2018, 07:56 PM
|
#347 |
|
Registered Member
Join Date: Apr 2003
Location: Mtl. Canada
Posts: 7,824
|
I don’t understand.. do you mean the tank rocks a bit sitting there?
__________________
Matt. Current Tank Info: 53x32.5x26 190g dt 60g of sumps 3 tank-100 gal frag system 6xAI prime 8xt5. 4x maxspect gyre. Skimz Dual internal sicce pump skimmer Deltec PF601s ca rx+Kalk stirrer |
|
|
|
|
02/19/2018, 09:33 PM
|
#348 | |
|
Registered Member
Join Date: Oct 2014
Location: Toronto GTA,Canada
Posts: 1,763
|
Quote:
And if I look underneath I see light around in various areas, which mean no Contact Between Tank and Plywood. BUT I SOLVED IT.... |
|
|
|
|
|
02/19/2018, 09:41 PM
|
#349 |
|
Registered Member
Join Date: Oct 2014
Location: Toronto GTA,Canada
Posts: 1,763
|
Tank Under padding (Right under my Nose) Perfect Material
So I wanted to find the ideal foam Underpad, to place the whole TANK TRIM on to EVEN THINGS UP. I didn't want to use the THICK PAD that I bought earlier, since I did double Plywood already (so tank would be too high) I tried all kinds of materials I had around the house. (PayFoam, Drawer Liners, Rubber, etc) THEN It hit me........ (I have TONS of an IDEAL MATERIAL)  The roll of foam under padding I was using for the VINYL FLOORING. NICE AND THIN. VAPOUR BARRIER Waterproof Liner, compresses nicely but hold up with Weight over larger area (1.5 Inch Trim width)  I cut 2" strip (a bit wider than the trim). I held up tank, and my daughter tucked it in. I cut off the excess foam on the outside of tank edges. And that one RIGHT corner that had a tiny ever so small wobble, I doubled up the foam over a area needed.  The tank is steady as a rock, and when (water & rocks) go in, 1200 More Pound will flatten the foam out (Where needed to Keep LEVEL BY GRAVITY) I DID A CALCULATION: (on lbs/sq inch) 46" of 1.5 inch Trim (Front and Back) = 138 24" of 1.5 inch Time (Left and right)= 72 Total Weight Distribution = 210 Square Inches Tank+contents weight approx. 1200 lbs ------------------------------------------------------ Weight Distribution = 10 Lbs/Square Inch (which is not much) I also placed a tiny thin shimmy in the corner for a touch of extra wiggle stop support. Last edited by Wally.B; 02/19/2018 at 10:12 PM. |
|
|
|
|
02/19/2018, 10:01 PM
|
#350 |
|
Registered Member
Join Date: Apr 2003
Location: Mtl. Canada
Posts: 7,824
|
So, the tank is level now, with the extra padding under that corner?
__________________
Matt. Current Tank Info: 53x32.5x26 190g dt 60g of sumps 3 tank-100 gal frag system 6xAI prime 8xt5. 4x maxspect gyre. Skimz Dual internal sicce pump skimmer Deltec PF601s ca rx+Kalk stirrer |
|
|
|
|
| Thread Tools | |
|
|


