
|
|
|
|||||||
 |
| Thread Tools |
 05/12/2017, 06:36 PM
|
#1 |
|
Registered Member
Join Date: Oct 2014
Location: Toronto GTA,Canada
Posts: 1,763
|
★ DIY Controller ★ (Doser, Auto Water Changer, Algae Scrubber, Custom Sump, etc)
I kind of regret not posting this in the DIY section of the forum, so just posting this pointer.
Basically, I've built a CUSTOM CONTROLLER that does a ton of stuff I want to automate. More information is in my New Tank Build Thread, but it all is centered around this ARDIUNO based Controller I just finished making. Starting Install into Tank/Sump now.   FULL DETAILS IN THIS (ongoing) THREAD here... http://www.reefcentral.com/forums/sh....php?t=2636608 I won't be posting anymore info here. Last edited by Wally.B; 05/12/2017 at 06:42 PM. |

|

|
|
05/13/2017, 06:40 AM
|
#2 |
|
Registered Member
Join Date: Sep 2003
Location: North Carolina
Posts: 20,050
|
Your use of screws and hot glue is great..
 "oh... need to prop up an LCD on an angle.. screw+hot glue".. "secure a keystone jack....screw+hot glue"..
__________________
Who me? |
|
|
|
|
05/13/2017, 09:23 PM
|
#3 | |
|
Registered Member
Join Date: Oct 2014
Location: Toronto GTA,Canada
Posts: 1,763
|
Quote:
Screw did work, and once inside an acrylic Case, everything will be fine. BTW. Warning about Glue guns. The one I used actually Blew up one night. Not a $store version, but bought from a Art Supply store (Certified). Glad the kids were not using it, since they use it all the time. It shorted and sparked like crazy with smoke, till it blew the house fuse. The weird part is I was left kind of Blind after the flash since power for all lighting also went in my office, so I did kind of go through a bit disoriented confusion and shock. At first I thought it might be the controller, Adapter etc. I remove all power to my desk (cords, and one by one plugged them in. Glue gun was last). |
|
|
|
|
|
05/14/2017, 11:42 AM
|
#4 |
|
Registered Member
Join Date: Oct 2014
Location: Toronto GTA,Canada
Posts: 1,763
|
I think I might post the build details and technical stuff on this thread after all.
The Tank thread should be more on the Future of the Tank and growing corals. Appears the Reef Audience on the Thread are more geared towards aquarium talk. This thread will get into the guts and glory for open discussion. Good idea? Stay Tuned. |
|
|
|
|
05/19/2017, 11:24 AM
|
#5 |
|
Registered Member
Join Date: Oct 2014
Location: Toronto GTA,Canada
Posts: 1,763
|
The Finished Controller (Auto-Station) Water Changes
I will post Details on the Tank Thread. On this Thread I'll just show the significant Milestone. This is the Auto-Station basically finished.  I ran the Water Change Lines into the Sump (Water Change Compartment) like this.  Originally the plan was to go with 50 Gallon Salt Water Bin. However it takes up too much space, and I'll have that elsewhere for Top Ups. Auto-Water Changes will be done for a few weeks. I'll test water and see what I need to Dose. Dosing the various Addatives and Coral Food I use for my other tank will commence once I get the Doser Head Tubing in place (in sump). The bucket on the Floor is just my Auto-Filling RO bucket (Simple Mechanical Float Valve) Fed from RO system). It top ups both Tanks daily via Tunze Osomolator. |
|
|
|
|
05/19/2017, 12:34 PM
|
#6 |
|
Registered Member
Join Date: Jun 2016
Posts: 67
|
Looks great!
|
|
|
|
|
05/21/2017, 10:19 PM
|
#7 |
|
Registered Member
Join Date: Oct 2014
Location: Toronto GTA,Canada
Posts: 1,763
|
DOSER (Auto Water Changer) COMPLETED & INSTALLED With (Lighting Feature)
So the Doser is Finally Installed (PERMANENTLY) and Couple of Water changes done. Everything is perfect. However I struggled many hours (2 days) to fix a misplaced wired. (I had trouble falling a sleep thinking things thru) When Installing the Final Feature (Mode Lighting) I screwed up one wire and nothing was working. As you can see it wasn't that easy (Lots of wire connections underneath), but I finally found the mistake.  The Lighting Feature is a 3 Color LED installed in the Acrylic Base. It show status, running mode, plus Future reminder feature. (I first Had a SImple LED on top, but a small hole Driller into base is more noticeable and Quite Awesome looking)  For now the Water Changer will be Manual. (ONE BUTTON ACTIVATE) -> PUSH Button [ Apex Turns off WC-Reservoir Pump] -> Apex Sends Signal to Doser(+) Controller for Go Ahead. -> Water Change is done and Apex Turn Reservoir Pump back on.  I need to learn how it works: -> Keep New Water Container FULL / (Empty Dump Container) [Will Add Sensors in the Future to Failsafe) -> Turn on New Water heater, and Watch for Tank Temp Match (manual) -> And also do Water Parameters to learn how much Dosing will be required with Regular Weekly Water Changes. WHATS REALLY weird, is I feel kind of Lost No doing Manual Bucket Water changes. I'll get used to it  So now I move to DOSING (Learn and Setup). Figure out new routine with Easy Weekly Water changes, and how tank Water Parameter need adjustment (if any). Maybe I’ll just need Coral Food and Coloration Additives. (Who knows. Routine/Weekly Water Changes may be good enough for a long while till Corals get bigger. But at least I’ll be ready when that day comes with a Dosing System setup). And I did make a 3 Camera View Movie that I'm editing showing a Installed Run with (Lighting). As Soon I edit the movie, I'll post on YouTube. Last edited by Wally.B; 05/21/2017 at 10:56 PM. |
|
|
|
|
05/22/2017, 03:02 PM
|
#8 |
|
Registered Member
Join Date: Oct 2014
Location: Toronto GTA,Canada
Posts: 1,763
|
DOSER SETUP (Dosing Head Tubing and Controller Config)
3 Dosing line have been installed (Test with water for now).  Here is how the Controller is configured. I decided not to make it tedious thru the LCD/Push Buttons. Plus the code would be complex to write for Interface, etc. Future features will be easier to add this way. The Dosing configuration is within the Aurdino Code. To make a dosing change, I edit the config and upload into Ardiuno from PC. Pretty simple as shown below (Example of 1 Dosing Head)  Once the config is uploaded, the Doser Scheduler uses this to run things. The scheduler uses Queuing Logic: --> You can Set Dose Head (#01,#02,#03) to all dose as 12:15PM --> It will queue up each pump at 12:15 --> Two Pumps will never run at same time --> When Pump one is finished, the Next Pump Starts After a week of water testing, I'll switch to real additives. Last edited by Wally.B; 05/22/2017 at 03:12 PM. |
|
|
|
|
05/24/2017, 12:56 AM
|
#9 |
|
Registered Member
Join Date: Oct 2014
Location: Toronto GTA,Canada
Posts: 1,763
|
NEW MODE (Doser Head Fine Calibration)
I am only posting these Doser Tech details here, since I mounted the SPS frags in the tank and the other Tank Thread is switching to Tank Talk. I found during setup for water only Trial Run that it's not that easy to calibrate, even these fairly accurate pumps. Hard to stop exactly at 20ml. I am a perfectionist and since I'll be watching clear acrylic reservoirs, so it will bother seeing DOSE-01 reservoirs lower than the other over time, as the calibration offset between heads will show up. It not a big deal for the Tank Chemistry for small additive offsets. So a new feature I coded in, is you can adjust the Stored (millisecond) Calibration Value (instead of doing another attempt at calibration). Then the adjustment there will be an option to re-run a sample run of each dosing head to see if they are matched. I provide a few different Volume runs to more closely match actual amounts being dosed into tank.  Wasn't too hard to code this up, and I had a Spare Flip Switch to get into this Adjustment Mode.  Theoretically this adjustment could be used to Tone back a One Or Mode Chemical Additatives (VS changing the IDEAL Config for Daily Dosing) IE (If Alk is too high after Water Change....Drop ALK calibration a bit, till it drops to Desired Level (Balanced with Calc) and then return to dosing normal [EQUAL DOSING] ) However that could be dangerous if not tracked and corrected. (Maybe that could be another mode. Tone Back, So controller Tracks the OFFSETs) Last edited by Wally.B; 05/24/2017 at 01:06 AM. |
|
|
|
|
06/09/2017, 10:39 AM
|
#10 |
|
Registered Member
Join Date: Oct 2014
Location: Toronto GTA,Canada
Posts: 1,763
|
DOSER (II) Plus Controller (Fully Installed)
Just in time as I really need to start dosing (Alk is dropping fast as Tank is doing Really well). Before I nailed everything down, I did some final touch ups. -> TRI-Color LED Status Indicators on Dosing Heads -> Dosing Tray / Tubing Runs / Utility Tray This is overkill on Lighting, but it looks cool and I will eventually take advantage of the Status indicators when I add a Maintenance Scheduling Reminder Feature into the Controller.  This completes the Tech Talk about the controller. And I can tell that for the first time in 3 years, SPS growth has really taken off. I see bumps and new appendages starting on many of the Frags. Also different from Past, the Colors of the Purple SPS are hanging in. In past they would all fade to brown. Also PE extension is everywhere!! Onward. |
|
|
|
|
06/10/2017, 11:34 PM
|
#11 |
|
Registered Member
Join Date: Oct 2014
Location: Toronto GTA,Canada
Posts: 1,763
|
DOSING LINE Installation (Couplers) ** Air Bubble Leak Problem Solved **
One last thing on install..... Thought I would pass on this bit of information. I had issues with Air Bubbles entering lines from my Dosing Container. It was the Connections on the Intake side of the Dosing Heads.(at Dosing Head and Container) ** INTAKE/Draw side only, Output Push was no issue ** The high quality Soft Silicone tubes are the best, but expensive for long run. So on Intake I used a tiny piece of the Soft Silicone tubing. And the Dual Sized Coupler make a great seal.  ** NO MORE BUBBLES **
|
|
|
|
|
06/13/2017, 03:47 PM
|
#12 |
|
Registered Member
Join Date: Oct 2014
Location: Toronto GTA,Canada
Posts: 1,763
|
DOSER (II) Plus Controller (Couple of Water Level Sensor for Water Change BIN)
The Cheapo Level Sensor arrived from China. I will be build a Mini Controller to do Auto Water Changes in other tank (Since I love it). I made a couple more Water Level Sensors for the Water Changer Bins.  The New-Water Bin Sensor will sense to ensure there is enough water to do a water change (Also give me warning that it's fill up time). The DUMP-Water Bin Sensor, will sense that Bin it getting close to full and time to empty so water Change can be done. If things don't pass checks, Water Changes won't run. This extra bit of failsafe mean I can go Total Automation with Water changes. I can consider increasing Bin Sizes. I will also have confidence to even do Scheduled Water changes, without supervision.[/IMG] I have a spare Arudino UNO that I plan on making a mini Controller, to do just Water Changes (No dosing) for my Other tank, since I love the freedom I'm getting from this setup. ** I am getting close to running out of I/O on the Audiuno Mega. Yep there are 54 Digital IO PIN and I think I used up around 49 (LEDS, RELAY, SWITCHES) ** ** The 5 Tri-Color LED for the Doser Heads themselves took up 15 I/O pins ** |
|
|
|
|
03/19/2018, 09:43 AM
|
#13 |
|
Registered Member
Join Date: Oct 2014
Location: Toronto GTA,Canada
Posts: 1,763
|
SUMP Room Completed
Will be integrating the Controller into this Room. 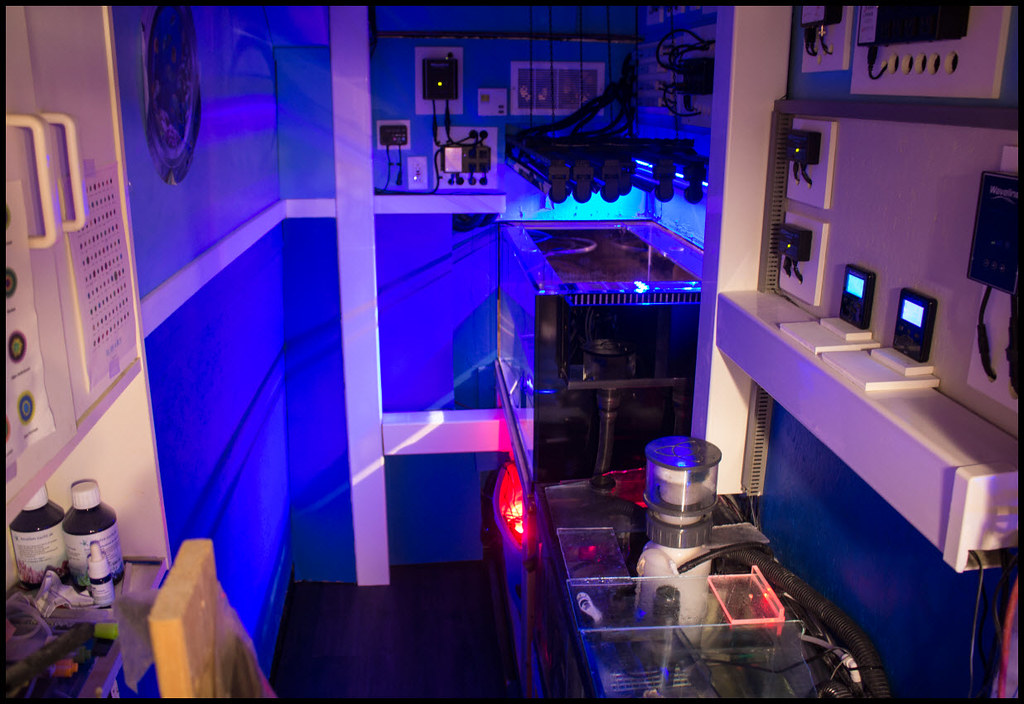 Thread POST Here. http://www.reefcentral.com/forums/sh...9&postcount=94 |
|
|
|
|
|
|


