
|
|
 02/17/2010, 04:35 PM
|
#1 |
|
Registered Member
Join Date: Jan 2010
Posts: 73
|
DIY ACRYLIC OVERFLOW
Although these instructions are in my tank thread, i figured that it may be of a better use in the DIY forum. Anyway, here it comes;D The Design Please take the time to carefully study the way the overflow works and how it is put together. I hope you will find my thoughts and tips into use. 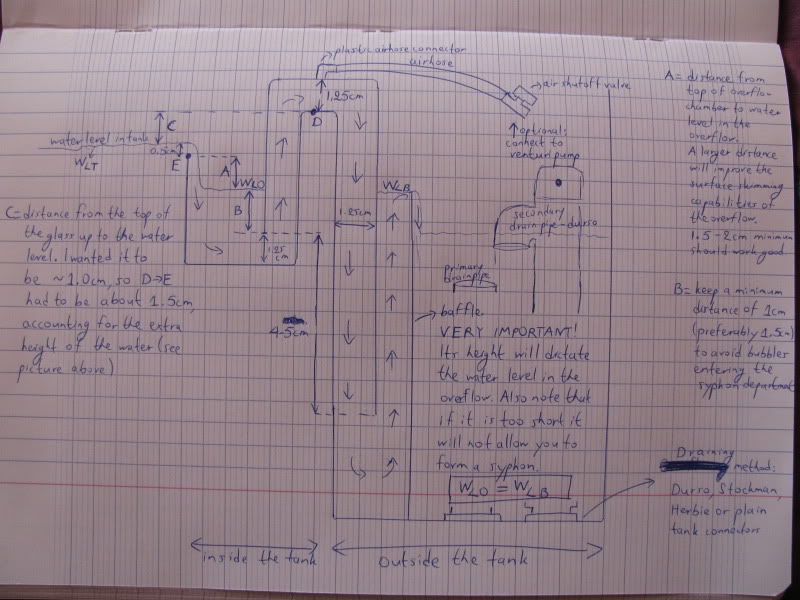 Cutting the main piece. To do this i attached my router on the bottom of a flat piece of wood using screws & bolts. In order to make a straight cut, i nailed another piece of wood, about 10cm away from the blade, which i used as a guide. Before cutting 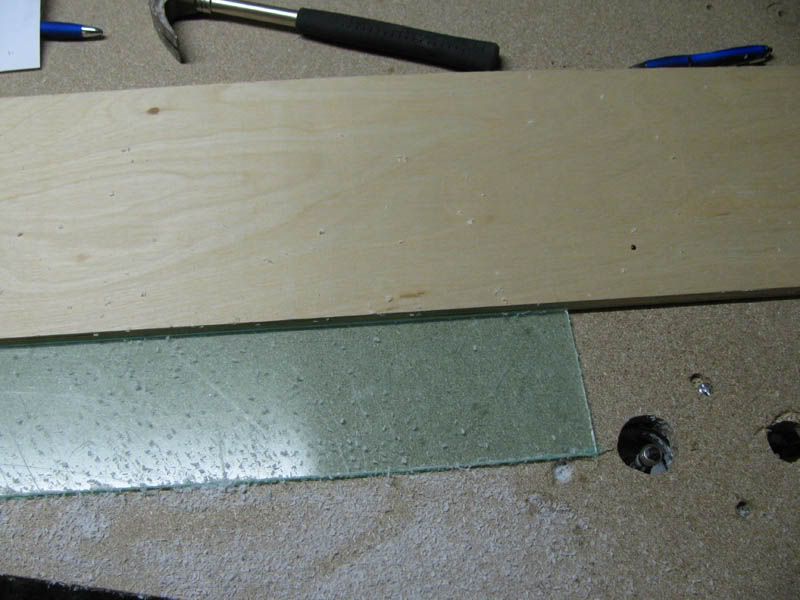 After cutting Note the wheel above the blade. This can be used to trace another surface. 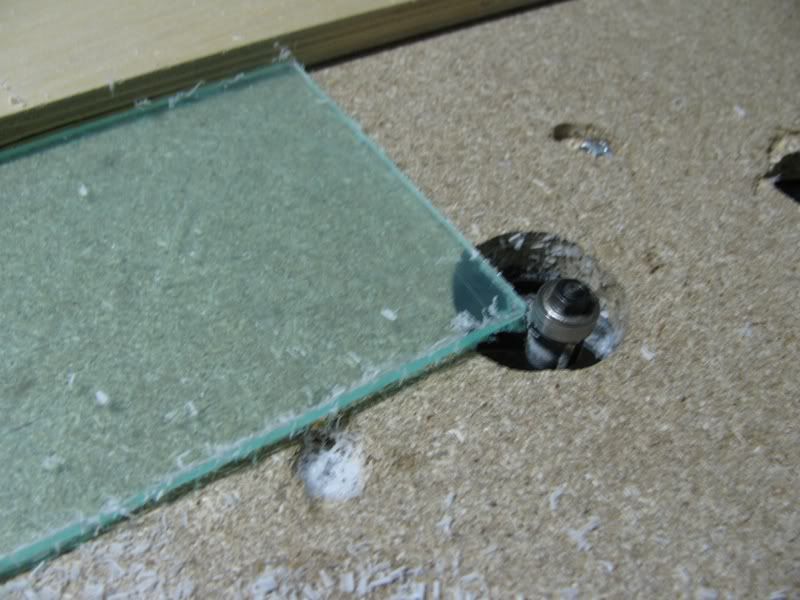 A Cut edge TIP: Make sure you don't pause while cutting the acrylic otherwise the blade will melt the edge (see picture below - the while spot). Luckily this can be fixed easily with light sanding of the edge. Note however that too much sanding can lead to an uneven edge which will be more difficult to glue later on). 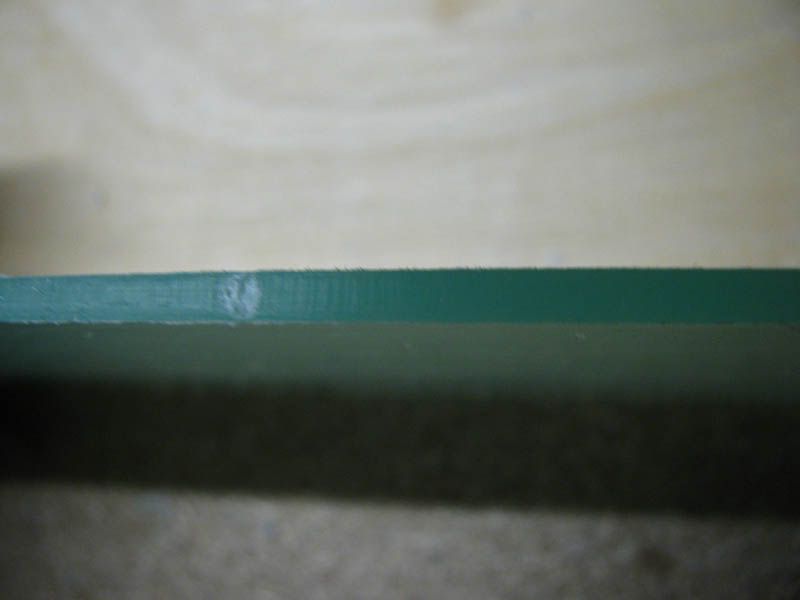 Heating acrylic I advise against the use of propane torches or gas stoves to heat up acrylic. I used a propane torch myself for my first 2 overflows with mixed results. I found that the torch would shoot flames for no reason, making air bubbles on the acrylic. Long story short, it is a stressful tool to use for this application. Short thereafter i decided to buy a heat gun (see picture below) for 35euros. Let me start by telling you that this was probably the best value for money for all my diy projects so far along with the router. Using a heat gun allows for more control, it heats the acrylic evenly (no flames) and if used properly will yield nice bends without bubbles. 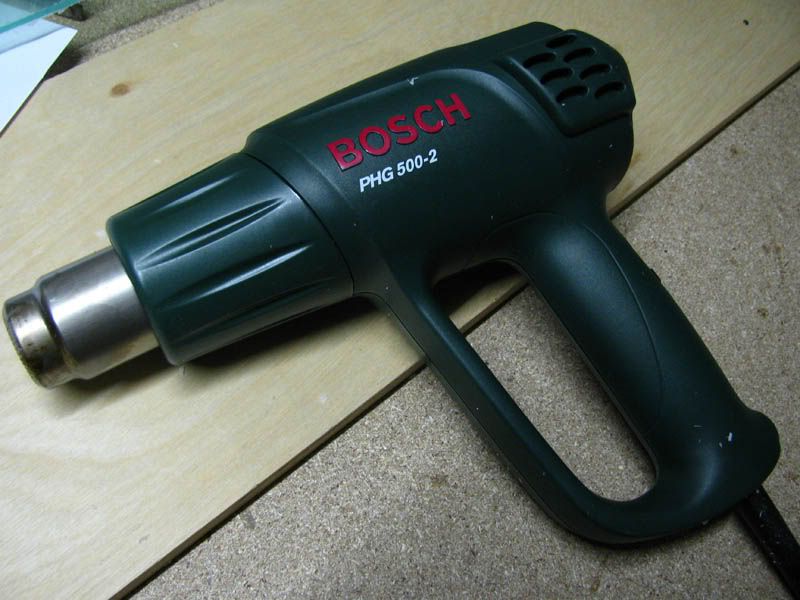 Bending acrylic First of all, for the best results you need some clamps to keep your workpiece in place. Clamp the acrylic on your worktable (or wood sheet in my case). Ideally, if you are using a wooden worktable, you should put a piece of aluminum foil to protect it from burning. I must say that this is a must when using a propane torch but merely a precaution if using a heat gun. (nonetheless i didn't use any foil at all) TIP: If exact measurements are important, you should take the length of acrylic required to make the bend into consideration. Generally i found that 0.5cm was all that was needed. For example, if you want a piece to to be 10cm long, you should heat it at 10.5cm. Heat the acrylic from both sides (not necessary but will help with yielding a nicer bend, without bubbles) with the heat gun about 10-20cm away while holding the other end of the acrylic with your hand. Keep heating your workpiece until you feel that it has gotten very soft. Note that if you overheat it it will start forming bubbles - for this reason you should never stay on one spot with the heat gun. Just keep moving up and down for a couple of times, then heat the other side and then do the same thing all over again. 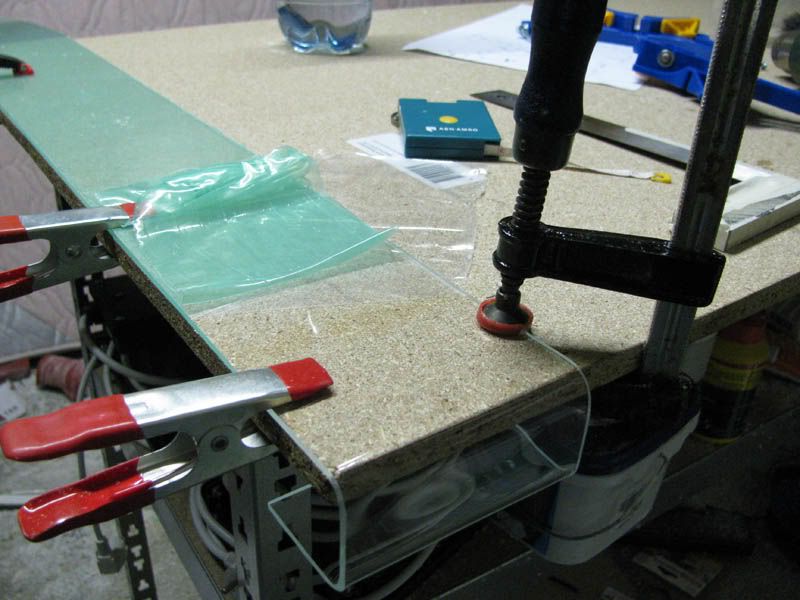 Making the middlemost bend I found that the easiest way to make this bend it to heat a slightly larger area of the acrylic and fold it over something that has the same thickness at the one you are looking for. In my case, this was a flat piece of wood. TIP: Make sure that if you are using a router to cut the acrylic, that the bend is slightly larger than the blade of the router. If it is not, you will not be able to use the router to cut the extra acrylic in the following steps. 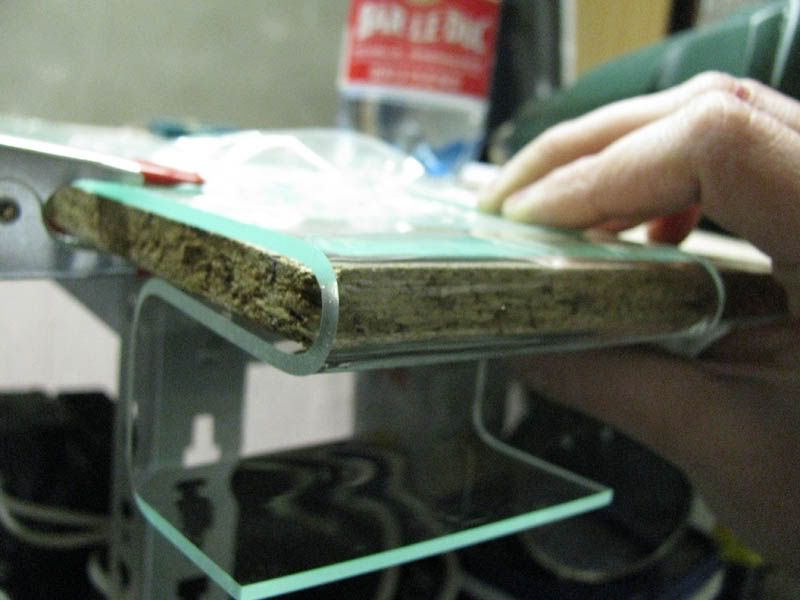 Drilling holes for the drain pipes First of all, i only had a hole saw for wood which did not seem to work good on acrylic, so i decided to make my own hole cutter from whatever tools i already had. I have to admit that this method of making holes is rather "ghetto" but it sure works nicely. I started by making a hole on the wood. I also cut a "line" on the wood so that i could slide my acrylic piece in. Alternatively you might want to drill the holes first and then make the last bend (i forgot to do so lol). I then drilled a few small holes close to each other with my electric drill, resulting in a bigger hole that is just as big as the router blade. The wheel on the router bit, will trace the hole in the wood and cut the acrylic similarly (see 2nd & 3rd) picture below) TIP: While drilling acrylic, take your time and let the tool do its job. If you apply a lot of pressure you will brake the acrylic. 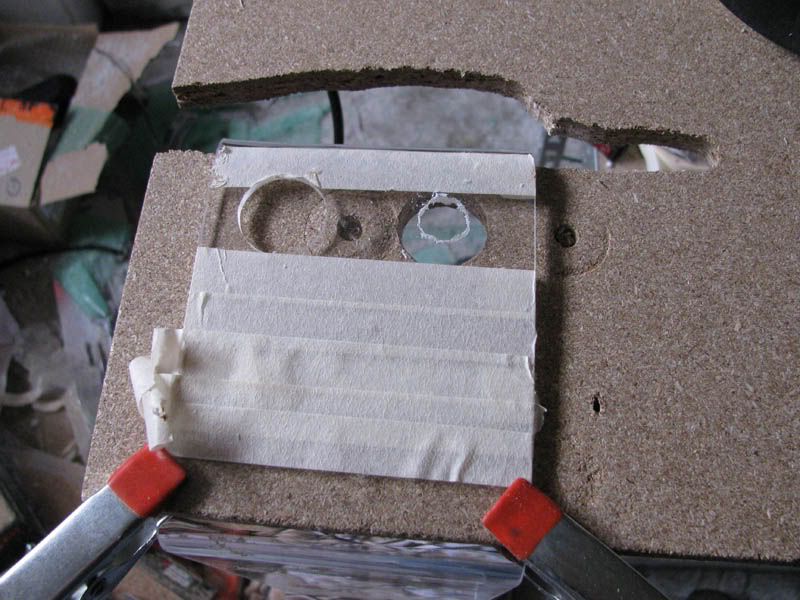 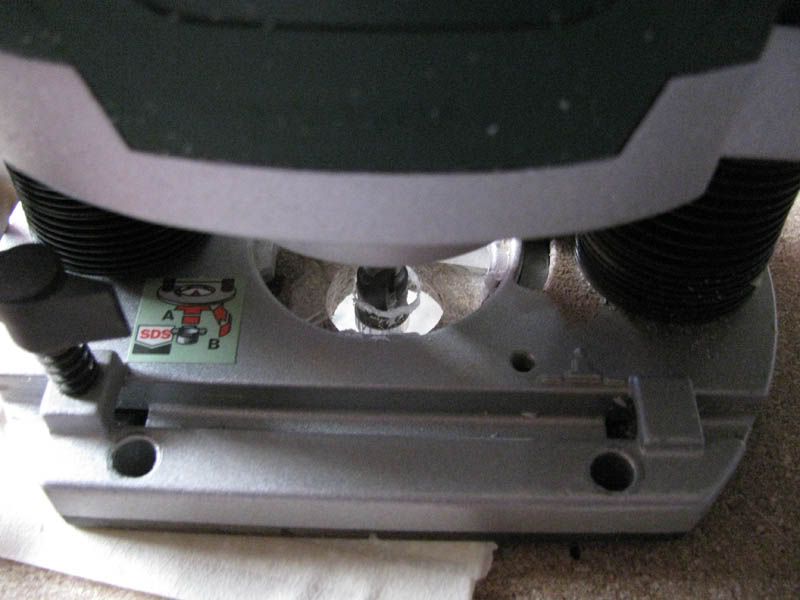 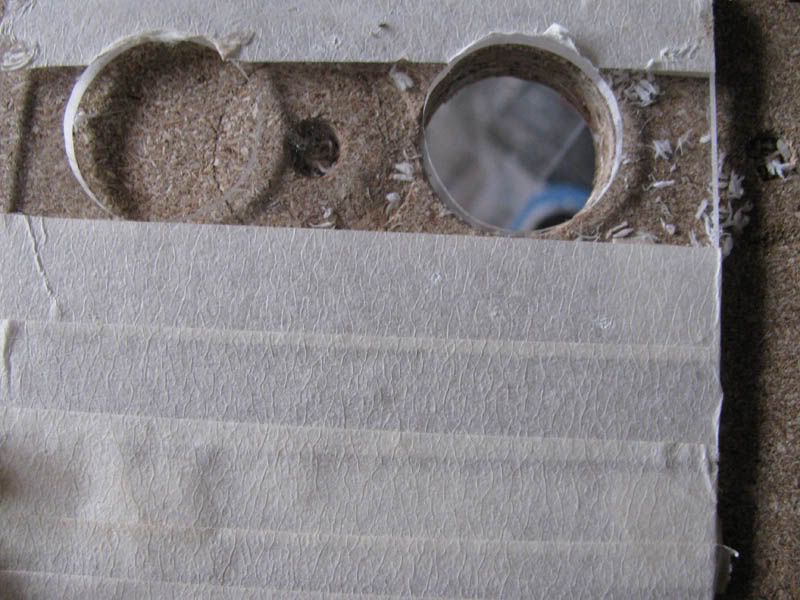
|

|

|
|
02/17/2010, 04:35 PM
|
#2 |
|
Registered Member
Join Date: Jan 2010
Posts: 73
|
Drilling a hole for priming the weir
Drill a hole and glue a plastic airhose connector on the weir. Alternatively you can slide a piece of airhose through the opening of the overflow towards the top of the syphon part of the weir. Personally i prefer drilling a hole as the hose in the 2nd method tends to get out of place easily. On the other hand, you wont have to prime the overflow very often anyway. 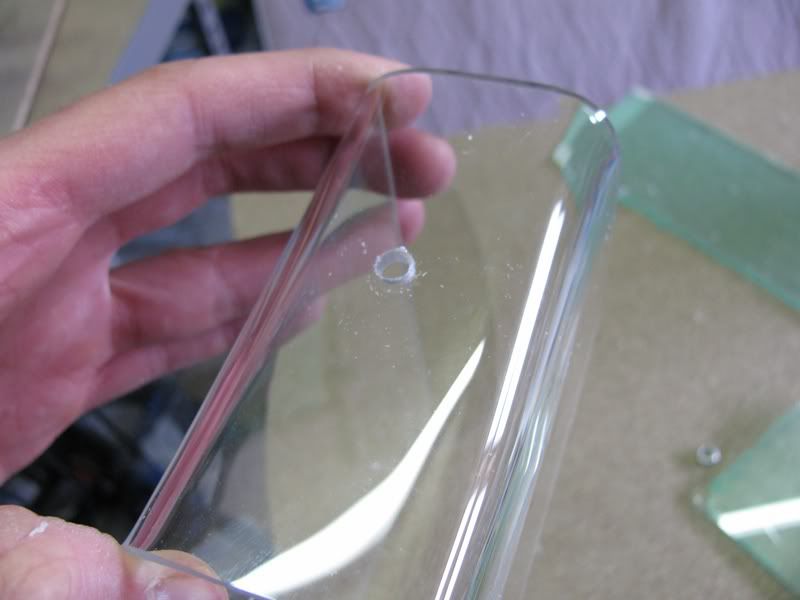 The Glue & Applicator To glue acrylic i decided to use Chloroform. I put a bit of chloroform in small glass pot (one from JBL test kits) and added some acrylic shavings to form a thicker mixture. For applying the glue, i used a cheap plastic syringe (buy several (2 should be enough for this project) as the glue will degrade the syringe after a while). Also buy a needle with a long tip as shown in the picture below. 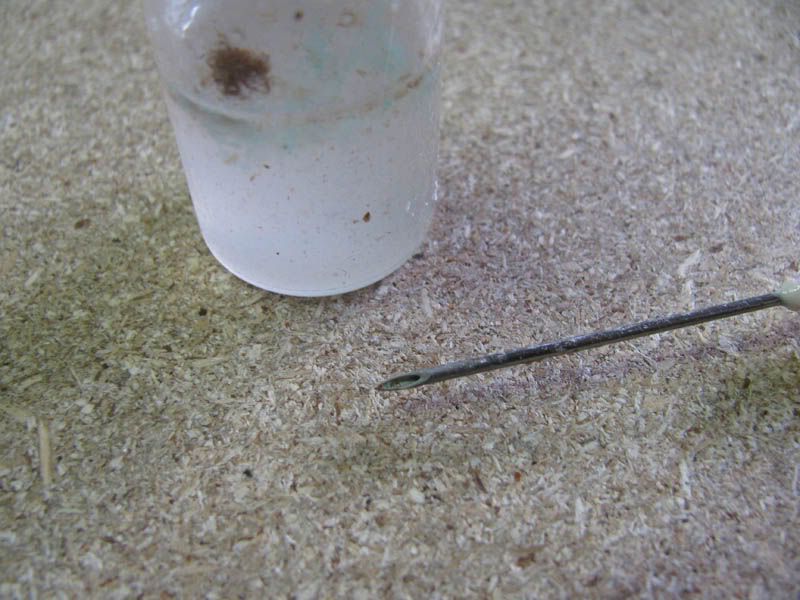 Protective gear Note that chloroform is nasty stuff and you should take all precautions and care when using it! Work in a well ventilated area and/or use a respiratory mask with carbon filter, gloves and eye protection (double in my case LOL). By the way, I might look like a crazy scientist on the photo but i swear i am not one;D 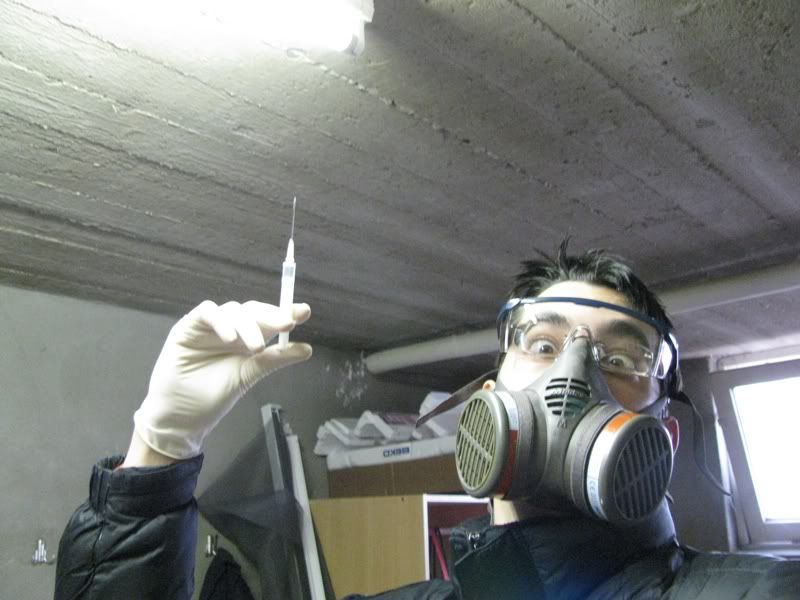 Pre-gluing preparations - The pins method of gluing Place the 2 main parts on a flat piece of acrylic (slightly larger dimensions than the acrylic). Place thin pieces of wire between the flat acrylic and the bended acrylic as shown in the picture below. TIP: Put some books on top of the acrylic to hold the workpiece in place when you remove the pins. 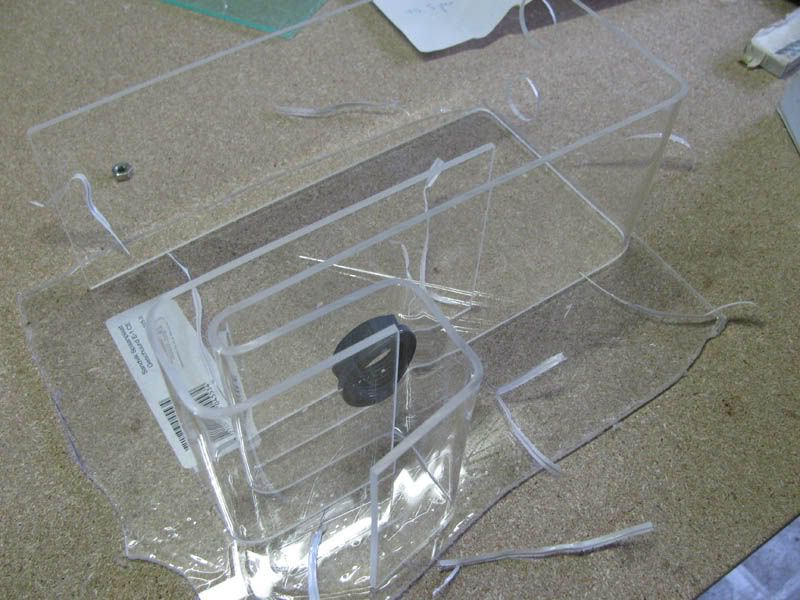 Gluing the acrylic Fill the syringe with glue. Apply the glue by gently pushing the syringe. Be fast though so that the glue doesn't dry out completely. You should see the glue flowing into the joint. TIP: Apply the glue from the outer side of the overflow whenever possible, so that any left over glue can be routed away later on for a better visual result. Let the glue sit for 30-60 seconds and then start pulling out the pins. Let the workpiece dry for 4 hours. Glue the other side using the same method and let it dry for 4 hours. Glue the baffle in place, 1 side at a time. Let the glue dry for at least 20 minutes before doing each side. Let the workpiece dry for a day or 2 so that joints reach maximum strength. Check for bubbles in the joints Large bubbles are likely to cause leaks and should be fixed. To fix them you can run an extra layer of glue where the bubbles are. TIP: If the glue does not enter the joint, wait for 30-60 seconds, until the glue softens the acrylic. Then use the tip of the needle to poke holes in the joint where the bubbles are located. This should help the glue to flow in the joint easier. Route the excess acrylic Priming the weir Fill the baffle with water. Turn on the return pump from sump Once water starts flowing in the overflow, suck the air out using the air-hose. Close the air valve or place the end on the air hose in water so that no air can enter in the hose. Alternatively you can connect the air-hose to a venturi to automatically suck any air that enters the weir. Test for leaks 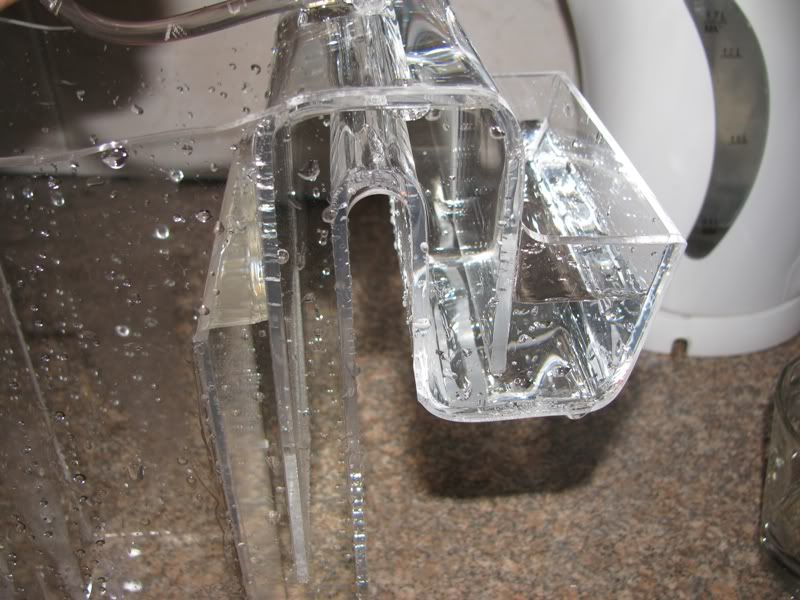 Assembly 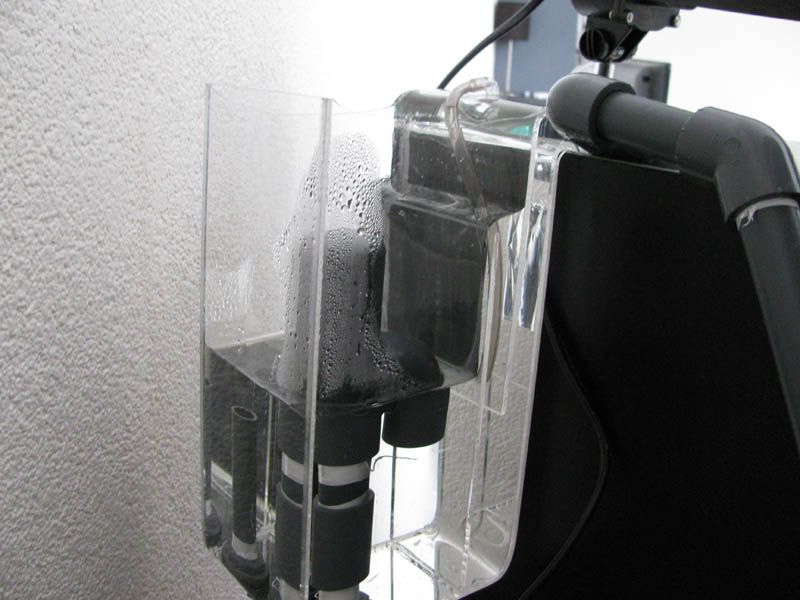 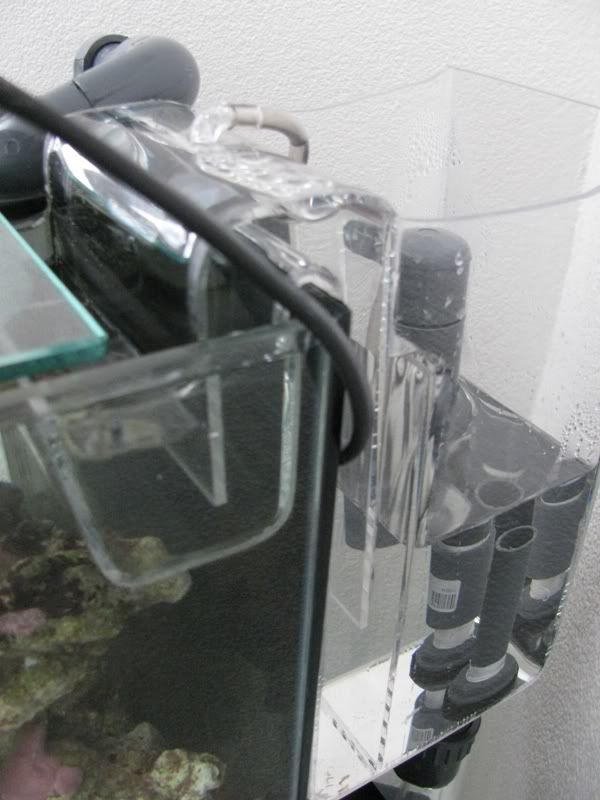
|
|
|
|
|
02/17/2010, 05:45 PM
|
#3 |
|
Registered Member
Join Date: Aug 2008
Location: Delaware
Posts: 1,028
|
Fantastic! Exceptional details, thank you! This will come in very handy someday so I am tagging along.

__________________
125 gal LED lighting Super Reef Octopus XP-3000 SSS Current Tank Info: 125 |
|
|
|
|
02/18/2010, 09:24 AM
|
#4 |
|
Registered Member
Join Date: Apr 2003
Location: Cupertino, CA USA
Posts: 4,027
|
Phenomenal! Great job on the acrylic work!
Did you sand down the edges of the pieces after they were bent? The few times I've bent acrylic I find the bent edge doesn't end up flat; it kinda rounds itself a bit. Also, how wide is the overflow box and how much flow do you have going through it? Thanks! Tyler |
|
|
|
|
02/20/2010, 07:22 AM
|
#5 |
|
Registered Member
Join Date: Jan 2010
Posts: 73
|
hi,
thanks for your replies @tgunn I know exactly what you are talking about. I actually had this problem some time ago when i was making my first overflow. I bend a certain piece multiple times at the same spot. In the end that whole area had a smaller width than initially (~9.7 vs 10cm). Needless to say the gap was too large to fix with glue only. Anyway, lesson learned. Make sure that you get the bend right in 1 go. The more you heat & bend the acrylic, the more round it will get. Once you finish all bends, put the workpiece on a flat piece of acrylic and look at how good/bad the contact in the bends is. Small irregularities (about 1mm) should be easy to fill with thicker glue mixtures (chloroform+acrylic, weldon4+acrylic, weldon16, acryfix 192). If you feel that the gaps are too large, you can tape a long piece of sanding paper on a flat surface (you should be holding the workpiece in your hands, now the sanding paper!) and sand the workpiece by applying little pressure. The overflow above is 10cm wide and has an internal diameter (syphon compartment-1.0-1.75cm should be your target. More than that can lead to problems with maintaining syphon) of 1.25cm. At the moment i have about 90GPH (after headloss) going through it, which really isnt that much, but based on my tap water test i am sure it can handle 200GPH easily.
__________________
15g LPS Bowfront NanoTank 5g refugium, DIY Overflow, DIY ATO 2x Amphiprion percula, 1x Yasha Goby, 1x Randall's Pistol Shrimp, 2x Blood Shrimp, 2x Dwarf Blue Legged Hermit, 1x Torch, 2x Grape, 1x Hammer, 5x Acanthanstrea Lordhowensis, Blue & Red mushrooms, Protopalythoa, Zoanthids |
|
|
|
|
02/20/2010, 12:40 PM
|
#6 |
|
Registered Member
Join Date: Jan 2010
Posts: 73
|
Update!
i made a very simple light shield to prevent/reduce algae growth Simple Light Shield Cut 2 pieces of black sticker (used for external backgrounds on tanks), slightly larger than required. Take almost all off the protective paper from piece A, leaving about 2cm on top protected. Fold the corners and stick them on a table to prevent the sticker from folding (picture below) (the sticky side of the sticker should be facing upwards) 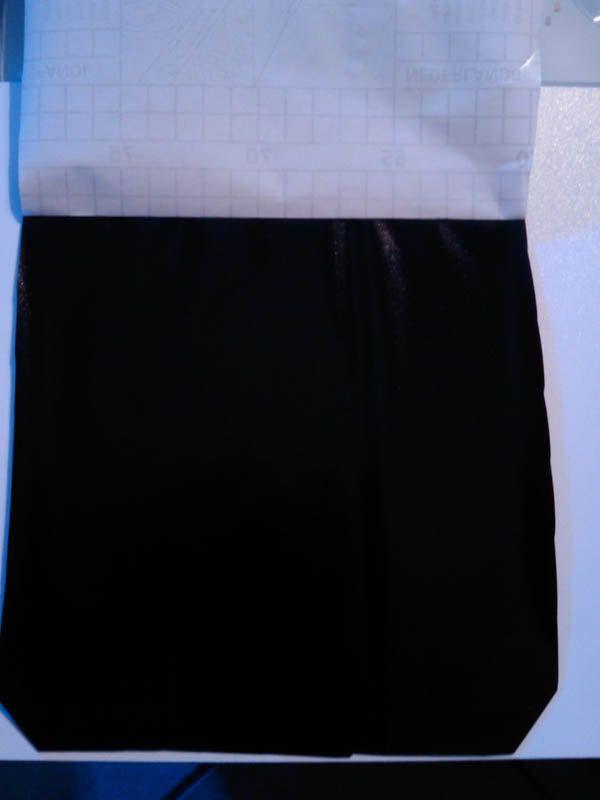 Take the protective paper from piece B off and stick it on piece B (sticky sides facing each other) slowly and carefully. Use scissors or a office paper cutter to cut the sticker in shape 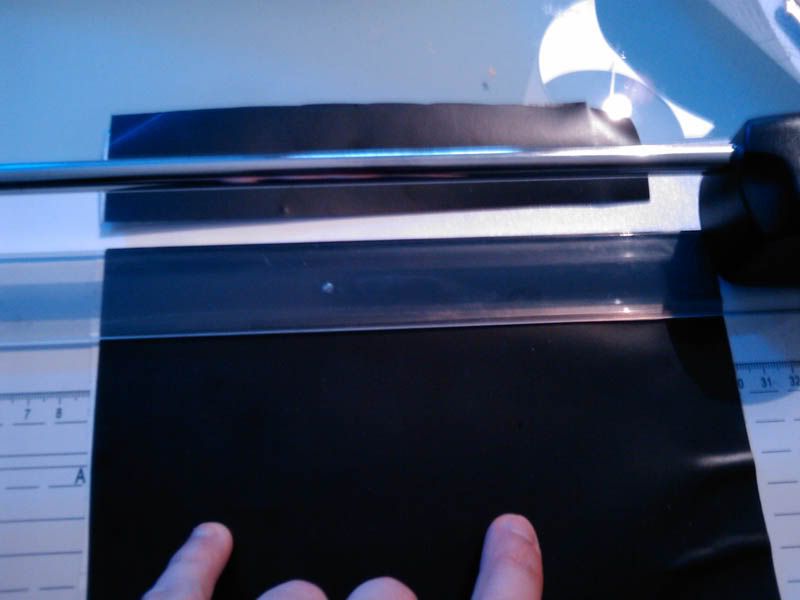 Cut a small hole to fit the sticker into the siphon hose. 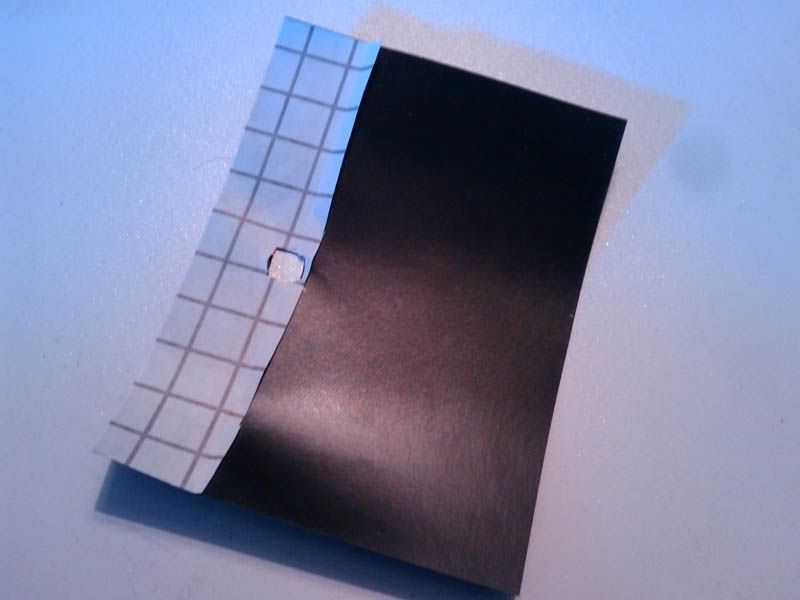 Slide the sticker in place and remove the protective paper. Adhere the sticker into position (do clean the area of the overflow first) 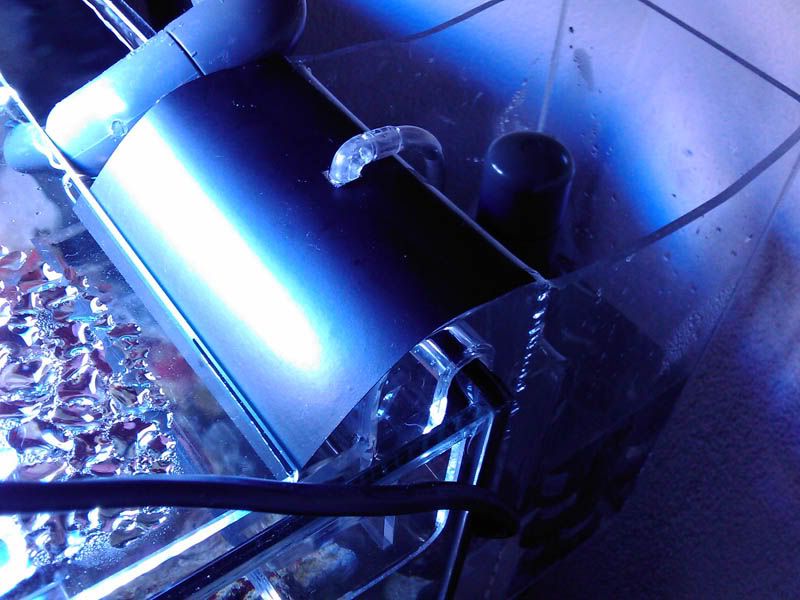
__________________
15g LPS Bowfront NanoTank 5g refugium, DIY Overflow, DIY ATO 2x Amphiprion percula, 1x Yasha Goby, 1x Randall's Pistol Shrimp, 2x Blood Shrimp, 2x Dwarf Blue Legged Hermit, 1x Torch, 2x Grape, 1x Hammer, 5x Acanthanstrea Lordhowensis, Blue & Red mushrooms, Protopalythoa, Zoanthids |
|
|
|
|
02/20/2010, 01:48 PM
|
#7 |
|
Registered Member
Join Date: Mar 2009
Location: Cedar Rapids, IA
Posts: 201
|
this is awesome. Great write up
|
|
|
|
|
02/21/2010, 10:38 AM
|
#8 | |
|
Registered Member
Join Date: Apr 2003
Location: Cupertino, CA USA
Posts: 4,027
|
Quote:
Great tips, thank you. I've never done anything with acrylic before, and I'm thinking that your design with the bent piece would result in less joins for me to muck up. Perhaps its time for me to finally give this a shot. I can handle getting a router and heat gun.  I think ultimately I'd like to be abe to run about 300gph through a sump with my 34g solana, but I guess I'll have to see how much room there is in my setup and adjust from there. THanks! Tyler |
|
|
|
|
|
02/22/2010, 08:13 AM
|
#9 |
|
Registered Member
Join Date: Apr 2003
Location: Cupertino, CA USA
Posts: 4,027
|
Hey, what thickness acrylic did you use? 1/4? or 1/8"?
Thanks, Tyler |
|
|
|
|
02/22/2010, 10:00 AM
|
#10 |
|
Registered Member
Join Date: Dec 2009
Location: evington ,va
Posts: 131
|
thats cool never thougt doing a over flow like that always used corner overflow in the tank but would be a good i dea for someone who doesnt have a drilled tank
|
|
|
|
|
02/22/2010, 01:59 PM
|
#11 |
|
Registered Member
Join Date: Aug 2004
Posts: 63
|
Awesome job! Did you just use a flush trim bit with your router for trimming the side pieces?
|
|
|
|
|
02/24/2010, 08:59 PM
|
#12 |
|
Registered Member
Join Date: Jan 2010
Posts: 73
|
@tgunn
i used 3mm thick acrylic. I believe thats about 1/8" As about the less joints, you are absolutely right. In the end you use much less glue (damn that chloroform isnt cheap...) and it will look nicer in the end Yes i did. Take a close look in the first photos. You can see the silver wheel (top) and the cutter under it. I used a similar bit as on melevs site, only difference being that mine is made for wood but it works good for this purpose.
__________________
15g LPS Bowfront NanoTank 5g refugium, DIY Overflow, DIY ATO 2x Amphiprion percula, 1x Yasha Goby, 1x Randall's Pistol Shrimp, 2x Blood Shrimp, 2x Dwarf Blue Legged Hermit, 1x Torch, 2x Grape, 1x Hammer, 5x Acanthanstrea Lordhowensis, Blue & Red mushrooms, Protopalythoa, Zoanthids |
|
|
|
|
02/25/2010, 07:06 AM
|
#13 |
|
Premium Member
 
Join Date: Nov 2006
Location: Atlantic City NJ
Posts: 181
|
great job, tagging along
|
|
|
|
 |
| Tags |
| acrylic, diy, overflow, weir |
|
|


