
|
|
 01/06/2017, 04:40 PM
|
#1 |
|
Registered Member
Join Date: Dec 2016
Location: Sydney, Australia
Posts: 65
|
Ben and Rosies 300g 4x4x2.5
Hi All,
My partner and I are relatively new to this game - we setup a AquaOne AquaReef 395 about 18 months ago with a bunch of fish and a mix of soft and lps coral and quickly became addicted. We had the usual learning experiences with whitespot, water quality, quarantine etc but over the last 6 months or so have enjoyed a relatively stable tank.  We currently have a mix of LPS and SPS and are favouring SPS going forward. From a fish point of view, we have the following: Gold Flake Angel - Apolemichthys xanthopunctatus White Tail Bristletooth Tang - Ctenochaetus flavicauda Nigricans / White cheek Tang - Acanthurus nigricans Redsea Sailfin Tang - Zebrasoma desjardini Leopard Wrasse - Macropharyngodon meleagris White bar Mystery Wrasse - Pseudocheilinus ocellatus Fireball Angel - Centropyge aurantonotus Redstripe Hogfish - Bodianus sepiacaudus Lawnmower Blenny - Salarias fasciatus Tomato Clown - Amphiprion frenatus And also have a Lennardi Wrasse (Anampses Lennardi) -  And a Sohal Tang (Acanthurus sohal) in Quarantine waiting to go in but will probably now move the wrasse and leave the Sohal in Q until the new tank comes online. We have reached the limit of our current tank and as there is more coral and fish I want to get we though it was time to upgrade. Last week, we slapped down the deposit for a 4'x4'x2.5' custom tank  I took some inspiration from what seems to be a fairly famous tank out there - Scott and Tammy's 4x4x2 tank - I took some inspiration from what seems to be a fairly famous tank out there - Scott and Tammy's 4x4x2 tank - 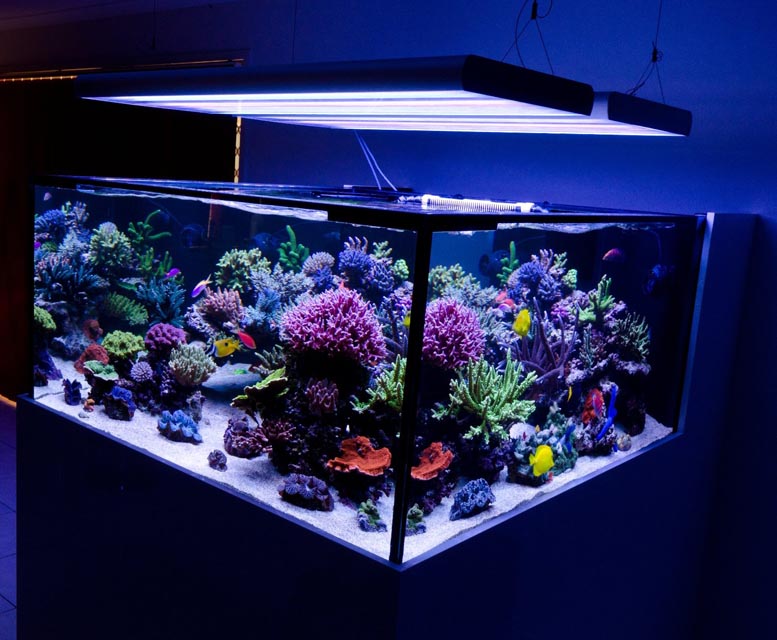 And also a friend of mine who has a 4x4x2.5 (albeit empty at the moment). The tank we have ordered is 15mm opticlear glass all round, eurobraced with an external rear overflow / weir. I went for the extra half foot of depth over the usual 2' depth as I wanted the extra water volume and also the extra height for something I want to do with the scape'ing (will talk more about later) . The tank is about 4 weeks away at the moment but in the meanwhile there is a heap of work that needs doing. I started off drawing the tank and sump up in Fusion360 -  Which you can play around with in 3d here - https://myhub.autodesk360.com/ue29b6...BCQxAIYAAXThQA Whilst we are waiting for the tank to be built, I will be making the stand which I will weld up with steel and use urethane coated doors which will attach with magnets similar to the AR395 setup but before I get started on the stand I need to get a skimmer sorted. Due to the extra half foot of height on the tank, we want to try and make the stand as low as possible but the skimmer is going to be the limiting factor here. I have decided at the moment to go for an external recirc skimmer which narrows down my choice a fair bit so at the moment am waiting to hear back re availability on a Reef Octopus and also pricing on a Royal Exclusive however I think the latter is going to be way to expensive for me to consider. Once I get the skimmer sorted and tank built, I am also making my own dosing pump, system controller / automated monitoring, controlled power board and at the moment what looks like a zeo reactor (may go bio pellets yet but lets see what happens) with a combination of arduino, raspbery pi, 3d printing and acrylic tube etc so there is plenty of work to do in the next 4 weeks to get everything ready once the tank arrives. RE lighting, we currently have 2 x Maxspec Ethereal's which have been doing a great job on the current tank so have decided to go for 2 more of those for a total of four on the new tank (we are not going to keep the old tank running) - they seem to have good depth penetration which we will need for that extra depth in the tank and I like the control software etc. Return pump will be a Vectra M1 and for a little while I considered moving the Ethereal's on and getting 4 x new Radion G4's as well as some Vortech QD's then using ReefLink to control it all but I just cant justify the added expense at the moment - the Ethereal's are doing a great job and the existing Jebao power heads are doing a great job at a quarter of the price of the QD's. The aim is to keep everything within the frame of the tank - ie there will be no "reef support room" etc, everything to run the tank will be in the stand beneath it. I want to run the largest possible sump I can fit in there so have gone with a 4x2 foot sump which will leave me another 4x2 (it will actually leave me with 4x2.5 as the external overflow goes back an extra 6 inches and I will extend the base of the stand that far) for skimmer, chiller, ATO, controller etc which will be a tight fit but it will all go in. RE fish, we will not be aiming to add too many more but have already decided to add a Conspic Angel (Chaetodontoplus conspicillatus)  A Femenus Wrasse (Anampses Feminus) which will look nice with the Lennardi wrasse- 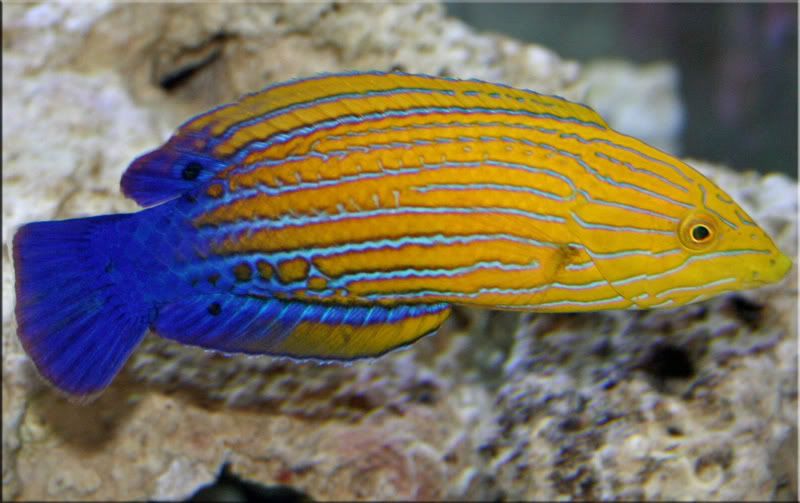 And some small schooling fish but not sure what yet. There is also scope for a Interruptus Angel at some point in the near future but lets see how things go! Re the scaping, I am thinking of putting a flat rock shelf covering a good percentage of the base of the tank about 6 inches off the base (supported by rock pillars) and then building some rock forms up from there - this has 2 advantages - 1) it gives us more rock volume and 2) it raises most of the part of the tank that we need to work on by 6 inches making it easier to reach anything. We went live rock for the current tank but have had issues with a few hitchhikers and as I want to do a complete dry build first of the rock work live rock would not last so have decided to go with real reef rock and some other "non-live" reef rock my LFS is recommending and will then put some pods etc into the tank that we want in the to keep the system going. We are both pretty excited with this project and looking forward to the work over the next few months - it will likely be 2 months before we see water in the tank and another month + before we move fish and coral over but I will definitely keep this post updated as we progress! Cheers, Ben |

|

|
|
01/08/2017, 01:32 AM
|
#2 |
|
Registered Member
Join Date: Dec 2016
Location: Sydney, Australia
Posts: 65
|
It would seem some of our pictures are not sharing too well, I have moved them elsewhere and you should be able to see them here (it also seems I am not allowed to edit a post so cant fix the image URL's
Here is our existing tank  And here is a drawing of the new tank - [img]Screen Shot 2017-01-07 at 9.10.26 AM.png[/img] |
|
|
|
|
01/08/2017, 01:33 AM
|
#3 |
|
Registered Member
Join Date: Dec 2016
Location: Sydney, Australia
Posts: 65
|
Grrr, I will get this right at some point - being able to edit a post would really save some extra posts here . . .
Here is the drawing of the new tank - 
|
|
|
|
|
01/08/2017, 01:44 AM
|
#4 |
|
Registered Member
Join Date: Dec 2016
Location: Sydney, Australia
Posts: 65
|
Just when we were getting excited about the new tank on the way, disaster strikes! We had a power outage for the first time ever today which resulted in the existing tank going about 7 hours without power which resulted in us losing our Gold Flake Angel, Candycane hogfish, Brazillian Fireball and Mystery wrasse
     So it looks like not only will be bringing on a new tank in the next couple of months but we will be restocking
|
|
|
|
|
01/08/2017, 11:02 PM
|
#5 |
|
Registered Member
Join Date: Dec 2016
Location: Sydney, Australia
Posts: 65
|
Some forward progress on the new tank, got the drawing for the stand finished off and have ordered the metal to make it which will be delivered this Friday.
 The top outer beams are 50x50mm 4mm wall thickness as are the uprights on each corner, the rest is 50x50 2mm wall to keep weight down - total weight will be about 80kg for the stand and have gone with hot dip galvanised tubing (which will be fun prepping for the welds!) so wont need to powder coat it. The main square of the stand is 1220x1220 and the stand is 700 high with an extra 150 off the rear as the tank will have an external overflow so thought I may as well use the space under the tank for something (dosing tanks etc) |
|
|
|
|
01/15/2017, 08:14 PM
|
#6 |
|
Registered Member
Join Date: Dec 2016
Location: Sydney, Australia
Posts: 65
|
Well we have had our first setback - it turns out the mob the tank was ordered through will not be able to deliver until late march / early April (knowing how these things go, that actually means late April) - we were expecting to have the tank in the next 2-3 weeks so this is a bit of a let down.
We are travelling in the middle of the year for 5 weeks and I dont want to leave a 2 month old tank in the hands of a carer so delay is a bit of a problem - off to find another tank builder now. |
|
|
|
|
02/16/2017, 07:50 PM
|
#7 |
|
Registered Member
Join Date: Dec 2016
Location: Sydney, Australia
Posts: 65
|
Well there has been a little bit of progress. The tank is being constructed at the moment and we should see it in the next 10 days or so. Meanwhile, work has been progressing with the stand -
 That is it all mocked up. I have got the top hoop all welded up but it has just been too damned hot the last few weeks in Sydney to cage myself up in the garage and weld so I am hoping to get the rest of it finished next weekend just in time for the tank. We also picked up the new skimmer the other week -  A shiny new Reef Octopus Elite 200. This is a nice bit of kit I have to say, the finish is amazing, the electrical's seem great and that pump really looks like it will do the job - time will tell though. We also picked up the rock the other day -     I was originally going to go for RealReef rock or other non-natural rock having decided against live rock for a number of reasons - 1 I didn't want the hitchhikers and 2 I wanted to do a dry rock build and trying to do that with live rock is not possible so after speaking to the LFS, we decided to go with this stuff. I cant remember what it is called but man is it porous! It is almost like a pumice stone . The flat pieces for the base shelf were not quite what I wanted but will do the trick ( I was hoping for some larger flat pieces) The base layer of rock will be supported on stilts about 6" above the base of the tank with sand underneath and the 2 rock structures on top of it. There will be a number of gaps in the base allowing fish to go down to the lower sand layer etc and about 6" clear of the glass on both sides and front - the rear will butt up with the back of the tank. We have lights, pumps etc ready to go, just need to finish off some of the DIY control electronics I am working on and get the tank and we are all go! |
|
|
|
|
02/27/2017, 12:20 AM
|
#8 |
|
Registered Member
Join Date: Dec 2016
Location: Sydney, Australia
Posts: 65
|
Well it looks like we are set for more disappointment.
We had engaged Western Sydney Aquariums to build the tank (this was the second shot after the first failure). We spoke to them back in Jan and explained that we had some deadlines that needed to be met due to some other things happening and they said that they had the time to build the tank, there would be no worries and that it would be ready by the end of Feb. I had checked in the other week and was told all was on track and that glass was expected in last week and that they would be on it right away so was looking to be on track. Then yesterday, I get a call from them informing me that they couldn't build the tank now and they were refunding my deposit. Apparently some other customers had changed their minds and caused some issues and rather than tell them that their changes and issues would delay their builds, the builder decided to let those issues impact his other customers and decided to drop our tank the week before it was meant to be delivered. We have now been through 2 tank builders and been trying to get this sorted out since mid December last year to no avail. All we have done to date is be messed around by tank builders who seem only capable of wasting weeks of your time. We are assessing what our options are at the moment but this latest setback and time wasted is causing some grief so not sure if we are going to be able to get a tank up and running before September now. |
|
|
|
|
03/06/2017, 03:43 AM
|
#9 |
|
Registered Member
Join Date: Dec 2016
Location: Sydney, Australia
Posts: 65
|
Well it looks like we have managed to get this build back on track (well, a few weeks behind but much earlier than what we were looking at) - we bit the bullet and went with a Lang (think it is actually Leng) tank. I got a status update last week and glass was ordered and on its way and we are expecting it to be built this week and pickup next week after curing. It has cost us almost twice what anything else was going to cost but everyone seems to be confident that it will a) be on time and b) they are the best built tank around.
With the tank expected in the next week, I pulled my finger out last week and finished the stand -  The perspex sheet that is sitting on top in the picture will be used as a base for all the rock work - it will be suspended about 6 inches above the sand and then the rock work will sit on top if it completely covering it - we are still deciding on wether to have a flat shelf or a sloping front to rear shelf - the latter will allow the rock work to merge into the sand work but I like the idea of having a subterranean level for anything to go to (fish to swim to, starfish etc) so we will have a play with it once the tank turns up. The sheet is 6 inches narrower than the tank in all dimensions and we ware thinking that the rock work will go back to the rear wall leaving about a foot at the front of the tank. Work is also progressing on a few of the custom jobs I have taken on such as a dosing pump -  I decided to go for the compact version on the right - both of them have a recess at the rear allowing them to hang over the glass of the sump. I had it printing perfectly on the 3d printer but then we had the power in the office turned off about 2/3's of the way through the print (due to some cabling work going on) which killed the print so I will have to kick it off again tomorrow. Software is also progressing as well as monitoring - I will post some screen shots of the UI tomorrow. Thats it for now, it feels good to be back on track and we cant wait for the tank now! |
|
|
|
|
03/16/2017, 04:20 PM
|
#10 |
|
Registered Member
Join Date: Dec 2016
Location: Sydney, Australia
Posts: 65
|
Things are getting real!
We have had confirmation that the tank and sump will be right to pickup tomorrow! After the best part of 4 months we are finally going to get this tank. I picked up a bunch of stuff yesterday in preparation for the tank:  2 pieces of 20mm styrofoam to go under the tank plus a whole bunch of plumbing fittings for bulkheads, manifolds and everything else (still need to pick up PVC tubing)  (Sorry for the dodgy photo) - 3 x Marin Pure blocks plus a bunch of RedSea filter socks which will be explained in a sec  I also put the skimmer together and placed it under the stand just to see how it looked. Due to the extra height of the tank (2.5' / 760 high) we have tried to keep everything else as low as possible. Due to the reduced height of the stand and the large skimmer, we had to go for a 350 high sump (would have liked to have gone 450) and most filter socks are designed for 450+ sumps but found that RedSea do a shorter sock for their systems so grabbed them. I also today finished off the dosing pump -   I have designed it so that it will hang over the side of the sump and there are 4 tube holders integrated into it. I used 4 of the cheap eBay peristaltic pumps coupled to an Arduinio micro and some circuitry to control the pumps. The arduino is then hooked back via USB (for both power and control) to a RaspberryPI which acts as the brains of not only dosing but all other control and monitoring aspects of the system. Next job will be to complete the controlled power board. Thats it for now, hopefully next post will be a pic of the tank in situ and then the real fun begins. . . .
|
|
|
|
|
03/18/2017, 06:46 AM
|
#11 |
|
Registered Member
Join Date: Dec 2016
Location: Sydney, Australia
Posts: 65
|
After almost 4 months and 3 tank builders, we finally have our new tank!
We headed over to Lang's workshop early this morning to pick it up. When we got there, Lang was applying some some last minute finishing touches to the tank :  He was not happy with some of the silicon so cleaned it up before we got there. It wasn't long before he had it ready to present to us:  After a quick look around the tank to make sure there were no scratches and that everything was as designed, we got it loaded up and ready to go:  I arranged for a few mates to come over and assist and a couple of guys from Reef River Reptile came over with the required tools to move the tank. I whipped the front door off the house quickly and before we new it, the tank was sitting in its new home:  Along with the tank, we got a new sump made up:  After a quick cleanup, we finally got to admire the handiwork that Lang had done. The silicone work is flawless as is the glass work and there is a lot of little things on this tank that really impress. He was quite chuffed with himself when we picked it up and you can see in the work he does that he is very passionate about building top quality tanks. The tank is euro braced (it is 4x4x2.5) and the front brace is set down 5mm so that when you are working on the tank, and water you drag with you gets caught on the brace and doesn't drop down the front pane of glass. With the bevelled edges and silicone work, the 5mm drop is almost imperceptible to the eye:  All the edges are reenforced with 10mm strip as well but with the black silicon you cannot really see it and the tank really has the feel of looking at TV screen:   As we wanted the maximum possible scape'ing space, we went with an external, coast to coast weir that will be running a Bean Animal 3 pipe overflow and 2 returns:   Once the tank was up and everyone had left, I jumped in and gave it a quick clean and the proceeded to get to work on the plumbing. I have made decent progress so far having completed the 2 returns and manifold and will hopefully tomorrow complete the overflows and the rest of the under-tank plumbing leaving only wiring to get the tank up and running. I will get some status update pics tomorrow to show how the plumbing is going. It is a huge relief to finally have the tank here and I have to say it looks great, Lang has done a great job on it and it really is hard to fault but now the real hard work begins with getting it plumbed, wired etc and then scaped and stocked! Let the fun begin! |
|
|
|
|
03/20/2017, 04:50 PM
|
#12 |
|
Registered Member
Join Date: Dec 2016
Location: Sydney, Australia
Posts: 65
|
Got all the main plumbing done yesterday - return lines, manifold, pump and BeanAnimal overflow.
     We also started playing with a trial run of the scape   The piece of supporting perspex will come out and have the backing paper removed and will also have some holes cut in it for both circulation and to allow fish to swim between. More to come later this week
|
|
|
|
|
03/20/2017, 05:12 PM
|
#13 |
|
Registered Member
Join Date: Dec 2016
Location: Sydney, Australia
Posts: 65
|
We had a play around with the first dry run of the scape last night and got all of the rock in -
     We are pretty happy with it so far. It will all come out again and the backing paper on the perspex will be removed and some holes will be cut in the perspex to line up with some cracks in the rocks to allow water flow and fish to swim through. We are also thinking of trimming hte perspex back a bit and trying to "disrupt" the edge so it is not as much of a straight line on. |
|
|
|
|
03/21/2017, 06:00 AM
|
#14 |
|
Registered Member
Join Date: Jan 2010
Location: Canadia
Posts: 4,276
|
You appear to be well on your way to getting the new tank up and running but you have not mentioned how you will protect it from the same sort of power failure that decimated your last tank.
Dave.M
__________________
My Gawd! It's full of corals! Current Tank Info: None. Nil. Zip. Nada. |
|
|
|
|
03/21/2017, 07:30 AM
|
#15 |
|
Registered Member

Join Date: Aug 2006
Location: TUCSON
Posts: 569
|
The tank, scape seem to be progressing. The skimmer cup seems awfully tight. Is there room for cleaning and maintenance?
|
|
|
|
|
03/21/2017, 09:03 AM
|
#16 |
|
Registered Member
 Join Date: Aug 2005
Location: Portland, OR
Posts: 106
|
Really nice! Beautiful Tank!
|
|
|
|
|
03/21/2017, 12:56 PM
|
#17 | |
|
Registered Member
Join Date: Dec 2016
Location: Sydney, Australia
Posts: 65
|
Quote:
I have a new 2.2kva ups sitting here ready to slot in under the tank. Once i have everything wired up i will do a test run and see how long it lasts. If i am not happy with the run time then i have found a 6kva deisel generator that is auto start and will get it wired into the house
|
|
|
|
|
|
03/21/2017, 12:59 PM
|
#18 | |
|
Registered Member
Join Date: Dec 2016
Location: Sydney, Australia
Posts: 65
|
Quote:
|
|
|
|
|
|
03/21/2017, 09:56 PM
|
#19 |
|
Registered Member
Join Date: Jan 2017
Posts: 389
|
Wow your build is amazing so far, I love the quality on that tank and I can't wait to see it full. I really like DIY and saving money so I wanted to pick your mind alittle about the doser you made. If you wouldn't mind could you give a bit of detail on how exactly you put it together and what all your had to purchase (what pumps, circuitry, etc.), a diagram would be cool if you have one but you deffenetly don't need to make one just for me haha. Also would it be possible for me to get a copy of the file you 3D printed? I have access to a 3D printer but no particular skill in creating the model plus using yours would mean the pumps and everything would fit for sure. Sorry to intrude on your thread but it just looked like to good a way to save $$ not to ask about haha. Happy reefing!
Sent from my ONEPLUS A3000 using Tapatalk |
|
|
|
|
03/22/2017, 10:12 PM
|
#20 | |
|
Registered Member
Join Date: Dec 2016
Location: Sydney, Australia
Posts: 65
|
Quote:
|
|
|
|
|
|
03/23/2017, 04:58 AM
|
#21 | |
|
Registered Member
Join Date: Jan 2017
Posts: 389
|
Quote:
Sent from my ONEPLUS A3000 using Tapatalk |
|
|
|
|
|
03/30/2017, 11:50 PM
|
#22 |
|
Registered Member
Join Date: Dec 2016
Location: Sydney, Australia
Posts: 65
|
Ben and Rosies 4x4 Floating Reef
Hi All,
Has been a lot of work done between the last post and now. After doing a couple of dry runs with the rock work, we got everything how we liked it so I then proceeded to mark out some gaps in the rock work on the acrylic and cut out those areas to allow some water flow and fish to swim between layers. Then finished the acrylic off by flame finishing all the edges to give it a real clean finish - note to self, take the backing paper off prior to flame finishing the edges next time!  Prior to slotting the rock work in for the last time, we covered the base with black sand - we thought the black contrast will pop the colours a bit more. We went with CaribSea Arag-Alive sand -   Rosie sorting the sand out - great to have a tank you can get into! On Sunday night we began the lengthy process of filling the tank with RO water -  It was great to finally get a wet tank!!!!!!!! By Tuesday morning, we still had a while to go!  Whilst waiting for the tank to fill, I got the reactor plumbing finished off -  And Tuesday afternoon we were almost there -  Man did that phase take a while! It is amazing how long the surface tension kept the tank from spilling over but when it finally did, it was a relief, but we still had to wait for the sump to fill. By 10pm that night it still had not but it was not far off so I turned the water off and was up again early Wednesday morning and got it going again. Within an hour, we had a fully wet tank and had the pumps running!  I currently have the pump set to turn over about 6000 lt / hr and man does it create some throughput through the sump. During the week, I managed to snag an APC 7922 Switched PDU for a good price so decided to grab it instead of making my own controlled power board so the next job was to begin the wiring. I moved the APC 2200 UPS under the tank and connected up the PDU along with some of the ancillaries - still need to mount the PDU and start tidying up the cabling etc which will be a job for this weekend but off to a good start -   It looks like I have hit the 10 photo limit so moving onto the next post . . . |
|
|
|
|
03/30/2017, 11:50 PM
|
#23 |
|
Registered Member
Join Date: Dec 2016
Location: Sydney, Australia
Posts: 65
|
cont from the last post -
And one of the things I got cabled up was 2 of the new lights, there are still 2 more to go on which will come over from our other tank once we have the coral migrated.  When looking at the tank like this, we are really happy with the way the Floating Reef has come up and how the black sand works! Even Edna our Cockatiel approves (top right corner) During the week I also picked up a rare yellow Yuma Ric which will look great on the black background -  Also also a pink Yuma which our Tomato Clown managed to photobomb -  We are now 3 days into a Dr Tim's cycle and if everything goes to plan we will start moving fish in next week and then coral in a couple of weeks. Still a lot of work to do with cabling etc which will hopefully get done this weekend. |
|
|
|
|
03/31/2017, 10:34 AM
|
#24 |
|
Registered Member
Join Date: Feb 2011
Location: Calgary, AB Canada
Posts: 209
|
I have to say I absolutely love the floating island idea, and the holes in the acrylic to match. Very unique idea and it looks fantastic! Great job.
__________________
210 Gallon Reef - 84"X24"X24" + 2 X 60 gallon sumps, 90 gallon Cheato Fuge and 60 gallon Frag Tank 210 Gallon FOWLR - 72"X24"X28" - 40 Gallon Cheato Fuge and 60 Gallon sump |
|
|
|
|
03/31/2017, 10:38 AM
|
#25 |
|
Registered Member
Join Date: Feb 2017
Location: Allentown, Pa.
Posts: 210
|
Why are the rocks up in the air?
|
|
|
|
 |
| Thread Tools | |
|
|


