
|
|
|
|||||||
 |
| Thread Tools |
 02/13/2018, 09:32 PM
|
#301 | |
|
Registered Member
Join Date: May 2013
Posts: 7,408
|
Quote:
Sent from my Pixel 2 using Tapatalk
__________________
Brandon I'm not saying let's get rid of all the stupid people.* I'm just saying let's remove all the warning labels and let the problem work itself out. Current Tank Info: 150g DT plumbed to an 80g frag tank and 220g sump in the basement. ~6-MP40s ~ 12 ATI powered t5s ~ Reefbrites and Radions supplementing ~ Custom GEO Skimmer ~ GEO CA Reactor 6x24~ Iwaki 70 Return ~ |
|

|

|
|
02/13/2018, 09:45 PM
|
#302 |
|
Registered Member
Join Date: Jul 2015
Posts: 227
|
Re glass cleaner: I gave both the flipper and the tunze car magnet. The flipper gave me several scratches! So tunze wins on that regard... but the flipper is much more ergonomic and super easy to move around corners as it floats. Tunze is a pia because it doesnt turn the corner as easy and it sinks... so you have to put your hand in the tank for switching sides. If you dont, you risk having the cleaner fall on your corals...
Sent from my iPhone using Tapatalk |
|
|
|
|
02/13/2018, 09:48 PM
|
#303 | |
|
Registered Member
Join Date: Oct 2014
Location: Toronto GTA,Canada
Posts: 1,763
|
Quote:
INTERESTING. So do you just stick the WHOLE thick pad in between your Strong magnet cleaner? Or slice it like thin salami? Last edited by Wally.B; 02/13/2018 at 09:53 PM. |
|
|
|
|
|
02/13/2018, 09:50 PM
|
#304 | |
|
Registered Member
Join Date: Oct 2014
Location: Toronto GTA,Canada
Posts: 1,763
|
Quote:
I can live with sinking but SAFE Tunze. Maybe add a fish line for recovery. I can't see more options (all pad types can grab dangerous grit)......... except maybe for the HARD TO BELIVE (Magic Eraser gizmo method). I gotta try it on my old 65 Gallon tank. |
|
|
|
|
|
02/13/2018, 09:56 PM
|
#305 | |
|
Registered Member
Join Date: May 2013
Posts: 7,408
|
Quote:
Sent from my Pixel 2 using Tapatalk
__________________
Brandon I'm not saying let's get rid of all the stupid people.* I'm just saying let's remove all the warning labels and let the problem work itself out. Current Tank Info: 150g DT plumbed to an 80g frag tank and 220g sump in the basement. ~6-MP40s ~ 12 ATI powered t5s ~ Reefbrites and Radions supplementing ~ Custom GEO Skimmer ~ GEO CA Reactor 6x24~ Iwaki 70 Return ~ |
|
|
|
|
|
02/13/2018, 10:03 PM
|
#306 | |
|
Registered Member
Join Date: Oct 2014
Location: Toronto GTA,Canada
Posts: 1,763
|
Quote:
I am reading up on Mr. Clean in various forums. Many many people say it's effective. People use the Mr.Clean Pads on ACRYLIC Tanks. If it won't scratch acrylic, then it's gotta be ok for Starphire Low Iron Glass. Amazing. Thanks Brandon. Maybe getting a good floating magnet might be the better choice. Or just use the one I Float Mag I have. Is it important to get a strong magnet to ensure pressure is good due to the extra SPACE/GAP (between Magnets) created by the MC pad thickness. How about getting to the Corners/Edges with the MC Pad? |
|
|
|
|
|
02/14/2018, 08:39 AM
|
#307 |
|
Registered Member
Join Date: May 2013
Posts: 7,408
|
I also use it on my acrylic tanks. With my strong hammerhead magnets it works great. I find it gets the corners well too since it over hangs the magnet. You're welcome.
__________________
Brandon I'm not saying let's get rid of all the stupid people.* I'm just saying let's remove all the warning labels and let the problem work itself out. Current Tank Info: 150g DT plumbed to an 80g frag tank and 220g sump in the basement. ~6-MP40s ~ 12 ATI powered t5s ~ Reefbrites and Radions supplementing ~ Custom GEO Skimmer ~ GEO CA Reactor 6x24~ Iwaki 70 Return ~ |
|
|
|
|
02/14/2018, 10:49 AM
|
#308 |
|
Registered Member
Join Date: Oct 2014
Location: Toronto GTA,Canada
Posts: 1,763
|
Brandon,
Very cool. I found a couple of Magic Erasers in the cupboards and Tried One (on Old 65G tank) Works like a charm for cleaning glass using my Not-So-Strong MAG FLoat magenet (when I sliced a pad thinner). The pad does provide quite a bid of resistance when sliding across glass. Bit tricky to use, and I figure will take some practice getting around corners (since I lost the MC pad once.....but it just floated away harmlessly). I also tried a small piece of the pad on my Two Little Fishes mini Magnet cleaner (works great too). For sturdiness I may carve the sponge to fit the inside cleaner pad better. I am ordering the Tunze for the frequent cleaning chore. Sure it doesn't float, but appears to me effective, easy to use, and safe. HOWEVER I just realized I have a new Challenge I never faced with my OLD TANK SETUP. -> I now have a EuroTRIM top, so it will be more challenging getting the inside magenet part into the tank (Over the 5inch, 3inch trim) ** Never thought of that disadvantage**) -> I used to be able to clean 3 side of tank in SUmp Room, and 1 side in office side (now I have 2 and 2). So having trim on hinges [side and top of tank] might be a good idea. NOT SURE how I'll build a way to have easy glass cleaning (ACCESS) This means I need to put tank on Stand, and have it roughly in wall for me to understand how to Frame the Tank (IN-WALL) for easy maintenance. |
|
|
|
|
02/15/2018, 12:52 AM
|
#309 |
|
Registered Member
Join Date: Oct 2014
Location: Toronto GTA,Canada
Posts: 1,763
|
FINALLY FIGURED OUT (BOTTOM FRAMING)
I've been thinking about this for Weeks. (Tons of ideas TO GET TANK FLUSH with WALLS). 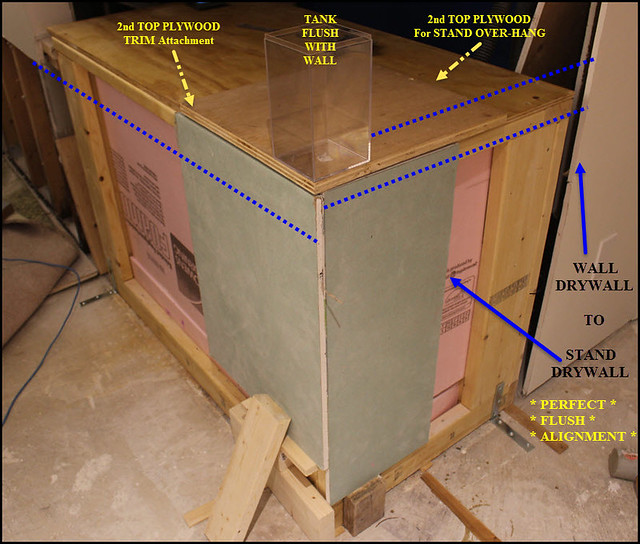 This finally to came me today. The * SOLUTION * is the 2nd Plywood or Solid Wood Sheet on TOP (It should work). The Objective is: -> A SOLID FOUNDATION (right to the Tank Edges). [ Done by a 2nd Plywood Sheet on Stand] -> A FLUSH TANK with Drywall [ Done by the 2ND Overhanging Plywood ] -> Perfectly Level Tank TOP [ The shims under stand AND if needed (fine adjustments) with shims between the TWO plywoods ] -> Alignment of (BOTTOM & TOP) Walls (with TANK WALL) [ if needed (fine adjustments) with shims between the TWO plywoods ] -> A PLACE TO ATTACH [Minimal Width Trim] [ To cover Bottom Tank Glass Plane ] THIS MEANS ( ** NO (Full Surface) FOAM TOP ** ), which would decrease Stability, and shift over time. I may place thin Pieces of FOAM (kids playmat pieces) in the Minor GROOVE under Tank (between TRIM)....For more even weigh distribution (Less pressure on Tank Trim Edges/Edge of Top Plywood) I can build this IN ADVANCE and GO AHEAD with Tank PLACEMENT (Then Figure out TOP/SIDE Framing) Last edited by Wally.B; 02/15/2018 at 01:22 AM. |
|
|
|
|
02/15/2018, 07:38 AM
|
#310 |
|
Registered Member
Join Date: Apr 2003
Location: Mtl. Canada
Posts: 7,824
|
Hey Wally, watching with interest!
You are a man obsessed. It’s going to look amazing.
__________________
Matt. Current Tank Info: 53x32.5x26 190g dt 60g of sumps 3 tank-100 gal frag system 6xAI prime 8xt5. 4x maxspect gyre. Skimz Dual internal sicce pump skimmer Deltec PF601s ca rx+Kalk stirrer |
|
|
|
|
02/15/2018, 09:05 AM
|
#311 |
|
Registered Member
Join Date: Oct 2014
Location: Toronto GTA,Canada
Posts: 1,763
|
Matt,
You know how many times this last week I had a feeling like "Just let's finish this....I want to move on to Sump room (the fun part)"..... But this is Last Chance.....for FOREVER. 15+ years in the making so it has to be done right (or it will bother me for a long time to do a less than perfect Tank install). I can redo sump , lighting, wires a 100 times, but tank Install changes after water goes in is one shot deal. Plus all this work for many, MANY weeks can't end with a less than best effort. Kind of lucky that I can't co-ordinate people to drop by and carry the tank downstairs. |
|
|
|
|
02/15/2018, 02:23 PM
|
#312 |
|
Registered Member
Join Date: Oct 2014
Location: Toronto GTA,Canada
Posts: 1,763
|
DOUBLE Plywood (Stand TOP) For Flush IN-Wall Tank
Absolute Perfection!! 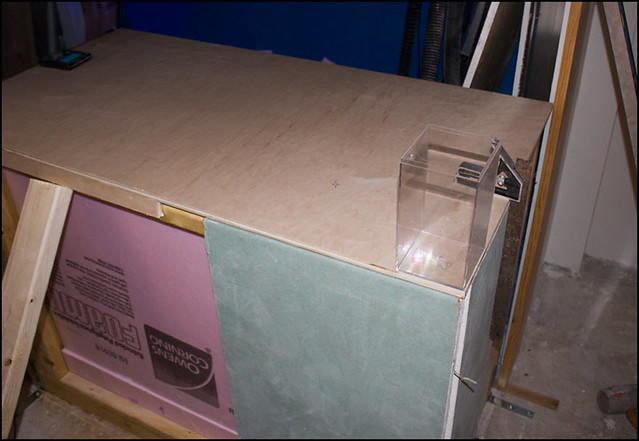 This plywood is what I was going to use for Front Bottom Stand Cover which I won't be using with Change to Drywall...... .. (so I just cut it 1/2" greater than Current Tank Stand TOP for the FRONT/RIGHT Overlap over 1/2" Drywall ) |
|
|
|
|
02/15/2018, 03:41 PM
|
#313 |
|
Registered Member
Join Date: Oct 2014
Location: Toronto GTA,Canada
Posts: 1,763
|
Stand Top Plywood (Sealer)
New Top Plywood sealed with one coat of URERTHANE (Sump Room Side Edges are most important....Where drips and spills may happen) 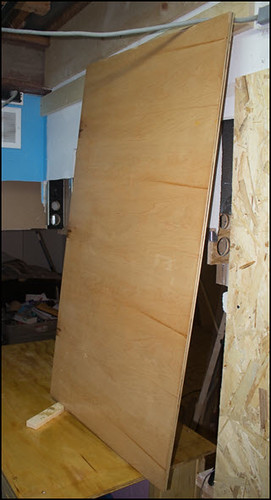 Takes one day to dry....Then I can finish the Tank Bottom Framing. |
|
|
|
|
02/15/2018, 04:19 PM
|
#314 |
|
Registered Member
Join Date: Oct 2014
Location: Toronto GTA,Canada
Posts: 1,763
|
SheetRock (Drywall Edging) Corner & Edge
Discovered this (new to me) SheetRock Edging at HOME DEPOT  Stuff is cheap but looks better than the OLD Fashion Metal Edging for Smoother but Strong Plaster CORNER Finish. (This one [shown on bottom] will be used for Drywall-to-Drywall Bottom Corner around Stand) The 2nd Edge Guard version gives me some idea's for some other possibilities (Top Panel Finish) and (Possibly a hinged panel that won't Crumble of time) I still might use plywood (scraps), but not sure if I can get a finish similar to Drywall, so it may stand out. Drywall with Plaster will be perfect match. |
|
|
|
|
02/15/2018, 06:36 PM
|
#315 | |
|
Registered Member
Join Date: Jun 2013
Location: Sault Ste Marie Ont
Posts: 2,475
|
Quote:
|
|
|
|
|
|
02/15/2018, 06:55 PM
|
#316 | |
|
Registered Member
Join Date: Oct 2014
Location: Toronto GTA,Canada
Posts: 1,763
|
Quote:
Perhaps your 18" height was allowed. Mine is 22" so 4" Taller. Could be other reasons (Derek Was having a bad day  , , Derek did check with the crew on the limits , And one of the main factors was this is a HIGH CIRCULATION SPS tank with 3 Gyre's, Plus SeaSwirl so he mentioned Internal Dynamic Pressure Safety, when pushing around WAVES and PULSES ). He said a regular tank with low-medium circulation could be larger at 1/2" Glass. I'm actually happy with my tank size. 46" Wide is really working out for desk space and great extra Space in Sump Room. 24" deep is something I look forward to trying for first time. Regardless, I am really pleased staying 1/2" Glass and not any thicker. Last edited by Wally.B; 02/15/2018 at 07:01 PM. |
|
|
|
|
|
02/16/2018, 08:51 AM
|
#317 |
|
Registered Member
Join Date: Oct 2014
Location: Toronto GTA,Canada
Posts: 1,763
|
ALL READY (For Tank Move) Nothing More Can be done
The Top is Dried (2 Coat). I also replaced the Corroding Metal studs with Wood...Last Chance before Drywall goes up.  My meticulous attention to Building stand to accuracy paid off. The Stand lines up SQUARE [Vertically and Horizontally] to (Side and Top Walls). Final validation will be when Tank is placed on top.  The Stand is perfectly Level without any adjustments. Shimmy are there to fill in minor gaps (concrete Floor), but no Leveling Adjustments were needed. NOW I need to find 3 helpers for Carry down. Plus one Spotter who can be my son. TANK WILL BE ON STAND THIS WEEKEND (I Hope). |
|
|
|
|
02/16/2018, 10:06 AM
|
#318 |
|
Registered Member
Join Date: Oct 2014
Location: Toronto GTA,Canada
Posts: 1,763
|
Trying a Stand Skirt (Wood VS Drywall) Left over Plywood/Planks
I don't want to cut the Full Sheet of Drywall yet. To line up Top Plywood, I used left over wood. Doesn't look bad. Wood is always better than Drywall. 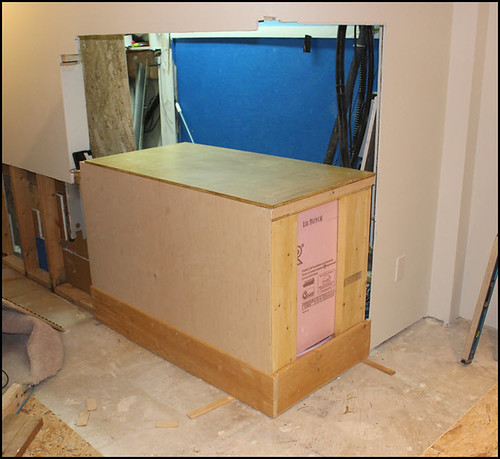 Not sure if this will work for the wall matching, etc. May look ok as a Stand Alone Stand but I am not sure.... May look awkward.....(1/2 a Stand Stuck in Wall). |
|
|
|
|
02/16/2018, 10:28 AM
|
#319 |
|
Registered Member
Join Date: Oct 2014
Location: Toronto GTA,Canada
Posts: 1,763
|
More Fooling around (Oak Trim)
Just trying to see options. 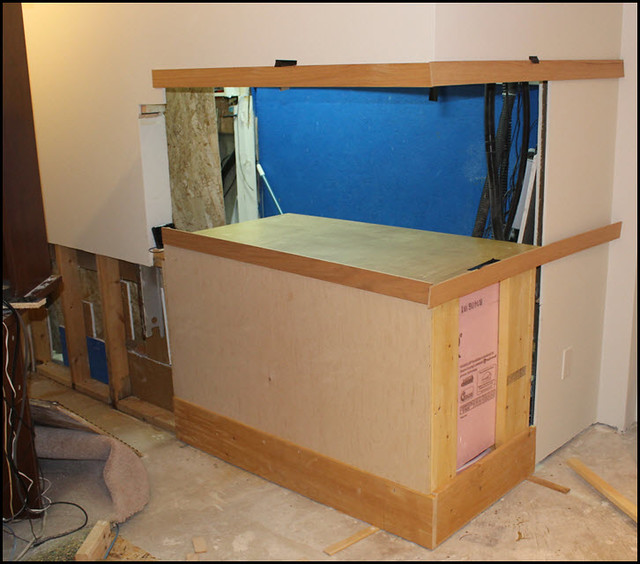 These Oak Trim Strip are $10 each, so I can't cut them unless I decided on using them. (using tape for trials) The value of the Oak Strip is they are THIN and HARD (so won't warp and easy to mount) Could be painting to match wall, or stained (but mixing 3 kinds of wood might not be ideal) BUT I HAVE TO PUT THINGS in Perspective. When the DESK is put back will all this Framing really matter.  Simple Drywall with Slightly Darker Paint Trim may be best. Last edited by Wally.B; 02/16/2018 at 10:36 AM. |
|
|
|
|
02/16/2018, 06:35 PM
|
#320 |
|
Registered Member
Join Date: Oct 2000
Posts: 2,661
|
Stain the oak trim to match the desk.
__________________
Advice is like a firehose. Be careful how you drink. |
|
|
|
|
02/16/2018, 08:17 PM
|
#321 | |
|
Registered Member
Join Date: Apr 2003
Location: Mtl. Canada
Posts: 7,824
|
Quote:
The desk is big and dark. Extending the dark wood beyond the desk with the trim will be distracting imo... I’ll help move the tank!.. oh wait.. I’ll be in montreal that day.. sorry.. But looking forward to seeing it in place.
__________________
Matt. Current Tank Info: 53x32.5x26 190g dt 60g of sumps 3 tank-100 gal frag system 6xAI prime 8xt5. 4x maxspect gyre. Skimz Dual internal sicce pump skimmer Deltec PF601s ca rx+Kalk stirrer |
|
|
|
|
|
02/16/2018, 11:10 PM
|
#322 | ||
|
Registered Member
Join Date: Oct 2014
Location: Toronto GTA,Canada
Posts: 1,763
|
Quote:
Quote:
But I did drop by the Paint Store since I had a tiny bit of White Paint Left from the Hallway Walls. I had them Color it up a bit darker. So I'm thinking slightly off white trim. Very close to wall, but a bit of contrast. If I don't like it I can paint the trim Again with Matching Wall Color. |
||
|
|
|
|
02/16/2018, 11:14 PM
|
#323 |
|
Registered Member
Join Date: Oct 2014
Location: Toronto GTA,Canada
Posts: 1,763
|
DELAY on Tank Carry-In (Nobody available till Sunday) Started WPC Plank Flooring
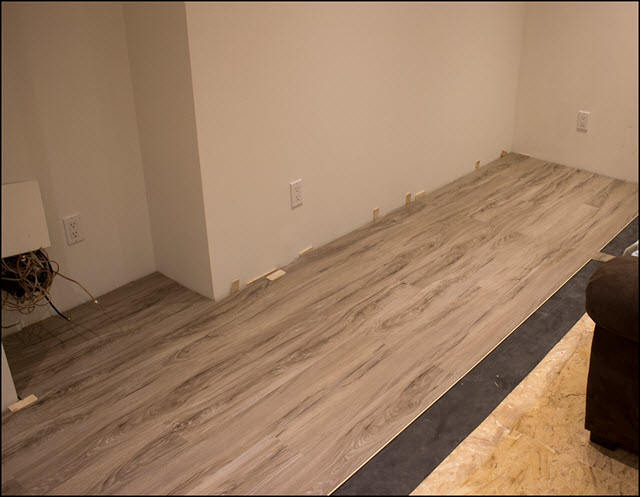 The guy on You Tube made it look so easy (In Fast Forward ) . But it is time consuming to stagger, and pick though the patterns to mix things up.At least it cuts with a Xacto-Knife Score and break. No Saw needed. I hate the end piece installs (very tight Tapping) HOW DO YOU Like the "COLOR" (Beige/Brown/Grey) Not the original I was going with (Dark Oak look). Change Color Choice at the last second after seeing Similar in Showroom. Was Too dark for a basement (which has only one tiny window) |
|
|
|
|
02/17/2018, 11:15 AM
|
#324 |
|
Registered Member
Join Date: Oct 2014
Location: Toronto GTA,Canada
Posts: 1,763
|
STUCK waiting for Tank (Flooring Work Maxed out) Head start on T5 Lighting Fixture.
Hard to believe the hardest part of this build is getting 3 Volunteers (available at the same time) to help bring in tank. Did all the flooring I can. 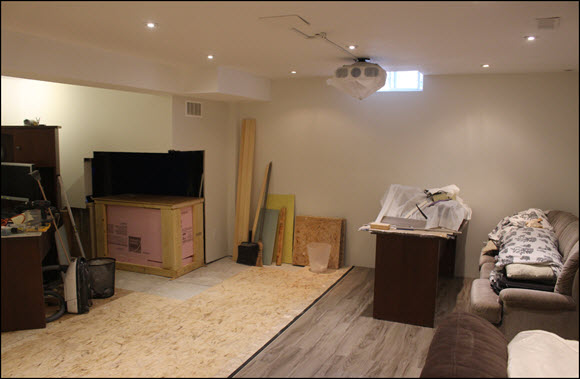 Might as well start the T5 Fixture Build. 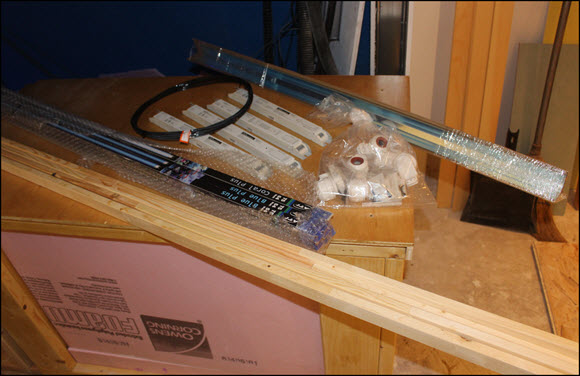 Have all the parts: -> HEP Ballasts -> T5 Reflectors -> T5 Endcaps and Mounts -> Wire -> Wood Strips -> T5 Bulbs (4x BP, 2x CP) |
|
|
|
|
02/17/2018, 11:18 AM
|
#325 | |
|
Registered Member
Join Date: Oct 2014
Location: Toronto GTA,Canada
Posts: 1,763
|
Quote:
If I go TANK FLUSH with drywall, I need to cover up: -> Bottom, Right Tank Glass Edges -> Top EuroTrim and down to Water Line So to your idea (which I am leaning towards), I may do a very thin trim and either paint it to match wall, or just a tiny bit darker. |
|
|
|
|
|
|
|


