
|
|
 04/03/2009, 08:39 PM
|
#1 |
|
Premium Member
 Join Date: Dec 2003
Location: EastSFBay, CA
Posts: 340
|
sump design
We're going to upgrade to a 120 gallon tank, and I'm working on sump designs. I haven't really thought about designing something like this for about 5 years, and hadn't planned to now, but our old stand is starting to look ugly from water damage and my wife decided we should get a new tank. And who's going to argue with that. So here I am.
I've read a lot here and on melev's site, and have learned from the two sumps I've had so far. I'm thinking I'll use a 50 gallon 36x18x18 tank. After sketching out a few possibilities, I think this is the starting point for something that avoids most of the annoyances I have with my current sump (most of which stem from it being too small). 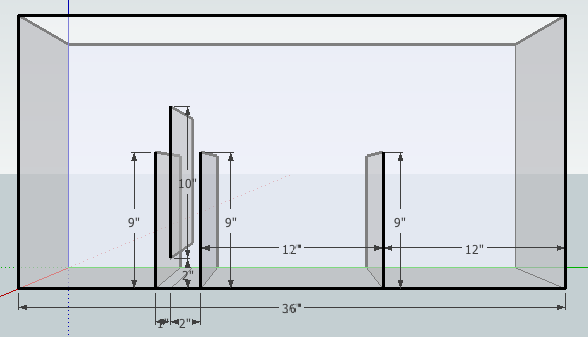 This would hold about 25 gallons, leaving room for another 25. (I want room for at least 20, the extra room is helpful during water changes.) The right most area would be the drain from the tank and skimmer, middle the refugium, and left the return. The dividers on either side of the refugium would probably have slits starting at this height instead of just a top edge as shown here. I left 2" between two of the baffles in case I need to stick something in there to catch bubbles, and/or as a possible place to filter. I'm a little concerned that the flow might be high over the refugium, but hoping that keeping the flow across the top will help. (And keeping the two right sections identical means I could swap skimmer and fuge if plan A doesn't work out.) I'm also concerned 9" may not be tall enough for the refugium. But I'm not crazy about having a separate, higher fuge section. (How do people normally supply water to that -- another pump, or more complicated plumbing?) Things I'm avoiding form my current sump, which is a much more compact version of this: the flow form skimmer into the fuge is at mid-low level, and I find it tends to push the macroalgae up to the surface. And I have a two baffle bubble catcher, which only tends to deliver any surviving bubbles directly to the return pump, thus the third baffle. Comments? Suggestions? |

|

|
|
04/03/2009, 10:32 PM
|
#2 |
|
Registered Member
Join Date: Jul 2004
Location: AWOL
Posts: 12,013
|
The plumbing is very simple to supply a fuge on the right side of your design. And has an advantage or two. There are two ways to do it, the first is with a split in your drain line, the other with a split in the return line. This is a somewhat debated topic. There is nothing to be gained by feeding from the drain line, as the way we mostly use a "fuge" is as an algae filter, the loss is more detritus and "Junk" in the fuge. The other side of the coin, feeding from the return line, gives the fuge the cleanest water, At the price of some return flow, I usually have the pump a "bit" oversized so the expense is nothing. You gain flow control in the "fuge", which in your design you do not, have, and can be directed in a manner that does not float your macro. The other advantage is that usually you can run a taller "fuge" which most see as an advantage. Not talking mega tall, but a few inches above where your last baffle is set. Another point is you can stop the flow in the "fuge" if the need ever arises, without shutting down the whole system.
The design you have here is very much a Melev design, as mine are. this is the design I use, and set up for others. (Though modified to run an external pump w/ center return section-- also a Melev design) They run without issues, as long as the baffles are set low enough to accommodate the power out drain down. I don't recommend using something stuffed between the baffles to catch bubbles, because it will catch more than bubbles. (a maintenance issue really) and if the output of the skimmers is directed away from the bubble trap, the three baffle bubble trap does a good job of catching the bubbles, IME. And you could probably move the last two closer together, and drop the middle one down an inch. There are many ways to build a sump, and there really is not a "right" or "wrong" way. Regards, Jim
__________________
"Things should be made as simple as possible, but not simpler." (oft attributed to Einstein; most likely paraphrasing by Roger Sessions; compactly articulates the principle of Occam's Razor) Current Tank Info: 325 6' wide Reef Last edited by uncleof6; 04/03/2009 at 10:40 PM. |
|
|
|
|
04/04/2009, 07:30 AM
|
#3 |
|
Gone Postal
Join Date: Dec 2006
Location: Coral Springs, FL
Posts: 5,461
|
IF I had a single sump I think I would prefer one with the return section in the middle and the fuge on one end in order to add height and control of flow through the fuge. I don't have a single sump set up so I don't have mine that way either.
Your design will work however I think your macro will still end up rising to the surface. It only has surface flow and that flow will have bubbles from the skimmer. These bubbles are going to catch in the macro and make it float. I would change a few things with your three baffles at the end. I understand why you gave a 2" space between the first two but as stated by others, I would not put any kind of sponge or anything there either. What I would do though is to switch the distances you have. I would put 1" between the first two and 2" between the second two. This would help to slow the water down instead of speeding it up as your current design will do by restricting the space the water must travel through. I would also lower the center baffle by 1". I would also cut the last baffle down to 1/4 to 1/2 its current height. This would make it more of a deflector than a full baffle. Depending on at what height you put an ATO float valve at, this could help keep it stable and still keep any bubbles clear of the inlet to your return pump.
__________________
Views expressed by this person are not neccessarily the views of any other person and may never be. Apology extended to any member who takes offense to any post. Offense is not meant nor intended. Current Tank Info: NONE - Sold - Can't afford it right now! Last edited by coralfragger101; 04/04/2009 at 07:35 AM. |
|
|
|
|
04/04/2009, 10:55 AM
|
#4 |
|
Premium Member
Join Date: Dec 2003
Location: EastSFBay, CA
Posts: 340
|
Thanks for the feedback.
Jim, I'll have to see how people are doing the plumbing to supply the refugium. As for sticking something between the baffles -- I had a sponge there when the tank was first breaking in and there were microbubbles everywhere. After that it's only an occasional as needed thing, like if I want carbon for a day or so, it's a handy place to put it. Anything I put there fills up pretty quickly. coralfragger101 -- I put the 2" gap first (in order of water flow) so that the water would be slower as it's flowing down, to give the bubbles more of a chance to fight the flow. If they make it past the barrier they're going to rise, so the last baffle is just to make sure they end up at the surface and not at the pump. Dropping that last baffle some sounds like a good idea, less turbulence there will make it more likely the bubbles will stay at the surface. I'm trying to decide on a center return section . . . I guess that would mean any pods would be returned to the tank instead of fed to the skimmer. As an aside, my current sump uses a sock for mechanical filtration, and I'm noticing that most people don't seem to use those any more. |
|
|
|
|
04/04/2009, 12:12 PM
|
#5 | |
|
Registered Member
Join Date: Jul 2004
Location: AWOL
Posts: 12,013
|
Quote:
 It is not the final word, but it works really well. Using an external pump would be different, but that would be in the sump design, not in the plumbing per se...... I did not put unions in, but basically.... Jim
__________________
"Things should be made as simple as possible, but not simpler." (oft attributed to Einstein; most likely paraphrasing by Roger Sessions; compactly articulates the principle of Occam's Razor) Current Tank Info: 325 6' wide Reef |
|
|
|
|
|
04/04/2009, 01:15 PM
|
#6 |
|
Premium Member
Join Date: Dec 2003
Location: EastSFBay, CA
Posts: 340
|
You've spent a lot more time working on sumps in Sketchup than I have, nice stuff! I just finished my next pass at what I might try, and it looks a lot like what you have there:
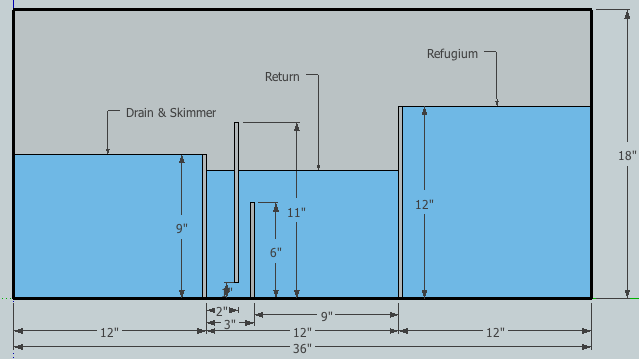 I might evenly space the baffles in the bubble trap. As I've sketched it out there it's holding about 27 gallons of water. The return is holding 7.5 gallons at 8" deep, the pump will probably start to suck air at 3 gallons and I'm expecting 1-2 gallons with a possible peak of 3 gallons of evaporation a day. I guess that will be ok as long as the automatic topoff keeps working. I was thinking of just using flexible tubing so that it's not a huge deal to pull the sump out and work on it. Since the tank has two returns, I was also thinking of using two pumps -- it looks like that might add a little more heat than a single pump, but it also seems like I could plumb it with less restrictions and get better flow from smaller pumps. I mention this incase anyone cares to poitn out any obvious pitfalls I'm overlooking. Thanks again. |
|
|
|
|
04/04/2009, 02:25 PM
|
#7 | |
|
Registered Member
Join Date: Jul 2004
Location: AWOL
Posts: 12,013
|
Quote:
 Jim
__________________
"Things should be made as simple as possible, but not simpler." (oft attributed to Einstein; most likely paraphrasing by Roger Sessions; compactly articulates the principle of Occam's Razor) Current Tank Info: 325 6' wide Reef |
|
|
|
|
|
04/04/2009, 09:27 PM
|
#8 |
|
Registered Member
Join Date: Jul 2004
Location: AWOL
Posts: 12,013
|
BTW, I just realized that what I said could be misunderstood. I was referring to my drawings, the last being "nicer" than my previous ones, and had nothing to do with yours. The rest was why I use sketchup, rather than taking photos--
Regards, Jim
__________________
"Things should be made as simple as possible, but not simpler." (oft attributed to Einstein; most likely paraphrasing by Roger Sessions; compactly articulates the principle of Occam's Razor) Current Tank Info: 325 6' wide Reef |
|
|
|
|
04/18/2009, 09:09 PM
|
#9 |
|
Premium Member
Join Date: Dec 2003
Location: EastSFBay, CA
Posts: 340
|
Ok, another question. The fuge baffle is going to be about 11-12" high (probably with slots above that). It will also be about 17" long, and during water changes or if the topoff fails, the water on the return side could drop quite low. How thick should it be to avoid bowing and pulling away form the sides? 3/8"? Should I add a brace to the top?
|
|
|
|
|
04/18/2009, 09:17 PM
|
#10 |
|
Registered Member
Join Date: Jul 2004
Location: AWOL
Posts: 12,013
|
The last sump I built was 3/8" cast. no problems. Euro-braced top (probably overkill.) 48 x 20 x 17. 9" and 12 " with 1" teeth baffle heights. The return flows around behind the "fuge" section. A knock off of Melev's Model H.
Jim
__________________
"Things should be made as simple as possible, but not simpler." (oft attributed to Einstein; most likely paraphrasing by Roger Sessions; compactly articulates the principle of Occam's Razor) Current Tank Info: 325 6' wide Reef |
|
|
|
|
04/18/2009, 09:21 PM
|
#11 |
|
Premium Member
Join Date: Dec 2003
Location: EastSFBay, CA
Posts: 340
|
I should add: I'll be using acrylic baffles in a glass tank. I haven't decided yet if I'll just use silicone or try some aquarium safe epoxy, the flexing and pulling away is especially a concern if I just use silicone.
|
|
|
|
|
04/18/2009, 09:48 PM
|
#12 | |
|
Registered Member
Join Date: Jul 2004
Location: AWOL
Posts: 12,013
|
Quote:
 On an overflow yes on a sump no. I would have the same concern you have w/silicone. On an overflow yes on a sump no. I would have the same concern you have w/silicone.Jim
__________________
"Things should be made as simple as possible, but not simpler." (oft attributed to Einstein; most likely paraphrasing by Roger Sessions; compactly articulates the principle of Occam's Razor) Current Tank Info: 325 6' wide Reef |
|
|
|
|
|
04/18/2009, 11:15 PM
|
#13 |
|
Moved On
Join Date: Nov 2008
Location: Ca.
Posts: 1,327
|
I hate to hijack this thread. Howdy Uncleof6. But what determines the height of the water level in the return section? The gph of the pump and how much you throttle back or don't?
1" seems the norm for between baffles. Is 9" standard on baffle hieght from the bottom? Seems I see that a lot too. You guys are both artists to me. Can either of you draw one of those up on a 30g? 30Lx12Wx18T, skimmer has a 10"x10" footprint. Thanks Very nice pictures in your gallery Markarian. |
|
|
|
|
04/18/2009, 11:59 PM
|
#14 |
|
Premium Member
Join Date: Dec 2003
Location: EastSFBay, CA
Posts: 340
|
Unless something is going terribly wrong, what determines the height in the return section is the amount of water in your system. (And where you set your automatic topoff, if you have one.) As water evaporates, the return section is where it shows up because you're pumping water out from there. The water height in the other sections is determined by the baffle height.
|
|
|
|
|
04/19/2009, 12:08 AM
|
#15 |
|
Moved On
Join Date: Nov 2008
Location: Ca.
Posts: 1,327
|
Okay.... I get that. Hmmm.....Maybe since I've been staring at a regular wet/dry for so long with one baffle doing nothing but holding bio balls, and not going all the way down and a sponge. I figured it all depended on the pump to regulate water level.
But now that I see your drawing again after looking at it for several minutes already, I see the light. I should go to bed. |
|
|
|
|
04/19/2009, 01:03 AM
|
#16 | |
|
Registered Member
Join Date: Jul 2004
Location: AWOL
Posts: 12,013
|
Quote:
Regards, Jim
__________________
"Things should be made as simple as possible, but not simpler." (oft attributed to Einstein; most likely paraphrasing by Roger Sessions; compactly articulates the principle of Occam's Razor) Current Tank Info: 325 6' wide Reef |
|
|
|
|
|
04/19/2009, 06:40 AM
|
#17 |
|
Registered Member.
Join Date: Dec 2003
Location: Mogadore OH
Posts: 1,792
|
The only thing that would concern me about the current design is that the fuge baffle is a few inches above where the water line will be. When the water from the fuge drops that couple inches its going to break and cause bubbles. With having the return pump so close you could introduce microbubbles into the display. This is just a theory, I know when my sump gets low a few bubbles are caused from the water breaking over that edge.
|
|
|
|
|
04/19/2009, 10:21 AM
|
#18 |
|
Premium Member
Join Date: Dec 2003
Location: EastSFBay, CA
Posts: 340
|
Yeah, that's something I'm a little concerned about. I'm hoping that with a low enough flow and an automatic topoff to always keep the return near 8" depth it won't be a problem.
Anyone care to comment on whether I should worry about the 17" long baffles flexing? I was looking at a spare chunk of 1/4" acrylic I have, and it flexes enough to be concerning. I could go 3/8" and add some 3/8" square rod as bracing. And I'm really going in circles about what glue I should use if I go with acrylic baffles (which I would prefer over glass). I see some people say silicone will be fine, and other threads where people have had it fail. I've heard of Mr. Sticky's Underwater Epoxy, and it looks like it might be ideal (still flexible when cured), but I haven't found a thread where anyone has any experience with it. And I've seen a few comments that epoxy is a bad idea. And a few people have mentioned special purpose adhesives, but I've never seen anything specific named. (And things like Amazing Goop, Loctite Stik-N-Seal, and others get honorable mention for occasionally being mentioned with few supporting details -- I'm a little bit afraid of anything that doesn't claim to be reef safe.) |
|
|
|
|
04/19/2009, 12:25 PM
|
#19 |
|
Moved On
Join Date: Nov 2008
Location: Ca.
Posts: 1,327
|
The fear is it wont adhere to the acrylic right? You know it will to the glass. So if the bead is big enough that the acrylic wont pop over it I would think you'd be okay. Especially if you add the bracing to keep it from flexing to do so.
With a bead on three sides. The bracing only need be at the top or maybe an inch or two down. I don't think bubbles would be an issue if the flow in the fuge is slow enough to just sheet over the the lip or between the teeth. It's only 5 inches. |
|
|
|
|
05/02/2009, 11:52 AM
|
#20 |
|
Premium Member
Join Date: Dec 2003
Location: EastSFBay, CA
Posts: 340
|
Part of the issue with acrylic was fear that the water pressure would push it loose, part was figuring out how wide to make them. Some people said to make them as wide as possible, some said to cut them back 1/8" (I'm assuming for a typical 12" wide sump). Looking at the spec sheets, between temperature (acrylic expands faster than glass with temp) and expansion from absorbing water (which glass doesn't do at all) I was calculating that with a 17-18" wide divider, the possible expansion was over 1/8". So to be safe I'd have to make them at least 3/16" to 1/4" short, and that started to seem like a pretty big gap to fill with silicone and hope it would hold. Probably this works better with sumps that aren't as wide, but in this case the uncertainties were getting too large for my liking.
I then started looking into glass shops and found a place that would do 1/4" glass dividers for me, polished and with the bottom corners rounded (to fit with the silicone already in the tank) for about the same acrylic was going to cost. So I went with that. We put it together last weekend and my wife did the leak testing this week (while I was on a business trip). Everything holds, and the dividers feel very solid.  I want to figure out a way to put a strainer on the top of the fuge overflow, I might make that out of acrylic but that's probably overkill, there's likely an easier solution. I just need something to clip onto 1/4" glass. Thanks again for everyone's input. |
|
|
|
|
05/02/2009, 12:25 PM
|
#21 |
|
Premium Member
Join Date: Sep 2007
Location: Bozeman, MT
Posts: 2,589
|
use some egg crate.. it'll help keep stuff in the fuge. you can just make a full sheet going from the bottom to a few inches above your baffle so you don't have to worry about clipping it or anything.
Thats a pretty lookin sump! I have a 50g breeder i'm going to be turning into a sum and may have to go this route. i'm used to doing skimmer > fuge > return, but have read the benefits of doing it your way. What sizes did your sections turn out to be? I need my skimmer section to be 14x18 so I'll have to adjust from there.
__________________
- Danny Current Tank Info: Dual 50 Breeder system, 30g custom sump/fuge, MSX200, Tank1-6x24T5 retro, Tank2-4x39T5 retro |
|
|
|
|
05/02/2009, 12:39 PM
|
#22 |
|
Premium Member
Join Date: Dec 2003
Location: EastSFBay, CA
Posts: 340
|
The inside length is about 35 1/4". The skimmer section is 12" x the width of the tank, about 17 1/4", and 9" deep. I don't know yet exactly which skimmer I'm going to use, but at least one of them needed 12" in the short dimension. The fuge is a little under 12" wide and about 11" tall, and the return section has 8 1/2" between the dividers. I'll probably run it at 8" deep, the last bubble baffle is 7" tall.
|
|
|
|
 |
|
|


