
|
|
 03/23/2010, 03:08 PM
|
#1 |
|
Registered Member
|
Well now the "Aqua Digital Tank Build" is nearing set up completion its now time to move onto the profiLux and show everyone what really can be done.
I thought I would do this step by step guide including software screen shots. So lets start with Temperature. As you can see here all probes including the Temp probe are situated in the sump at a level that the probes will never be completely submersed. 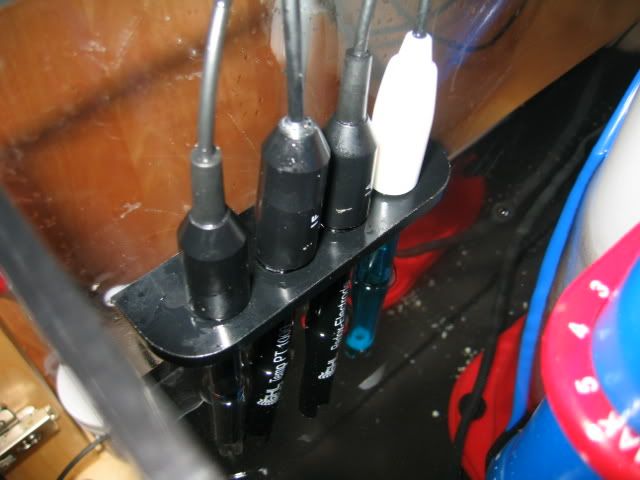 (The white tipped probe is the new generic pH probe that will be coming with all beginner packs as of April, just field testing it) So here is a screen shot of the temperature software screen. Here you can see my nominal value is 28 degrees and the hys is set to .02 meaning the tank will only fluctuate by .02, my graphing clearly shows this as an even saw tooth over a 24 hours period. Any more switching than this in a small tank that does not hold heat well could cause thermostat bounce, something to be aware of more so with chillers. 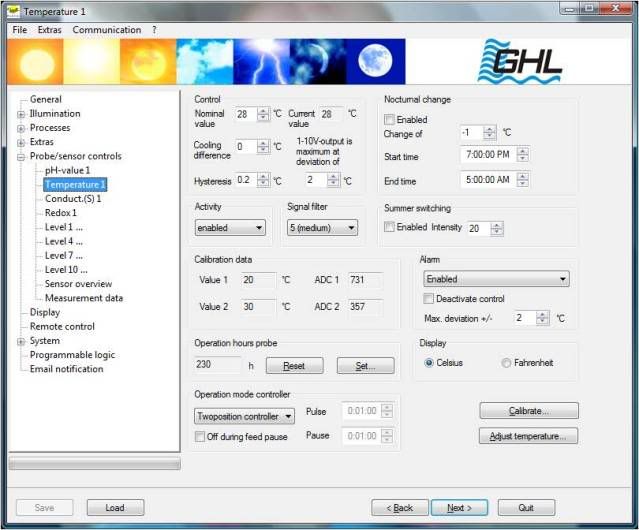 So thats the input but what about turning the heater on and off at the set value? Next step is to program the power bar to control the heater, but first set the thermostat of your heater to 1-2 degrees above your nominal value, this is so the GHL had control over the heater but still allowing for failure redundancy, no matter how good your controller is, it could be made by Nasa for all I care, make sure you have redundancy or 3rd party cut out for such devices. Ok onto the power bar. here you can see the power bar input screen and I have chosen socket 1 to be the temperature "heating" control socket. The socket is edited to be Temperature 1 - Heater. If you want to also control a chiller just select another socket i.e socket 2 and program that to Temperature 1 - Chiller. The ProfiLux will then turn either device on or off depending on your nominal value and Hys' set. 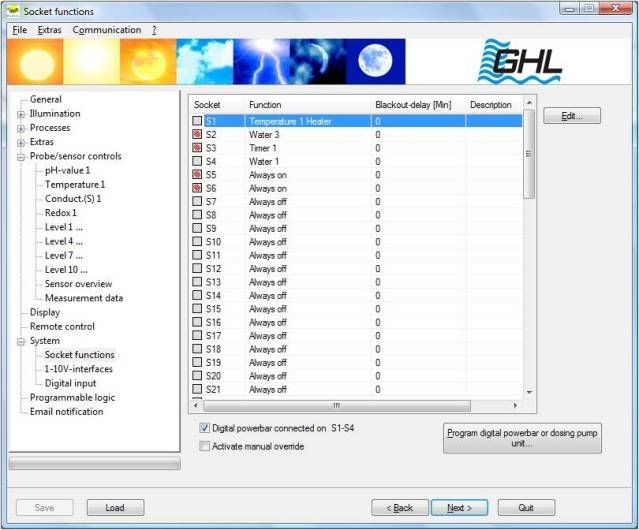 More about the other sockets later. So thats the temperature set up. - Next pH
__________________
Michael Hall Tank Build and product reviews coming soon. 60x30x24 Ecotech powered, OLD Profilux 3 but looking to upgrade when market settles, Seneye Monitored, Bubble Magus DC Skimmed. Current Tank Info: Floating about on the water enjoying semi retirement!! |

|

|
|
03/23/2010, 04:43 PM
|
#2 |
|
Registered Member
Join Date: Apr 2003
Location: San Clemente
Posts: 382
|
So far, this is great! My P3 just arrived about an hour ago and I am following this guide to set it up. Thanks!!
|
|
|
|
|
03/23/2010, 05:38 PM
|
#3 |
|
Registered Member
Join Date: Dec 2002
Location: San Francisco
Posts: 1,350
|
I'm glad that you're walking thru the setup, but I wish you had done this earlier. I had the painful experience of trying to follow the instruction manual, but it isn't the best at walking thru steps. It's almost like the manual was written by an engineer or something.

__________________
"Beer is proof that God loves us and wants us to be happy." ~ Benjamin Franklin Current Tank Info: Elos [~] 70 powered by Profilux |
|
|
|
|
03/23/2010, 05:42 PM
|
#4 |
|
Registered Member
|
 This is the intention This is the intention  OK so pH - Well once you have set up the Temp everything starts to fall into place like a jigsaw really, setting pH up is no different you are just dealing with different values. So here we have the pH screen 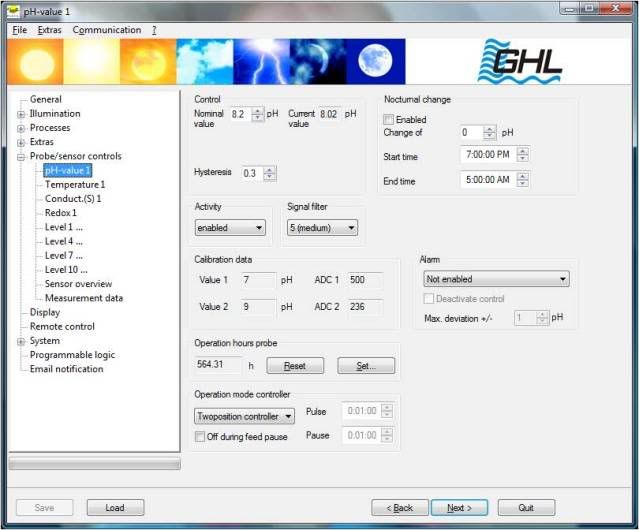 Just as the temperature control page, you have nominal value current value and hys'. As with the temp input there are plenty of other funky add ons to play with if you wished here, for example nocturnal mode etc, this is important only if you really do not like natures ability to lower pH at night, I personally let the tank follow a rythm. So what can pH be used for? In my case its just monitoring, of course I can set an alarm to wake me at 2am if it drops too low, or goes to high if my Alk dosing got stuck on, or if running a kalk stirrer etc. But the main purpose in reef tanks for pH control other than just monitoring the tank is calcium reactor control. So to set up a ca reactor Co2 solenoid (I do not have this on my tank as I cast that old pony out long ago )First set up your nominal value in a ca reactor it should be around 6.2 to 6.5 depending on your media. The Hys' can be set to 0.1 in this case, we are controlling a solenoid so does not have so many issues with being switched on and off often. Now go back to the socket function screen and decide what socket you wish the solenoid to be plugged into, lets say socket 2 for now. Just as you did with the temp socket set up, select the socket to be edited and set as follows pH - downward thats it you are set, of course you can name the socket Co2 control or Freds Diner what ever you choose If you want to control a Kalk stirrer you can do the same but opposite, if the pH drops you want the kalk to be turned on so set to pH up. Next Salinity control - Oh thats a scary one
__________________
Michael Hall Tank Build and product reviews coming soon. 60x30x24 Ecotech powered, OLD Profilux 3 but looking to upgrade when market settles, Seneye Monitored, Bubble Magus DC Skimmed. Current Tank Info: Floating about on the water enjoying semi retirement!! |
|
|
|
|
03/23/2010, 06:06 PM
|
#5 |
|
Registered Member
|
So salinity - This will take a while
 First thing I need to address here is YES when you plug in your highly expensive lab grade platinum plated conductivity probe and follow the instructions to calibrate it to the letter, you will then test your refractometer and drop the whisky glass in disbelief!! WOW can the GHL be that innacurate?? Whaooo stop there  Lets look at what the old trusted refractometer is really designed for? Reading NSW? Nope, reading wee? Yep, Reading NACL? YES, but NOT natural salt water! To do this you must calibrate the refractometer using an NSW solution, the most trusted until recently was Pinpoint 53mS but then along came Fauna Marin with its highly technical "multi reference test solution" I strongly recommend anyone getting a GHL salinity probe and wish to match its reading to a refractometer to get this stuff. Digital reading of salinity IMO will be more accurate than a refract becuase it is not subject to the influences of other refractive compounds found in NSW We are getting a bit deep here and away from reviewing the ProfiLux but what i am trying to say is do not panic if you see the GHL reading different then the old trusted dog the refract' calibrate the refract correctly and you will not see much of a difference. My refract - digital pen and GHL probe is calibrated to fauna solution at 53mS. This does not mean the GHL stuff is innacurate at 50Ms it is just no good for calibrating a refractometer. So if you want to match both you need an NSW solution for the refract. OK so we have follwed the calibration instructions to the letter (mega important) so now what can we do with salinity control? I do not personally do this but I know many GHL users do and that is control their ATO based on the salinity level of the tank. Here is the salinity screen 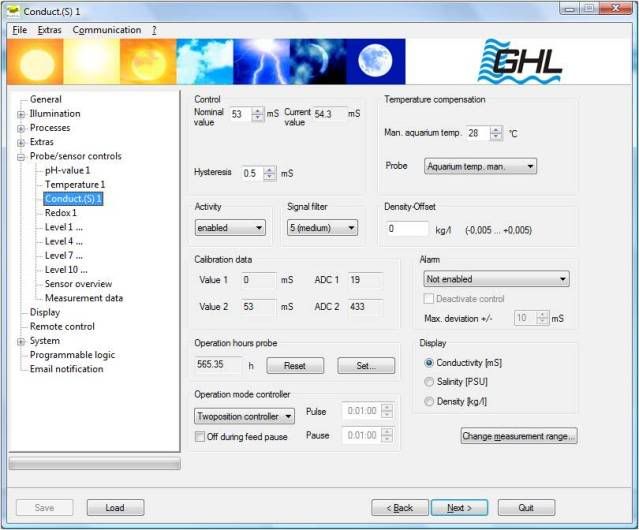 I am not going to touch on setting this up here to control ATO, if you wish to do this then let me know and once the review is finished I will discuss more detailed subjects. And next is level control ATO and AWC and alarms.
__________________
Michael Hall Tank Build and product reviews coming soon. 60x30x24 Ecotech powered, OLD Profilux 3 but looking to upgrade when market settles, Seneye Monitored, Bubble Magus DC Skimmed. Current Tank Info: Floating about on the water enjoying semi retirement!! Last edited by AQD_ottawa; 03/23/2010 at 06:13 PM. |
|
|
|
|
03/23/2010, 06:39 PM
|
#6 |
|
Registered Member
|
So good ole level control etc etc
Lets start with the basics. ATO. There are different ways of doing this Direct from the RO unit (my choice) From storage container (most popular) From one of the above controlled by a salinity probe instead of level sensor (advance topic - later) So which ever you choose of the first two the only thing that changes in the set up is what you plug into the assigned power bar socket, whether it be a water solenoid of water pump. In my case water solenoid. So first thing we must do is set a float or optical level sensor up in the sump to the desired (controlled) level point. Here is mine. 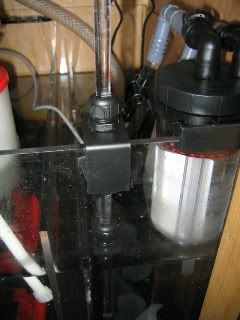 Set up the assembly and loose fit to the sump so it can be adjusted, now go to the profilux front screen and go to level - diagnostic - level 1, adjust the sensor until it just turns off, you now have your level set at where you wish the water to always be maintained at. So back to the software. Go to the level control screen  By now you should have plugged in your sensor to the back of the profilux and not by mistake plugged it into the temperature port instead  Double click on Level 1 in the settings tab at the top and up pops - 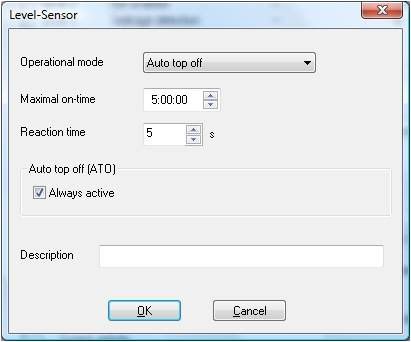 In this box you can set all sorts of treats, the first important thing to set is the function, in this case ATO, the next most important is Max on time, this is your safety net, lets say heavens forbid you forgot to clean your ATO sensor and it stuck on, you are in Cuba and downing a lovely cool local brew while your ATO goes AWOL and floods the Granny apartment below! To avoid such minor issues here you set the maximum time you wish the sensor to be in an active state. So in my case 5 minutes is, well probably to long and needs to adjust that down to 30 seconds, thats a good target. So now you have fail safe ATO next in the same screen you need to set up the reaction time, no this is not the time you have to get back from Cuba to sort out the mess in the apartment below, but the amount of time the sensor is active before the controlled socket is switched, this is ideal for tanks with turbulance or other things that can make the sensor switch on and off periodically. I have mine set to 5 secs, which is just right. So thats the ATO sensor set up, what about the socket? You have now chosen a socket to control your pump or solenoid. Just as before go to socket function and click edit the chosen socket. Set this to water 1. Waheyy, you now have fail safe fully set up ATO
__________________
Michael Hall Tank Build and product reviews coming soon. 60x30x24 Ecotech powered, OLD Profilux 3 but looking to upgrade when market settles, Seneye Monitored, Bubble Magus DC Skimmed. Current Tank Info: Floating about on the water enjoying semi retirement!! |
|
|
|
|
03/23/2010, 06:42 PM
|
#7 |
|
Registered Member
|
More tomorrow - AWC and level alarms
__________________
Michael Hall Tank Build and product reviews coming soon. 60x30x24 Ecotech powered, OLD Profilux 3 but looking to upgrade when market settles, Seneye Monitored, Bubble Magus DC Skimmed. Current Tank Info: Floating about on the water enjoying semi retirement!! |
|
|
|
|
03/23/2010, 10:27 PM
|
#8 |
|
Registered Member
Join Date: Nov 2003
Location: South Harrison, NJ
Posts: 1,024
|
tag
__________________
My addiction began as a kid visiting Martin's Aquarium!! Current Tank Info: 100 starphire rimless in planning since January 2012. 100 Gallon Rubbermaid Basement Sump and 65 gallon refugium. |
|
|
|
|
03/24/2010, 02:55 AM
|
#9 |
|
Moved On
Join Date: Nov 2006
Posts: 386
|
Great review, Very hard to find info on people using the PFL 3.
|
|
|
|
|
03/24/2010, 06:20 AM
|
#10 |
|
Registered Member
Join Date: Aug 2008
Location: Fremont, CA
Posts: 1,161
|
Thank you for doing this. I have most everything set up, bu thave still learned a few things.
|
|
|
|
|
03/24/2010, 05:49 PM
|
#11 |
|
Registered Member
|
So for the topic tonight - water alarms.
You can have all manner of alarms - Maximum on time alarm (this is described in ATO set up) Low water level alarm High water level alarm Leakage alarm Depending on the amount of sensors you have depends on how many alarm states you can create. I have main tank ovefill alarm and max on time ATO alarm and here i will show you how to create an alarm and shut off for the main pump if the drain got blocked. As you can see from the photo I have attached a float level sensor to the Euro brace inside the weir box, the sensor will then be triggered if the water level rises too high, in doing so setting off an alarm and turning off the main pump. You can set the same thing up for low water in your sump by putting the sensor there instead, mounted differently of course. 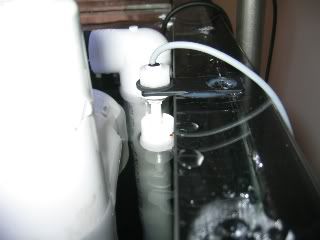 So how to program? First connect the sensor to a level sensor port. Now go to level control in the software and select the sensor for editing. Set the sensor to leakage detection and set your max on times etc as you choose. 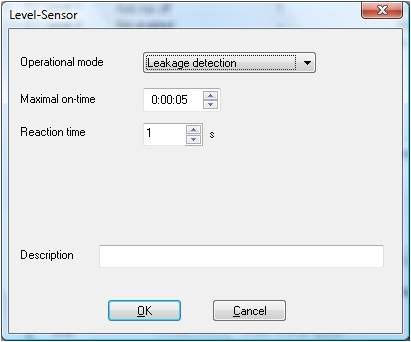 Now go to socket function outlet and choose what socket you want the return pump plugged into then edit this socket as follows  Here you will see I am using sensor 3 so have programmed as water 3. If using an optical sensor, when setting up the socket fnction remember to "invert" the socket function. Thats all for tonight folks
__________________
Michael Hall Tank Build and product reviews coming soon. 60x30x24 Ecotech powered, OLD Profilux 3 but looking to upgrade when market settles, Seneye Monitored, Bubble Magus DC Skimmed. Current Tank Info: Floating about on the water enjoying semi retirement!! |
|
|
|
|
03/27/2010, 06:48 PM
|
#12 |
|
Registered Member
 Join Date: May 2001
Location: Fairfield County, CT
Posts: 363
|
When are you going to do the Tunze setup?
I have a YL2-2,5 splitter, is it supposed to be plugged into L1L2 or L3L4, thanks! |
|
|
|
|
03/27/2010, 08:03 PM
|
#13 |
|
Registered Member
Join Date: Nov 2005
Location: toronto, ontario, canada
Posts: 223
|
Good Info
thanks for the step by step. If you can include calibration of temperature that would be of interest to me as my temp prob is off.
Steve |
|
|
|
|
03/28/2010, 02:32 AM
|
#14 | |
|
Registered Member
Join Date: Aug 2003
Location: Victoria, BC Canada
Posts: 274
|
Quote:
For instance: Splitter connected to L1L2 would divide that port into L1 and L2 allowing you to connect a Tunze1 cable and a Tunze2 cable. You would then configure L1 and L2 as Current Pump 1 and Current Pump 2 in your 1-10v interface options and you are good to go for setting your flow options in the extras/pumps menu of your profilux pc software. |
|
|
|
|
|
03/30/2010, 08:01 AM
|
#15 | |
|
Registered Member
Join Date: May 2001
Location: Fairfield County, CT
Posts: 363
|
Got the Tunzes to work, thanks!
Quote:
|
|
|
|
|
|
04/04/2010, 12:44 AM
|
#16 |
|
Registered Member
Join Date: Apr 2005
Location: Belmont, Victoria, Australia
Posts: 5
|
Thanks AQD_ottawa, I am just starting to setup my new Profilux IIIeX and am finding your setup notes very helpful.
|
|
|
|
|
04/05/2010, 06:21 AM
|
#17 |
|
Registered Member
Join Date: Dec 2006
Location: South Windsor, CT
Posts: 924
|
More please
|
|
|
|
|
04/05/2010, 06:44 AM
|
#18 |
|
Registered Member
|
Yep more coming but due to demand I will be focussing on connectivity, sometime this week if workload allows.
__________________
Michael Hall Tank Build and product reviews coming soon. 60x30x24 Ecotech powered, OLD Profilux 3 but looking to upgrade when market settles, Seneye Monitored, Bubble Magus DC Skimmed. Current Tank Info: Floating about on the water enjoying semi retirement!! Last edited by AQD_ottawa; 04/05/2010 at 06:49 AM. |
|
|
|
|
04/09/2010, 08:39 AM
|
#19 |
|
Registered Member
|
So the next part of the "how to guide" is to cover initial connectivity via USB and or USB to RS232 adapter.
So first off - Always install first the matching and newest driver before you connect the USB with the PC! I will explain how to do this below If you use the PLM-USB card you will find our newest driver at our download-page http://www.aquariumcomputer.com/Syst.../download.html Important: there are 2 different drivers available - one for Prolific chipset, the other for FTDI chipset. If you are not sure which chipset (the name is printed on the chip of the USB-card) you can install both drivers, this is not a problem. Third party adapters (RS232 to USB) - The only time you should use one of these is for firmware updates using the fujitsu tool. I do advise everyone with a Plus II to get PLM-USB as adapters are our biggest nightmare. The biggest issues faced is by the use of these adapters so i will cover as many hints as possible regarding this. Of course ProfiLux will always get the blame when it does not work even though they did not make it So this is very important for everyone to read If you do decide to use a third-party USB-RS232-converter then you have to use the shipped driver, always look for an updated driver on the manufacturers website. If the adapter does not come with a driver or a brand name, my advise is do not buy it, but if you do have one like this and can not find the driver, use the driver for PLM-USB, however we do not guarrantee this will work So you have installed the driver(s), if you now connect the profilux to the PC with power applied windows should say "new hardware found" and after a few seconds display what COM port it is using. if not then the USB-port will be displayed in the windows device manager under "Ports (COM and LPT)". There you can also see the assigned port number (e.g. "COM 7"). In ProfiLuxControl this port number has to be adjusted under connection settings. Connection settings can be located by clicking on the 3 dots ... next to the connect button. open the connection window for RS232/USB and this box will be displayed 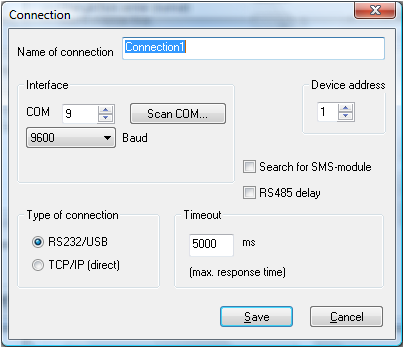 The baudrate (transmission speed) of ProfiLux and ProfiLuxControl must be matching. Standard is 9600 for both, usually you need not to change them. In the COM window edit this to match the COM number that you noted earlier. Make sure RS232/USB is ticked Press save in the list of connection tick the connection for RS232/USB Exit You should now be able to connect Notes - Even if you are using a USB-RS232-converter you must use our cable ProfiLux-SER between converter and ProfiLux! If the connection fails although then: The used USB-RS232-converter is not working correctly (hardware and/or driver are not according to the standards). In this case try using the profiLic driver I personally have found this to work in my case, also use this driver if you adapter was not supplied with a driver CD. I hope this gives a good insight
__________________
Michael Hall Tank Build and product reviews coming soon. 60x30x24 Ecotech powered, OLD Profilux 3 but looking to upgrade when market settles, Seneye Monitored, Bubble Magus DC Skimmed. Current Tank Info: Floating about on the water enjoying semi retirement!! Last edited by AQD_ottawa; 04/09/2010 at 08:47 AM. |
|
|
|
|
04/09/2010, 09:03 PM
|
#20 |
|
Canadian Reefer
Join Date: Oct 2007
Location: Markham, Ontario
Posts: 112
|
This thread is great Michael!
Can you do a future one with regards to networking? I have the P3 and an old network router. I would like to set it up so I can connect to the P3 wirelessly. Keep up the great work! Wei
__________________
In Loving Memory of the World's Greatest Dog: Bentley 1999-2010 Current Tank Info: 245G SPS Dominant Tank |
|
|
|
|
04/09/2010, 09:05 PM
|
#21 |
|
Registered Member
|
I would love to say yes but my network knowledge goes as far as my front door step! Maybe someone else will step up to that challenge
__________________
Michael Hall Tank Build and product reviews coming soon. 60x30x24 Ecotech powered, OLD Profilux 3 but looking to upgrade when market settles, Seneye Monitored, Bubble Magus DC Skimmed. Current Tank Info: Floating about on the water enjoying semi retirement!! |
|
|
|
|
04/10/2010, 08:02 AM
|
#22 |
|
Moved On
Join Date: Jun 2002
Location: Syracuse Area
Posts: 587
|
How about a doser tutorial and the various programming options available?
Right now I have my slave doser plugged into a standard outlet instead of using the powerstrip's programmable outlet because the doser is controlled by the Pro II's auto dosing configuration. It saves me from using one of the powerstrip's limited number of controllable outlets for other equipment that cannot be programmed like the doser can. Not sure if that is the best way to set up/control my doser? |
|
|
|
|
04/10/2010, 08:05 AM
|
#23 |
|
Registered Member
|
first install the latest PII firmware this gives you greater options and expanded options for socket outlets.
I doser tutorial is coming.
__________________
Michael Hall Tank Build and product reviews coming soon. 60x30x24 Ecotech powered, OLD Profilux 3 but looking to upgrade when market settles, Seneye Monitored, Bubble Magus DC Skimmed. Current Tank Info: Floating about on the water enjoying semi retirement!! |
|
|
|
|
04/27/2010, 10:00 AM
|
#24 |
|
Registered Member
Join Date: Feb 2007
Location: Waynesville, NC USA
Posts: 1,737
|
Time for some more "updates" no?
Great tutorial Michael
|
|
|
|
|
04/27/2010, 10:14 AM
|
#25 |
|
Registered Member
|
I am waiting for a software update then will continue, I have done the doser review seperatley on the other thread but will put a link across here shortly
__________________
Michael Hall Tank Build and product reviews coming soon. 60x30x24 Ecotech powered, OLD Profilux 3 but looking to upgrade when market settles, Seneye Monitored, Bubble Magus DC Skimmed. Current Tank Info: Floating about on the water enjoying semi retirement!! |
|
|
|
 |
|
|


