
|
|
 07/08/2014, 01:32 PM
|
#26 |
|
Moved On
Join Date: Mar 2013
Posts: 383
|
I will send you a pic of the tabs I ordered as soon as they come in
|

|

|
|
07/08/2014, 04:42 PM
|
#27 |
|
em-lee-vee
Join Date: Mar 2004
Location: central florida
Posts: 2,910
|
BRS posted this to their facebook page today..
 for inspiration. 
|
|
|
|
|
07/08/2014, 06:27 PM
|
#28 | |
|
Registered Member
Join Date: Apr 2001
Location: Miami, FL
Posts: 6,544
|
Quote:
I have Sailfin, Yellow tang, chevron, in a 200 and all three are fine with each oth. Mind you different families.
__________________
Eddie Soler FMAS BOD Member MACNA 2013 Chairman "I'd rather die living than live to die" Current Tank Info: 200G mixed reef with 60G sump, Radion LED’s , Bubble King skimmer, blah blah blah. |
|
|
|
|
|
07/08/2014, 07:03 PM
|
#29 |
|
Registered Member
Join Date: Feb 2008
Location: Miramar, FL
Posts: 7,518
|
Thanks Eddie, I was not planning on the yellow and purple together, or at a minimum know of the risk. Chevron tangs get huge, so that's out. Plus, adult chevron tangs are ugly IMHO.
I think the most likely combo is the yellow/kole. If I get ambitious, maybe the purple/powder blue, but my gut tells me that's too much fish. What do you think? |
|
|
|
|
07/08/2014, 07:05 PM
|
#30 | |
|
Registered Member
Join Date: Feb 2008
Location: Miramar, FL
Posts: 7,518
|
Quote:
|
|
|
|
|
|
07/09/2014, 07:02 AM
|
#31 |
|
Registered Member
Join Date: Jan 2004
Location: East Coast/West Coast
Posts: 4,887
|
What? No Achilles tang love? LOL Then again they are recommended for 200+ gal tanks.
My Achilles was one of my MUST HAVE, HOLY GRAIL fish when i set up my 200.
__________________
- John *blackthunda stands for a black Mistubishi 3000GT with black rims I used to own. Don't get any funny ideas! Current Tank Info: 200 Gal custom tank with dual corner overflows, 80 gal custom sump/refugium, Neptune Apex controller, Dual Lumenmax Elite reflectors with 250 Radiums, SWC 160 Cone Skimmer, 2x Jebao WP-25....and some other stuff. |
|
|
|
|
07/09/2014, 08:13 AM
|
#32 | |
|
Registered Member
Join Date: Feb 2008
Location: Miramar, FL
Posts: 7,518
|
Quote:
 If I ever upgrade, which chances are at some point I will ( I already know what I want, LOL!) I'll get one! |
|
|
|
|
|
07/09/2014, 09:29 AM
|
#33 |
|
Registered Member
Join Date: Feb 2014
Location: Keys
Posts: 1,392
|
Gorgeous tank! Following along as well!
|
|
|
|
|
07/09/2014, 09:30 AM
|
#34 | |
|
Registered Member
Join Date: Apr 2008
Location: North Palm Beach, FL
Posts: 2,270
|
Quote:
The initial look was sleek and imo, complimented the tank since the black acrylic matches the black silicone used to build the tank, and I was completely satisfied with the way it came out... at first. The lid is a 2 part construction, with an upper and lower frame. Believe it or not, materials to build this were on par with building a "screen door" frame setup. It did however take more time due to cutting all the strips, channeling the lower frame, beveling the edges and gluing it all together. The lower frame provides both centering of the frame while resting on the edge of the tank (because the lower framing sets inside the tank), and a channeled groove for the spline and screen, which gives it an incredibly clean look since you cannot see any spline or channel, almost as if the screen is floating under the frame. The issue with something like this is with the acrylic warping, and possibly weight. The upper frame is 1" wide on 3 sides, and the rear of the frame is 3 5/8" wide (this is due to the fact that my returns are coming over the back of the tank. See the image below and you'll understand why). Anyways, this covers both the 3/4" glass right to the edge of the tank, and also provides the 1/4" mounting/gluing area for the lower frame. Over time, all 4 corners have warped in an upward direction. This completely ruins the nice clean look that it originally had. I believe the problem stems from the acrylic absorbing moisture over time, and possibly the weight of the rear edge being wide. I know that "absorbing moisture" sounds nuts, but research it and ask your local acrylic expert. You will be shocked to know that it's possible with standard acrylic. I think the narrow 1" strip's also adds to this as they are not as rigid as a wider piece can be. I know it's not the screen being pulled to tight causing the warping because I installed it loose on purpose, so not to distort the frame. fyi: If I hold down the 4 corners, the entire lid looks perfect. I've considered using Velcro at the 4 corners, but that would also mean adding in 1/8" runs along the edges of the frame to "level" it out. I feel that this would take away from the sleek look, and it will make it a pita to remove the lid when needed. I'm in the process of building a new one. The new one will sit inside the top edge of the tank and be held up with tabs that will rest on the edge of the tank. Using 1/4" strips will be the way to go, but the issue I will have again will be with my returns coming over the top rear of the tank. Rovster, your tank has a clean edge all the way around, so building one that sets inside the edge of the tank, imo, would be the "slickest" look. Couple images, both when first installed, and then 6 months later. You can also see the cover I made for my external overflow box. Even this piece warped. It has since been replaced with a glass lid. This prevents any "splashing" getting outside of the box from the water running into the overflow, which was an issue at first. The cover completely solved that problem. 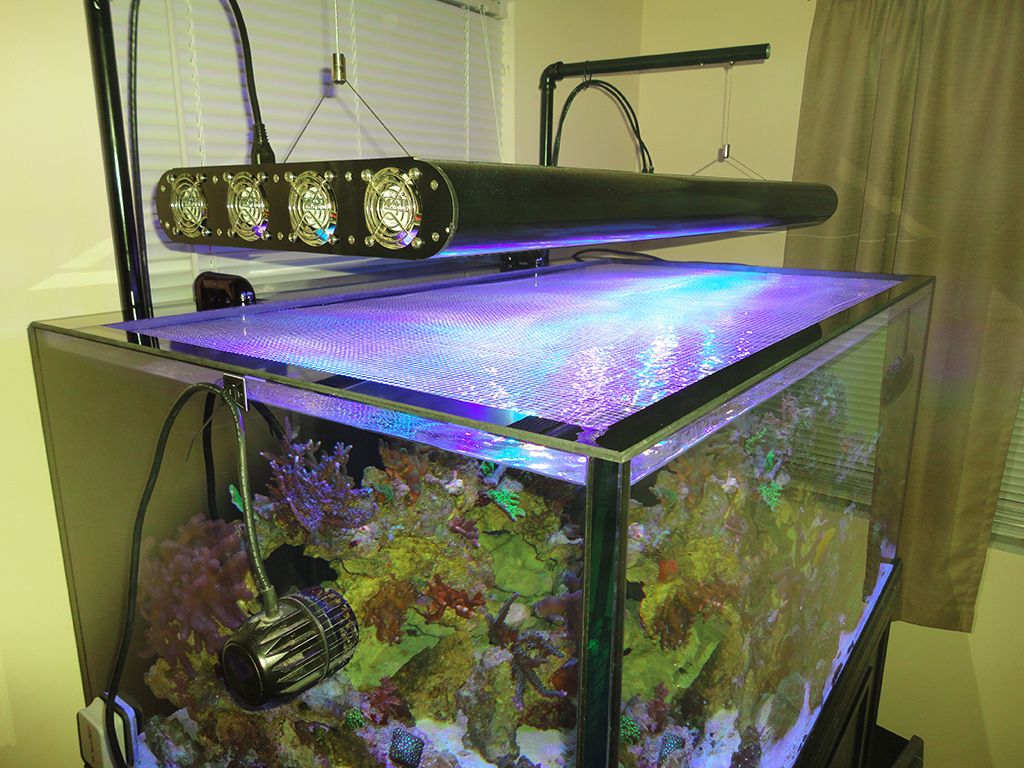 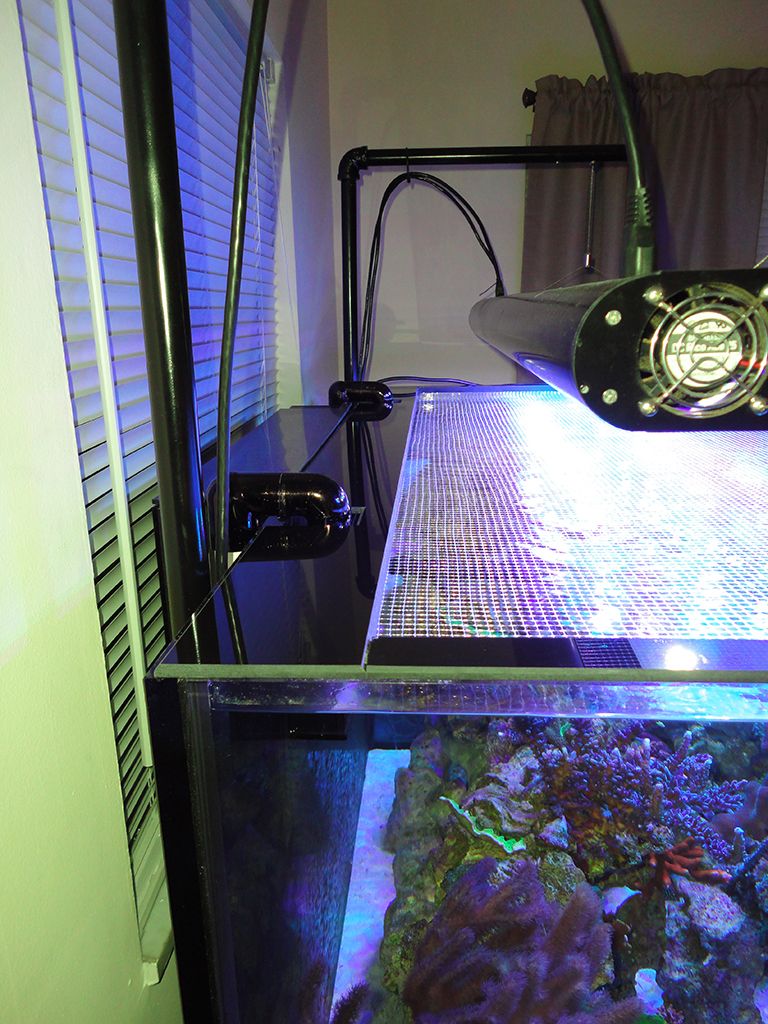 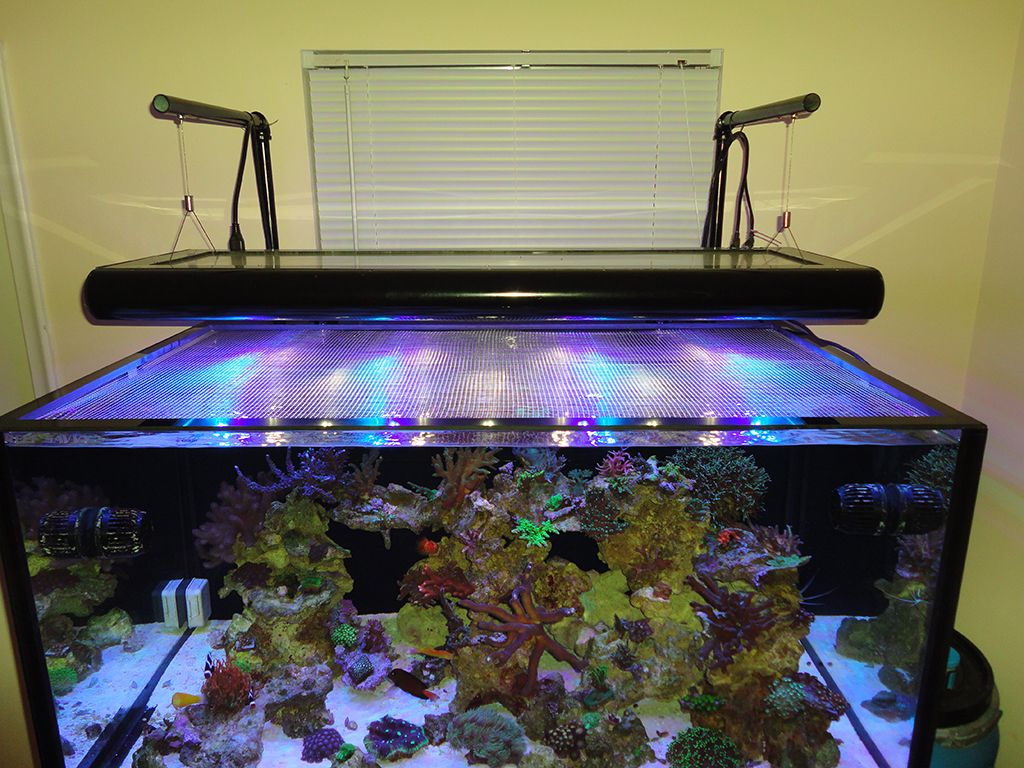     I added this image because the tank looks like crap in all the images above 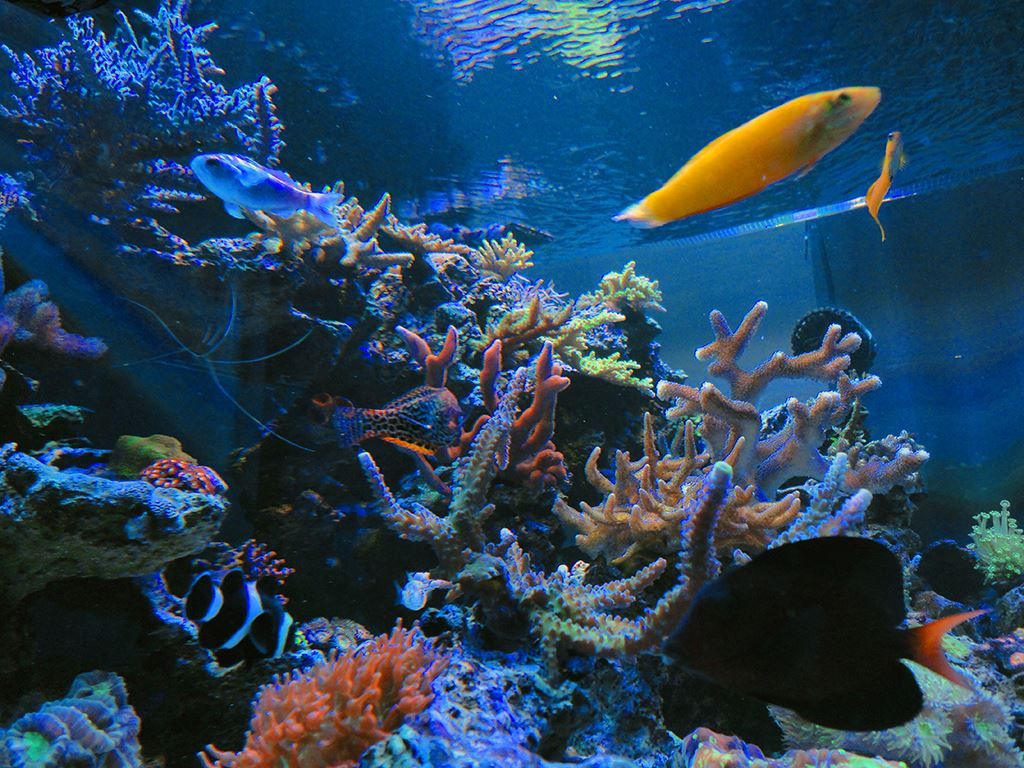
__________________
120g, 50g Sump, SRO XP2000i, MP40W x2, DIY Hybrid LED/T5 Fixture, Apex PBMAS VP 2010-11 PBMAS 2017 President |
|
|
|
|
|
07/09/2014, 10:31 AM
|
#35 |
|
Registered Member
Join Date: Feb 2008
Location: Miramar, FL
Posts: 7,518
|
Thanks for posting! These images are better than the ones you previously sent me! I was also confused and didn't realize you built it yourself. Very impressive. I'm assuming you used a router to create the spline channel?
|
|
|
|
|
07/09/2014, 12:10 PM
|
#36 |
|
Registered Member
Join Date: Apr 2008
Location: North Palm Beach, FL
Posts: 2,270
|
To make the channels, I used a table saw (contractors table). I did have to make 2 passes to widen the channel. One pass yields a channel that is just enough to get the spline in (about 1/8" wide, which is the width of most common circular saw blades). The 1/8" channel is tight, and what happens when you try to install the netting and spline is that the netting will get cut clean on the sharp edges, and not be held in.
By moving the fence 1/32" over, it opens up the channel just enough so that I could install the netting and spline without issue. I also ran a razor blade on all the channel edges to smooth them out. It's amazing that fresh cut acrylic can be sharper than a fine knife.
__________________
120g, 50g Sump, SRO XP2000i, MP40W x2, DIY Hybrid LED/T5 Fixture, Apex PBMAS VP 2010-11 PBMAS 2017 President |
|
|
|
|
07/10/2014, 11:07 PM
|
#37 |
|
Registered Member
Join Date: Jul 2007
Location: Miami / Coral Gables
Posts: 3,187
|
I think the warping may be due more to the heat from the lights (are they LEDs?) than water absorption by the acrylic.
That's too bad though because I bet that did look sleek and was a nice solution to covering a rimless tank. Me personally, after my experience with the rimless nano, I don't think I'll be doing rimless on my next aquarium. While I love the modern, sleek look, I don't like that you can always see the water line and eventually, that water line starts to leave a permanent line on the glass that has to scraped with a razor blade.
__________________
Jorge S. "I need Reef Addiction Therapy" Current Tank Info: Being set-up. Timeline: One day. |
|
|
|
|
07/10/2014, 11:08 PM
|
#38 |
|
Registered Member
Join Date: Jul 2007
Location: Miami / Coral Gables
Posts: 3,187
|
I think the warping may be due more to the heat from the lights (are they LEDs?) than water absorption by the acrylic.
That's too bad though because I bet that did look sleek and was a nice solution to covering a rimless tank. Me personally, after my experience with the rimless nano, I don't think I'll be doing rimless on my next aquarium. While I love the modern, sleek look, I don't like that you can always see the water line and eventually, that water line starts to leave a permanent line on the glass that has to scraped with a razor blade.
__________________
Jorge S. "I need Reef Addiction Therapy" Current Tank Info: Being set-up. Timeline: One day. |
|
|
|
|
07/11/2014, 07:11 AM
|
#39 |
|
em-lee-vee
Join Date: Mar 2004
Location: central florida
Posts: 2,910
|
With water enough movement, to agitate the top also, you won't build up on the water line. I'm on my 2nd rimless.

|
|
|
|
|
07/11/2014, 11:53 AM
|
#40 |
|
Registered Member
Join Date: Apr 2008
Location: North Palm Beach, FL
Posts: 2,270
|
Definitely not a heat issue. My fixture puts out no heat at all. With 4 fans pushing and 4 pulling, the air coming out of the fixture is cool. You can hold you hand on the bottom piece of clear acrylic, 1/2" away from the LED's, and there is almost no heat at all.
My next tank most likely won't be a rimless either. Like you, I like the sleek/clean look, but the hassle of getting water running down the glass when you pull your arm out of the tank, the water line/buildup/stain, and a couple other things, have made me realize that in the future, I may go with a custom size, but it will have some type of trim on it.
__________________
120g, 50g Sump, SRO XP2000i, MP40W x2, DIY Hybrid LED/T5 Fixture, Apex PBMAS VP 2010-11 PBMAS 2017 President |
|
|
|
|
07/23/2014, 11:46 AM
|
#41 |
|
Registered Member
Join Date: Feb 2008
Location: Miramar, FL
Posts: 7,518
|
Sorry about the lack of updates, but I've been having trouble uploading photos. I think I've been having issues with my wifi, so the uploads get interrupted and I have to start over. I've given up a few times, but for now, I'll post what I have.
So the next chapter I want to share is the stand build. I decided to build my own stand in order to offset the cost of the custom tank, lets face it, Reef Savvy is not cheap. Plus, it gave me something fun and entertaining to do. My main inspiration for my stand design came from d2mini's custom cube. This has to be one of my all time favorite threads: http://www.reefcentral.com/forums/sh...ht=d2mini+cube I liked the design for its simplicity and modern look. Granted, it doesn't match anything in my house, but it doesn't look too bad either. My wive axed the oversized lip, so I ended up just making it with a small trim piece. I also learned a lot browsing the various build threads, and sort of did a hybrid technique between Rocket Engineers template, and just using the plywood box method. It seems that a plywood box is strong enough to comfortably hold up a tank this size, but I wasn't comfortable enough to do just that. I used an internal frame of 1X lumber to both add some extra reinforcement and security, and ease of assembly. I tried to avoid the 2X4 construction to save on space and weight. It seems those stands are such overkill. Anyway, before undergoing that project, I decided to build my pimp daddy QT stand to sort of familiarize myself with working with wood, as I had little to no prior experience. That was my tester project to work out the kinks, and if you're interested it can be found here.... http://www.reefcentral.com/forums/sh....php?t=2160913 Another thing to note, is that all this was constructed with basic tools I borrowed from my dad. I used a circular saw, a chop saw, and a router. I could have done it with out the router, but it wouldn't have turned out as nice. So lets get to it...... I started with a plan. First step was to construct the inner frame. For this I used just 1X4 and 1X6 pine. Because I wanted no middle support for sump access, rocket engineer recommends 2X6 for the span I had, I decided to follow that rule. I used wood glue and a kreg jig for all the joinery. Rough sketch and some numbers....  All my tools and ready to go.....  My make shift work station. Forgive the ghetto-ness, but that's what I'm all about. I had to get creative, but it worked out. The chop saw was a breeze for cutting all the lumber.... 
|
|
|
|
|
07/23/2014, 11:56 AM
|
#42 |
|
Registered Member
Join Date: Feb 2008
Location: Miramar, FL
Posts: 7,518
|
What is the old saying, "measure twice, cut once". Well, I tried to take my time and minimize the screw-ups. Fortunately, I only screwed up at the very beginning, so I was able to quickly recover. So I chopped all the wood for the inner frame....
 Nice pile of straight wood....that doesn't sound right   Started laying down some pieces to see how they fit together. Took me forever to drill all the kreg holes!   I started assembling the frames. I used the nifty clamp that came with the kreg kit I bought. I can't say enough good things about the krek jig. Its awesome  Along the way, I was always checking for squareness, both before and after joining all the corners....  More ghetto work station creativity... 
|
|
|
|
|
07/23/2014, 12:05 PM
|
#43 |
|
Registered Member
Join Date: Feb 2008
Location: Miramar, FL
Posts: 7,518
|
All 4 panels put together....
 Now it was time to start joining them up! I first clamped everything together to see how it fit, and to check progress. Also, at this point I had not received my tank, so I was giddy just to see how big it would be  If you have a keen eye, its not clamped properly in the pic. I fixed that, LOL!  All joints were glued and screwed, and clamped tightly. I took my time to make sure it was as perfect as could be. One thing to note, is that I did this with all the kreg holes facing the OUTSIDE. I did this because I was planning on gluing the 3/4' ply skin to it, thus hiding all the holes. That was my smarty pants idea  I used corner clamps to hold everything in place....     Frame coming together.... 
|
|
|
|
|
07/23/2014, 12:22 PM
|
#44 |
|
Registered Member
Join Date: Feb 2008
Location: Miramar, FL
Posts: 7,518
|
Inner frame finished...
 I went ahead and decided to place the sump and skimmer, just to see if my measurements were OK. I slightly underestimated how huge the 40 BR sump would be....I'll post more on the sump build later...  I added some cross bracing. I probably should have added more on top. The bottom ones were to support the floor for the sump. I layed them flat for more vertical room inside the stand....  Next step was to cut the floor for the stand. I used a straight edge guide I bought at home depot for all my cuts, since I don't have or know anyone with a table saw. That would have made my job easier, but not totally necessary....   Fit like a glove....   No screws, just wood glue and assisted gravity, LOL! 
|
|
|
|
|
07/23/2014, 12:22 PM
|
#45 |
|
Registered Member
Join Date: Feb 2008
Location: Miramar, FL
Posts: 7,518
|
Next step, skin.....More to follow....

|
|
|
|
|
07/23/2014, 01:24 PM
|
#46 |
|
Registered Member
Join Date: Oct 2011
Posts: 1,580
|
Awesome build. Can't wait to see if fill in. PLEASE don't ruin the look of the tank by putting a top on it. Make your fish selection carefully and you won't have to worry about fish jumping out. I am over 1.5 years with my 105G rimless and no jumpers. All fish were selected for their compatibility. No conflicts = No jumpers.
__________________
105 Gallon Reef Savvy (48"x 24"X 21") Glass Holes overflow, 29G sump, Mag 12 return, Reef Octopus 150, 2- Jebo WP-25s, Phosoban reactor, 2 Ai Sol Blue's controlled by Reef Angle Controller. Last edited by treetopflyn; 07/23/2014 at 01:29 PM. |
|
|
|
|
07/23/2014, 03:14 PM
|
#47 | |
|
Registered Member
Join Date: Feb 2008
Location: Miramar, FL
Posts: 7,518
|
Quote:
 I think the only fish I'm considering that are jumpers are some wrasses. Was thinking of a flame or 2. I don't have a top on my 30 gallon, and only loss was a purple chromis, and they were always fighting, so it was only a matter of time I guess. We'll see. |
|
|
|
|
|
07/23/2014, 05:27 PM
|
#48 | |
|
Registered Member
Join Date: Oct 2011
Posts: 1,580
|
Quote:
__________________
105 Gallon Reef Savvy (48"x 24"X 21") Glass Holes overflow, 29G sump, Mag 12 return, Reef Octopus 150, 2- Jebo WP-25s, Phosoban reactor, 2 Ai Sol Blue's controlled by Reef Angle Controller. |
|
|
|
|
|
07/26/2014, 02:17 PM
|
#49 |
|
Registered Member
Join Date: Feb 2008
Location: Miramar, FL
Posts: 7,518
|
Lets continue with the onslaught of pics. Hopefully its not too much. I always enjoy threads with lots of pics, so here it my attempt.
So I painted the interior of the stand with Kills prime and paint. Seems its a popular choice. Only thing I noticed is that it retains a tacky feel. I always thought it was because the coats were too thick. I did like 2-3 coats.  Close up of the side. All these holes were covered with the "skin".  The reason I did the frame like I did, was because I decided to use the frame as a template for gluing in the skin. The Skin is 3/4" birch ply from home depot. I figured the skin itself is enough to support the tank, the frame was just added security, and made for a nice build. So I glued down the side and used some brad nails to secure, although probably not needed....  Then I used a router with a flush bit to cut it to size. So easy a caveman can do it.  Gluing the front. Using whatever I had in the garage for weight, including sand and salt   A pic of the router and how it works....  Before gluing the top, I laid everything out so I could start planning out the plumbing and placment of components....   I ended up with a better solution for the electronics. More on that later... Moving along.... 
|
|
|
|
|
07/26/2014, 02:22 PM
|
#50 |
|
Registered Member
Join Date: Feb 2008
Location: Miramar, FL
Posts: 7,518
|
Here I fabricated a makeshift guide to route out the pass through for the overflow...
 Stand "box" complete....  Here I was placing some tester pieces for the trim to start to get an idea on how I was going to lay anything out, and also to appreciate how things were coming together....  With "door"... 
|
|
|
|
 |
| Thread Tools | |
|
|


