
|
|
 07/24/2016, 04:58 PM
|
#1 |
|
Registered Member
Join Date: Nov 2003
Location: NC
Posts: 55
|
Planning a fish room
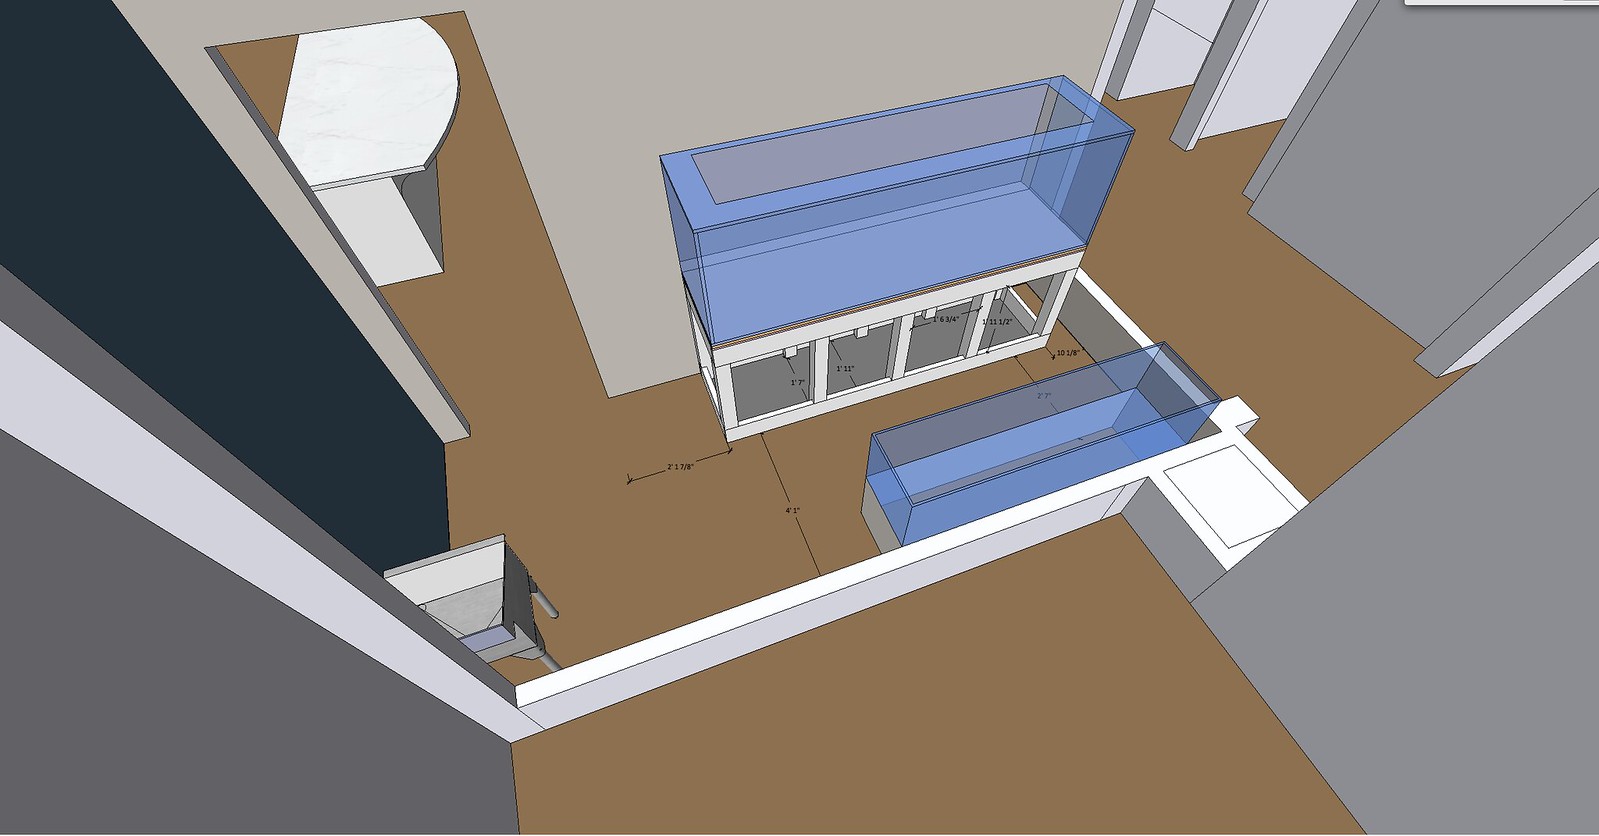
Was mocking up our house we are building in sketchup and was playing around with the fish room. I have been planning for a few months and we haven't even broke ground yet so we probably have at least 6 months before we even think about moving in. Anywho, was playing with the layout. We are planning a 96" l x 27" or 30" high x 30" depth. The fish room in about 14' x 6'. I have an old 90ish gallon 6ft tank I was thinking of setting up as the sump on it's own stand so I don't have to kneel over. What do you guys think of this. Trying to maximize room but I was thinking of getting the stuff out from under the tank. The return will probably be on the left side of the sump. Will run PVC for the overflows and return along the walls that are lowered so I can see in the room. Figured it would be about a 14' run with about 3' of height to the return. Was thinking of a Vectra or some other DC pump. Also want to put a dosing type station probably to the left of the sump tank. Thinking a fold down type table top next to the sink. The garage is right behind that long lowered wall. I will have a couple 50 or 100 gallon barrels out there. What do you all think of the layout? I still also haven't decided on a steel stand or would. Just made a wood one just to mock up something. Wanted to make sure I am heading down the right path before I start messing with mocking up plumbing. Hope all that rambling makes sense. oh, forgot to add. I taped out the 2' 7", it's not too tight. I was surprised. Can get my ladder in there and all. I used my existing tank and some bar top chairs for the sump. Thanks!
Last edited by angnak; 07/24/2016 at 05:08 PM. |

|

|
|
07/24/2016, 06:47 PM
|
#2 |
|
Registered Member
Join Date: Nov 2003
Location: NC
Posts: 55
|
Meant to add that I was thinking the overflow would be on the right side of the tank from this view
|
|
|
|
|
07/25/2016, 10:53 PM
|
#3 |
|
Registered Member
Join Date: Jun 2016
Location: Earth
Posts: 88
|
I know you're asking about pumps mostly...I don't know about that. ..
I do know about chilling. .. 2.5 feet might fit your ladder. ..but where does your chair and beer table go? I'm just saying... sounds like you're early enough in the process to incorporate more room for chilling... I look at the mockup and I feel like you're gonna be crouching in that little tunnel to get any decent view. ..and even then it's like sitting in the front row at the movies Or tear out the wall so you can see it from the. ..kitchen? back there |
|
|
|
|
07/26/2016, 05:54 AM
|
#4 |
|
Registered Member
Join Date: Nov 2003
Location: NC
Posts: 55
|
Thanks for the reply. Oh I plan on having a place to sit and enjoy that tank. That's just the room for the tank. You see the counter in the door way. You are right about the kitchen but it will be viewable on the other side of the wall. In front of that island is the living room where I will spend most of my time. I can post a pic later. I will make it smaller than above. ��
I was wondering about pumps but more on the layout. Just looking for some experience with tighter fish rooms. I don't mind having the filtration under the main tank but it gets annoying now so I was just trying to maximize the floor space in the room and make it easier to get to the components in the sump. |
|
|
|
|
07/26/2016, 06:46 AM
|
#5 |
|
Registered Member
 Join Date: Mar 2012
Location: Boca Raton,Florida
Posts: 447
|
I have a thin fish room also. 6 x 20. I thought it out carefully while I was building and the plan worked.Check out my photos for the plan.I do not have my sump under the tank.
__________________
Ricardo 18 Current Tank Info: 500 gallon display,650 system Lifereef Skimmer Ozone UV Apex Radion Genesis |
|
|
|
|
07/26/2016, 10:02 AM
|
#6 |
|
Registered Member

Join Date: Apr 2015
Posts: 143
|
If it was me I would open it up more behind the tank and utilize the wall space on the right side of the tank (away from door). Get a 75 gallon or some 48" or less sump on that wall. This then frees up the current sump space for ATO storage tank, work bench, chair, quarantine etc. It would also make the plumbing easier to the sump.
The only issue I can think of with having the sump up high is drainage/flow rate potential issues. |
|
|
|
|
07/26/2016, 10:48 AM
|
#7 |
|
Registered Member
Join Date: Nov 2003
Location: NC
Posts: 55
|
Thanks, Ricardo. I just saw your thread last night and I have it on the reading list for today.
I thought about that wall and didn't go into it much above because I was already rambling enough about everything else. That big square dead space in the pushed down wall to the right of the sump tank, that may be the exchange for the room the builder said. Nothing definite yet but if that is the case that 6' tank will have to be moved down some out of the way. I can still use that wall some obviously but with the exchange there, I would need to make sure I am not blocking it too much. I do agree that that wall would be best. I was also worried about being able to access that right side of the tank if I put something along that wall. The space to the left, when looking at the photo, of the sump would be where I would put a table/bench, QT tank, etc... I was thinking of building a rack type thing that I can put the QT up at eye level and have a bench under it for some equipment. Plus was thinking underneath the sump there could be some storage stuff. Haven't had too much time the last couple days to play around with adding those thoughts to the plan yet. I will try to get some stuff added tonight and repost an updated pic of what I am talking about. Thanks again! |
|
|
|
|
07/26/2016, 08:12 PM
|
#8 |
|
Registered Member
Join Date: Jul 2011
Location: O-H I-O
Posts: 67
|
 Sent from my HTC6535LVW using Tapatalk |
|
|
|
|
07/26/2016, 08:13 PM
|
#9 |
|
Registered Member
Join Date: Jul 2011
Location: O-H I-O
Posts: 67
|
This is under my stairs and the tank is on the other side of the wall . Tight space but it's not that big of a hassle really . I'm sure it will all turn out great ! Keep updates I'd like to see what you end up doing with it .
Sent from my HTC6535LVW using Tapatalk |
|
|
|
|
07/27/2016, 09:20 AM
|
#10 |
|
Registered Member
Join Date: Feb 2014
Posts: 238
|
Where's the frag tank going? Now's the time to plan ahead. I just went through a remodel/addition. Are you running a separate circuit for the fish room? How are you dealing with humidity? Are you feeding the room with HVAC?
Sent from my XT1096 using Tapatalk |
|
|
|
|
07/27/2016, 11:29 AM
|
#11 |
|
Registered Member
Join Date: Nov 2003
Location: NC
Posts: 55
|
Thanks Dwarf_angels for the pic and feedback. I will probably start a new thread in the build forum once we get started and keep this one for planning.
Definitely the time to plan Tommy. The rack, I for some reason call it a rack but it is just some stand/shelf type things, like below is what I was thinking next to the sump tank in between the sink and sump for the QT/Frag area. The room will be in with the HVAC. Going to discuss more with the builder and HVAC guy on if it will be enough so we can determine if the dehumidifier is or is not needed. Will have a drain on the floor. Was looking into some of the fiber glass/plastic drain flooring too so it wouldn't get slippery in there. I just grabbed this off google images but here is the link to the room. https://www.youtube.com/watch?v=F5mACz6Awew I haven't watched it yet. Just grabbed the pic for reference. I was thinking the QT/Frag tank could be up on the top level around eye height. Will have a workbench or something below or one that can fold down from the wall to the left of the sink. The ceilings will be 10' in the room. My current setup has a nice sump that I may just keep for the equipment and plumb in a refuge. The sump is 39" long. Maybe set that where the 6' sump tank is in the original picture and plumb the refuge under it to save room. The part that bugs me about something underneath is trying to get equipment in and out and with the sump on top of the fuge, maybe that will help. Still working on the layout. I appreciate the feedback so far everyone. I will try to work on getting these ideas in the plan and post a new layout soon. |
|
|
|
|
07/27/2016, 02:05 PM
|
#12 |
|
Registered Member
Join Date: Feb 2014
Posts: 238
|
I think you'll be surprised at the effectiveness of have the room fed by HVAC and then using an exhaust fan on a humidistat to pull the warm air out. My system is only about 250g and my fish room is 5*10. I have one HVAC register coming in from the ceiling and a DC powered Panasonic exhaust fan. Iv had no need for a chiller so far this summer and the tank hasn't gotten above 79. I don't run my ac all day either. Set to 78 during the day. 75 in the evening. With these larger water volumes it takes a lot to get the tank temp moving. Male sure you use the mold resistant drywall in that fish room also.
Sent from my XT1096 using Tapatalk |
|
|
|
|
07/31/2016, 04:53 PM
|
#13 |
|
Registered Member
Join Date: Nov 2003
Location: NC
Posts: 55
|
Thanks, tommyboynj. Good to hear about adding in the HVAC. I will definitely be using the mold resistant drywall.
Been kind of crazy but finally started working on the room. The more and more I added the stuff I want to do the more cramped it got with that 6' tank sitting in there. There may be a change in where the door way wall will be so I went ahead and planned for it with that in mind. If it goes back to the look of the photo above then I gain some room. So I started thinking about my current sump and what bugs me the most and it is the lack of room underneath. So I looked into some stands to maybe have a larger span and found the wood stand post from rocket here on RC. Now I didn't read all of it and my plan may not work but we will see. Here is what I have. It is in X-ray so you can see the braces. 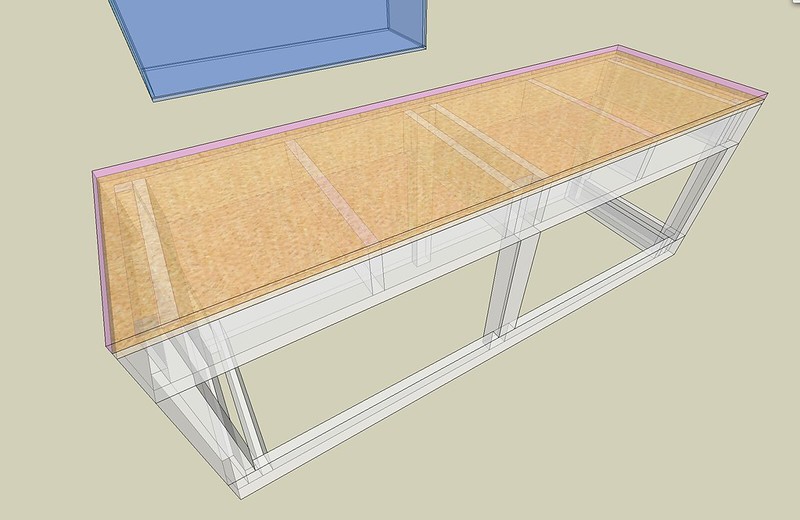 The pink is just a layer of some foam/place holder for planning. Next is the 3/4" plywood and that will sit on 2"x8"s. I added some 2x8 braces in there too. Then notched 4x4 post at the corners and 4x4s in the middle to support the span. Those will be notched and resting on 2x6s with a couple braces on the ends. Open to changes if needed. Can do 2x4s instead of 4x4s and 2x4s as the screw plates behind them. The stand for that 6' tank has 2x4s instead of 4x4s. Figured the notching may be the problem. Open to anything even steel but trying to save some $. The stand would be over all 36". Leaves the "doorways" at 42"w x 21"h. From floor to bottom of plywood about 34 1/4" and about 27" from the floor to the bottom of the braces. That is about 8" more room than I currently have in head room for pulling equipment out. My current openings under my tank are 16" w x 21" h. one frame is right in the middle of the sump below. On the saving money front I thought I could recycle my current sump and just modify it a bit to help out. Here is my sump. 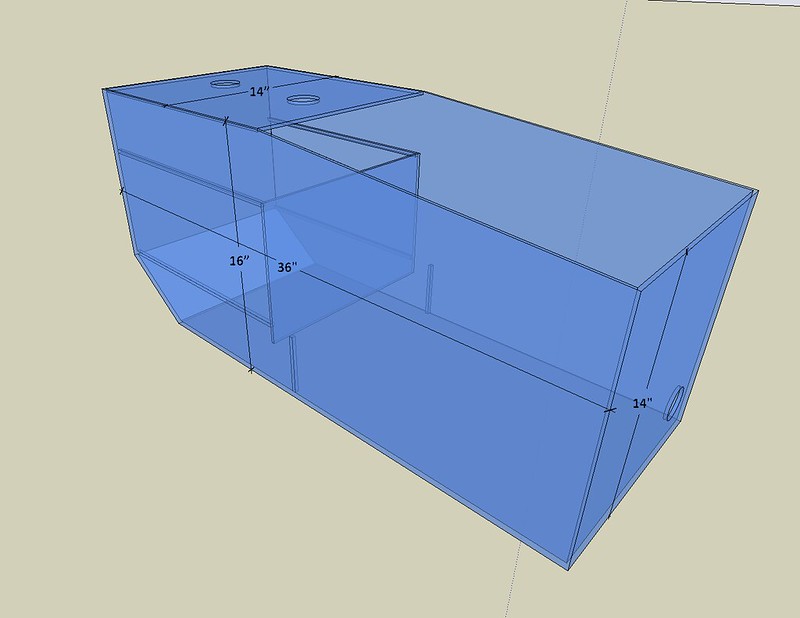 It was a trickle type and I took out the trays and on the left side I have some rubble and a couple filter bags over my pvc coming into the sump. The right side holds my skimmer and my return pump. There is an outlet on the ride side but I have that capped off currently. I was thinking of cutting open the left top side some and putting in a piece of acrylic on the two top bars where the old trays were. I have an ASM G4 skimmer I was hoping to keep using but it will be cutting in close on the new tank size. I always wanted to do those mods to it but never did. Might do it now to make it perform better but I have never had a complaint out of it as is. I would now take advantage of the outlet on the right side and tie a refuge into it. Now the outlet is only 1" so that may not be feasible. I could always keep it capped and add a larger hole to the other side. I can also add some probe holders, another one of my current complaints because I don't have one. Thoughts on the semi plan so far? Here is the possible new layout of the room. 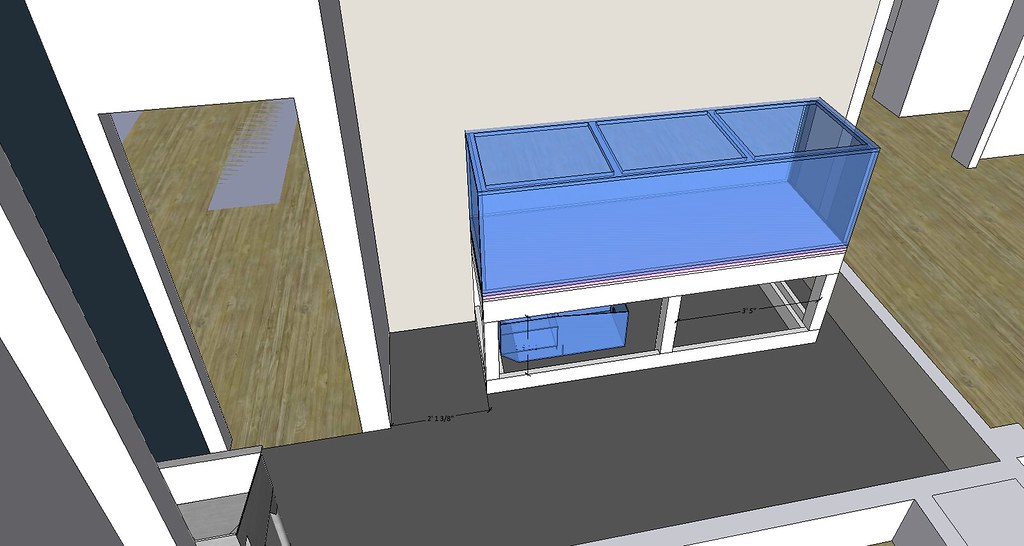 See how the doorway wall is in the room more now. That is because we are going to have a door that looks like a tall cabinet in the kitchen to hide the door into the room. This would leave the area I had the 6' tank at for the QT/Hospital and the frag tanks. Then the bench area next to the sink. I was thinking of getting the synergy ghost overflow and thinking of putting it on the left side of the tank in the pic above. That gives me a little more room to fix the plumbing than the right side like I was thinking before. Now there is also another possibility that this room will need to be down a couple steps which then will make my stand taller and even more room underneath. Thoughts so far on the plans? Thanks for reading this long post. Here is a pic of what I am talking about for the hidden door. Kind of like yours, ricardo. 
Last edited by angnak; 07/31/2016 at 05:31 PM. |
|
|
|
|
08/01/2016, 04:22 PM
|
#14 |
|
Registered Member
Join Date: Oct 2001
Location: Longmont, CO
Posts: 1,889
|
Not to hijack your thread, I'm building a new under stairs fish equip room and would be grateful for any advice/thoughts that you all have. Thread is here:
http://reefcentral.com/forums/showthread.php?t=2592544 Sorry for the interruption. We will now resume your normally scheduled programming.
__________________
Some days it's not even worth chewing through the restraints. Current Tank Info: 250g starphire: 72x28x30, BeanAnimal drain with an oversized non-durso emergency drain, 4 inch DSB, 3x Reefbreeders Value LED fixtures, SWC/MSX 300A skimmer, Geo kalk reactor, 3 Vortechs w/bb, carbon reactor, and a RKL |
|
|
|
|
02/19/2017, 02:03 PM
|
#15 | |
|
Registered Member
Join Date: Feb 2016
Posts: 34
|
Quote:
|
|
|
|
|
|
02/19/2017, 05:11 PM
|
#16 |
|
Fish Nerd
Join Date: Feb 2014
Location: Pittsburgh, PA
Posts: 378
|
These are my thoughts, based on my somewhat limited experience with a small fish room.
1) Make sure you include a floor drain (not sure if that is included with the sink). Spills happen, so you need some way to handle the mess. Putting your fish room a couple of steps down from the rest of the living space also isn't a bad idea. It will help to keep any spills contained (hopefully you never have to test it). Make sure whatever floor you put in can handle the occasional spills. 2) As already mentioned, make sure you have some way to deal with humidity. You don't want a dehumidifier sitting in the middle of your somewhat cramped fish room. 3) If you use Rocket's design you won't need a center brace, which makes the sump more accessible. 2x4s are better than notched 4x4s since they are less prone to warping/twisting as they dry. 4) Try to include a means to access the tank from the front. With a tank this size, it's difficult to reach the sandbed at the front of the tank from the fish room. Your overflow and possibly the drain/return lines will be in the way. 5) Don't forget to plan a space for your RO/DI. It can be with your storage tanks or in the fish room, but plan a space that is accessible so that changing filters/media is not such a chore. 6) Don't forget storage. You can never have enough shelves or cabinets. - Ivan
__________________
225 mixed reef (72"x30"x24") started 2/4/17 http://www.reefcentral.com/forums/showthread.php?t=2559165 Current Tank Info: Slowly stocking.... |
|
|
|
 |
| Thread Tools | |
|
|


