
|
|
|
|||||||
 |
| Thread Tools |
 04/01/2008, 07:16 AM
|
#76 |
|
Registered Member
Join Date: Apr 2007
Location: Virginia
Posts: 2,230
|
It's lookin very nice! Keep it up!
|

|

|
|
04/01/2008, 07:26 AM
|
#77 |
|
Registered Member
 Join Date: Dec 2003
Location: Denver, Colorado
Posts: 9,579
|
Thanks very much, edwing206 and bues 0022, greatly appreciated.
__________________
Make it a Great Day!!!! Current Tank Info: 60 gal SPS cube, with 25 gal refugium, 400W MH, DIY Lumenarc III, DIY skimmer, DIY stand and canopy. 40 breeder LPS with 40 gallon sump, DIY stand, 250W MH |
|
|
|
|
04/01/2008, 07:46 AM
|
#78 |
|
Registered Member

Join Date: Oct 2006
Location: Cincinnati, OH
Posts: 1,234
|
Very impressive handy work! That stank looks VERY solid. I'm sure it could hold up a tank 5 times as heavy! I also really like all the careful attention to detail and neatness of it all. The fans, the pump mounting..all very nicely done. Keep those pics coming!
|
|
|
|
|
04/01/2008, 09:31 AM
|
#79 |
|
Registered Member
Join Date: Dec 2003
Location: Denver, Colorado
Posts: 9,579
|
Thanks so much hatfielj, I try to pay attention to what I am doing. And yes the stand is pretty structuraly sound, I had a buddy ask "what kind of tank are you putting on it, a SHERMAN tank?".
I like the piece of mind knowing things are over built, I like sleeping at night.
__________________
Make it a Great Day!!!! Current Tank Info: 60 gal SPS cube, with 25 gal refugium, 400W MH, DIY Lumenarc III, DIY skimmer, DIY stand and canopy. 40 breeder LPS with 40 gallon sump, DIY stand, 250W MH |
|
|
|
|
04/02/2008, 10:30 PM
|
#80 |
|
Registered Member
Join Date: Dec 2003
Location: Denver, Colorado
Posts: 9,579
|
Ok so I started construction on the canopy. It will be MUCH MUCH easier than the stand and much lighter weight. I will face it with the same Oak and stain and poly it the same, obviously.
I am very very happy with the outcome of the tank. The actual Dimensions of the tank are 24" X 24" X 26" high. The reason for the 26" high, is that I wanted 1' of trim on the bottom, and 1" of trim on the top, but still wanted a full 24" X 24" viewing widow. The tank is made of 1/2" material. Inside, actual water volume will be just over 56 gallons. One of the things I see out there is when people measure volume of a tank is that they measure outside dimensions. Using the outside dimensions of my tank the volume come up just under 65 gallons. That is a pretty significant difference, when figuring any dosing or the such. Just something to consider. Thanks again for looking and I will keep everyone posed as I progress. Spleify
__________________
Make it a Great Day!!!! Current Tank Info: 60 gal SPS cube, with 25 gal refugium, 400W MH, DIY Lumenarc III, DIY skimmer, DIY stand and canopy. 40 breeder LPS with 40 gallon sump, DIY stand, 250W MH |
|
|
|
|
04/03/2008, 07:31 AM
|
#81 |
|
Registered Member
Join Date: Apr 2007
Location: Virginia
Posts: 2,230
|
I think you have a good point when calculating water volume. Mostly, it won't make too big of a difference with glass because it's so thin, but your acrylic is very think for that size of a tank, and it deffinately comes into play.
|
|
|
|
|
04/12/2008, 05:26 PM
|
#82 |
|
Registered Member
Join Date: Nov 2004
Location: Grand Rapids, MI
Posts: 344
|
That's an awesome stand..thinking about doing something similar. Any updates?
__________________
DEW Current Tank Info: 50 Gallon Shallow Reef |
|
|
|
|
04/12/2008, 05:27 PM
|
#83 |
|
Registered Member
Join Date: Nov 2004
Location: Grand Rapids, MI
Posts: 344
|
sorry double post
__________________
DEW Current Tank Info: 50 Gallon Shallow Reef Last edited by dew9000; 04/12/2008 at 05:32 PM. |
|
|
|
|
04/12/2008, 06:40 PM
|
#84 |
|
Registered Member
Join Date: Dec 2003
Location: Denver, Colorado
Posts: 9,579
|
Hey thanks dew, I actually got just got back in from working on the canopy. I put the first coat of stain on it, and then put all the trim on. I have a molding on the bottom of it and dentil crown molding at the top. I just puttied all the nail holes and am waiting for it to dry. I will put a single coat on the trim and then proceed with coating the whole thing 3 more times, then on to poly. I will try and update further and post some pics tonight or tomorrow.
Spleify
__________________
Make it a Great Day!!!! Current Tank Info: 60 gal SPS cube, with 25 gal refugium, 400W MH, DIY Lumenarc III, DIY skimmer, DIY stand and canopy. 40 breeder LPS with 40 gallon sump, DIY stand, 250W MH |
|
|
|
|
04/12/2008, 11:21 PM
|
#85 |
|
Registered Member
Join Date: Dec 2003
Location: Denver, Colorado
Posts: 9,579
|
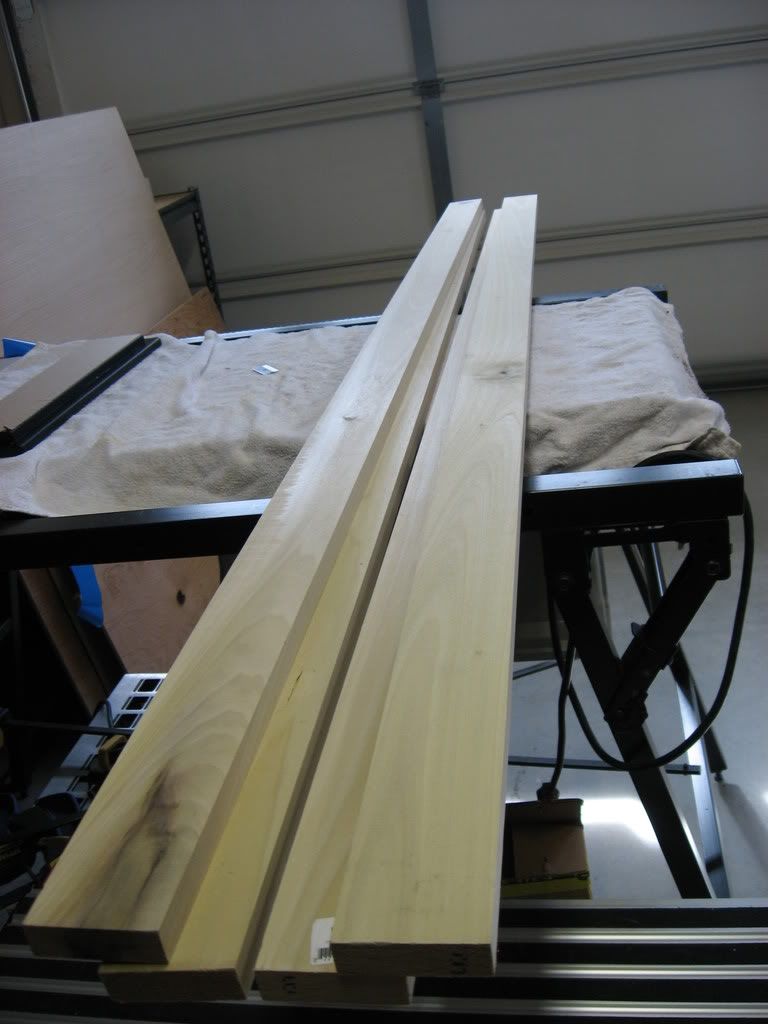
Ok so there has been some progress made. I am working on the canopy now. I started with some simple poplar wood for the framing. Light and easy to work with.
 Cut them down, then clamped them to make sure they were cut to EXACT size. 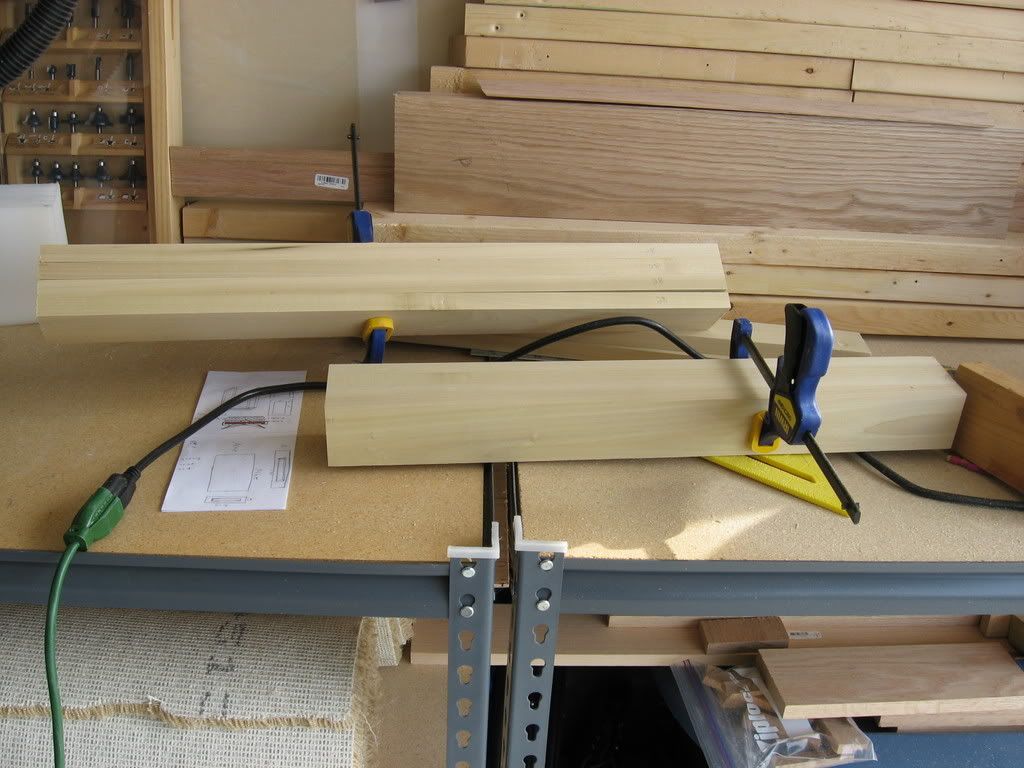 These are the verticals. 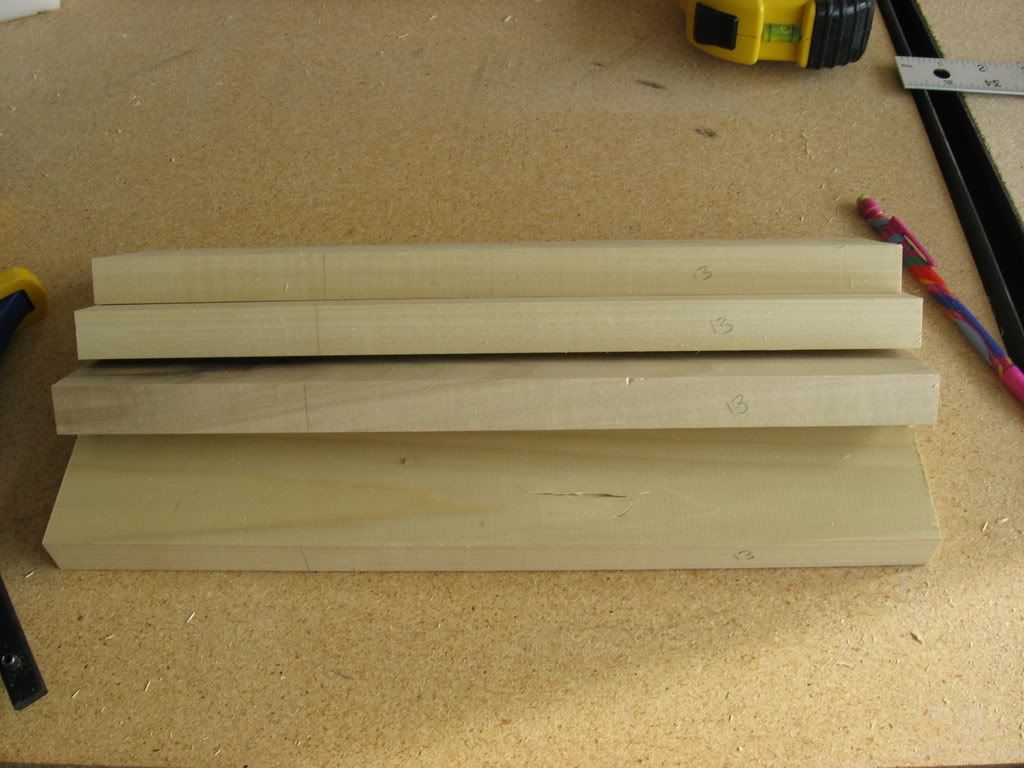 Here are the top and bottom frames. All joints were biscuited and glued then clamped until dry. 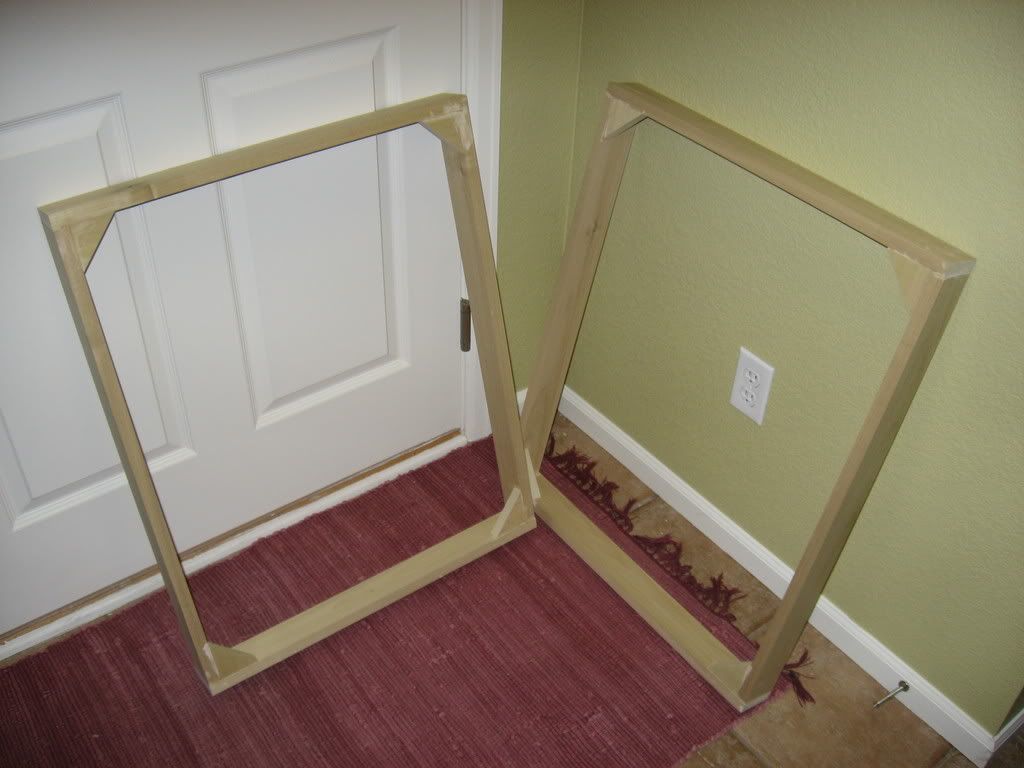 Alright, sorry for missing so much but here it is pretty close to being finished. I used 3/16" thick red oak, for the facing, sticking with the theme of keeping this thing as light as possible light. Then used the same trim on the bottom of it and like said earlier, dentil crown molding for the top. 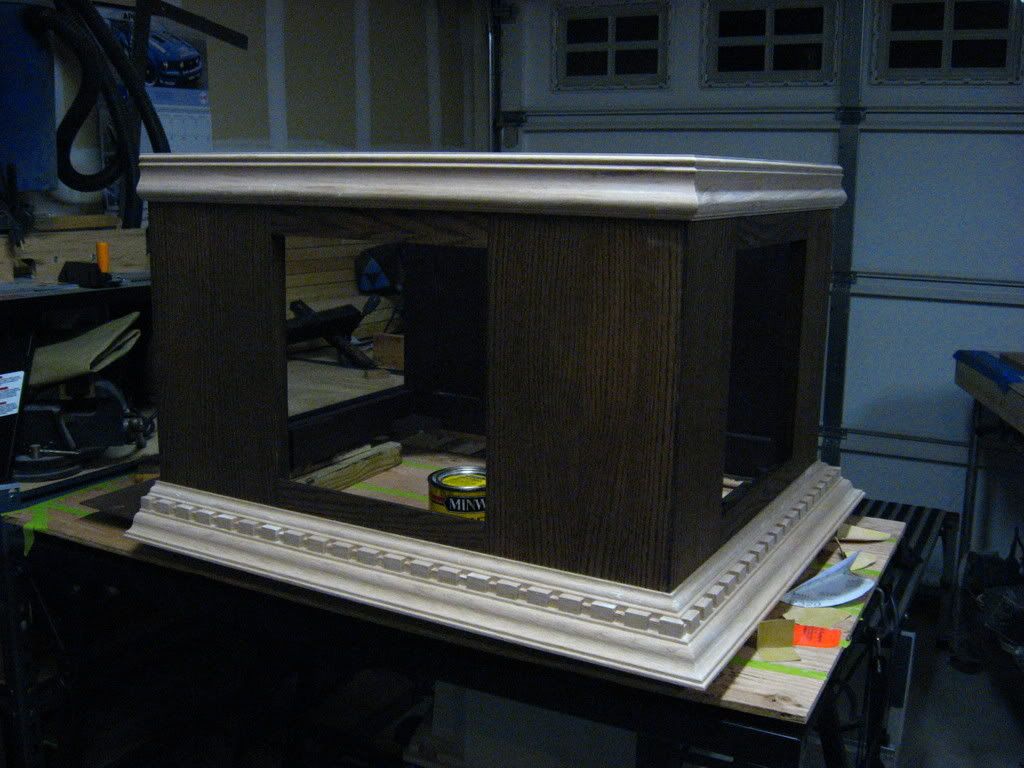 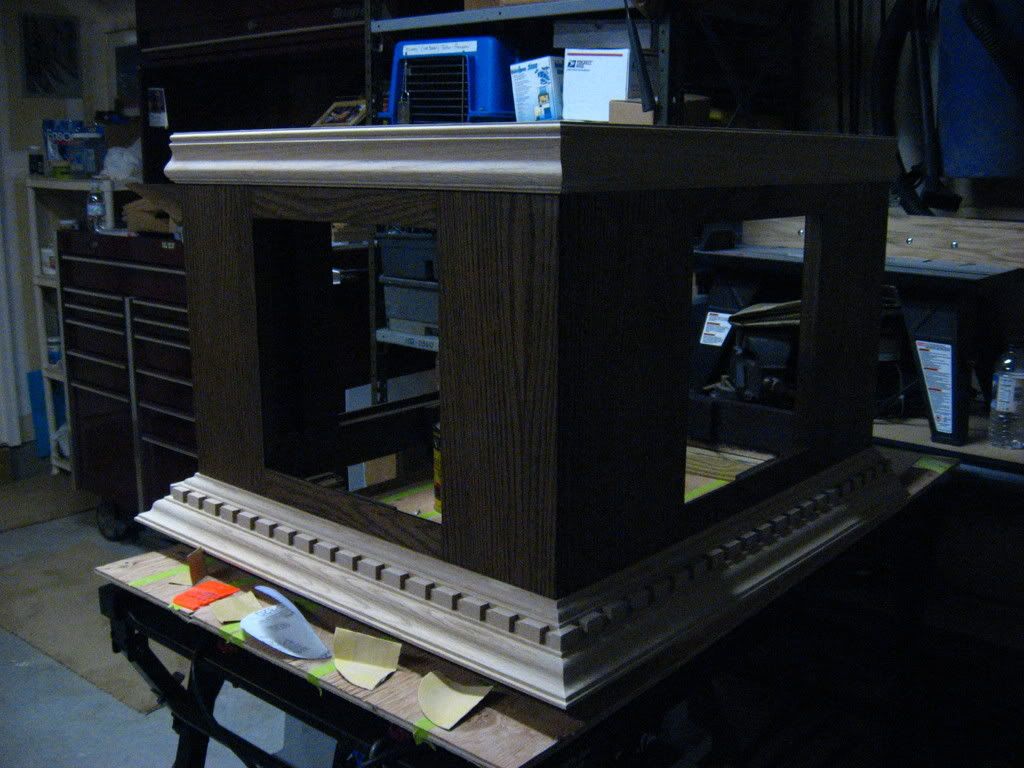 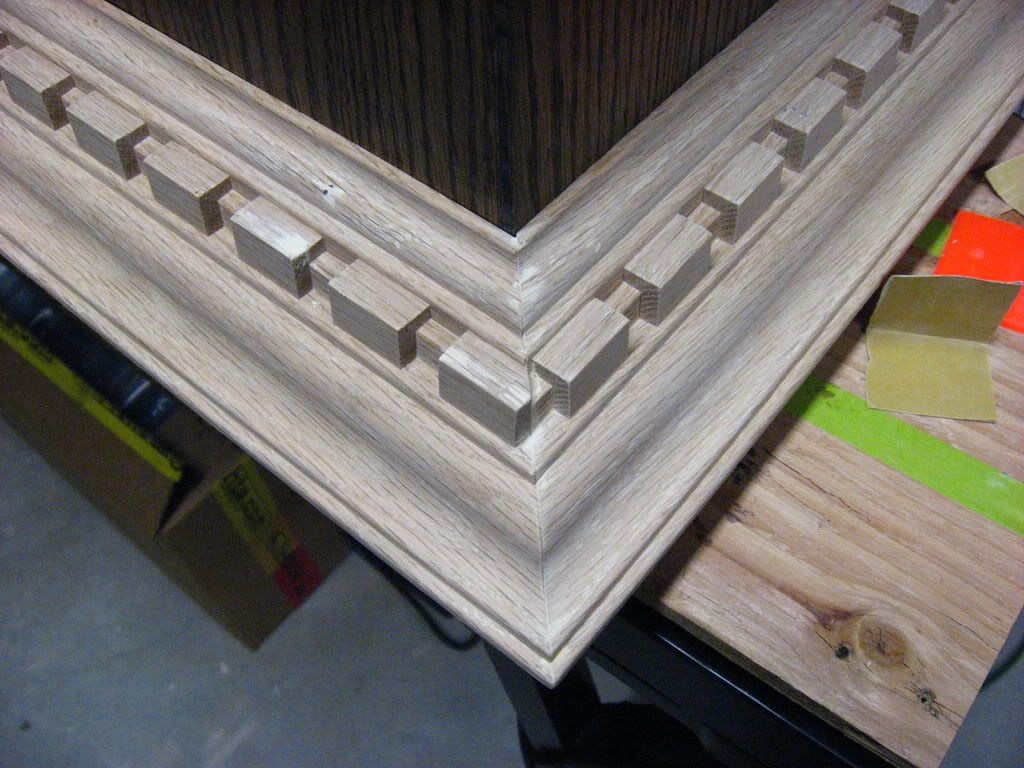 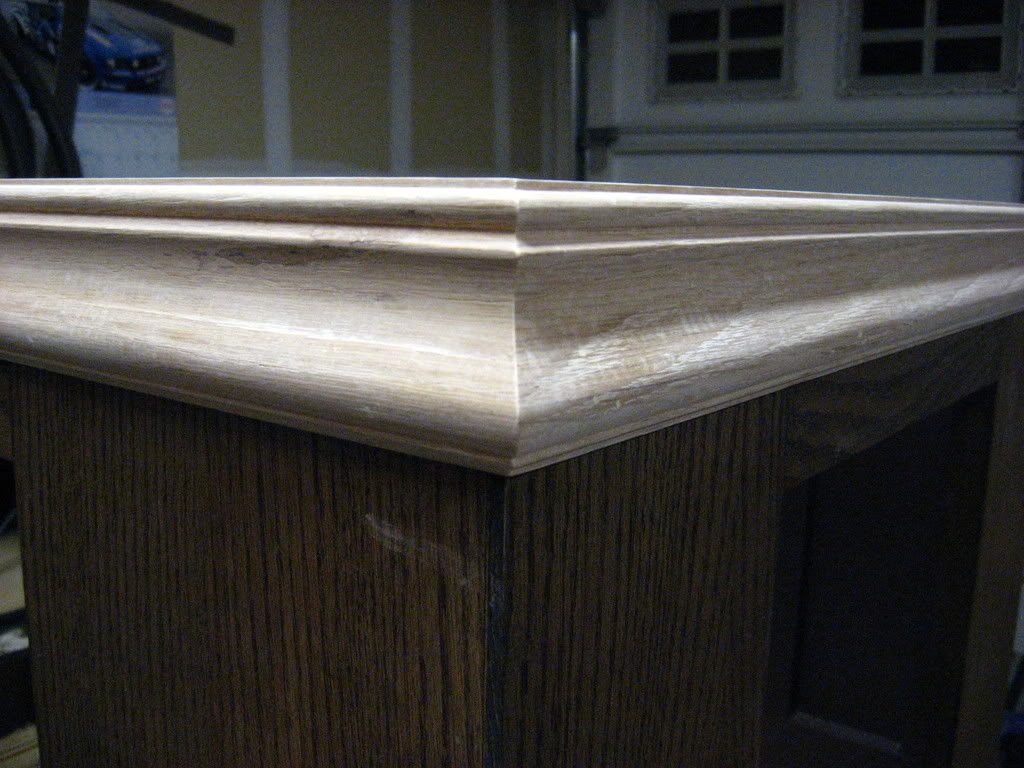
__________________
Make it a Great Day!!!! Current Tank Info: 60 gal SPS cube, with 25 gal refugium, 400W MH, DIY Lumenarc III, DIY skimmer, DIY stand and canopy. 40 breeder LPS with 40 gallon sump, DIY stand, 250W MH |
|
|
|
|
04/12/2008, 11:43 PM
|
#86 |
|
Registered Member
Join Date: Dec 2003
Location: Denver, Colorado
Posts: 9,579
|
I put one coat of stain under the trim, so at least it had some type of protection under it.
So I had to see what it looked like, and to make sure it was gonna fit. And it does, like a glove. 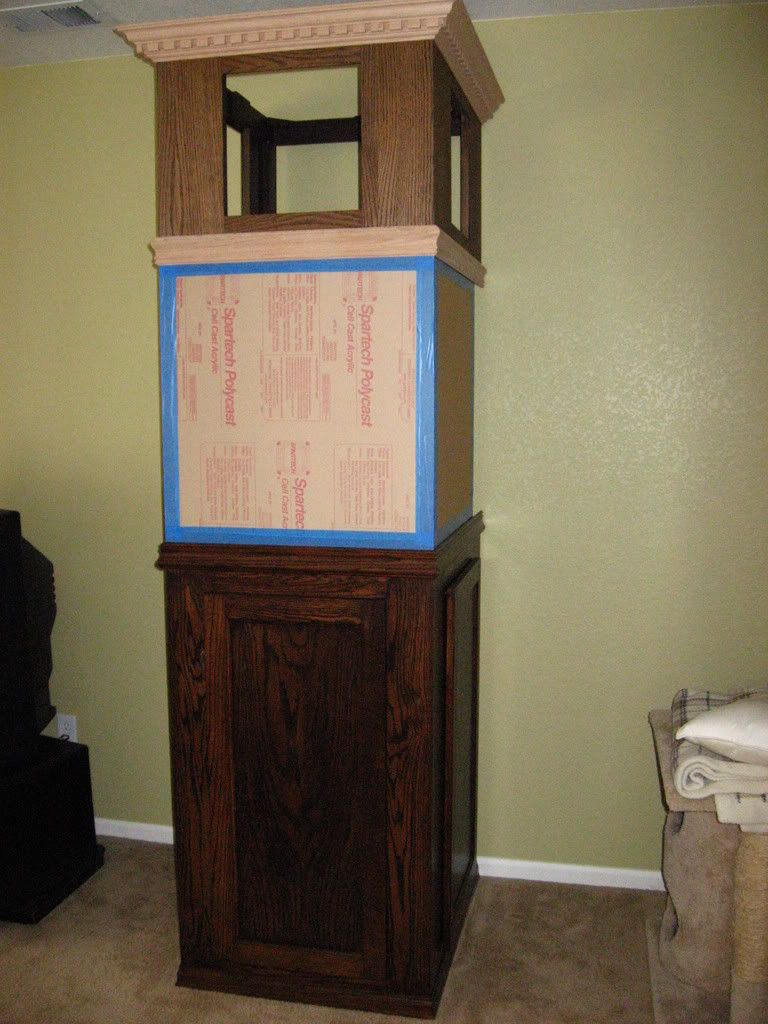 Right about now I'm thinking, "yeah a stool is probably in order" I guess I will have to make one of those now. 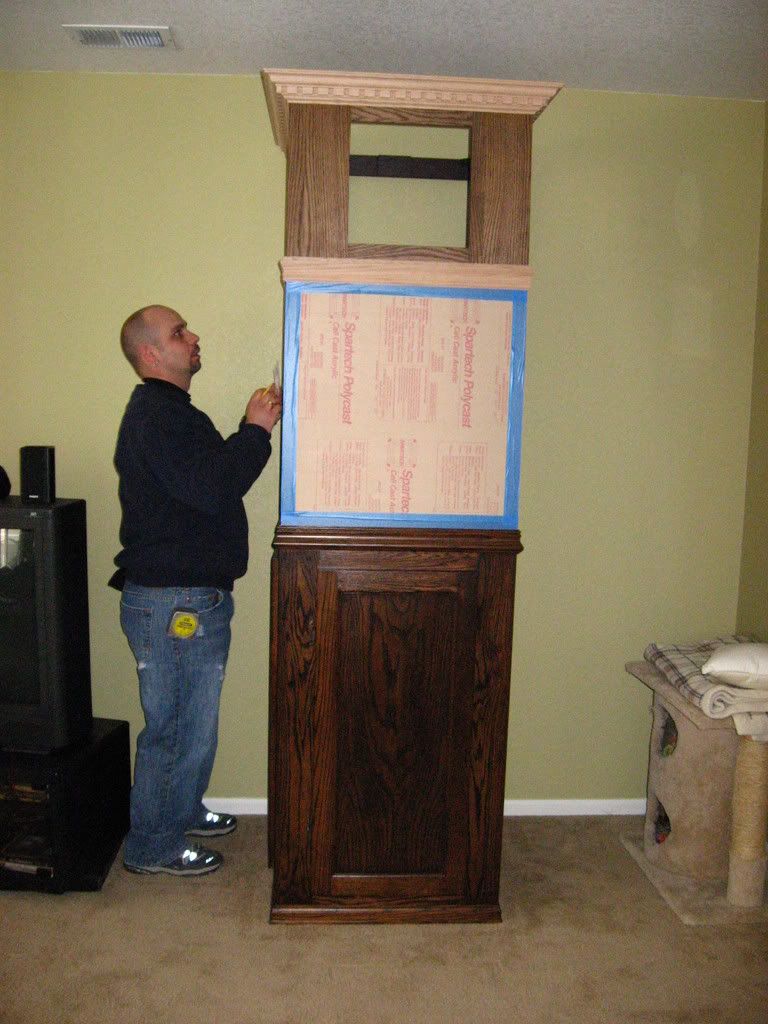 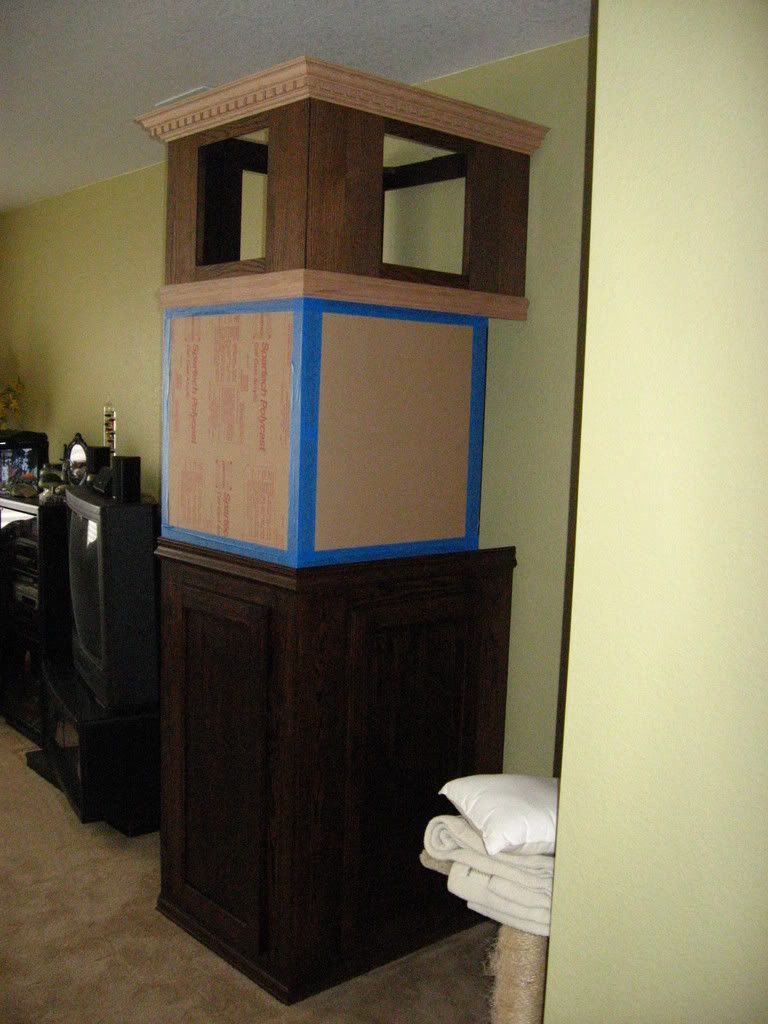 Ok back off and out into the garage to stain the trim. 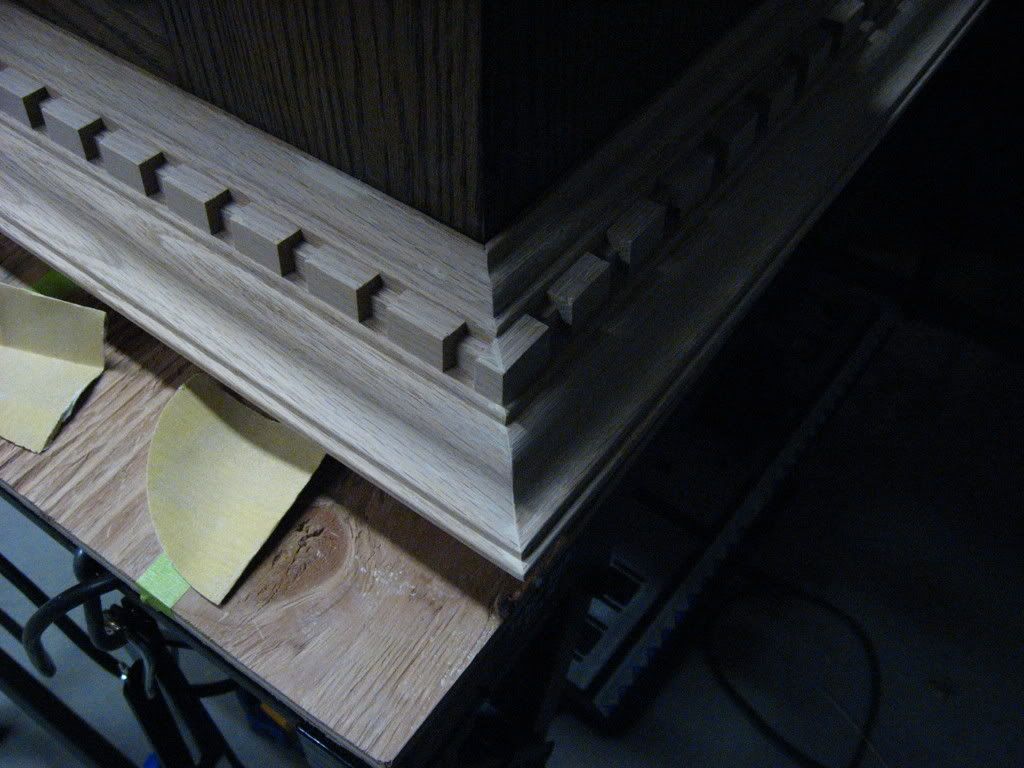 I had to use a brush and individually stain each tooth. This is gonna suck to do 3 more times. 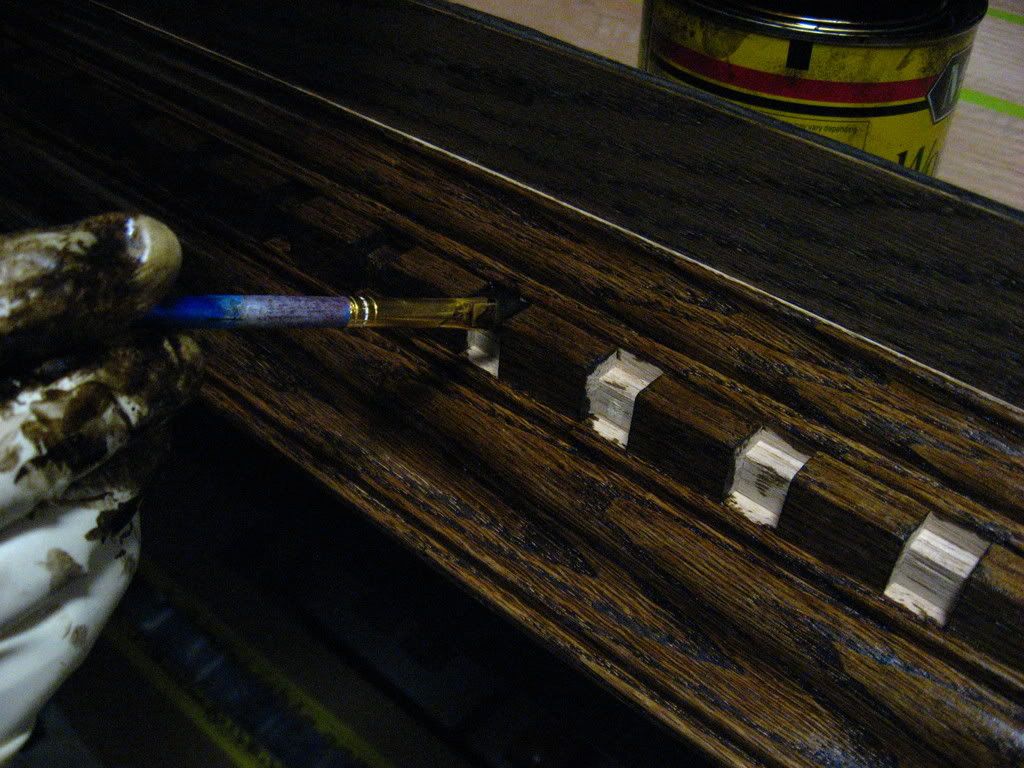 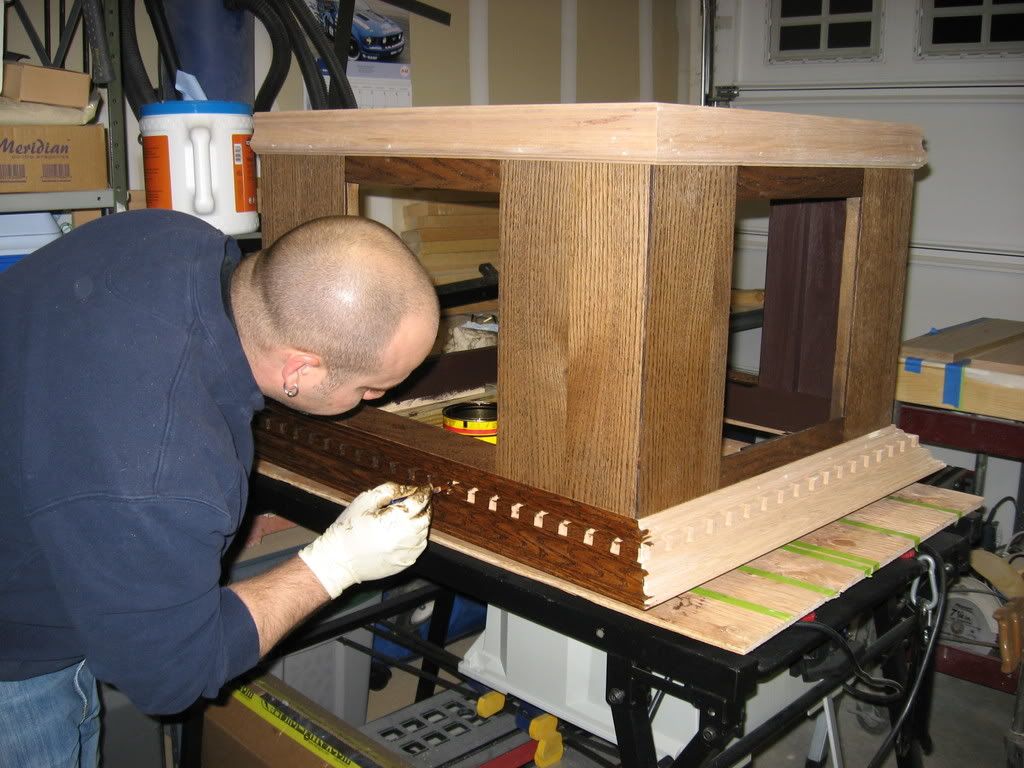 Got it all coated. 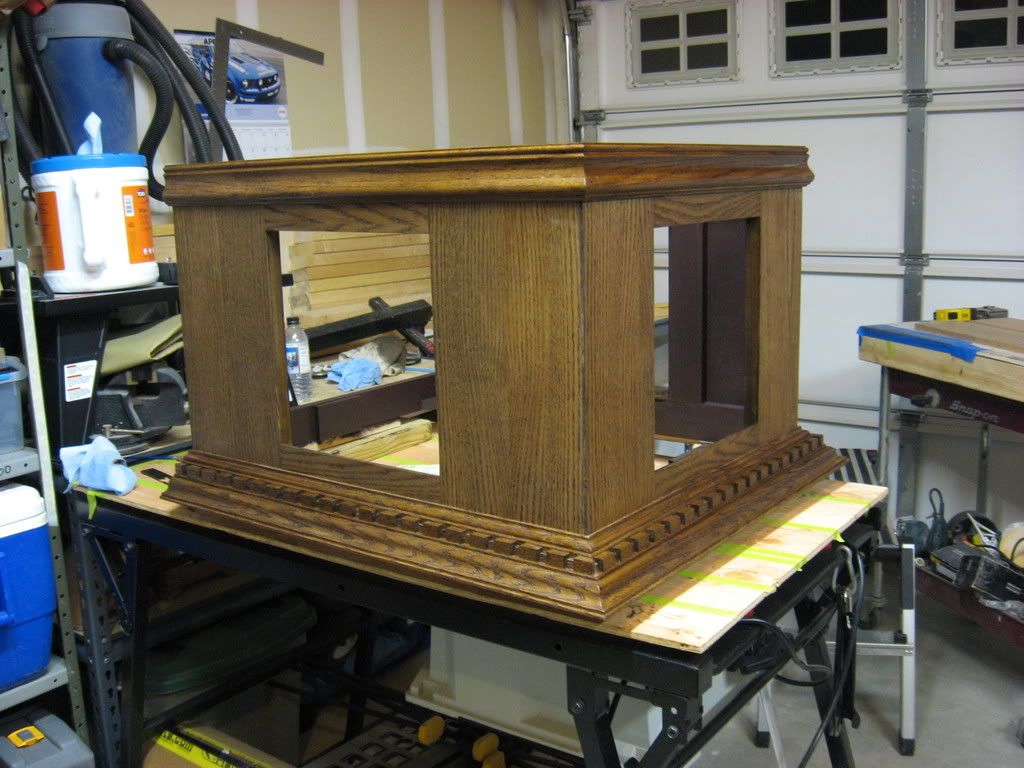 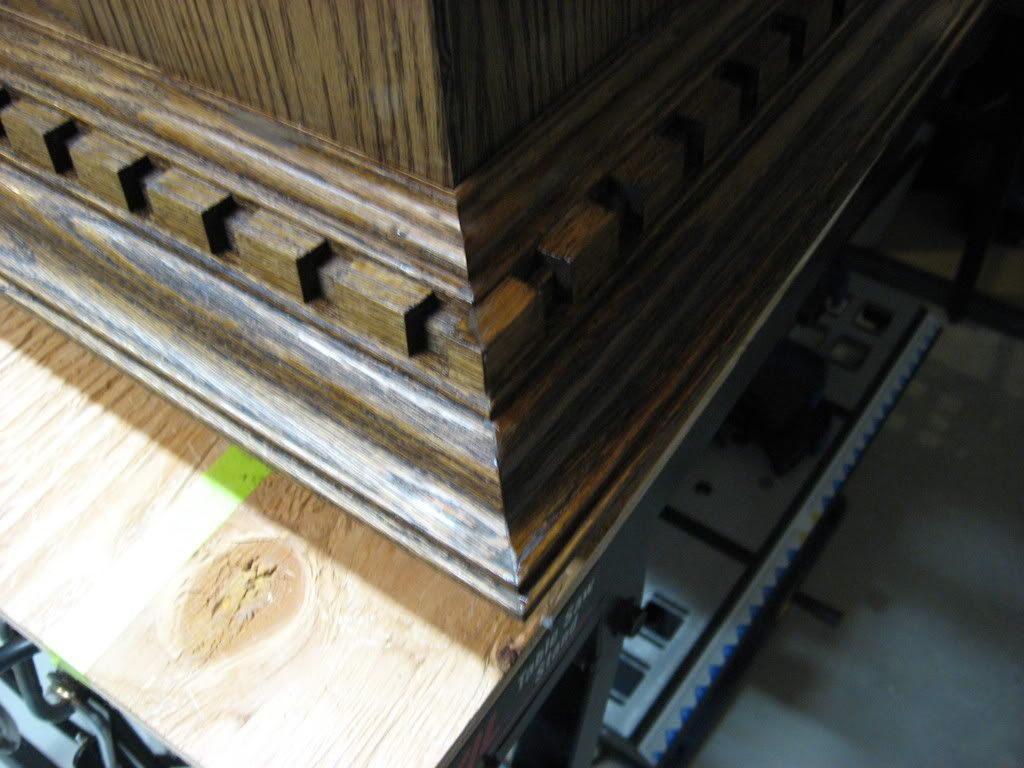 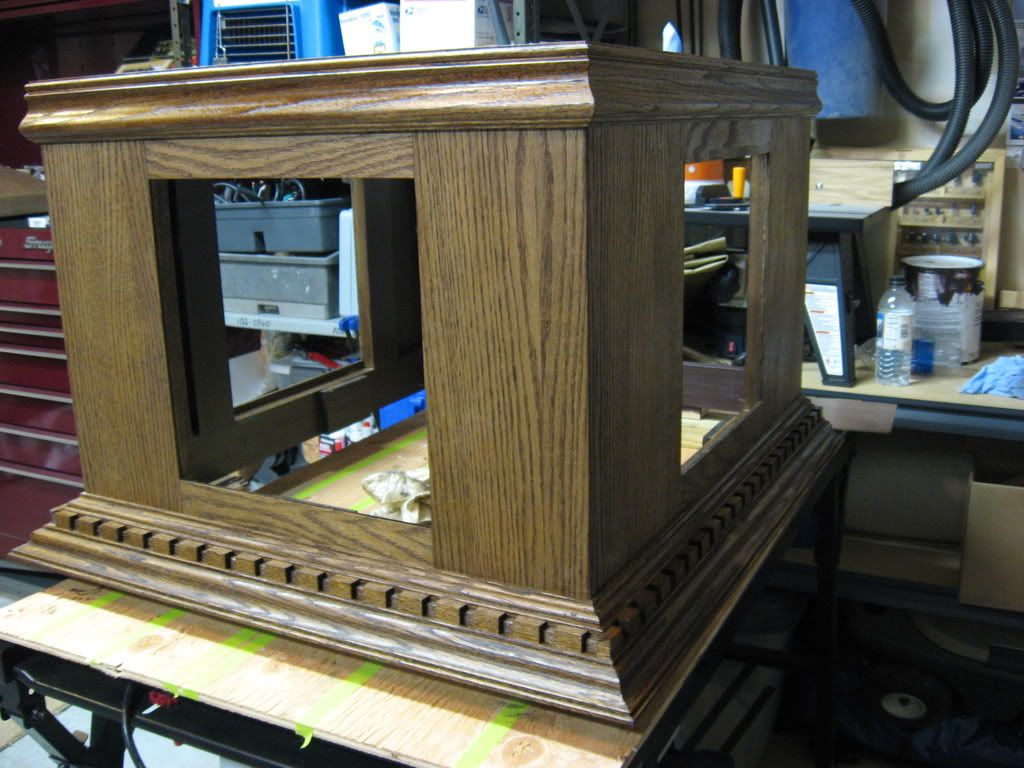 I should get some more done tomorrow and will try and update what I've done. Thanks for looking Spleify
__________________
Make it a Great Day!!!! Current Tank Info: 60 gal SPS cube, with 25 gal refugium, 400W MH, DIY Lumenarc III, DIY skimmer, DIY stand and canopy. 40 breeder LPS with 40 gallon sump, DIY stand, 250W MH |
|
|
|
|
04/13/2008, 08:24 AM
|
#87 |
|
Premium Member

Join Date: Oct 2007
Location: Norway
Posts: 45
|
Great carpenter work here and looking forward til the tank is filled

|
|
|
|
|
04/13/2008, 08:49 AM
|
#88 |
|
Registered Member
Join Date: Oct 2005
Location: DFW Texas
Posts: 5,249
|
love the build, great milwork.
love that shop (garage), lots of nice toys
|
|
|
|
|
04/13/2008, 10:14 PM
|
#89 |
|
Registered Member
Join Date: Jul 2006
Location: Shoreline,Washington
Posts: 4,518
|
Looks great. Love the work you do.
__________________
The name's Luis. :) Current Tank Info: 50G cube |
|
|
|
|
04/13/2008, 10:18 PM
|
#90 |
|
Likey the bikey
Join Date: Dec 2004
Location: Colorado
Posts: 3,371
|
Leif - you're definitely going to win our race! Looking good!
__________________
Mike On hiatus. I'm either out riding my bicycle, playing with my family, or throwing ferts in my planted tank. Or working. I hope I'm not doing that though. Current Tank Info: 140 DIY Cube |
|
|
|
|
04/14/2008, 07:39 AM
|
#91 |
|
Registered Member
Join Date: Dec 2003
Location: Denver, Colorado
Posts: 9,579
|
Thanks for the great comments everyone. This certainly has been a learning experience. Lots of trial and error. But all said, and almost done, I am pretty happy with how everything has turned out.
Mike have you made any progress on you new system? Thanks again everyone. Spleify
__________________
Make it a Great Day!!!! Current Tank Info: 60 gal SPS cube, with 25 gal refugium, 400W MH, DIY Lumenarc III, DIY skimmer, DIY stand and canopy. 40 breeder LPS with 40 gallon sump, DIY stand, 250W MH |
|
|
|
|
04/14/2008, 07:41 AM
|
#92 |
|
Likey the bikey
Join Date: Dec 2004
Location: Colorado
Posts: 3,371
|
This week my friend, this week.
__________________
Mike On hiatus. I'm either out riding my bicycle, playing with my family, or throwing ferts in my planted tank. Or working. I hope I'm not doing that though. Current Tank Info: 140 DIY Cube |
|
|
|
|
04/14/2008, 07:46 AM
|
#93 |
|
Registered Member
Join Date: Dec 2003
Location: Denver, Colorado
Posts: 9,579
|
Awesome! I can't wiat to see it. Let me know if you need any help.
Spleify
__________________
Make it a Great Day!!!! Current Tank Info: 60 gal SPS cube, with 25 gal refugium, 400W MH, DIY Lumenarc III, DIY skimmer, DIY stand and canopy. 40 breeder LPS with 40 gallon sump, DIY stand, 250W MH |
|
|
|
|
04/17/2008, 11:05 PM
|
#94 |
|
Registered Member
Join Date: Dec 2003
Location: Denver, Colorado
Posts: 9,579
|
Alright, made some more progress, seems like it's never going to be ready.
Here is the canopy with a couple more coats of stain on it. I finished staining it tonight. 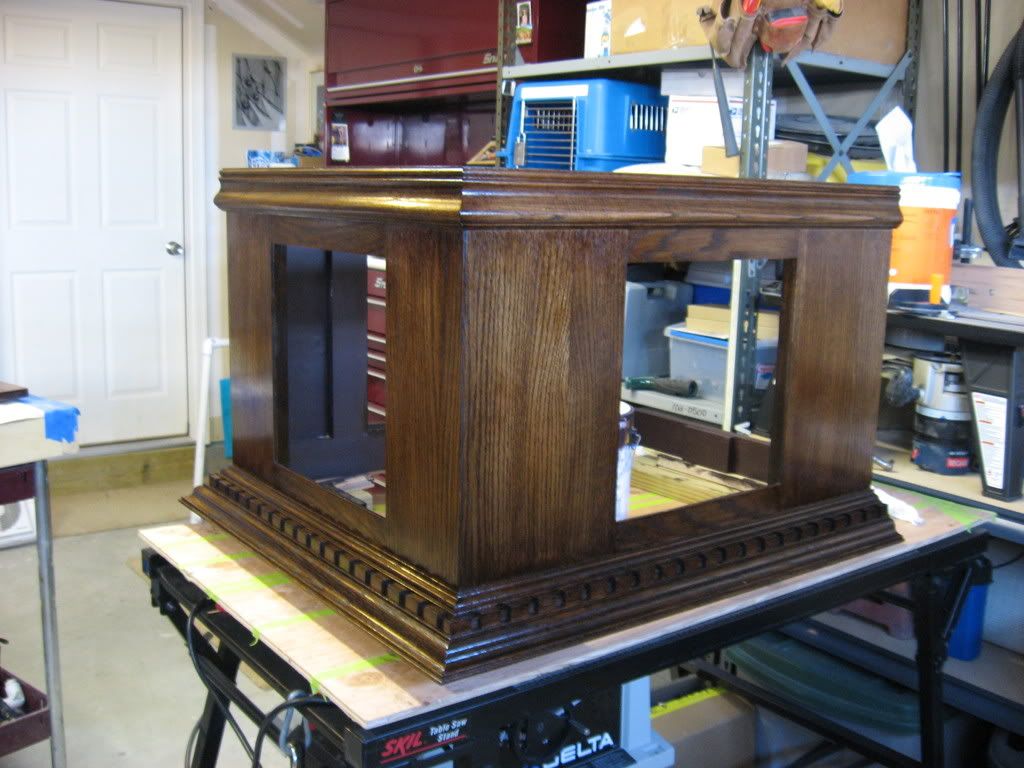 Here's the rear filler pieces with a couple coats of stain on them.  And the doors with a couple coats on the back. 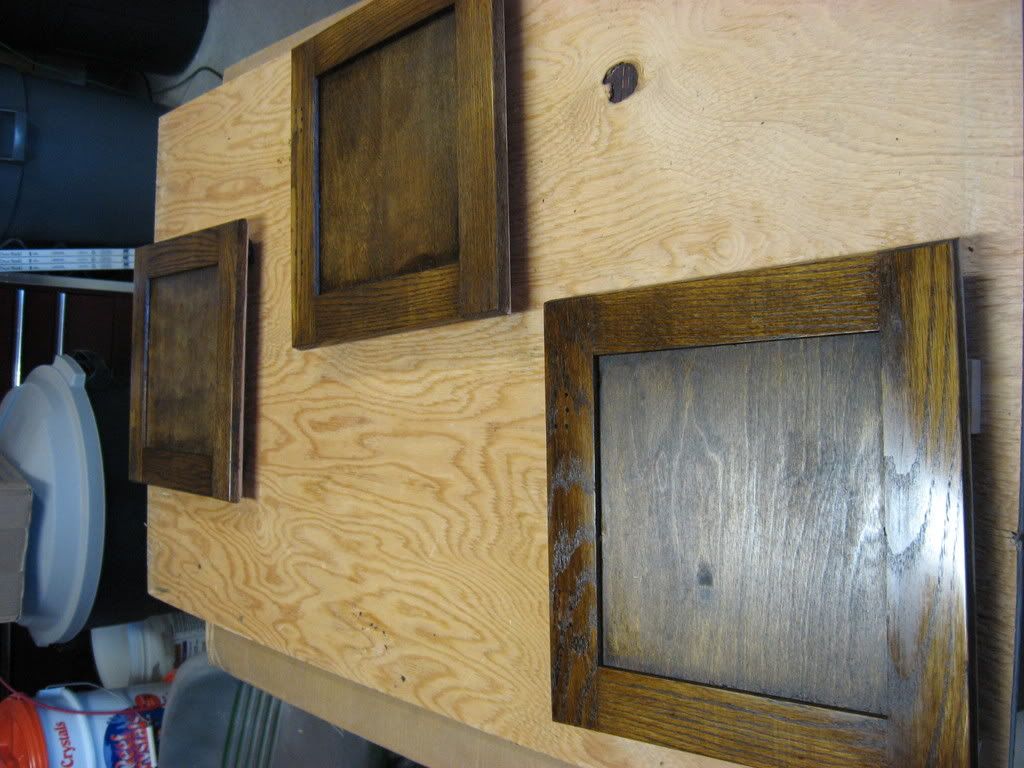 So here are a few of the extra plumbing parts I had or accumulated in the garage. Dumped out. 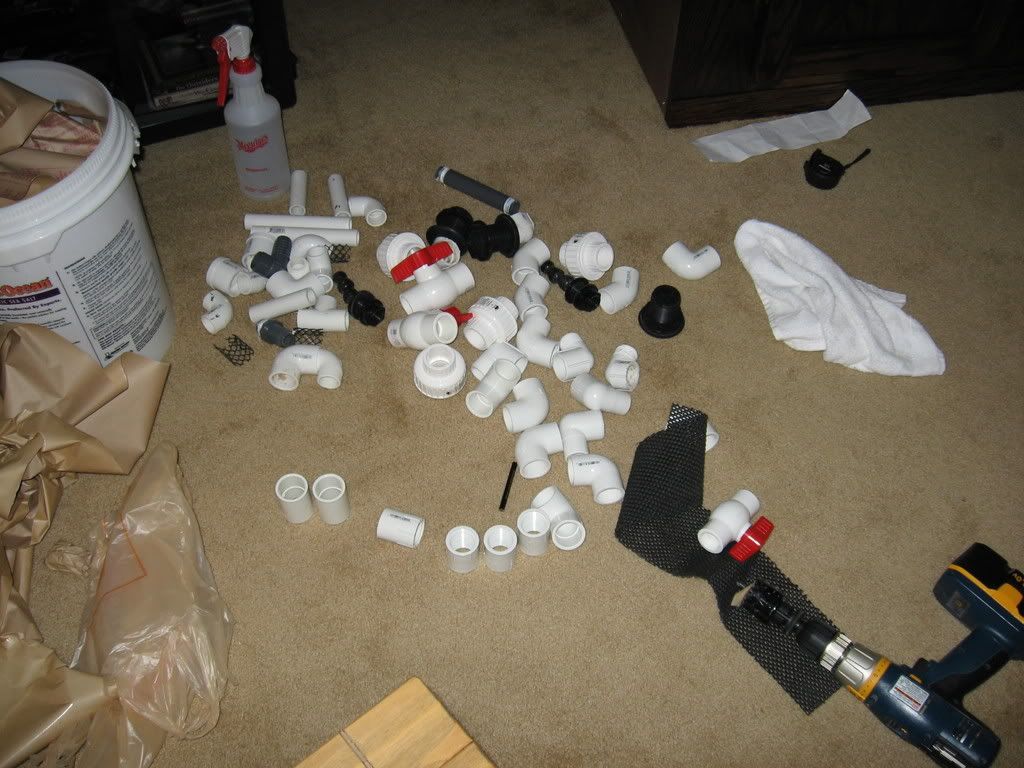 Then went an got some more today. 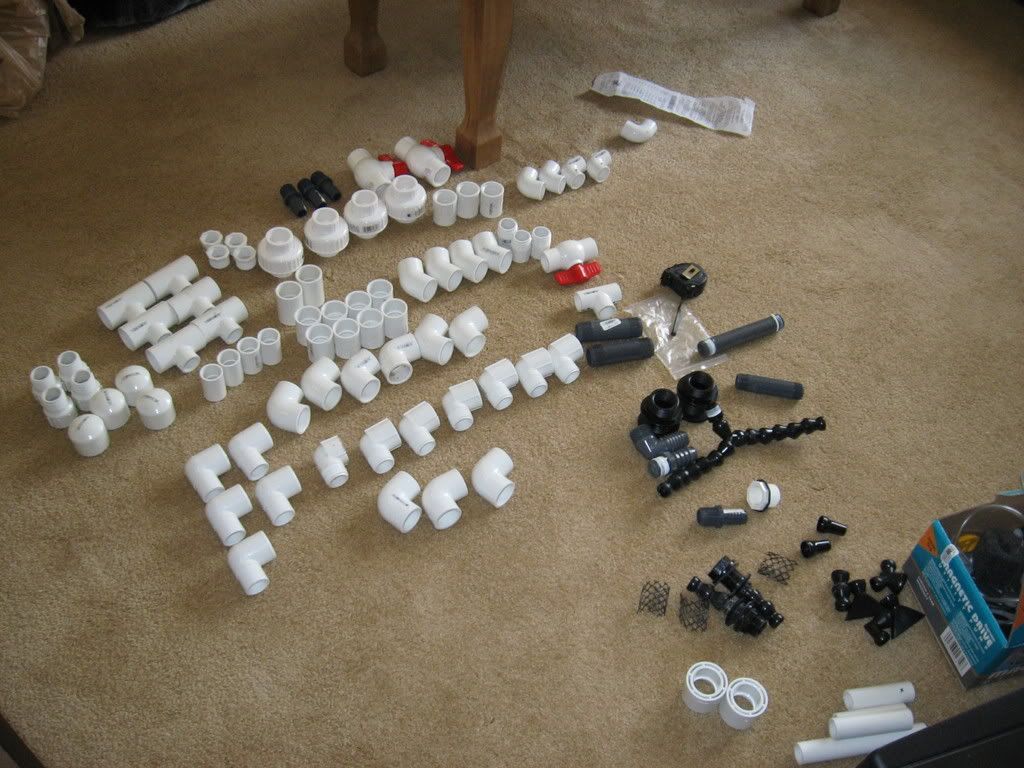 I need to pick up some Loc-Line tomorrow, and I'm sure at least a few more trips to HD. Getting started: 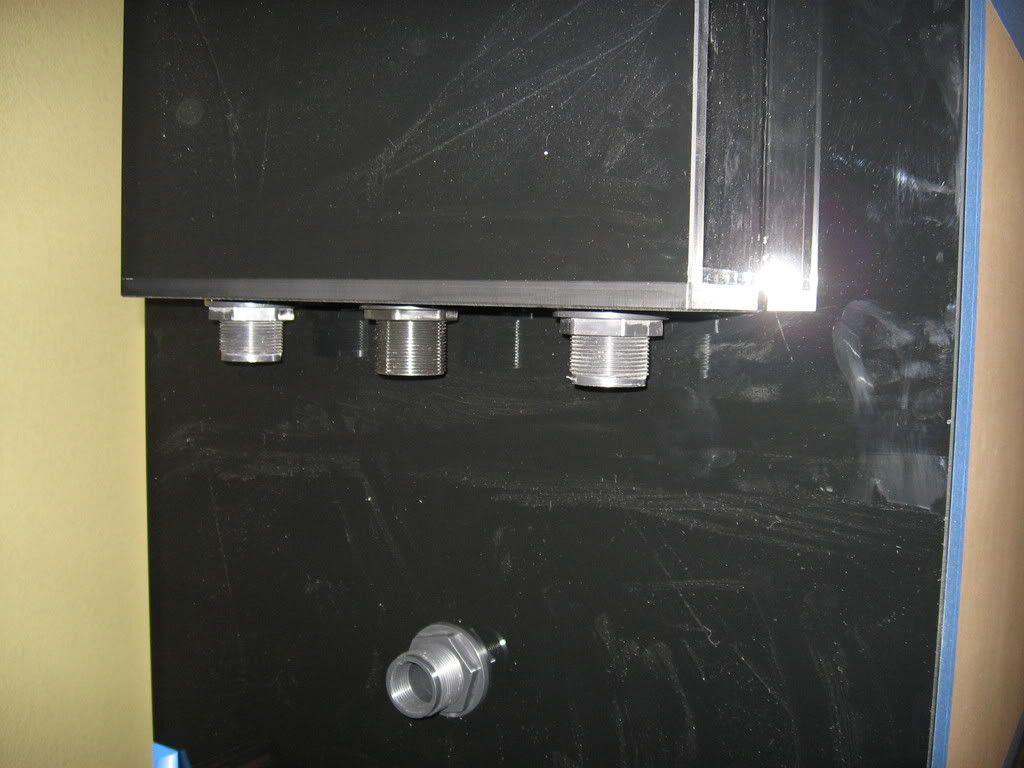 Heres the Hoffer Gurgle Buster's that I made, I cant wait to see how the work! 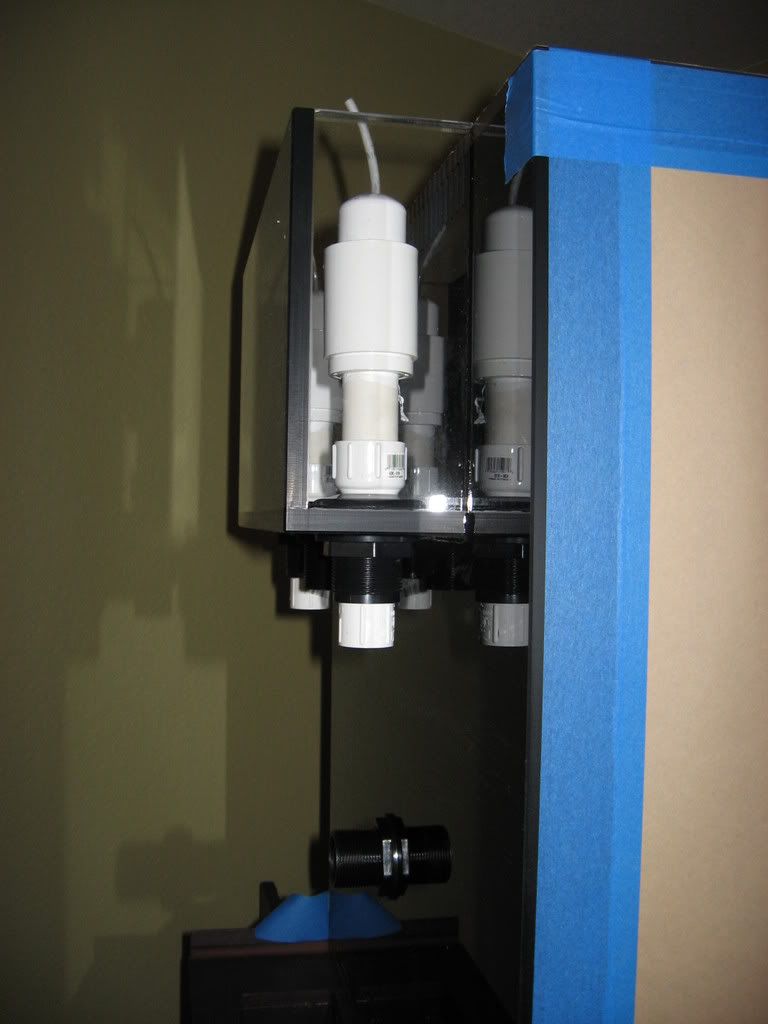 I actually cut down the Drains a little bit now that they are in. 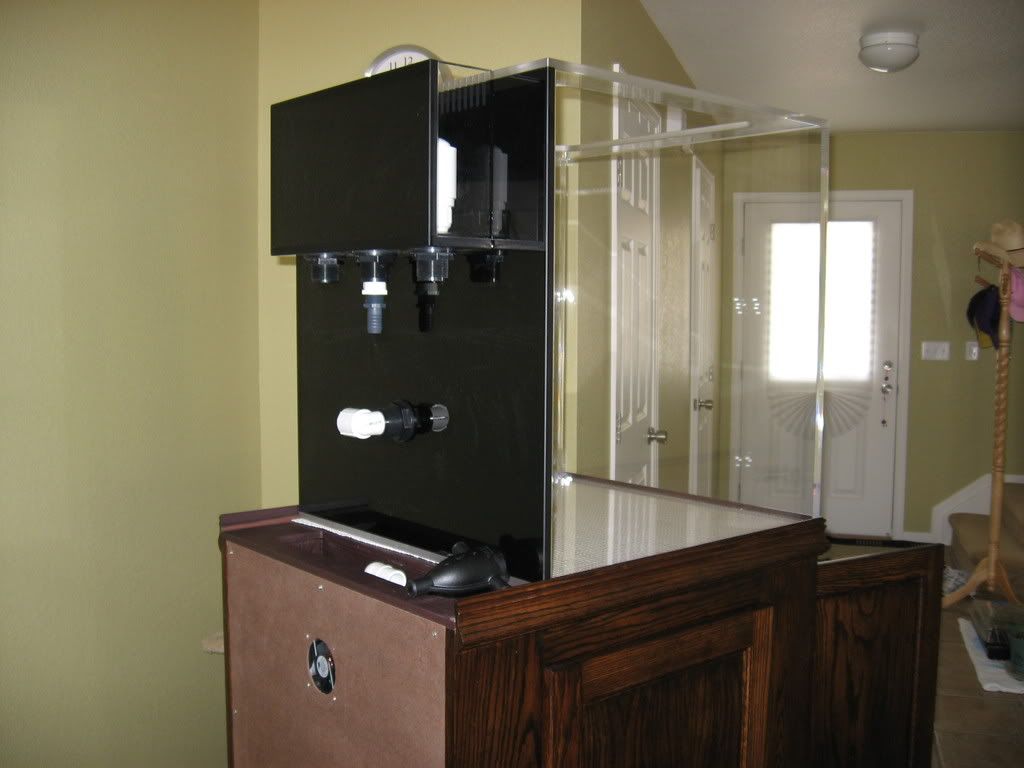 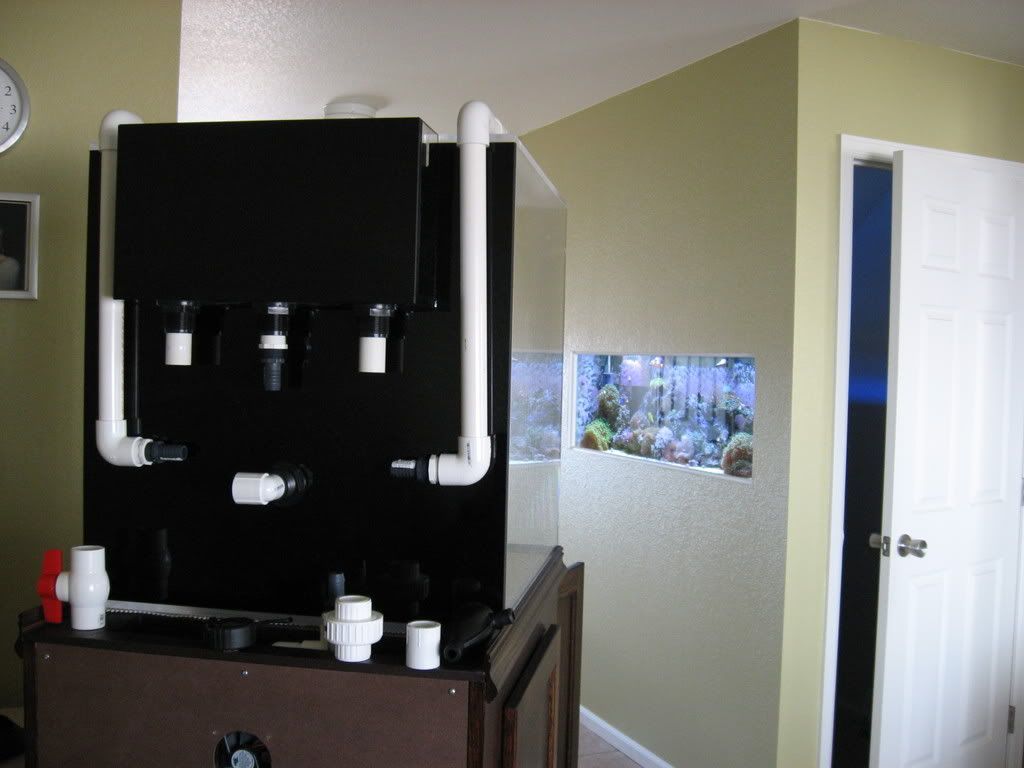
__________________
Make it a Great Day!!!! Current Tank Info: 60 gal SPS cube, with 25 gal refugium, 400W MH, DIY Lumenarc III, DIY skimmer, DIY stand and canopy. 40 breeder LPS with 40 gallon sump, DIY stand, 250W MH |
|
|
|
|
04/18/2008, 07:37 PM
|
#95 |
|
Registered Member
Join Date: Jul 2006
Location: Shoreline,Washington
Posts: 4,518
|
Looking great! That canopy sure turned out nice.
__________________
The name's Luis. :) Current Tank Info: 50G cube |
|
|
|
|
04/18/2008, 07:40 PM
|
#96 |
|
Moved On
Join Date: Jun 2006
Location: Cape Coral, F.L.
Posts: 2,106
|
your in wall setup looks great! Can I see more pictures of it?
|
|
|
|
|
04/18/2008, 08:48 PM
|
#97 |
|
Registered Member
Join Date: Aug 2003
Location: Phoenix, AZ
Posts: 5,101
|
How do you every hope to get inside that tank? Good woodworking skills!
__________________
Limit 1 stupid question per day Current Tank Info: Mr. Aqua 7.5g bowfront |
|
|
|
|
04/18/2008, 10:38 PM
|
#98 |
|
Registered Member
Join Date: Dec 2003
Location: Denver, Colorado
Posts: 9,579
|
edwin206- Thanks, I am pretty happy with it. I put the first of 4 coats of poly on it today. I also cut the top and the back panel for the canopy , I need to paint them, maybe this weekend still. Then wiring time comes.
scaryperson27- Thanks for the complements on the in wall. Click on my little red house, it's a thread on it. Not a build thread but lots of good pics,you know me, I like pictures. crrichey- It is a little bit of a challenge, but I got a real nice light weight aluminum plank style step stool. I also made some good strides on the plumbing today. I moved the CL pump to under neath the inside top of the stand. It worked out good for a couple of reasons. I was concerned that it would be difficult to remove it down the road, because it was so close to the back panel, now it will be a breeze to access it when it comes time for maintenance. Second, it ended up making the plumbing a snap to line up. Well, thanks again everyone, I promise water is not to far off. Spleify
__________________
Make it a Great Day!!!! Current Tank Info: 60 gal SPS cube, with 25 gal refugium, 400W MH, DIY Lumenarc III, DIY skimmer, DIY stand and canopy. 40 breeder LPS with 40 gallon sump, DIY stand, 250W MH |
|
|
|
|
04/18/2008, 10:42 PM
|
#99 |
|
Registered Member
Join Date: Jan 2006
Location: Clermont, FL
Posts: 379
|
Very nice, Stand looks great. More pic's
|
|
|
|
|
04/19/2008, 06:45 AM
|
#100 |
|
Registered Member
Join Date: Oct 2006
Location: Loveland, CO
Posts: 749
|
That tanks looks very nice, very well done. I have a 60g hex. And a problem that I am running into is controlling the heat, and I just have standard fluorescent lighting. You have totally enclosed your stand and even with fans installed it is going to be hard for heat to escape and get cool air in. My stand was totally enclosed and I couldn't get the heat down even with a large clip fan blowing on my refugium. The only things producing heat in my tank are a mxijet 1200, a mag 9.5 for my return and a mag 5 for my skimmmer. I had a quiet one 4000 for a while but it ran hotter then the mag 9.5. I had to take the back panel off my stand to get air to circulate under my tank. Since I have taken the back off the tank has stayed cooler. I also make sure my fan is blowing across the surface of my sump so water will evaporate. It is hard to keep a tall collum of water cool without much surface area for water to evaporate.
__________________
I'm pretty sure there's a lot more to life than being really, really, ridiculously good looking. And I plan on finding out what that is. -Derek Zoolander Current Tank Info: 60 gallon hex mixed reef, 250w HQI Sun Pod, Aqua C Urchin pro, 15g refugium |
|
|
|
|
|
|


