
|
|
|
|||||||
 |
| Thread Tools |
 03/02/2016, 04:19 PM
|
#176 | |
|
Registered Member
Join Date: Oct 2015
Location: Istanbul
Posts: 24
|
Quote:
Here is a picture of 3 days of skimming pictures.  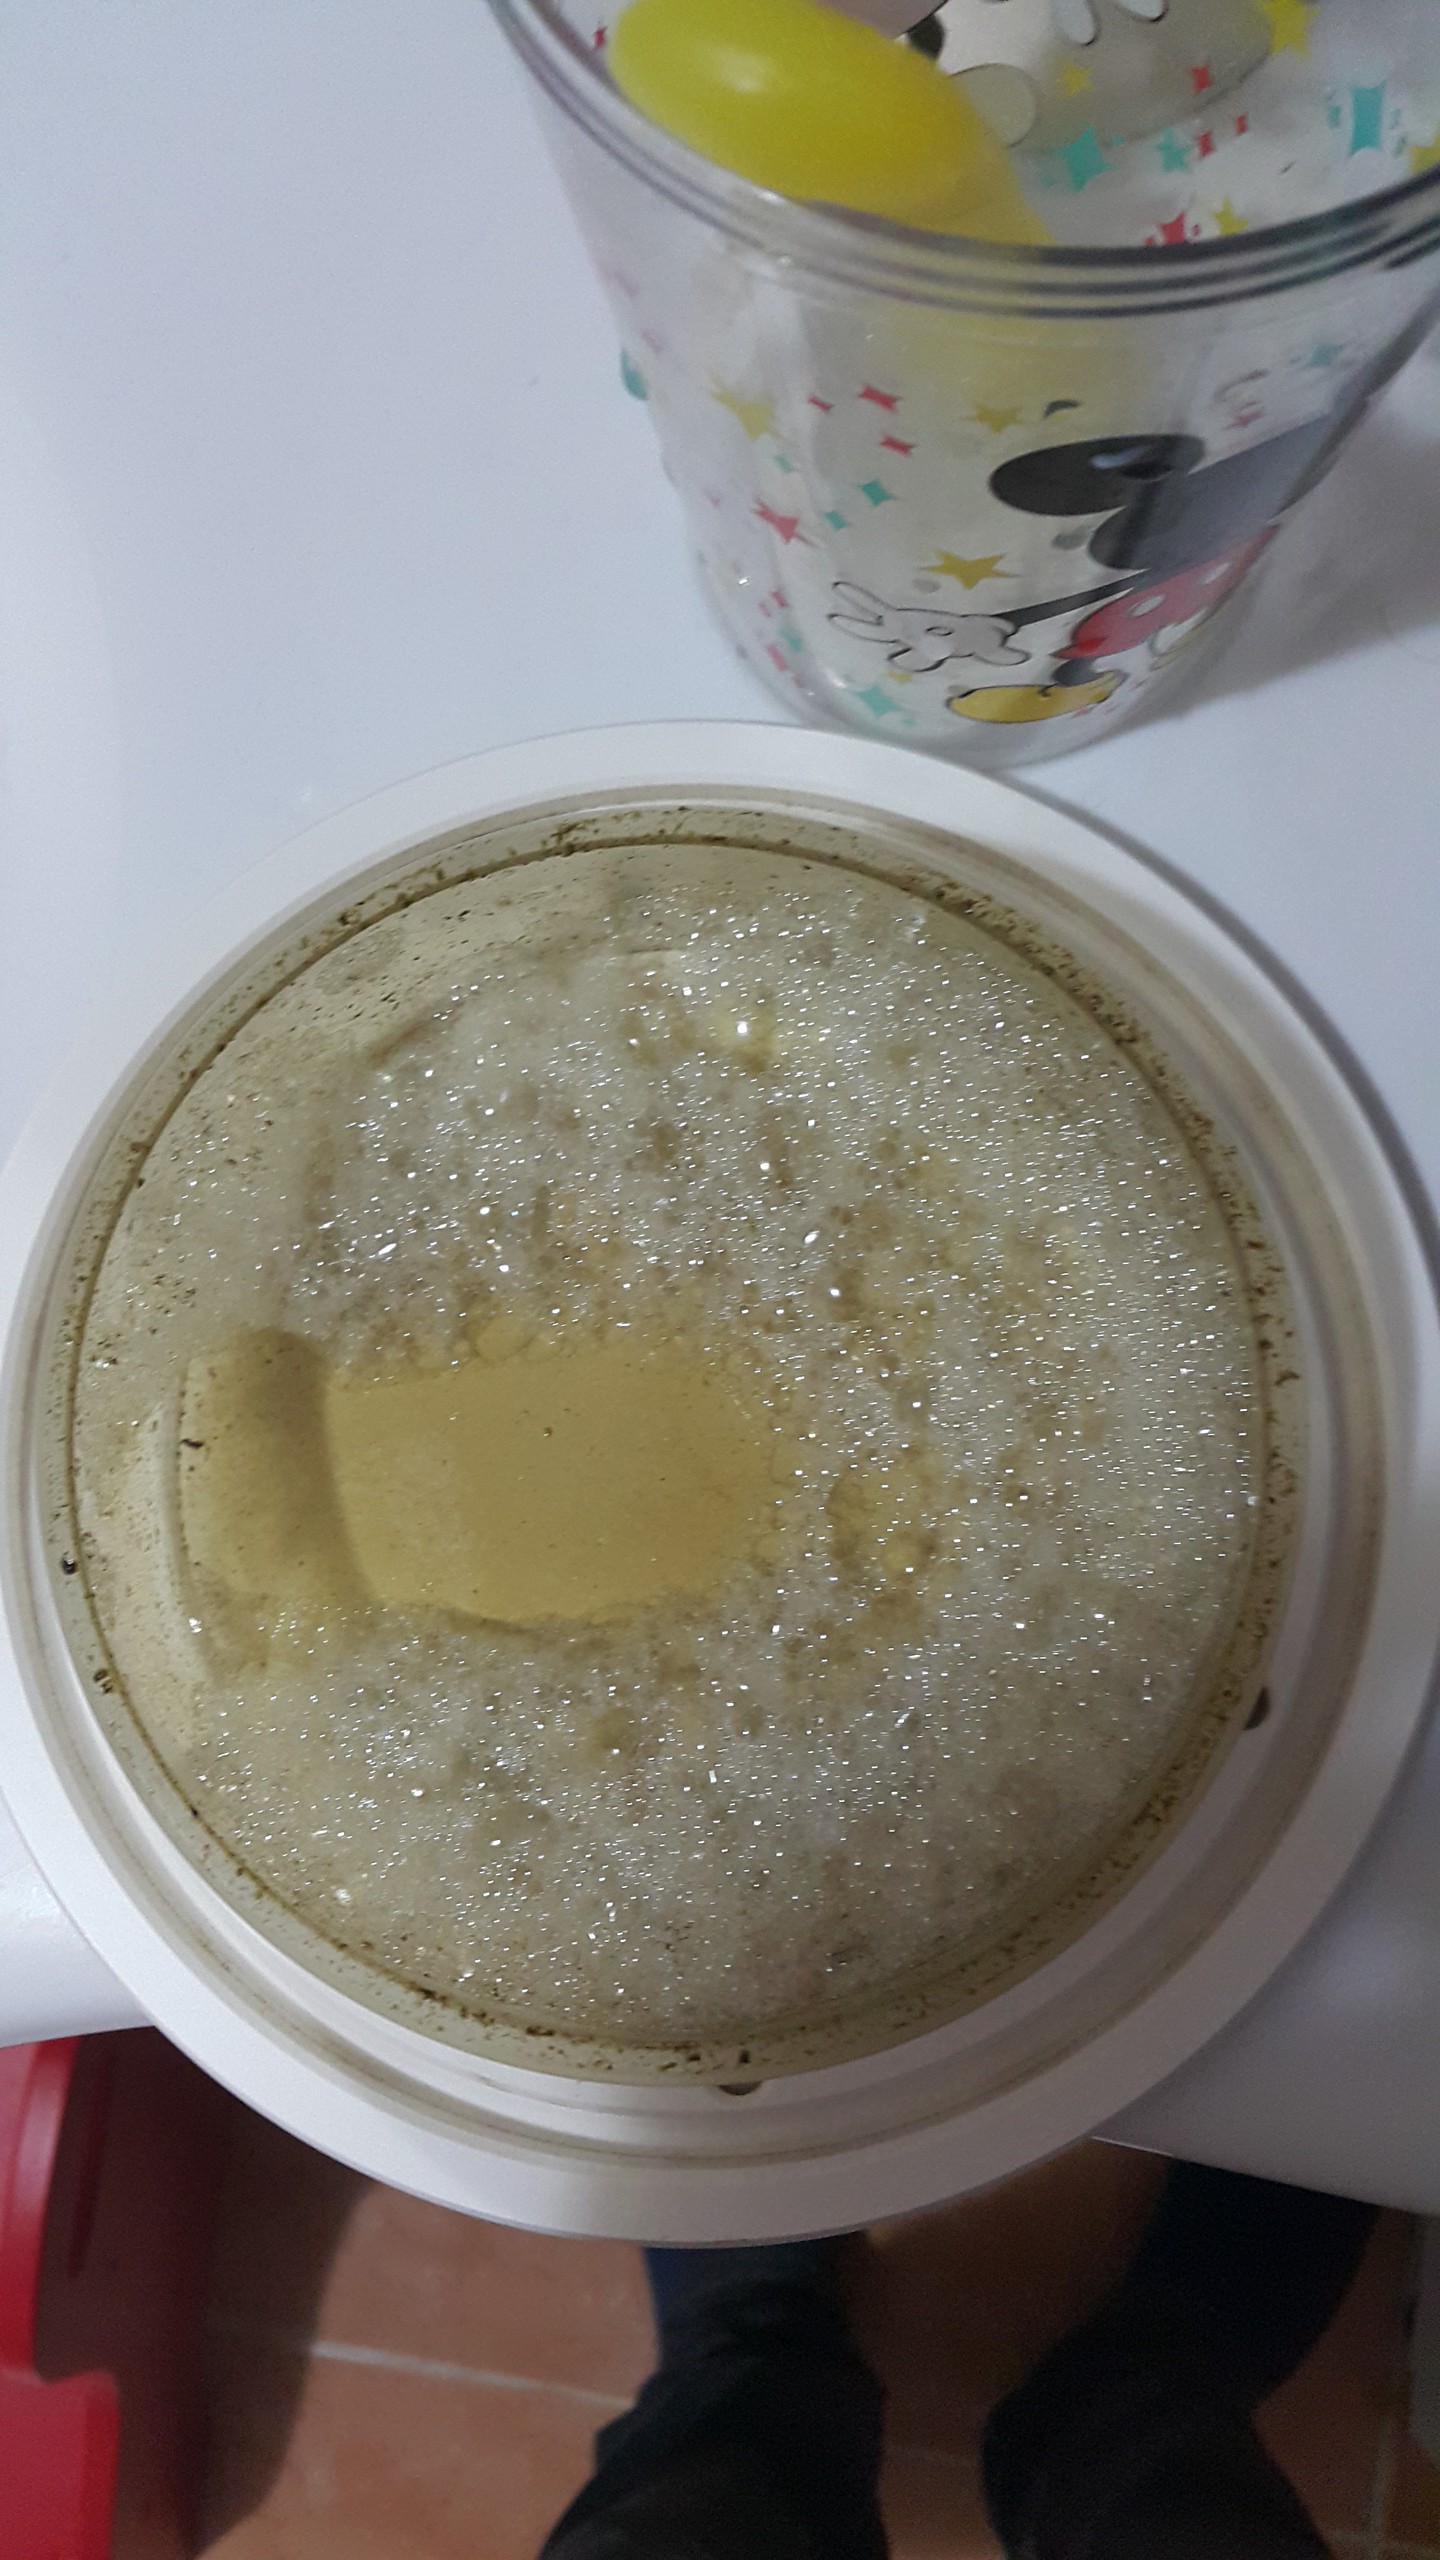 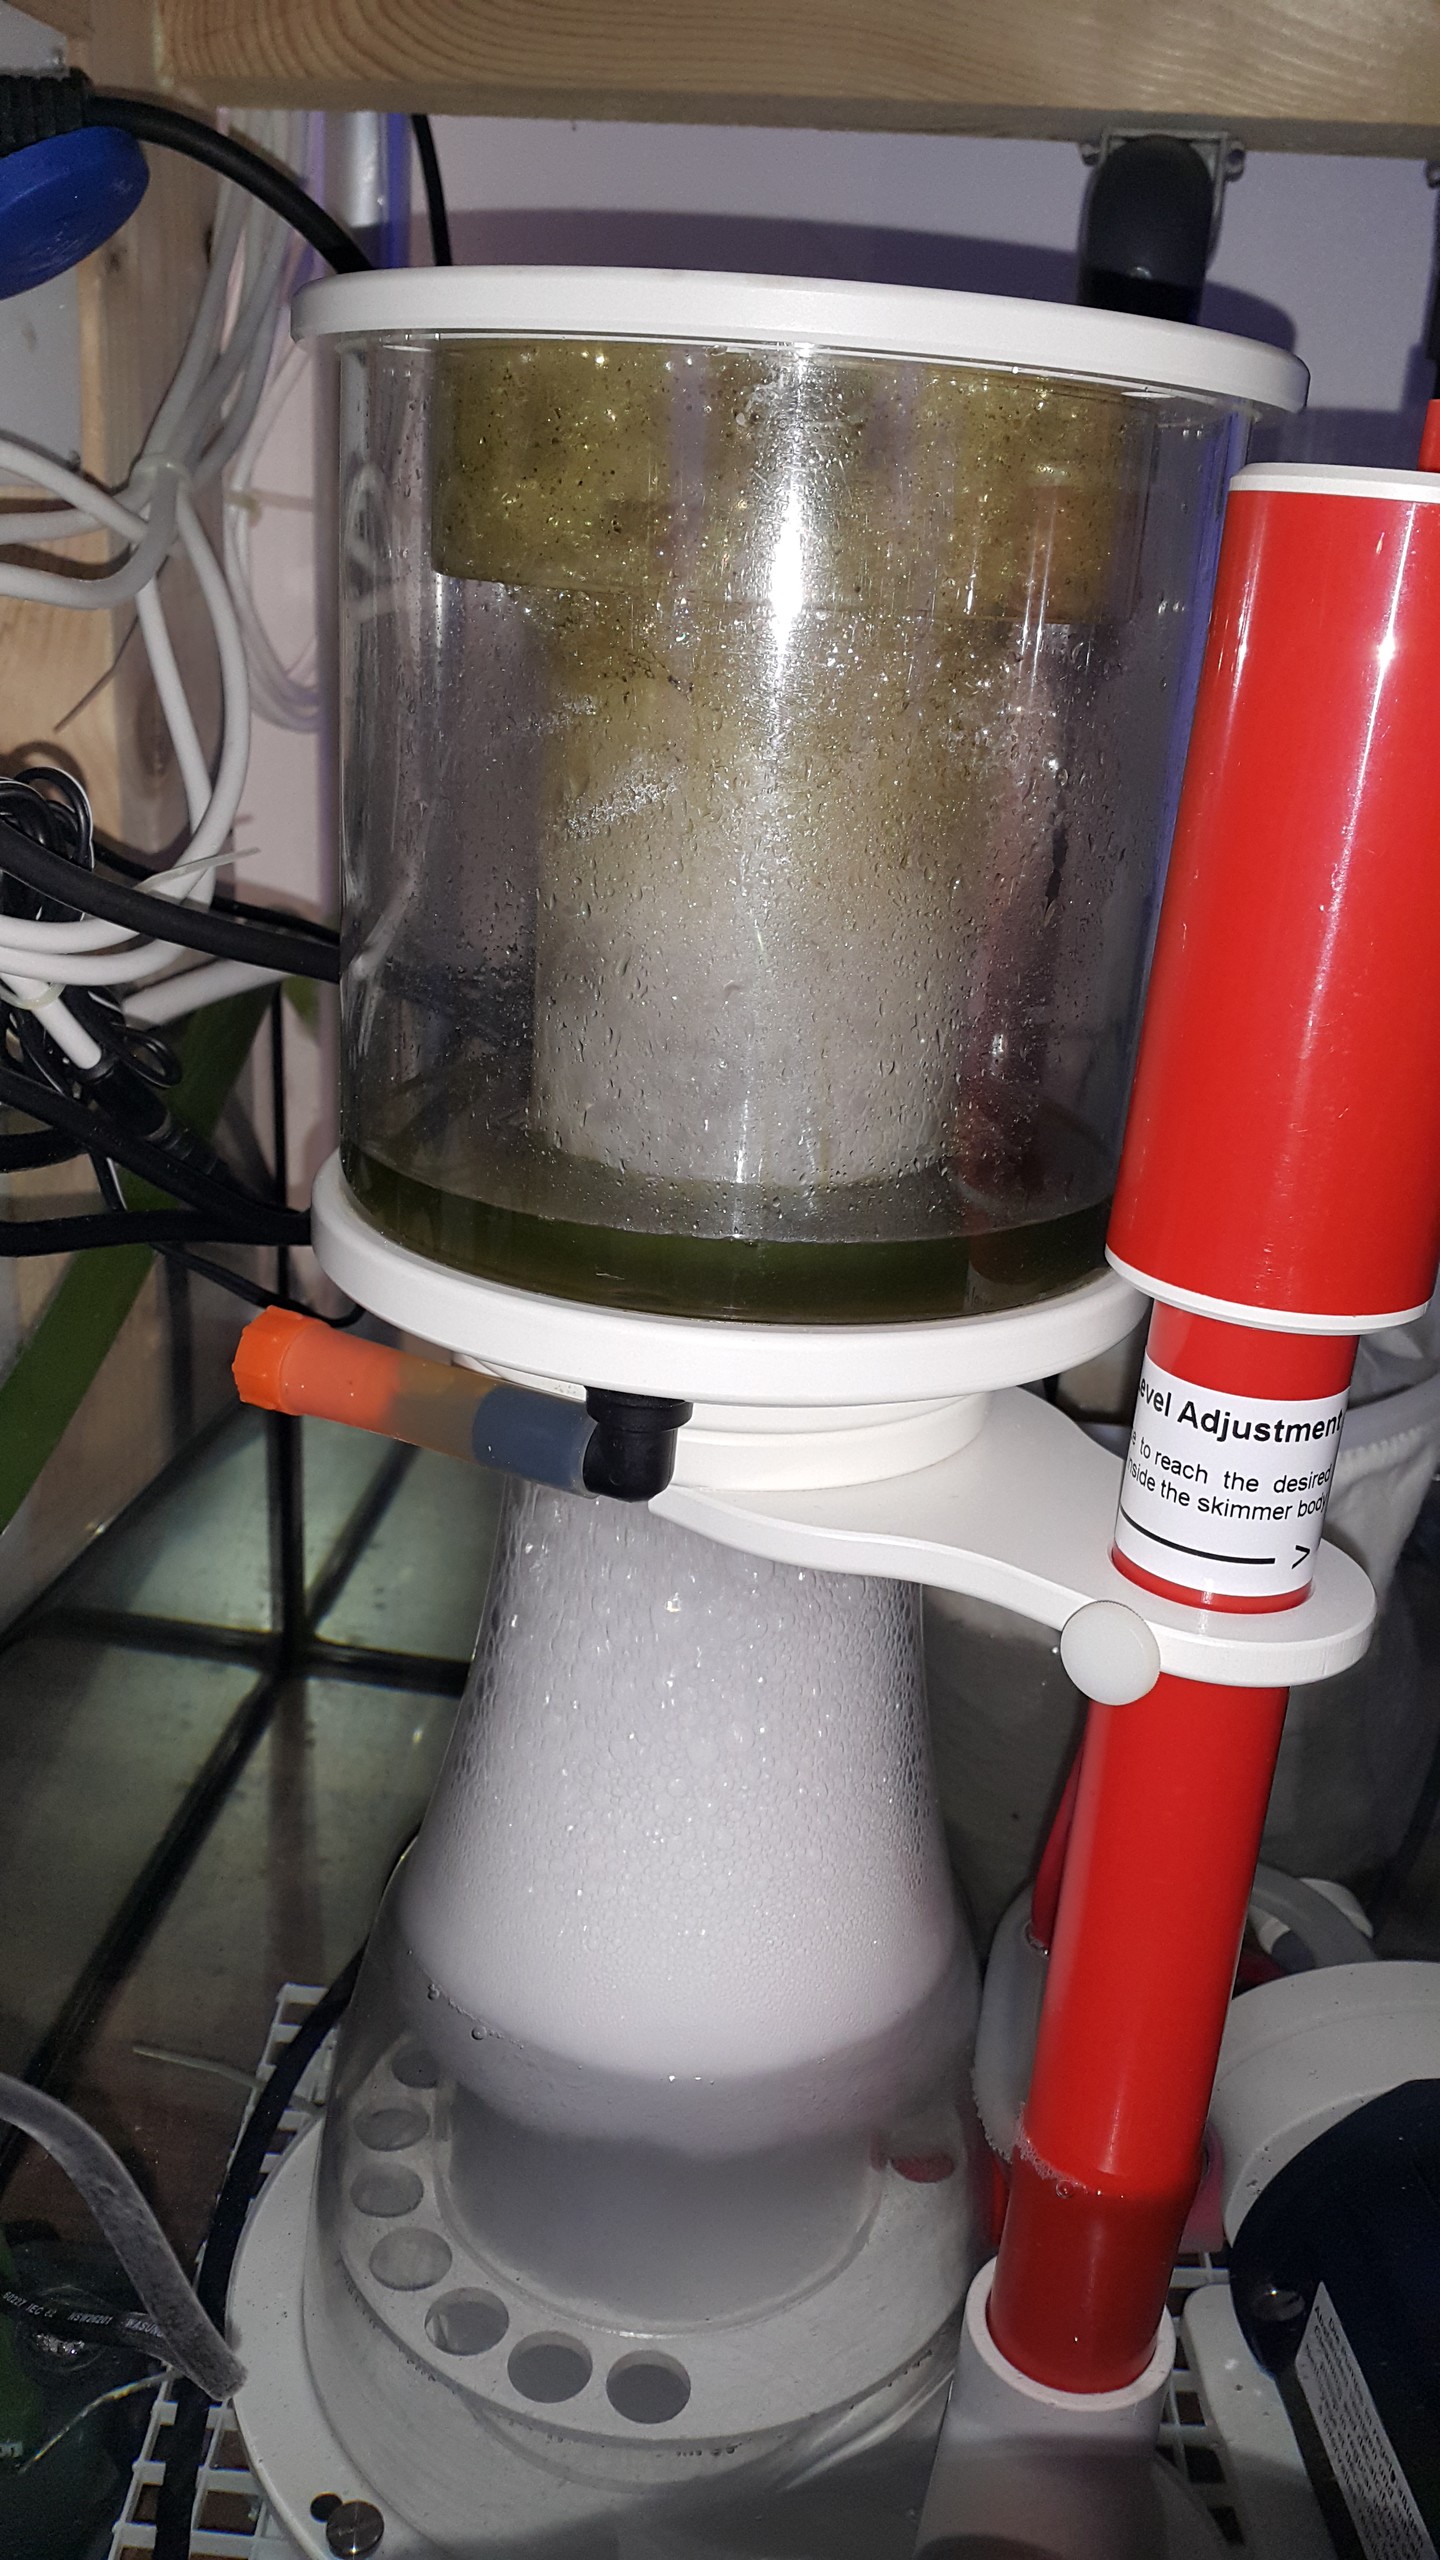
|
|

|

|
|
03/02/2016, 04:54 PM
|
#177 | |
|
RC Sponsor
 Join Date: Sep 2009
Posts: 14,173
|
Quote:
__________________
Director Customer Support Royal Exclusiv USA For All Royal Exclusiv & Bubble King questions please refer to our Sponsor forum: http://www.reefcentral.com/forums/fo...play.php?f=745 Current Tank Info: 480G display mixed reef, 90G sump, 90G refugium, 60G display refugium. Check out my build thread: http://www.reefcentral.com/forums/showthread.php?t=1783476 |
|
|
|
|
|
03/02/2016, 04:58 PM
|
#178 | |
|
Registered Member
Join Date: Oct 2015
Location: Istanbul
Posts: 24
|
Quote:

|
|
|
|
|
|
03/02/2016, 08:49 PM
|
#179 | |
|
RC Sponsor
Join Date: Sep 2009
Posts: 14,173
|
Quote:
__________________
Director Customer Support Royal Exclusiv USA For All Royal Exclusiv & Bubble King questions please refer to our Sponsor forum: http://www.reefcentral.com/forums/fo...play.php?f=745 Current Tank Info: 480G display mixed reef, 90G sump, 90G refugium, 60G display refugium. Check out my build thread: http://www.reefcentral.com/forums/showthread.php?t=1783476 |
|
|
|
|
|
03/03/2016, 05:23 AM
|
#180 |
|
Registered Member
Join Date: Oct 2015
Location: Istanbul
Posts: 24
|
Slief, will I just turn the volute on or should I raise the skimmer 1/2" more?
I can start with volute adjustment. |
|
|
|
|
03/03/2016, 08:09 AM
|
#181 | |
|
RC Sponsor
Join Date: Sep 2009
Posts: 14,173
|
Quote:
__________________
Director Customer Support Royal Exclusiv USA For All Royal Exclusiv & Bubble King questions please refer to our Sponsor forum: http://www.reefcentral.com/forums/fo...play.php?f=745 Current Tank Info: 480G display mixed reef, 90G sump, 90G refugium, 60G display refugium. Check out my build thread: http://www.reefcentral.com/forums/showthread.php?t=1783476 |
|
|
|
|
|
03/04/2016, 12:29 PM
|
#182 |
|
Registered Member
Join Date: Dec 2008
Posts: 144
|
 After 3days, still running with wedge pipe open full. |
|
|
|
|
03/04/2016, 01:19 PM
|
#183 | |
|
RC Sponsor
Join Date: Sep 2009
Posts: 14,173
|
Quote:
__________________
Director Customer Support Royal Exclusiv USA For All Royal Exclusiv & Bubble King questions please refer to our Sponsor forum: http://www.reefcentral.com/forums/fo...play.php?f=745 Current Tank Info: 480G display mixed reef, 90G sump, 90G refugium, 60G display refugium. Check out my build thread: http://www.reefcentral.com/forums/showthread.php?t=1783476 |
|
|
|
|
|
03/16/2016, 02:24 PM
|
#184 |
|
Registered Member
Join Date: Mar 2010
Location: Chandler, AZ
Posts: 620
|
Bubble King Setup Guide by Day
All,
I just recently purchased a SM200. Over the curse of the last week, I've been trading emails back and forth with Scott on optimizing my setup. The summary below is a day by day guide that I wrote based on my emails with Scott. You may find this helpful in getting your skimmer setup. Bubble King Setup Guide by Day Start with a Vinegar Bath When you get the skimmer, I’d recommend running it in a vinegar bath for a few hours before you add it to the tank. This will significantly reduce the break-in time for you. The way I complete the vinegar bath is to fill a sink up with about 8” of water/vinegar, I like to use about 20% vinegar to 80% water. Set the skimmer in the sink and plug it in. I pull the drain plug on the skimmer cup so that whatever solution gets skimmed ends up back in the sink. I tune the skimmer to run pretty wet during the clean procedure. From there just let it run for a few hours. This is the same procedure I use every 6 months to clean my skimmer. Mark your Wedge Pipe Before you put the skimmer into operation, mark a position on the wedge pipe so that you know what is fully open and what is half closed. Half-closed is equal to a quarter turn on the wedge pipe. You can look through the skimmer and easily see the wedge position. I used some small pieces of tape to mark fully open and half closed. These two markings will be very important during your tuning of the skimmer. Day 1-2 Start your skimmer in 8” of water at 30 watts on the pump and the wedge pipe fully open. Let it run this way for 2 full days. While tempted, don’t change any of the settings during these first 2 days. During this time you want to watch the line where bubbles transition to foam. Don’t confuse this with the line where water transitions to bubbles. The goal is to get the bubble to foam transition to happen right at or slightly above the white collar where the skimmer cup meets the skimmer body. How high this transition happens is directly related to the contaminants in your tank. If you tank is clean, the transition will likely be much lower than the target position. If your tank is dirty, the transition could happen higher than the target position. Day 3 At this point, your skimmer should be broken in enough to start making adjustments without the fear of it overflowing the cup. If you are lucky enough to have your bubble to foam transition at the collar in 8” of water at 30 watts with the wedge wide open then your skimmer is tuned. I doubt this will be the case so here is where the adjustments take place. Your first adjustment will be to raise/lower the water level in the sump. Continue to run the pump at 30 watts with the wedge pipe wide open while you adjust the sump volume. For the sake of these instructions, let’s assume your bubble to foam transition is happening below the collar. (This is the most likely case) Raise the water in the sump ¼” at a time and let it run for a few hours before making another sump volume change. Again, your goal during these changes in sump volume is to get the bubble to foam transition happening at or just above the collar. Continue raising the sump volume ¼” at a time until you either get to 9” of water in your sump or the bubble to foam transition at/above the collar. Note, you are still set to 30 watts with the wedge wide open. If you hit 9” of sump volume and your bubble to foam transition is still below the collar let it run this way for a full day. Day 4 If after running in 9” of water at 30 watts with the wedge wide open for a full day you are still not transitioning from bubbles to foam at or above the collar, your next adjustment will be the wedge pipe. Begin making very small adjustments (1/16th of a turn at a time) and let your skimmer run for a couple hours before making the next adjustment. Still, your goal here is to get the bubble to foam transition happening at or just above the collar. Continue this process until the bubble to foam transition is either at or above the collar or your wedge has been turned a 1/4th of a turn (this is the same as the wedge being half closed) If you reach ¼ turn on the wedge in 9” of water at 30 watts and your bubble to foam transition is still below the collar, let it run this way for the next day. Day 5 If your bubble to foam transition is still below the collar, we are going to repeat the instructions from day 3. Raise the water in your sump ¼” at a time until you’ve either hit 10” of water volume or your bubble to foam transition is happening at or above the collar. Again, your pump is still running at 30 watts and your wedge is half closed. For me, I finally got the bubble to foam transition at the collar in 9.5” of water, at 30 watts and with the wedge ½ closed. This is where I’m currently running and should be able to keep running from this point forward. From this point forward, only small adjustments will be made with the wedge if contaminant levels change in the tank. If I would have got to 10” of water, ½ closed on the wedge and the bubble to foam was still not at or above the collar, I would have then started increasing the pump speed 1 watt at a time until the bubble to foam transition hit the collar. In summary The optimal pump speed for the SM200 is between 28-32 watts with 30 being the target speed. The optimal wedge pipe position is wide open or as close to wide open as you can get. The optimal sump volume is between 7” and 9”. You should only go over 9” when you can’t get the bubble to foam transition above the collar with the wedge half closed. You should not close your wedge more than ½. It’s always best to drive the bubble to foam transition line in the skimmer up using sump volume first, the wedge second and pump speed last. |
|
|
|
|
03/16/2016, 02:41 PM
|
#185 | |
|
RC Sponsor
Join Date: Sep 2009
Posts: 14,173
|
Quote:
That is a very well put together set of instructions! Thank you for the great contribution. For anybody who is interested, here are some guidelines for the pump speeds that can be applied to the other Bubble King skimmer models and size with the RD3 pumps. This is based on skimmer size and not specific to model numbers as the internal volumes between the Double Cones, Supermarin and Deluxe skimmers are very similar if you are comparing a 250mm skimmer of each class. 180 size skimmers: RD3 pump best set to 20-23 watts 200 Sized Skimmers as noted above: RD3 pump best set to 28-30 watts 250 Sized Skimmers: RD3 Pump best set to 36-40 watts (I run my SM250 at 38 watts). 300 Sized Skimmers with Single RD3 60w pump Best set to 55-60 watts but results may vary. The idea is that you are setting the pump to achieve the most dense foam possible. The different sized skimmer bodies necessitate different flow requirements. The smaller the body, the less flow needed where as the larger bodies need increased flow. The slower the setting, the greater the contact time. The RD3 pumps strike a perfect balance between air and water ratio so finding the best setting for the pump insures best foam quality. Things such as salinity and amount of dissolved organics (fish load) have a direct impact on what is "ideal". Thus there is a bit of a range in there.
__________________
Director Customer Support Royal Exclusiv USA For All Royal Exclusiv & Bubble King questions please refer to our Sponsor forum: http://www.reefcentral.com/forums/fo...play.php?f=745 Current Tank Info: 480G display mixed reef, 90G sump, 90G refugium, 60G display refugium. Check out my build thread: http://www.reefcentral.com/forums/showthread.php?t=1783476 |
|
|
|
|
|
03/19/2016, 04:01 PM
|
#186 |
|
Premium Member
Join Date: Mar 2000
Location: stafford, va
Posts: 513
|
I'm hoping someone has some ideas.
I have a SM300 on a 300ish gallon system. It's the one with 2 non controllable pumps (older model). One of the pumps was shut off about a week ago. I opened it up, saw a little piece of debris in the impeller (very small) and assumed that caused the shut down. Cleaned everything, put back together and then plugged in again. Ran fine for about 24 hours and then shut off again. I regularly clean both pumps about every 3-4 months (just clean out any debris but don't run any vinegar or anything else). I've had the skimmer for about 3 years now without any problems. The manual talks about not using any acid to clean but I assume a diluted vinegar solution should be fine? Just wanted to check before possibly damaging my pump. My guess is that there is a little calcific deposition that just needs to be cleaned but any other ideas? |
|
|
|
|
03/19/2016, 04:20 PM
|
#187 | |
|
RC Sponsor
Join Date: Sep 2009
Posts: 14,173
|
Quote:
At the base of the impeller shaft is what is referred to as a bearing. This bearing doesn't actually spin. Instead it provides support the impeller just below the magnet. This bearing is supposed to be seated in the motorblock at the bottom of the magnet cavity. It's held in place with an o-ring. The bearing is often a neglected item when it comes to regular pump cleaning and it tends to build up calcium in the little hole that supports the bottom of the impeller shaft. Eventually that bearing will stick the impeller shaft which causes a big issue and can burn the motorblock out. If, when you remove the impeller from the motor, the bearing is stuck the shaft, that is a sign of an issue and that will prevent the impeller from spinning and it will also lead to premature failure of the motorblock. Soaking the impeller in hot vinegar will help un bond the bearing from the shaft. Otherwise some force may be needed to separate the two. The shaft needs to spin freely in the bearing. Once the bearing is clean inside and out, I suggest slipping it over the end of the impeller shaft to make sure it spins freezing. Then the bearing should be reinserted into the block insuring that it is properly seated. You don't slip the bearing over the shaft and then put the impeller into the block. Doing that will not seat the bearing properly. There is a little slot that the o-ring slips into within the bearing cavity at the base of the motorblock. You first insert the bearing into the motorblock making sure it's seated in the cavity properly and once the bearing is in place, you then install the impeller and put the pump back together. Take a look at page 7 and 8 of the manual below. Those pages cover removal and installation of the bearing. If the impeller doesn't spin freely in the bearing or if the bearing is seized to the impeller shaft, that will cause the impeller to stop spinning. In your case, I suspect it could just be some calcium build up in the bearing orifice. http://royalexclusiv.com/images/cont...enance_eng.pdf When you clean the pump and impeller in vinegar, you should also remove the bearing and clean it as well following the above steps. There is one more bearing between the magnet and impeller that is part of the plastic shield. That obviously should spin freezing on the impeller shaft too. Once reassembled, it the issue continues to happen where the impeller stops spinning, then the issue is likely the motor block failing. The only other thing to look at is the magnet on the impeller shaft. The magnet is permanently bonded to the shaft. In some rare cases, the magnet can slip on the shaft. If the magnet rotates on the shaft or if there is play in the magnet on the impeller shaft, that that can be the root cause of your issue. The magnet needs to be firmly affixed to the impeller shaft. Hope that helps. Check the stuff above and report back.
__________________
Director Customer Support Royal Exclusiv USA For All Royal Exclusiv & Bubble King questions please refer to our Sponsor forum: http://www.reefcentral.com/forums/fo...play.php?f=745 Current Tank Info: 480G display mixed reef, 90G sump, 90G refugium, 60G display refugium. Check out my build thread: http://www.reefcentral.com/forums/showthread.php?t=1783476 |
|
|
|
|
|
03/20/2016, 07:55 AM
|
#188 |
|
Premium Member
Join Date: Mar 2000
Location: stafford, va
Posts: 513
|
You're the man! So, that bearing is stuck to the impeller. I put everything in a 1/3 diluted vinegar bath and am planning for an hour. Any downside to doing a regular 1 day soak in that dilution? I'm just a little leery with all the statements about not using HCl, which is obviously much stronger then vinegar.
I do it for my tunzes and ecottechs but wasn't sure if anything in the rd pumps could get damaged. |
|
|
|
|
03/20/2016, 09:10 AM
|
#189 | |
|
RC Sponsor
Join Date: Sep 2009
Posts: 14,173
|
Quote:
__________________
Director Customer Support Royal Exclusiv USA For All Royal Exclusiv & Bubble King questions please refer to our Sponsor forum: http://www.reefcentral.com/forums/fo...play.php?f=745 Current Tank Info: 480G display mixed reef, 90G sump, 90G refugium, 60G display refugium. Check out my build thread: http://www.reefcentral.com/forums/showthread.php?t=1783476 |
|
|
|
|
|
03/21/2016, 07:58 PM
|
#190 |
|
Premium Member
Join Date: Mar 2000
Location: stafford, va
Posts: 513
|
So, the bearing came off the impeller pretty easily and rotated smoothly around the impeller shaft. put it back together, putting the bearing in first and then pushing the washer on. Should the washer be pushed onto the bearing or just sit on it loosely? From the pictures, it looks like it should be pushed onto the bearing.
Ran the pump. Shut off again. I then took it apart and double checked everything and connected again. It turned on fine but the pump sounds louder then the main rd pump. I turned it off. The magnet is well attached and the other bearing closer to the impeller looks fine. I'm at a loss. Any thoughts? thanks again for your help. |
|
|
|
|
03/21/2016, 09:19 PM
|
#191 | |
|
RC Sponsor
Join Date: Sep 2009
Posts: 14,173
|
Quote:
__________________
Director Customer Support Royal Exclusiv USA For All Royal Exclusiv & Bubble King questions please refer to our Sponsor forum: http://www.reefcentral.com/forums/fo...play.php?f=745 Current Tank Info: 480G display mixed reef, 90G sump, 90G refugium, 60G display refugium. Check out my build thread: http://www.reefcentral.com/forums/showthread.php?t=1783476 |
|
|
|
|
|
03/21/2016, 09:30 PM
|
#192 |
|
Premium Member
Join Date: Mar 2000
Location: stafford, va
Posts: 513
|
sorry, i mean the rubber o-ring. that should be pushed down so that the bearing doesn't fall out when the pump is turned upside down? I can take a pic but to my eye, it looks like the pic from the manual. The other option is to put the rubber o-ring on top of the bearing but that doesn't seat the bearing.
thanks |
|
|
|
|
03/21/2016, 10:52 PM
|
#193 | |
|
RC Sponsor
Join Date: Sep 2009
Posts: 14,173
|
Quote:
__________________
Director Customer Support Royal Exclusiv USA For All Royal Exclusiv & Bubble King questions please refer to our Sponsor forum: http://www.reefcentral.com/forums/fo...play.php?f=745 Current Tank Info: 480G display mixed reef, 90G sump, 90G refugium, 60G display refugium. Check out my build thread: http://www.reefcentral.com/forums/showthread.php?t=1783476 |
|
|
|
|
|
03/25/2016, 09:23 PM
|
#194 |
|
Registered Member
Join Date: May 2009
Location: Buffalo NY
Posts: 962
|
Scott,
After a few days my skimmer production tends to slow doe I still get a little foam but not a lot of it overflows into the collection cup. If I take my finger and plug the air intake for 3-4 seconds and then let go it starts to produce a very thick foam that overflows into the cup at a much much higher rate. What do you think causes this and does it need to be tuned differently? My valute pipe is about 3/4 open and I run at 30-31 watts. Double cone 180. Lightly stocked at the moment 110 gallon total system. Can't remember water height at the moment but it is whatever you recommended to me before. Thanks, Dan |
|
|
|
|
03/26/2016, 08:36 AM
|
#195 | |
|
RC Sponsor
Join Date: Sep 2009
Posts: 14,173
|
Quote:
Plugging the Venturi port sends more water into the skimmer which raises the water level. That pushes all the foam into the neck up which will result in an overflow. You might try slowing the pump down more. 30-31 watts is a good speed for a 200 sized skimmer but is on the high side for the 180 IMO. I would drop it down to 23 or 25 watts. That will allow more contact time and thicker foam. You will need to raise the water level in the skimmer though and might need to raise you sump level so you don't have to go nuts closing the wedge pipe. That said, if you are happy with the foam quality where it's at, just raise the water level some but realize that it will be more sensitive with that much flow going though and may overflow easier as a result. Take a look at Urbaneks post above and my comments just below it (posts 184 & 185). It might give you some more insight into fine tuning the skimmer.
__________________
Director Customer Support Royal Exclusiv USA For All Royal Exclusiv & Bubble King questions please refer to our Sponsor forum: http://www.reefcentral.com/forums/fo...play.php?f=745 Current Tank Info: 480G display mixed reef, 90G sump, 90G refugium, 60G display refugium. Check out my build thread: http://www.reefcentral.com/forums/showthread.php?t=1783476 |
|
|
|
|
|
03/26/2016, 03:08 PM
|
#196 |
|
Registered Member
Join Date: Apr 2009
Posts: 51
|
I have a BK mini 160 that has been running in my system for about 3 months. I have raised the skimmer section from 7.5-9" of water trying to get the skimmer to skim dryer. Any reccomendations? Thanks in advance.
|
|
|
|
|
03/26/2016, 03:18 PM
|
#197 |
|
Registered Member
Join Date: Apr 2009
Posts: 51
|
By the way my system is 75 gallon mixed reef
|
|
|
|
|
03/26/2016, 04:21 PM
|
#198 | |
|
RC Sponsor
Join Date: Sep 2009
Posts: 14,173
|
Quote:
__________________
Director Customer Support Royal Exclusiv USA For All Royal Exclusiv & Bubble King questions please refer to our Sponsor forum: http://www.reefcentral.com/forums/fo...play.php?f=745 Current Tank Info: 480G display mixed reef, 90G sump, 90G refugium, 60G display refugium. Check out my build thread: http://www.reefcentral.com/forums/showthread.php?t=1783476 |
|
|
|
|
|
03/26/2016, 07:37 PM
|
#199 | |
|
Registered Member
Join Date: Apr 2009
Posts: 51
|
Quote:
Should I start from scratch at 7.5" water level and open the wedge pipe? |
|
|
|
|
|
03/27/2016, 08:07 AM
|
#200 |
|
Registered Member
Join Date: Jun 2001
Location: Hong Kong
Posts: 24
|
Scott,
A little help is needed, my tank is about 120gallon, the dc180 is sitting 8.5" in the sump, if I run the pump at 26W I'm not getting any foam at all. I have tried all the setting that you have suggested for the others like raising the sump level, closing the wedge pipes, cleaning the pump etc. I have the dc180 for few months already, and I have to run it at 50W to have foam overflow to the cup, is there anything wrong with the pump that seems like produce very little bubbles at 26W as shown in the video? https://www.youtube.com/watch?v=qm8TbWF6uHQ Thanks. |
|
|
|
|
|
|


