|
|
 06/27/2012, 07:53 PM
|
#4851 | |
|
Registered Member
Join Date: Aug 2011
Location: Star, ID
Posts: 84
|
Quote:
google fu |
|

|

|
|
06/27/2012, 07:57 PM
|
#4852 |
|
Registered Member
Join Date: Nov 2011
Location: Maui, Hawaii
Posts: 521
|
Yes they do make a sweep but you called it a sani elbow. Aloha!
__________________
Current Tank Info: 50 G Tall |
|
|
|
|
06/27/2012, 07:58 PM
|
#4853 | |
|
Registered Member
Join Date: Apr 2012
Location: Sandy Eggo
Posts: 197
|
Quote:
Here's one on Amazon: Genova Products 72815 700 Series 1 1/2" 90 Degree Sanitary Elbow BTW, Mahalo! Born and raised in Honolulu, but that was many ages ago. Still have all my family on my father's side there on big island, near Kona Beach... |
|
|
|
|
|
06/27/2012, 08:08 PM
|
#4854 | |
|
Registered Member
Join Date: Nov 2011
Location: Maui, Hawaii
Posts: 521
|
Quote:
 Love the big island Honolulu is like the mainland for me way to busy. 'mahalo nui loa' Brah! Love the big island Honolulu is like the mainland for me way to busy. 'mahalo nui loa' Brah!Maui No Ka Oi
__________________
Current Tank Info: 50 G Tall |
|
|
|
|
|
06/27/2012, 08:09 PM
|
#4855 | |
|
Registered Member
Join Date: Apr 2012
Location: Sandy Eggo
Posts: 197
|
Quote:
 I just know what they look like! And I'm sure you've heard of my cousin... Benny 
|
|
|
|
|
|
06/27/2012, 08:15 PM
|
#4856 |
|
Registered Member
Join Date: Nov 2011
Location: Maui, Hawaii
Posts: 521
|
Kalama?
__________________
Current Tank Info: 50 G Tall |
|
|
|
|
06/27/2012, 08:20 PM
|
#4857 |
|
Registered Member
Join Date: Apr 2012
Location: Sandy Eggo
Posts: 197
|
Agbayani!
|
|
|
|
|
06/27/2012, 08:23 PM
|
#4858 |
|
Registered Member
Join Date: Nov 2011
Location: Maui, Hawaii
Posts: 521
|
for real wow!
__________________
Current Tank Info: 50 G Tall |
|
|
|
|
06/27/2012, 08:29 PM
|
#4859 |
|
Registered Member
Join Date: Nov 2011
Location: Maui, Hawaii
Posts: 521
|
I didn’t know he was born to Filipino and Samoan parents. Hapa like my daughter she has the Filipino kine in her blood
__________________
Current Tank Info: 50 G Tall |
|
|
|
|
06/28/2012, 03:16 PM
|
#4860 | |
|
Moved On
Join Date: Jun 2012
Location: Carrollwood Tampa
Posts: 177
|
Quote:

|
|
|
|
|
|
06/28/2012, 03:28 PM
|
#4861 | |
|
Moved On
Join Date: Jun 2012
Location: Carrollwood Tampa
Posts: 177
|
Quote:
With that, I'm just about ready to put in my order for a new custom starphire shallow reef tank by Tom at glasscages.com. I swear, designing and planning a tank is 3/4 the fun! 
|
|
|
|
|
|
07/01/2012, 07:13 PM
|
#4862 |
|
Registered Member
 Join Date: Nov 2008
Location: Houston, TX
Posts: 10,344
|
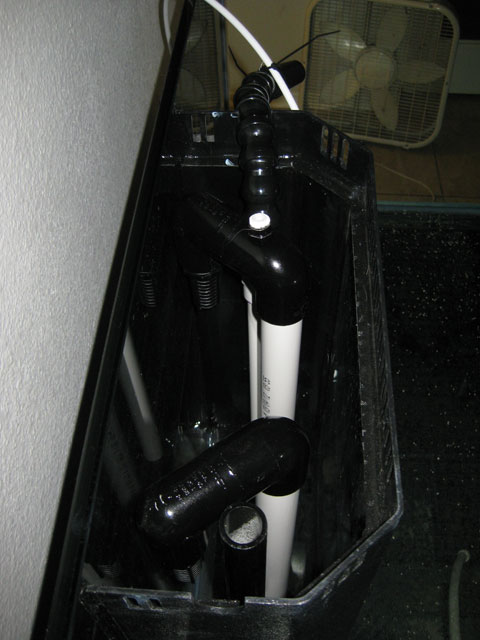
Hi all, I wanted to post the results of the past month's worth of work on my BeanAnimal plumbing, both to give thanks to those who answered questions (and beananimal of course), and to show that the system does actually work when going through a wall! My garage is directly behind my tank so that is where I have located all equipment and needed to have all drains/controls out there since the tank will eventually be surrounded by floor to ceiling custom cabinetry. So I ran the plumbing straight out the back of the tank, through the wall, and THEN into the sanitary tee. Also, I decided to just do all 1" plumbing since I don't need crazy turnover and I could save a few bucks on plumbing. The only 1.5" is the sanitary tees and the return plumbing/pump from the sump to the manifold.
I do have two questions though. 1. Where exactly is the opening of the airline of the durso supposed to be in relation to the three drain elbows in the overflow? 2. I notice that if the main drain's outlet in the sump is below the water line, it will NOT start to drain. Once it starts the siphon and water is flowing I can connect an extension of pipe to get it below the water line in the sump and it will continue to siphon. Thanks!  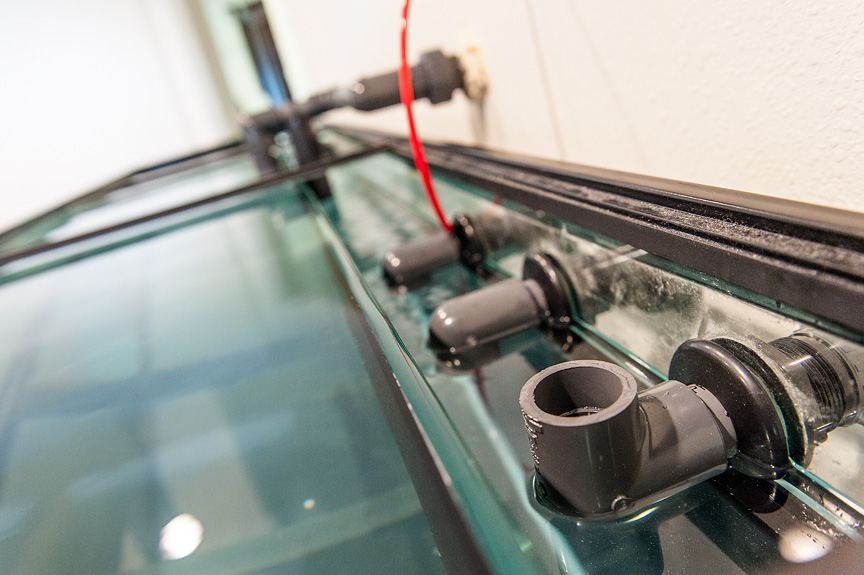 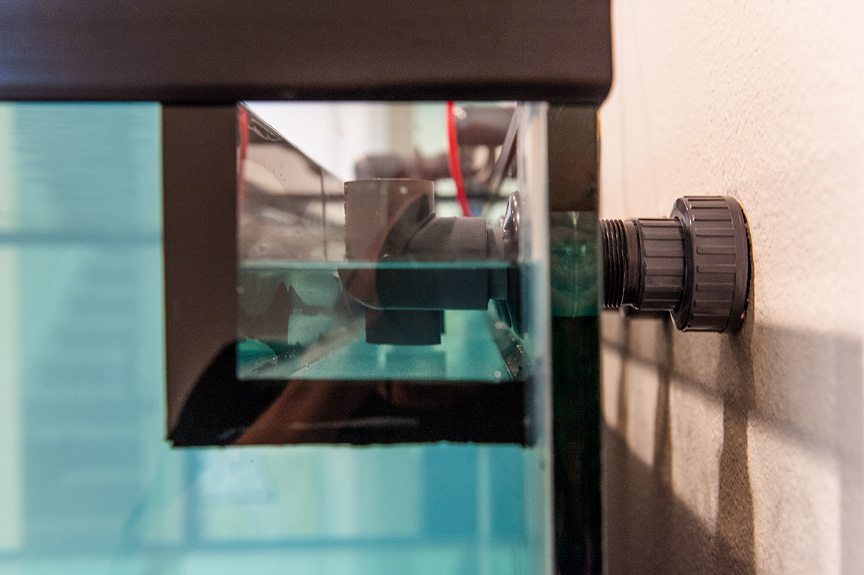 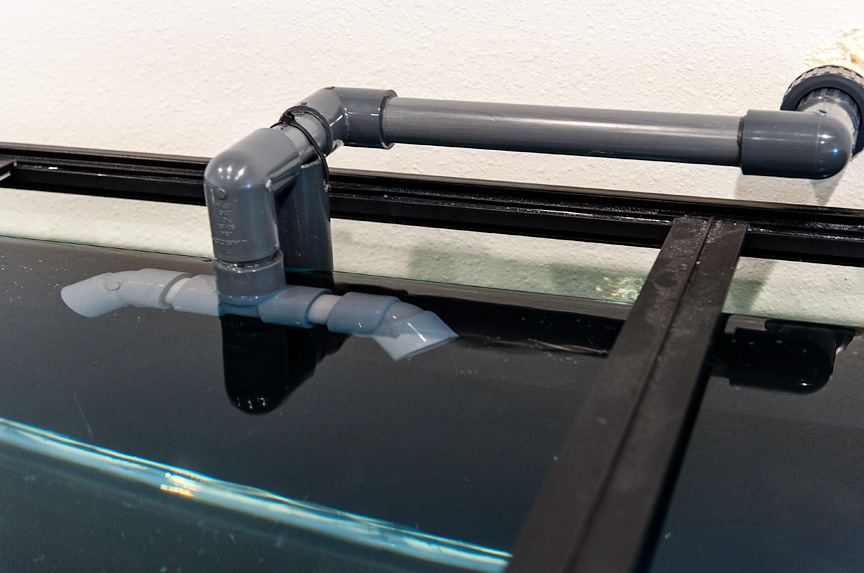 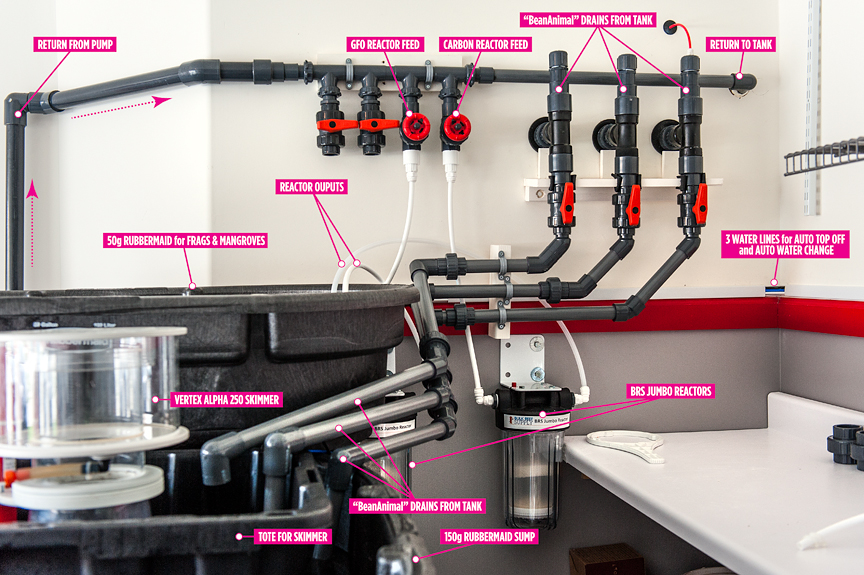
__________________
-dennis Elos Diamond 120xl | Elos Stand | Radion G4 Pros | GHL Profilux Controller | LifeReef Skimmer | LifeReef Sump Photos taken with a Nikon D750 or Leica M. |
|
|
|
|
07/02/2012, 12:18 AM
|
#4863 |
|
Registered Member
Join Date: Jun 2000
Location: El Paso, TX, USA
Posts: 1,549
|
Stupid question but are all the PVC piping all good together in the original plan or are they just held by friction?
|
|
|
|
|
07/02/2012, 07:57 AM
|
#4864 | |
|
Registered Member
Join Date: Aug 2006
Location: Menifee,Ca.
Posts: 484
|
Quote:
|
|
|
|
|
|
07/02/2012, 10:33 AM
|
#4865 | |
|
Registered Member
Join Date: Nov 2008
Location: Houston, TX
Posts: 10,344
|
Quote:
I have a 90 degree elbow hovering above the water in the sump. I had a length of pvc inserted into this elbow that terminated several inches under the water line. This is when the siphon wouldn't start. And it wasn't flowing ANY water. But as soon as I removed that length of pvc so that there was air space between the water and the elbow, the water started flowing hard.
__________________
-dennis Elos Diamond 120xl | Elos Stand | Radion G4 Pros | GHL Profilux Controller | LifeReef Skimmer | LifeReef Sump Photos taken with a Nikon D750 or Leica M. |
|
|
|
|
|
07/02/2012, 11:32 AM
|
#4866 |
|
Registered Member
Join Date: Aug 2006
Location: Menifee,Ca.
Posts: 484
|
If your siphon clogs,then your open channel (durso with the airline) takes the slack,then your emergency(upturned elbow) is your final drain.
Try to terminate your siphon line about an inch or so in the sump (mine is about 1/2 inch).If you can,do not use the elbow. |
|
|
|
|
07/02/2012, 12:45 PM
|
#4867 |
|
Registered Member
Join Date: Nov 2008
Location: Houston, TX
Posts: 10,344
|
ok, great. That's how I have the drains set up. Right now the airline is about equal to the top of the elbow of the open channel.
If you look at the schematic pic above, you can see that I need that last elbow to turn down into the sump. But maybe the extension of pvc was TOO far down into the water. I will have filter socks there anyway, so this will quiet it down, even if it has to be above the water line. Unless there is some other reason it should empty out below the water line.
__________________
-dennis Elos Diamond 120xl | Elos Stand | Radion G4 Pros | GHL Profilux Controller | LifeReef Skimmer | LifeReef Sump Photos taken with a Nikon D750 or Leica M. |
|
|
|
|
07/02/2012, 01:20 PM
|
#4868 |
|
Registered Member
Join Date: Aug 2006
Location: Menifee,Ca.
Posts: 484
|
I see which elbow your talking about now. Submerging the full siphon too deep is a common problem for start-up issues,I would start there.
|
|
|
|
|
07/03/2012, 02:10 AM
|
#4869 |
|
Registered Member
Join Date: Jun 2012
Location: NYC / Philly
Posts: 227
|
I am trying to get my parts list in order to get everything that I need. I will be using this on 40g breeder tanks. Should I scale it down at all or just build it as it is? Also can I use flexible tubing or spaflex to come off of it? If so what would I need to order for that.
I will probably be moving in a few months so want it to be modular. Also the tanks will be on a rack one above the other into a common sump so I was hoping to use tubing so I could route them easier. I can find this on the savko site: 3x $4.88 101015 (1.5" TEE PVC DWV) any help? Thanks. |
|
|
|
|
07/03/2012, 04:08 AM
|
#4870 |
|
Registered Member
Join Date: Jun 2012
Location: NYC / Philly
Posts: 227
|
So after doing more research I am wondering three additional things:
1) How to use flex tubing and connect it to PVC to run down to sump 2) What parts do I need for the return (loc-line). If someone could come up with a parts list that would help sooo much. 3) What kind of cement to use - Ok one more should I go with the gate valve and add a union below instead of union/ball like in the original plan? |
|
|
|
|
07/03/2012, 06:08 AM
|
#4871 |
|
Registered Member
Join Date: Sep 2009
Posts: 552
|
can't quite get my head around how the whole thing works?
is the siphon drain an actual siphon? and so basically are you trying to ajust the siphon rate to a point where it is draining a little bit less than what is flowing into the overflow box and then the other drain is catching the leftovers, because if you had the siphon draining more than was coming into the overflowbox it would suck all the water out of the overflow box and start sucking air. what happens if it sucks in air, does it break the siphon, does the siphon restart by inself? i don't really understand how the siphon gets started in the first place on my old standpipe whenever i put my finger over the hole in the cap that lest the air in/out the drain stops draining and the overflow box starts filling up? also what about putting a ballvalve onto a normal standpipe? why don't people do that? |
|
|
|
|
07/03/2012, 06:40 AM
|
#4872 |
|
Registered Member
Join Date: Feb 2003
Location: Pittsburgh
Posts: 20,772
|
Shrimphead...
Yes the idea is to adjust the siphon until the open channel "catches the leftovers". The siphon starts on its own. If it sucks air, it makes noise and/or starts and stops siphoning. Once the system is adjusted it is stable over a fairly wide range of flow rates. It shouldn't suck air and make noise. It is a "normal" standpipe with a ball valve
|
|
|
|
|
07/03/2012, 08:13 AM
|
#4873 |
|
Registered Member
Join Date: Sep 2009
Posts: 552
|
i was saying would it would suck air if you had the gate valve fully open as would suck all the water up in the overflow then suck air? correct?
but how does it start the siphon when you have your drain pipe in the sump underwater, the air has to be pushed out. also why did you use a T section on the siphon pipe when you capped the top of it? could you just use an elbow? |
|
|
|
|
07/03/2012, 08:41 AM
|
#4874 |
|
Registered Member
Join Date: Feb 2003
Location: Pittsburgh
Posts: 20,772
|
Shrimp:
It may be best of you spent a bit of time reading the project page at my site and/or the first page of this thread and skimming through the contents of the thread itself. I think it may help answer most of your questions rather directly. The operation of each standpipe and how they interoperate is explained in fairly specific detail on the first page of this thread (and every 20 pages thereafter) and on my site http://www.beananimal.com/projects/s...ow-system.aspx In short, the valve is used to control the rate of the siphon and is adjusted so that the standpipe DOES NOT "suck air". If the standpipe "sucks air" it will make a lot of noise or in extreme cases cause the overflow box and other standpipes to oscillate (cycle) in and out of differnet modes of flow. That is, the box will fill and flush, but it will not flood due to the design of the other standpipes. The system is not hard to "adjust" and once "adjusted" it stays "adjusted" over a fairly wide range of flow rates. The siphon starts like any other siphon starts. The water rises in the overflow box and begins to flow over the wier in the standpipe. If the rate is high enough the air is purged and a siphon forms. The air is purged easily as long as the standpipe termination is just below the water surface. The Tee on the standpipe allows the cap to be removed and the internals cleaned of biological growth (fan worms, etc) that build up over time. You can use 90 bend if you like. However, do note that on the open channel, the air breather may "slurp" due to the air intake being IN the water stream because it is on the back of a 90, not in the dry part of a tee (out of the water flow). |
|
|
|
|
07/03/2012, 03:36 PM
|
#4875 | |
|
Registered Member
Join Date: Feb 2011
Location: Rockledge Fl
Posts: 1,348
|
Quote:
|
|
|
|
|
 |
| Tags |
| beananimal, plumbing |
|
|