
|
|
 08/22/2011, 11:09 AM
|
#151 |
|
Registered Member
Join Date: Aug 2011
Location: Old Lyme
Posts: 1,308
|
any more refugium DIY's?
|

|

|
|
09/21/2011, 11:26 AM
|
#152 |
|
Zoa Addict
Join Date: Dec 2005
Location: Calgary Alberta, Canada
Posts: 274
|
i did a small DIY media basket for my 6 gallon zoa tank. a large % of the water was passing by the right side of the filter and not actually getting filtered. here is what the flow looked like. notice how a fairly large amount is passing by the right side?
 stock filter out.  so i cut 3 of these for "levels" for the new filter  then i used an 80 tooth saw blade on the table saw and cut some acrylic  here is the acrylic weld i used  so i built it 3 sided, so i can put the media in the open side, and the outside wall of the tank acts like the 4th side. here it is   and here it is with filter floss in the top, carbon in the middle (waiting on chemi-pure for 3rd chamber)  and here it is in action  notice how the whole water collumn is going into it now! it actually cleared up the water after a water change about twice as fast. let me know what you guys think
__________________
120 Gallon Reef With Starfire Front, 45 Gallon Sump, Lit by Aqua Light Pro Deluxe, Super Reef Octopus 2000 Skimmer. 25 Gallon Top Down Shallow Cube lit by a Radion Pro with a TIR lens kit Current Tank Info: 120 Gallon Reef. 45 Gallon Sump. 25 Gallon Top Down Reef |
|
|
|
|
09/24/2011, 09:03 AM
|
#153 |
|
Registered Member
Join Date: Nov 2010
Posts: 10
|
good job~
|
|
|
|
|
09/27/2011, 02:22 PM
|
#154 | |
|
Registered Member
Join Date: Sep 2011
Posts: 7
|
Quote:

|
|
|
|
|
|
09/27/2011, 08:04 PM
|
#155 | |
|
Registered Member
Join Date: Sep 2011
Location: Fairfax, VA
Posts: 36
|
Quote:
 Immature? Absolutely! |
|
|
|
|
|
09/27/2011, 09:40 PM
|
#156 |
|
Registered Member
Join Date: Apr 2008
Location: South Dakota
Posts: 63
|
Anybody have pictures and steps for mounting an AI nano above a BC29?
|
|
|
|
|
02/08/2012, 06:51 PM
|
#157 |
|
Registered Member
Join Date: Mar 2004
Location: New Hampshire
Posts: 341
|
Another DIY Media Basket / Rack BC 14
Thought I would throw my media basket on... I understand they are cheap enough to buy, however I like to build stuff... I used plexi glass, sealant, the front of an old box fan to make shelves... and the stock false bottom for a bottom, and cut the over flow to drop three waterfalls into the basket.
Without top and bottom 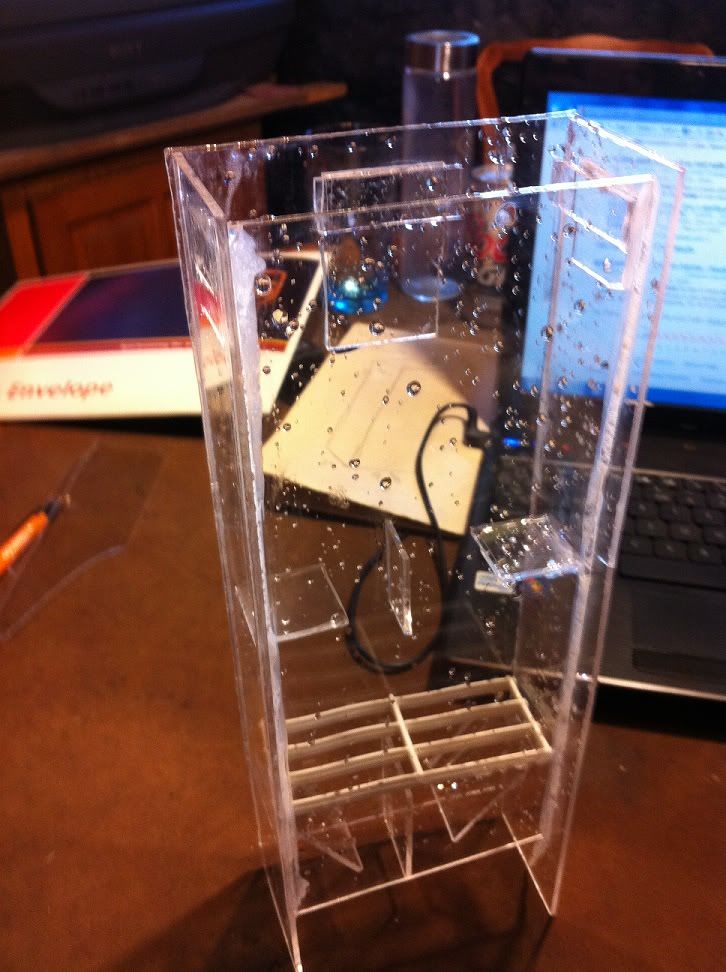 Top and Bottom 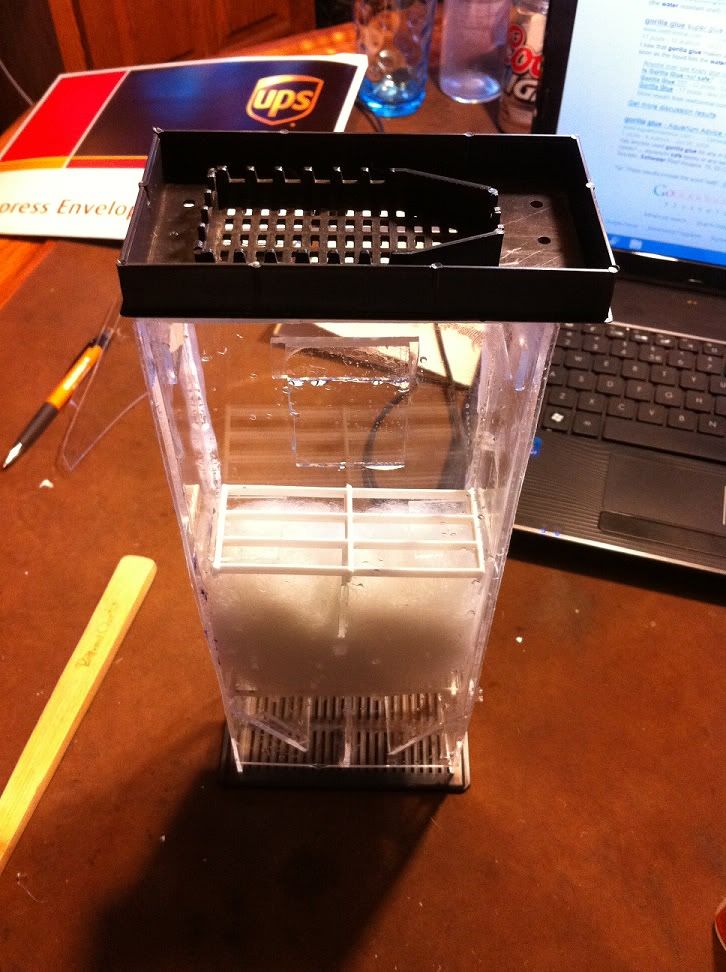 Installed next to BC14 Nanoskimmer 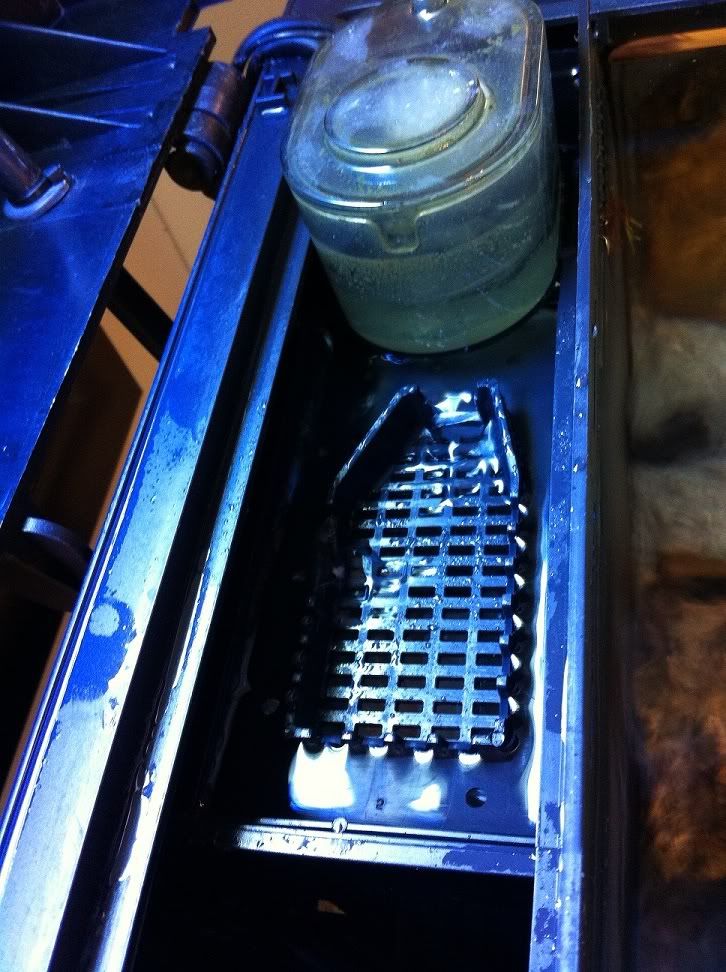
|
|
|
|
|
06/08/2012, 05:50 AM
|
#158 |
|
Registered Member
Join Date: Nov 2009
Posts: 48
|
Good job stevie t would be proud I also built my own but used super glue because i wasn't sure about the acrylic glue seems to be holdnig on
|
|
|
|
|
10/19/2012, 08:28 AM
|
#159 |
|
Registered Member
Join Date: Aug 2012
Location: Templeton, CA
Posts: 240
|
Auto top off for nano's anybody?
|
|
|
|
|
01/03/2013, 06:49 PM
|
#160 |
|
Registered Member
Join Date: Dec 2012
Posts: 9
|
Sweet.
|
|
|
|
|
01/17/2013, 11:42 AM
|
#161 |
|
Registered Member
Join Date: Feb 2007
Location: Santa Monica, California, USA
Posts: 2,511
|
I think more auto top offs are being made for nano's nowadays. But fortunately the (mostly) closed tops of nano's keeps evap to a minimum.
__________________
Inventor of the easy-to-DIY upflow scrubber, and also the waterfall scrubber that everyone loves to build: http://www.reefcentral.com/forums/showthread.php?t=1424843 |
|
|
|
|
03/18/2013, 09:39 AM
|
#162 |
|
Registered Member

Join Date: Mar 2013
Location: Savannah Georgia
Posts: 2
|
I'm made a hospital tank out of off one of my uncles old filtration tanks and a pile of PVC I've already got it hooked up, it's in the cabinet under a 28g nano cube but anyone got any idea of what light to buy
|
|
|
|
|
07/04/2013, 09:26 PM
|
#163 |
|
Registered Member
Join Date: May 2013
Location: PA
Posts: 52
|
You can use the eshopps nano overflow box in the last chamber in a biocube for a sump and connect the pump back up and connect to the jet that the small powerhead was on originally. You just have to cut the plastic a little to make it fit. There's a video on youtube on it. If you type in "eshopps nano overflow" it should come up.
|
|
|
|
|
07/20/2013, 08:10 PM
|
#164 |
|
Registered Member
Join Date: Nov 2012
Posts: 594
|
|
|
|
|
|
09/12/2013, 11:11 AM
|
#165 |
|
Registered Member

Join Date: Apr 2009
Location: Colorado
Posts: 65
|
Here is my DIY for an overflow and display refugium for my 3.4g pico
http://www.reefcentral.com/forums/sh....php?t=2329600
__________________
3.4g pico reef w/3.4g refugium 29g pistol shrimp tank |
|
|
|
|
10/04/2013, 09:14 AM
|
#166 | |
|
Registered Member
Join Date: Aug 2002
Location: Boise, ID
Posts: 524
|
Quote:
Parts list for mine: float switch(es): $5 12v relay from Radio Shack: $10 project box from Radio Shack: $3 air pump from Petco: $10 misc: FW reservoir, airline tubing, wire, super glue, mounting bracket for float switch Key benefits: -low cost. -easy to find parts: I was able to get everything locally -reliable, though component based, so easy to replace components -runs on 12v, not 120v like other DIY ATO's -no possibility of ruining your pump by running reservoir dry as mentioned above This is not my design or original by any means. I did struggle to find build instructions 'tho when I went to make mine. There are several people who post the parts but don't list instructions (like I just did  ). So if anybody would like me to, let me know. ). So if anybody would like me to, let me know.
|
|
|
|
|
|
10/04/2013, 09:38 AM
|
#167 | |
|
Registered Member
Join Date: Jul 2013
Location: Columbia, SC
Posts: 72
|
Quote:
|
|
|
|
|
|
10/04/2013, 10:03 AM
|
#168 | |
|
Registered Member
Join Date: Aug 2002
Location: Boise, ID
Posts: 524
|
Quote:
|
|
|
|
|
|
10/05/2013, 03:17 PM
|
#169 |
|
Registered Member
Join Date: Aug 2002
Location: Boise, ID
Posts: 524
|
Air Powered ATO
OK... I would be pretty disappointed if I looked at these instructions to learn how to do a DIY project. I couldn't take very good pictures because everything's assembled and zip-tie'd in. This would have been better to write up DURING the build. Anyways..
Parts: - Air powered pump from Petco - Relay from Radio Shack - 12v power supply - Reservoir: I found a great 3 gallon drinking water jug at the grocery by the water refill machine. You could use a Gatorade bottle or something, but you'd need to refill more often. - bracket for float switch(es) - airline tubing - rigid airline tubing - Super glue or silicone or both - Project box - OPTIONAL misc items: clamp on airline valve to secure output of airline tubing to tank, shrink tube and solder for any splices if you don't want to use wire nuts, extension cord if you don't want to cut your air pump's power cord. Socket for your relay if you'd prefer to use screw terminals on your electrical connections. Put simply, this ATO uses the air pump to force air into an airtight reservoir which forces water out of another piece of airline tubing running to your tank. Steps: Electrical: notes: You're using the 12v relay and power supply simply to keep 120v out of your tank. You will have to cut your air pump's power cord. If you'd rather not void your $10 Petco air pump, you could always use a cheap $2 extension cord to cut into. 1) Take the power cord for your air pump (or extension cord) and cut ONE wire. Peel a couple inches back on each side and strip back a bit of the jacket. These exposed ends plug into pins 4 and 6 on your relay. The order doesn't matter. I soldered my wires to the relay pins. In retrospect, I would have definitely grabbed a few female wire connectors and used those. Much easier. 2) Take the wire from your float switches and make connections to 12 volt power supply and pins 7 and 8 on the relay. You can use 1 float switch or 20. Doesn't matter. I won't get into details on how many float switches you want to use for safety or redundancy or the best way to wire them. There's a lot of info on that here about wiring float switches. My diagram shows 2 float switches. You may need to extend your float switch wiring down to your relay. If you do, use whatever wire you're comfortable with to extend it. I used an old plug in wire you would find on the back of a VCR or something. I suggest using shrink tubing and soldering your splices for safety. Both power supplies will be plugged in and left plugged in. The signal from the float switches activate the relay which converts the 12v to 120v, activating the air pump. Stuff your relay into a project box, tidy your wires, and be done with it. Hand drawn diagram below: 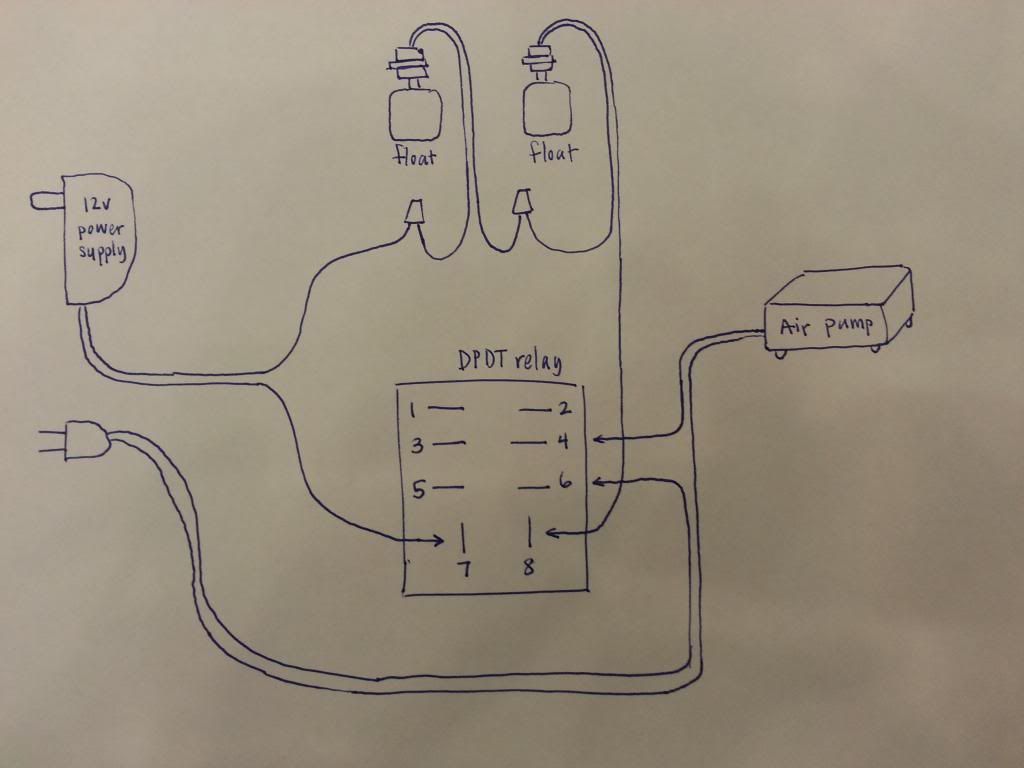 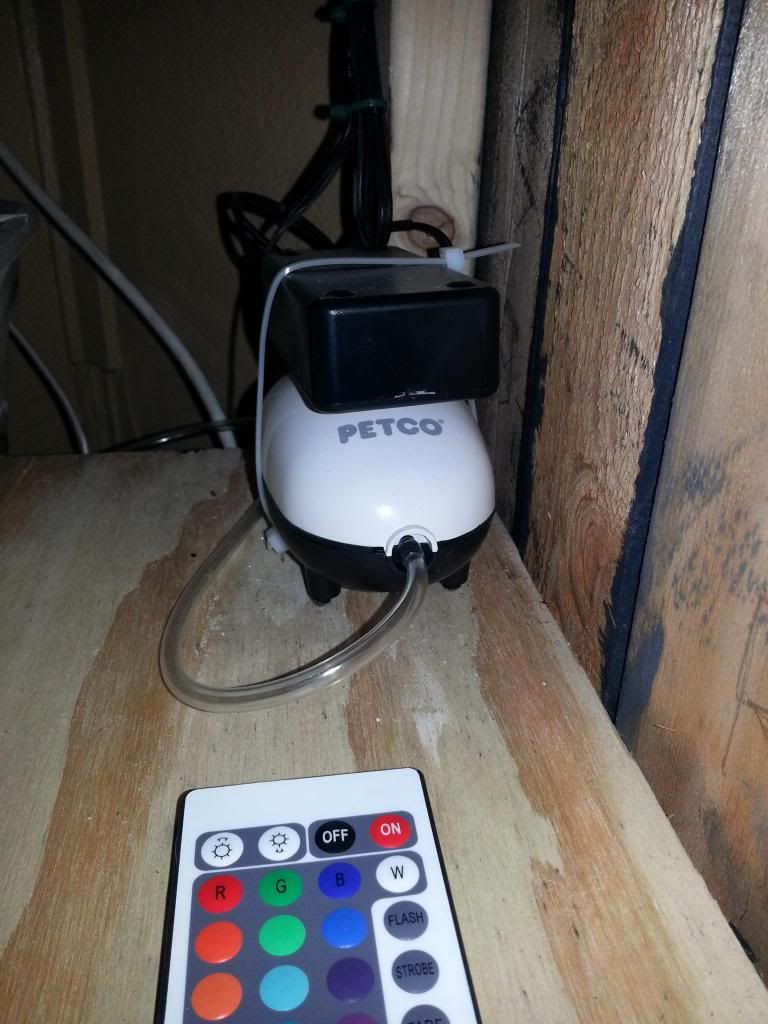 Tubing and reservoir: 1) Take the tight fitting lid of your reservoir/container and drill 2 holes just a bit smaller than your rigid airline tubing. Cut one short piece, about 4", then the other longer one to reach to the bottom of your reservoir with about 2" left to come out of the top. Push the tubing through the holes you drilled. I suggest Super gluing the tubes in place AND siliconing them for maximum airtightness. The air pump output tubing goes onto the shorter tube on the lid. Run another piece of soft airline tube from the longer piece of rigid tubing on the lid up to the tank. I used the clamp on airline valve shown in the pic below, which I found in the FW section of my LFS. This piece basically keeps the tubing out of the water to eliminate the possibility of a syphon. notes: this $10 Petco air pump easily pumps the 4 ft from my reservoir to my tank. If you have a lot further to go, you may want to splurge on a $15 pump :P I would also suggest letting the silicone or caulk dry until firm and dry. I made the mistake of being impatient and got it wet while it was soft. 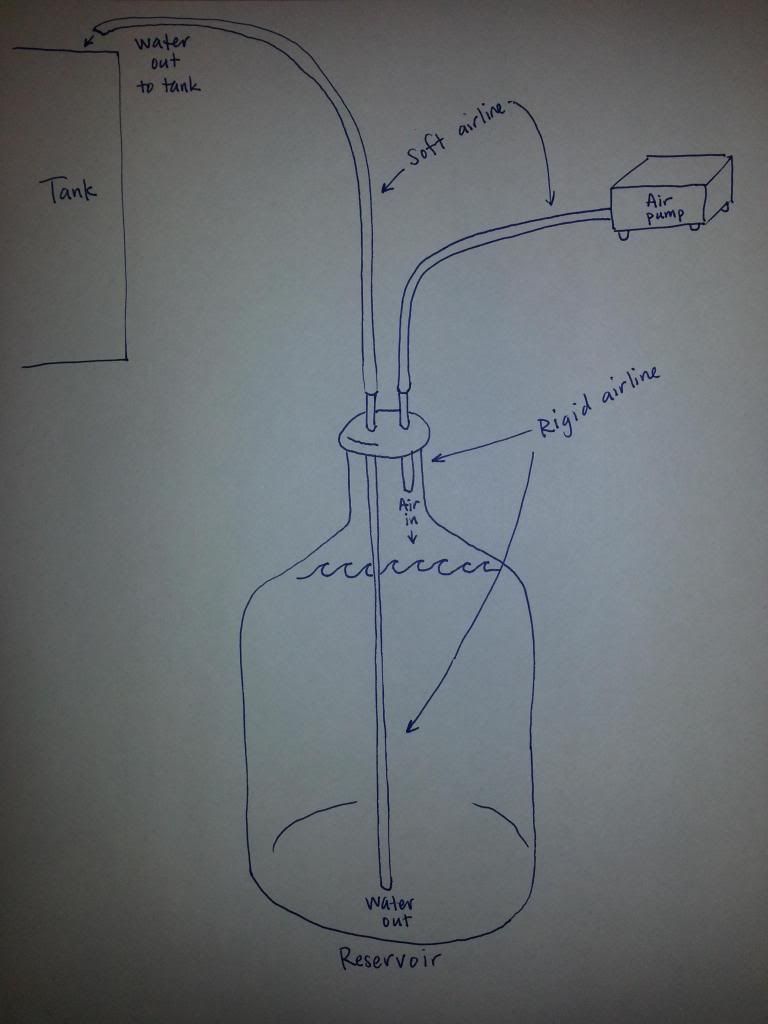 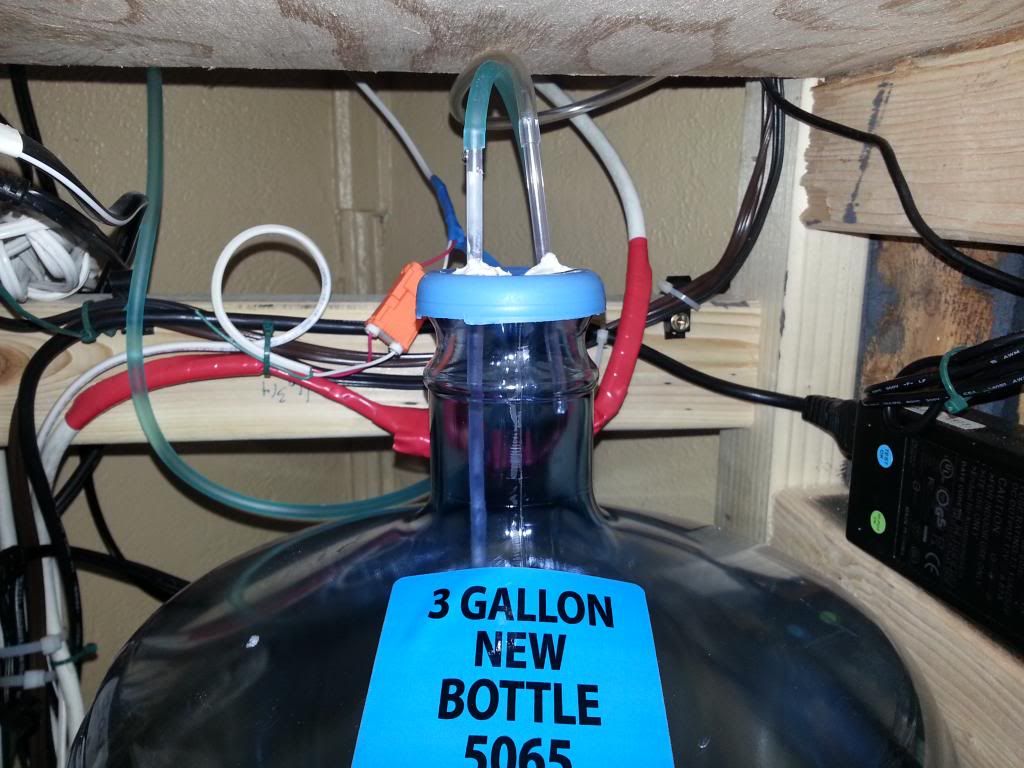 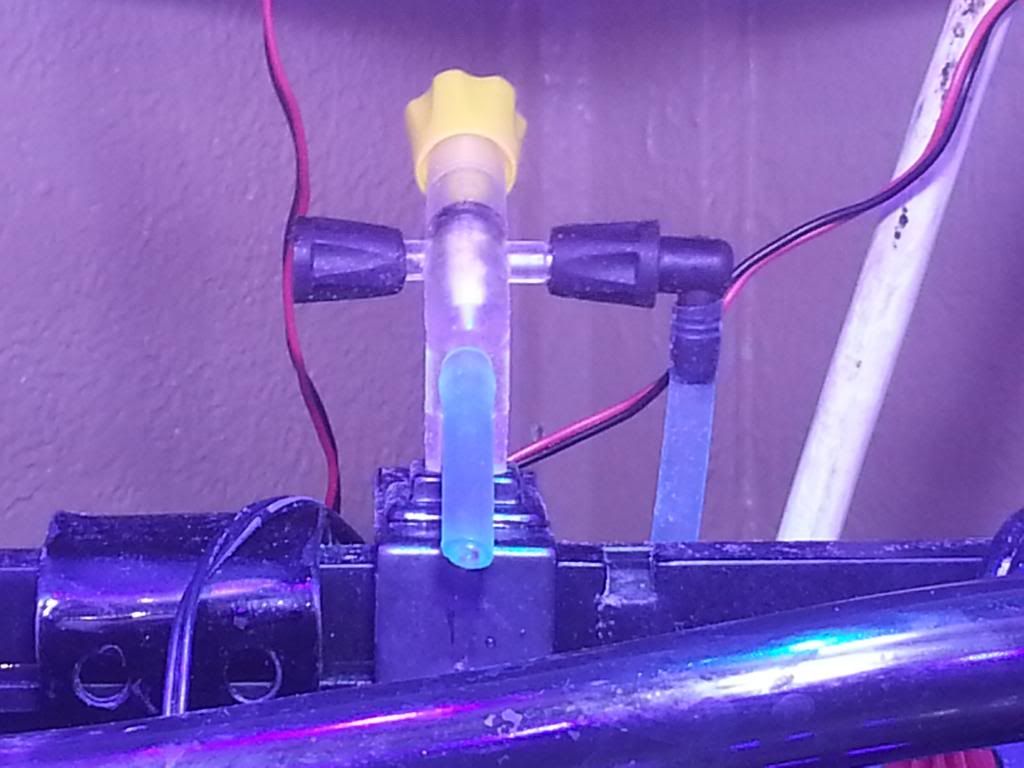 Float switch bracket: I won't get into a ton of detail on this. You can buy one, make one, or maybe you have one lying around. If you need to make one, run to your local store that sells acrylic, snap off a couple pieces, and shape them as needed for your tank and float switches with a lighter or other heat source. You should really try to make this thing adjustable. Couple more comments.. There are a lot of ways you can splash/snail proof your float switch(es). Pill bottle, 35mm film canister, pvc end caps. I used pvc end caps and drilled a bunch of little holes so water can flow through. I find that this setup is perfect in terms of the system coming on and off. It's not constantly switching on and off. Also, this is a GREAT setup if you ever want to does KALK. No pump comes into contact with the water and you have an easy jug to work with and clean out if necessary. Good luck and enjoy. Let me know if anything needs clarification. Last edited by brvheart; 10/05/2013 at 03:55 PM. |
|
|
|
|
10/06/2013, 03:13 PM
|
#170 | |
|
Registered Member
Join Date: Nov 2012
Posts: 594
|
Quote:
__________________
SPS = STABILITY PROMOTES SUCCESS :D GO VOLS!!! CURRENT TANK: 35 gallon cube w/ 10 gallon sump. Mixed/SPS dominant Current Tank Info: 35 Gallon Cube w/ 10 gallon sump |
|
|
|
|
|
10/07/2013, 01:58 PM
|
#171 |
|
Registered Member
Join Date: Feb 2007
Location: Santa Monica, California, USA
Posts: 2,511
|
Have not seen an air ato in a long time.
__________________
Inventor of the easy-to-DIY upflow scrubber, and also the waterfall scrubber that everyone loves to build: http://www.reefcentral.com/forums/showthread.php?t=1424843 |
|
|
|
|
01/14/2014, 09:46 PM
|
#173 |
|
Registered Member
Join Date: Aug 2004
Location: El Dorado Hills, CA
Posts: 239
|
I've seen aquaclear's converted to algae scrubbers
|
|
|
|
|
01/21/2014, 05:02 PM
|
#174 | |
|
Registered Member
Join Date: Dec 2013
Location: Largo
Posts: 150
|
Quote:
|
|
|
|
|
|
03/21/2015, 04:22 PM
|
#175 |
|
Registered Member
Join Date: Mar 2015
Posts: 1
|
Bad links
Just joined,looking at diy nano getting a lot of bad or old posts ,what's going on?
|
|
|
|
 |
|
|


