
|
|
 09/28/2012, 12:50 PM
|
#5076 | |||
|
Registered Member
Join Date: Sep 2012
Location: The Netherlands
Posts: 10
|
Quote:
But I can always change my plans. Maybe I should think about this a day or so  Quote:
 ) So therefore I wrote "acrylic". Plexiglass (looks very similar to acrylic) is very good bendable. I made this "machine" what makes this an easy task ) So therefore I wrote "acrylic". Plexiglass (looks very similar to acrylic) is very good bendable. I made this "machine" what makes this an easy task  Regards, Atmoz |
|||

|

|
|
09/28/2012, 01:11 PM
|
#5077 | |
|
Registered Member
Join Date: Jul 2004
Location: AWOL
Posts: 12,013
|
Quote:
If you know how to bend acrylic, and have done it often, it is an easy process. 
__________________
"Things should be made as simple as possible, but not simpler." (oft attributed to Einstein; most likely paraphrasing by Roger Sessions; compactly articulates the principle of Occam's Razor) Current Tank Info: 325 6' wide Reef |
|
|
|
|
|
09/29/2012, 01:30 AM
|
#5078 |
|
Registered Member
Join Date: Sep 2012
Location: The Netherlands
Posts: 10
|
Maybe this is better for drilling my last 2 holes:
(tank is standing at his side) 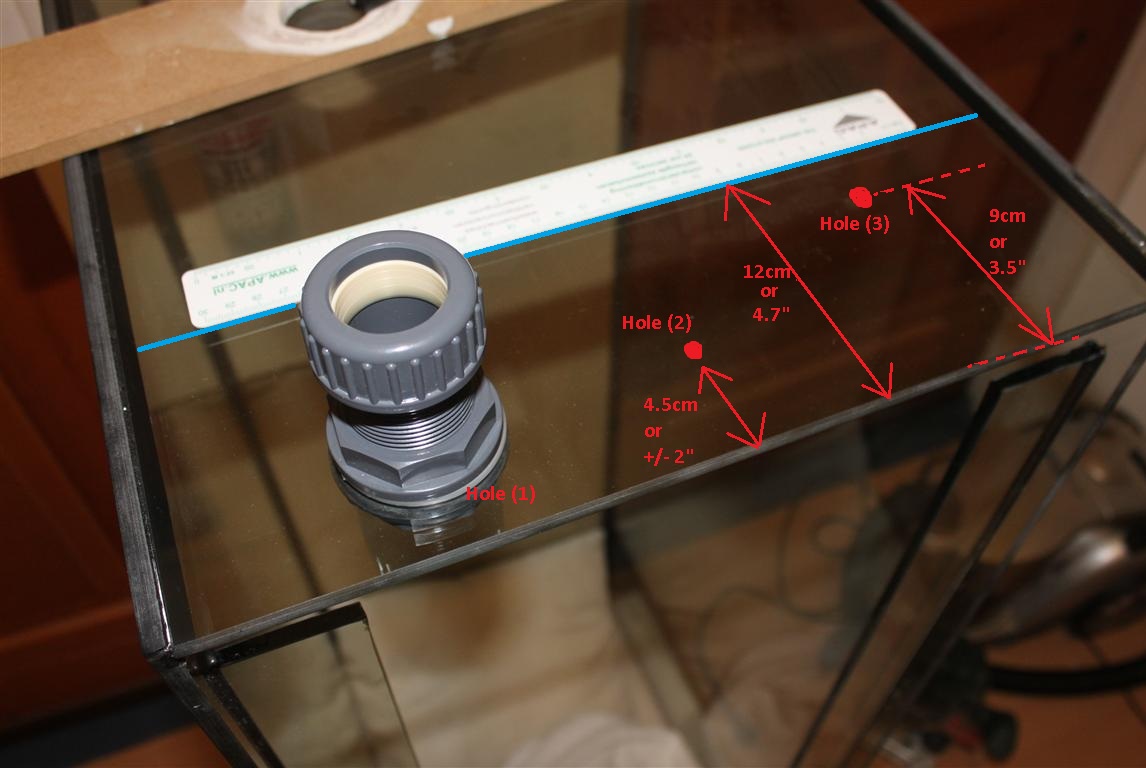 Hole (1) --> already drilled hole 2" from top of tank (open channel pipe) Hole (2) --> same height as hole 1 (full siphon pipe) Hole (3) --> much lower hole 3.5" from top of tank (emergency pipe) The blue line is the bottom of the overflow weir. Should this be better? Because as I mention before, I can always extend the 2 channel pipes downwards if needed. So therefore Hole (2) at the same height as Hole (1)? Is that a good idea? Thanks in advance / kind regards, Atmoz |
|
|
|
|
09/29/2012, 09:56 AM
|
#5079 |
|
Registered Member
Join Date: Feb 2011
Location: Rockledge Fl
Posts: 1,348
|
Uncle,
If my siphon is low enough(which I believe it is) I should then be able to turn my open into a siphon before the dry takes effect correct? Would this be better than dry first then open? The reason I ask, is because in another thread you said its best to keep the dry, dry, because you don't want anything to go in there and block it. Thanks... They should change your name from uncleof6 to "Mr.Plumb-yer-tank".
__________________
220 w/75 sump. 2 Kessil AP700s, 2- MP60, 2- MP40, 1-MP10(in sump/frag tank), Waveline DC 10000, Reef Octopus elite INT220, Radion G1(over sump/frag tank), Apex Wifi with a few extras Current Tank Info: 220 in progress |
|
|
|
|
09/29/2012, 10:10 AM
|
#5080 | |
|
Broncoholic
 Join Date: Oct 2011
Location: Mineola, Tx. 75773
Posts: 181
|
Quote:
Just for what it's worth," I am not a Professional, and I never try this at home"!!!..............................Budster
__________________
Going to Church does not make you Righteous any more than standing in a garage makes you a car! Sarchasm: The gulf between the author of sarcastic wit and the person who doesn't get it! Current Tank Info: 210g Miracles "Starphire" In-Wall, 340g total system, RO Skimmer, Maxspect Razor LED's, Mixed Reef. |
|
|
|
|
|
09/29/2012, 10:49 AM
|
#5081 |
|
Registered Member
Join Date: Feb 2003
Location: Pittsburgh
Posts: 20,772
|
Why would you go through the trouble of using the "plug" to purge the air. The system should (must) work without human intervention. Setup properly, the air will pruge itself
|
|
|
|
|
09/29/2012, 10:51 AM
|
#5082 | |
|
Registered Member
Join Date: Feb 2003
Location: Pittsburgh
Posts: 20,772
|
Quote:
|
|
|
|
|
|
09/29/2012, 11:22 AM
|
#5083 | |
|
Registered Member
Join Date: Jul 2004
Location: AWOL
Posts: 12,013
|
Quote:
__________________
"Things should be made as simple as possible, but not simpler." (oft attributed to Einstein; most likely paraphrasing by Roger Sessions; compactly articulates the principle of Occam's Razor) Current Tank Info: 325 6' wide Reef |
|
|
|
|
|
09/29/2012, 07:39 PM
|
#5084 |
|
Registered Member
Join Date: Sep 2012
Posts: 5
|
ok..unique situation and could really use your help as I'm a newbie but willing to learn...I've attached 2 drawings of a 100g rectangular acrylic tank I plan on purchasing to place on a half-wall that will be seen from both sides from 2 rooms. I like the idea of the overflow system you have designed but is it possible to do with the design plan I have shown? I do plan on leaving a space between the tank and the regular wall allowing room for the plumbing and then just box it in to be hidden from sight. The questions I have are:
1. Will the overflow be enough placing it in the width-end of the tank? 2. Not sure how I would plumb to the sump which will be on the floor at the bottom of the sidewall (not a straight run as the halfwall shelfplate will be there) any help would be appreciated!! thx!! sorry images didnt load right..geeez photo 1.jpg photo 2.jpg Last edited by rxnet; 09/29/2012 at 08:03 PM. |
|
|
|
|
09/29/2012, 09:40 PM
|
#5085 | |
|
Broncoholic
Join Date: Oct 2011
Location: Mineola, Tx. 75773
Posts: 181
|
Quote:
 .............Budster .............Budster
__________________
Going to Church does not make you Righteous any more than standing in a garage makes you a car! Sarchasm: The gulf between the author of sarcastic wit and the person who doesn't get it! Current Tank Info: 210g Miracles "Starphire" In-Wall, 340g total system, RO Skimmer, Maxspect Razor LED's, Mixed Reef. |
|
|
|
|
|
09/29/2012, 11:19 PM
|
#5086 | |
|
Registered Member
Join Date: Jul 2004
Location: AWOL
Posts: 12,013
|
Quote:
 --upload them to photobucket (you need a free account) and copy the html code giving the location of the photo on photobucket, paste in in your post, and the pictures will appear in your post. --upload them to photobucket (you need a free account) and copy the html code giving the location of the photo on photobucket, paste in in your post, and the pictures will appear in your post.I get the idea you are curious about however. The drain system/overflow will work fine on the end of the tank, rather than the back. One problem I have heard of, is the far end of the tank, not renewing the surface, ie, the oil slick is remaining. This can be addressed with a power head moving water toward the overflow end of the tank, or placing the return at the far end of the tank (opposite the overflow.)
__________________
"Things should be made as simple as possible, but not simpler." (oft attributed to Einstein; most likely paraphrasing by Roger Sessions; compactly articulates the principle of Occam's Razor) Current Tank Info: 325 6' wide Reef |
|
|
|
|
|
09/30/2012, 08:21 AM
|
#5087 |
|
Registered Member
Join Date: Mar 2009
Location: Barboursville, WV
Posts: 628
|
Using 1" bulkheads, is a 12" wide overflow box wide enough to house all three drains?
|
|
|
|
|
09/30/2012, 08:23 AM
|
#5088 |
|
Registered Member
Join Date: Mar 2001
Location: Aberdeen NJ
Posts: 1,853
|
AMAZING, Simply Amazing. I just finished my setup. After a bit of really loud gurgling I am can only hear the humm of the pump.
I have a 46 bow. Busted one tank drilling it. I went with a eheim 1260 with a 1 inch fittings rather than 1.5. I tried the 1.5, and their size just over took the tank. I bet I could go down to 3/4 as well. Just finished filling it with water about 1 hour ago and waiting on something to happen. Super super silent. I have the siphon closed about 25%. Here is a question... the depth of my c2c is 5 inches and width is 3.5 and 30inches long. The water is only about 1inch deep, is that normal???? Bean, thanks for this really smart, great mod. rich TylerHaworth : I think it might depend on its location. Reading all the notes on hole locations, drilling near the edge is of the greatest concern. I have 2 of my holes spaced 5 inches on center. So in theory I could put another another 5 inches on center, only requiring 10 inches, and I was a bit concerned, so I provided a bit more distance. However, if one of those holes is near the edge you might need some more room. Last edited by GROSSR; 09/30/2012 at 08:35 AM. |
|
|
|
|
09/30/2012, 08:58 AM
|
#5089 |
|
Registered Member
Join Date: Mar 2009
Location: Barboursville, WV
Posts: 628
|
This is gonna be on a four foot tank...
(6" of glass) [(Gap)(Bulkhead1)(Gap)(Bulkhead2)(Gap)(Bulkhead3)(Gap)] (Remainder of 48") The 45mm holes are 1.77" and I'd use a 2" gap from edge of hole to edge of hole and 3/4" between edge of hole and wall of box on the ends... [.75+1.77+2+1.77+2+1.77+.75] = 10.81 = Within 12" of the box Too close? Dangerous? Fine? |
|
|
|
|
09/30/2012, 12:12 PM
|
#5090 |
|
Registered Member
Join Date: Mar 2001
Location: Aberdeen NJ
Posts: 1,853
|
With that much room, why do you need to be 12"? There might be some design considerations. I used the following post.
http://www.reefcentral.com/forums/sh....php?t=1772359 Also found an advantage to a C2C that leaks. As the tank was filling up, I noticed water coming into a couple of small spots where the Weldon didn't quite flow. Water was leaking in, very slowly. At first I was concerned but was also concerned about water pressure on the outside of the C2C overflow. With water gently leaking in, it was not so much of a concern. Now I have to drain the tank and I am trying to figure out how to get all the water out, towel, cups, etc,,I noticed it leaked out. So while not exactly a perfect seam, having a tiny leak does have its advantages. rich |
|
|
|
|
09/30/2012, 01:04 PM
|
#5091 |
|
Registered Member
Join Date: Sep 2012
Posts: 5
|
Heres the rough drawing.. Sorry.. Best i could do from work. Let me know ur thoughts. Also placing the return at the opposite end of the overflow would be tough to conceal being on the half wall. As you can see trying to get the three siphons to the other side of the wall also presents a problem as they need to be plumbed sideways . Any ideas appreciated!
  
Last edited by Misled; 11/01/2017 at 06:46 PM. |
|
|
|
|
09/30/2012, 02:12 PM
|
#5092 |
|
Registered Member
Join Date: Mar 2009
Location: Barboursville, WV
Posts: 628
|
I just want it to be as minimal in tank footprint as possible.
|
|
|
|
|
09/30/2012, 03:53 PM
|
#5093 |
|
Registered Member
Join Date: Sep 2012
Posts: 5
|
This is what i was thinking but not sure it would work and be quiet

Last edited by Misled; 11/01/2017 at 06:47 PM. |
|
|
|
|
10/01/2012, 07:28 AM
|
#5094 |
|
Registered Member
Join Date: Mar 2001
Location: Aberdeen NJ
Posts: 1,853
|
As I said, I tested my overflow 30" and it doesn't make a sound. To help you out, I tilted the stand so about 14 or so inches of the C2C only overflowed. Being I tilted the tank, the lowest end of the C2C had a bit more water than the other end. It made some noise of water flowing. The noise was absolutely minimal. If I could have had an even flow of water over the C2C I bet it would be silent. So at the lowest end of the C2C water was about 1/2" deep and the other end just getting over the C2c.
My daughter who has incredible hearing said she was amazed at how quiet it was when tilted and said she heard next to nothing when the tank was level, she did hear the hum of the pump. rich |
|
|
|
|
10/01/2012, 03:48 PM
|
#5095 | |
|
Broncoholic
Join Date: Oct 2011
Location: Mineola, Tx. 75773
Posts: 181
|
Quote:
with a 36" drop..........................Budster
__________________
Going to Church does not make you Righteous any more than standing in a garage makes you a car! Sarchasm: The gulf between the author of sarcastic wit and the person who doesn't get it! Current Tank Info: 210g Miracles "Starphire" In-Wall, 340g total system, RO Skimmer, Maxspect Razor LED's, Mixed Reef. |
|
|
|
|
|
10/01/2012, 05:40 PM
|
#5096 |
|
Registered Member
Join Date: Sep 2012
Posts: 5
|
looks like what I need to do...thanks!! Any ideas on hiding the return...the aquarium will be rimless acrylic...sounds like I need to get the return on the opposite end but not sure how to do it without looking like ***. And how bad would it be to place on the same side of the overflow?
thx! |
|
|
|
|
10/01/2012, 07:37 PM
|
#5097 | |
|
Broncoholic
Join Date: Oct 2011
Location: Mineola, Tx. 75773
Posts: 181
|
Quote:
Same side for sure, easliy hidden with the other pipes. Place as far into one corner as possible, create flow around the tank and back to the OF. You should use power heads for the bulk of your movement anyway......Budster
__________________
Going to Church does not make you Righteous any more than standing in a garage makes you a car! Sarchasm: The gulf between the author of sarcastic wit and the person who doesn't get it! Current Tank Info: 210g Miracles "Starphire" In-Wall, 340g total system, RO Skimmer, Maxspect Razor LED's, Mixed Reef. |
|
|
|
|
|
10/07/2012, 10:02 AM
|
#5098 |
|
Registered Member
Join Date: Nov 2011
Location: Akron, OH
Posts: 401
|
I have my semi coast to coast built and it turned out great very quiet and moves a ton of water. But I am having trouble finding something to secure the air line at the right level in the overflow box. Whats everybody using?
|
|
|
|
|
10/08/2012, 07:11 AM
|
#5099 |
|
Registered Member
Join Date: Nov 2011
Location: Gilbert
Posts: 743
|
This is an awesome and inspiring thread. It took me a week to get through it all. I am working on a project tank right now. It is a 150 long and is as of yet undrilled. I am going to drill this weekend. I am planning for a 48 inch semi coast to coast
I would love to get some expert advice on hole size and drill height. The tank is 29 high x 72 long. This is the first time I am drilling a tank and really dont want to mess it up. What do you guys recommend? |
|
|
|
|
10/08/2012, 07:12 AM
|
#5100 |
|
Registered Member
Join Date: Nov 2011
Location: Gilbert
Posts: 743
|
This is an awesome and inspiring thread. It took me a week to get through it all. I am working on a project tank right now. It is a 150 long and is as of yet undrilled. I am going to drill this weekend. I am planning for a 48 inch semi coast to coast
I would love to get some expert advice on hole size and drill height. The tank is 29 high x 72 long. This is the first time I am drilling a tank and really dont want to mess it up. What do you guys recommend? |
|
|
|
 |
| Tags |
| beananimal, plumbing |
|
|


