
|
|
 02/14/2010, 10:07 PM
|
#1 |
|
Registered Member
Join Date: Dec 2006
Location: kaukauna, wi.
Posts: 3,879
|
q5 led mod to hqi pendent...tons of pics!!
well i wanted to to a 3w led set up for my frag tank for frag swaps...i know leds do great on color and growth, energy savings and putting a beam of light where i really want it....almost strait down
 this is what i came up with....sorry for all the pics...i wanted to catch everything that i could.. step one...get one of these (this one is a 150w pendent that i moded for a 70w de) 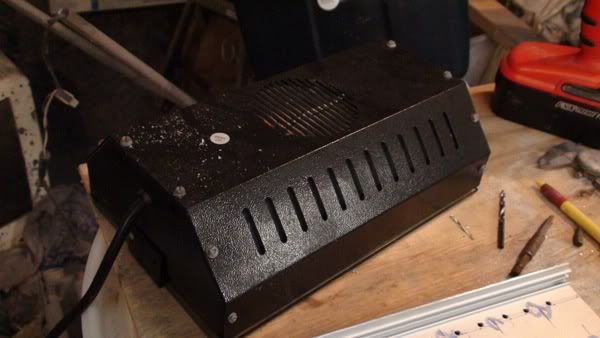 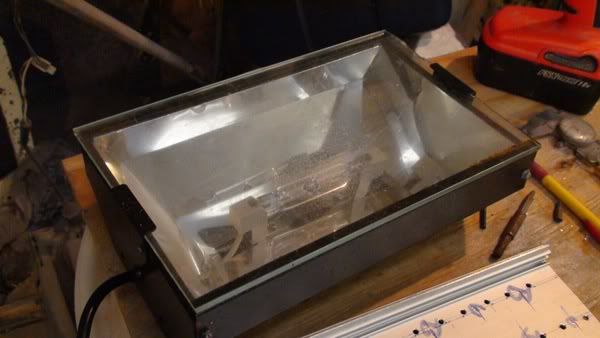 next i need a heat sink..well i have 2 of these and they where just laying around not getting use cuz of a misleading bad buy i did...  when i take off the end plates it slides apart in to 2 equal halves that i can use.. 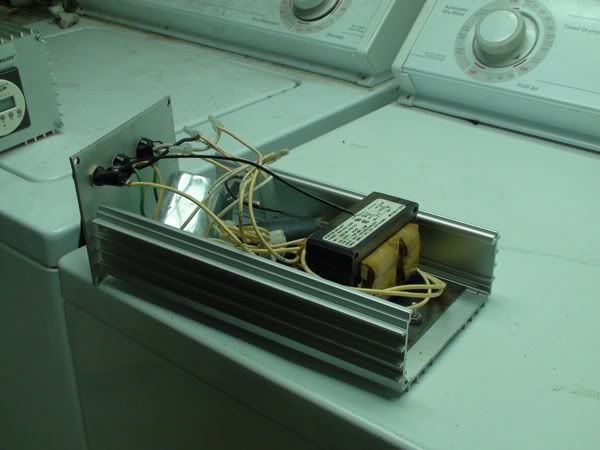 even in half it was to tall so i stuck it in a vise and went at it 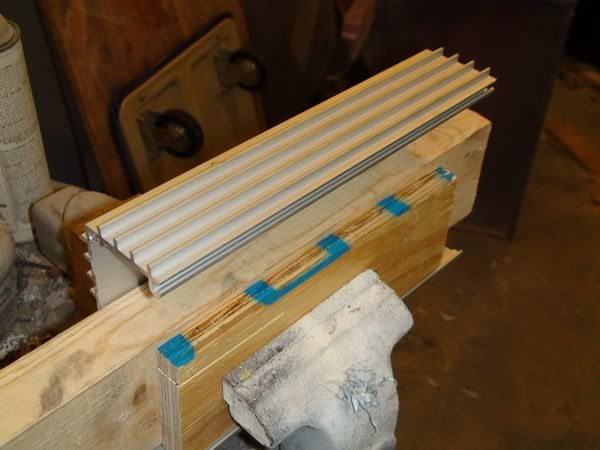 after 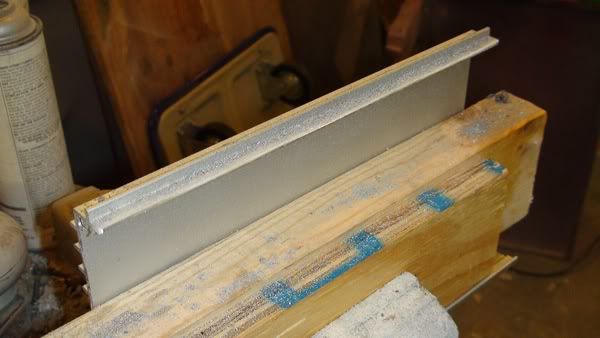 granted its not very thick but it is thick enough.. 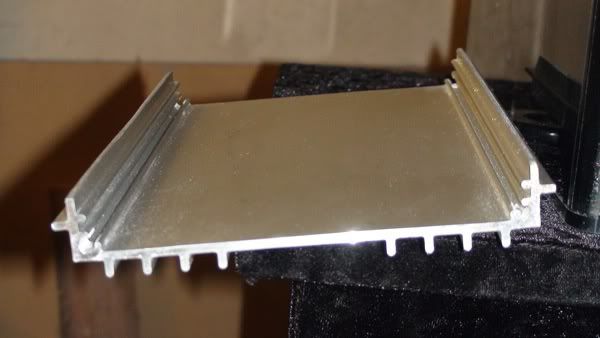
__________________
PLEASE DONT USE GREAT STUFF (THE YELLOW STUFF) IN YOUR TANK........USE POND FOAM (THE BLACK STUFF).. I BEG YOU! Great stuff====$5 a can 24-48 hour cure Epoxy to cover it====little as $5 for small projects or up to $100+ for larger projects and another 24-48 hour cure I hope you covered it well cuz if you didnt it will start to break down in a few months sand is another added cost to cover up the yellow. Pond foams====$9-$15 a can 24-48 hour cure DONE! You can cover it with sand if you want to (YOU DONT HAVE TO) though but thats added cost again Current Tank Info: 75 gal under way |

|

|
|
02/14/2010, 10:09 PM
|
#2 |
|
Registered Member
Join Date: Dec 2006
Location: kaukauna, wi.
Posts: 3,879
|
well i had to do a lay out of the 24 so the color was even when it hits the coral im trying to light..
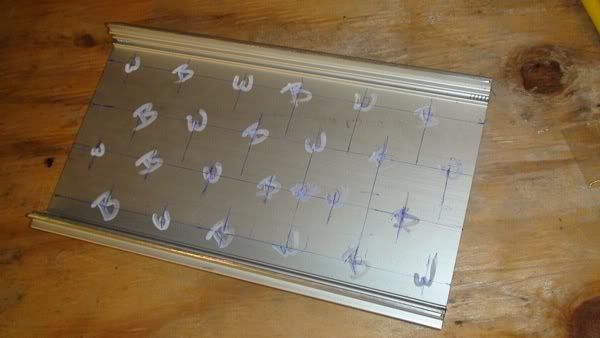 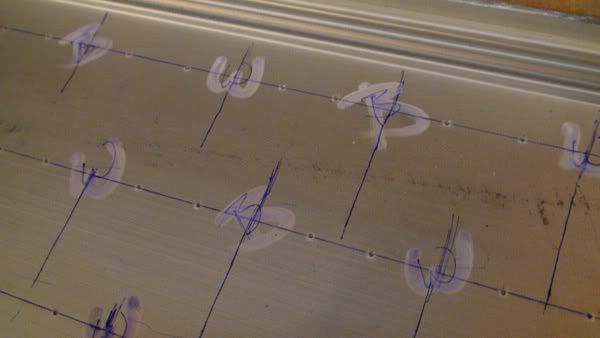 now i didnt use a drill press to drill my heat sink....you may say thats nuts but its not if you do it right. first you must make shure that the drill bit doesnt walk away from where you want it to go. using a spring loaded center punch makes quick work of the aluminum for making little divots in it so the bit digs in..and second...USE A SHARP DRILL BIT  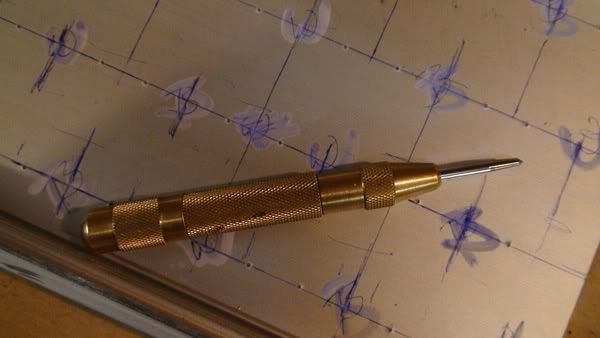 DRILL IT!! 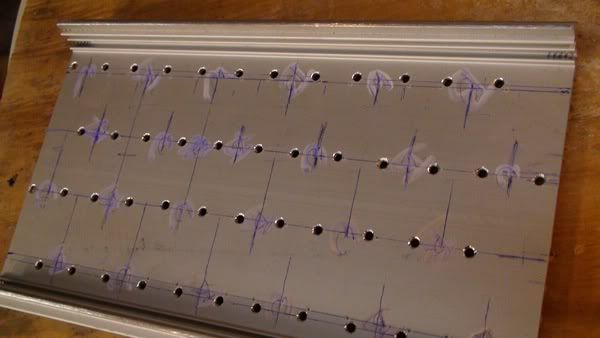 i had to move the outside sets of led since the mounting hole would have interfered with the fins of the sink..you can see my old lines and the new ones with the holes in them..plus as you can see in this next pic also is that since these where off a ballast...they have come end holes in them that have some threads in them....well it comes in real handy for mounting in the pendent... 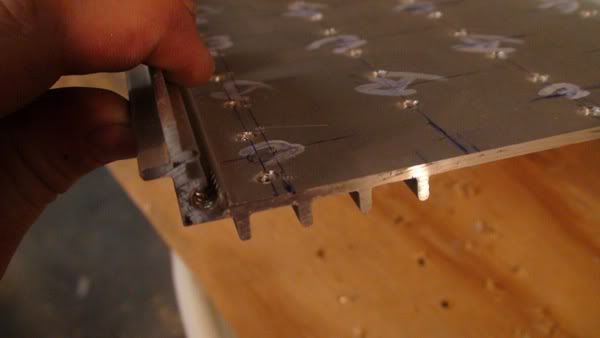 see the gap from the edge of the sink to the pendent all the way around?? well if you cant i can tell you that there is a .300" gap all the way around...this comes in real handy to move air around this sink...and it makes the side fins usable...plus in this next pic you can see what it will kinda look like with a led with an optic on it. 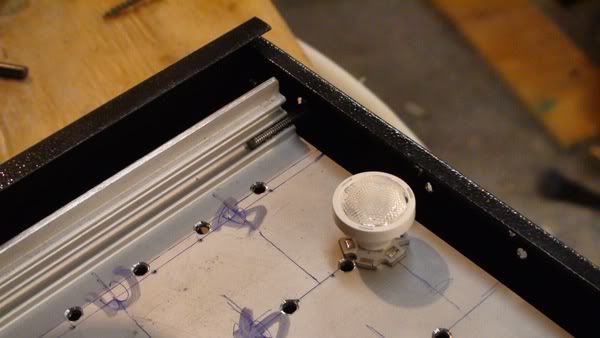 side view to show the depth of the sink to hide the led from me setting it down and hurting the leds....remember this set up will be going in a car a few times a year to go to swaps.. 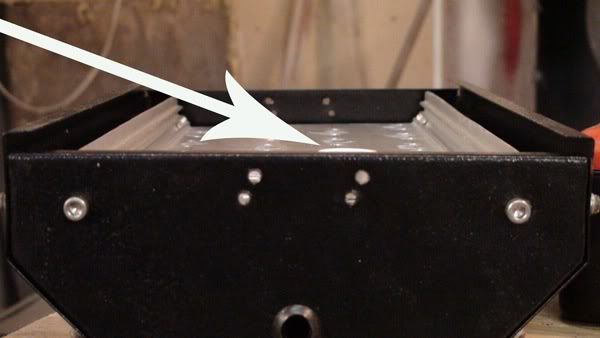 befor i mound the leds i decided to mount the 2 meanwell nondimable drivers first on the top side.. 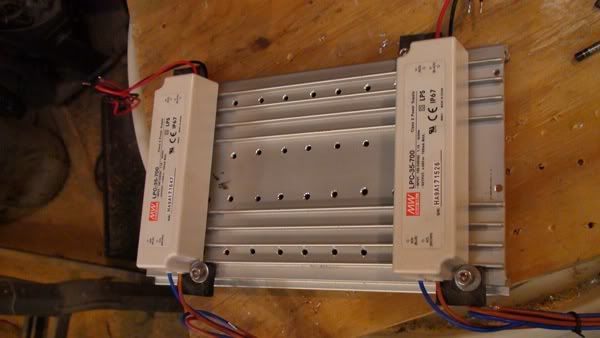 i made shure there was a little gap for air to move past 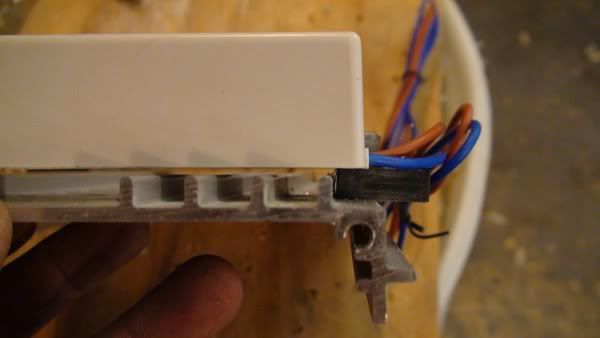
__________________
PLEASE DONT USE GREAT STUFF (THE YELLOW STUFF) IN YOUR TANK........USE POND FOAM (THE BLACK STUFF).. I BEG YOU! Great stuff====$5 a can 24-48 hour cure Epoxy to cover it====little as $5 for small projects or up to $100+ for larger projects and another 24-48 hour cure I hope you covered it well cuz if you didnt it will start to break down in a few months sand is another added cost to cover up the yellow. Pond foams====$9-$15 a can 24-48 hour cure DONE! You can cover it with sand if you want to (YOU DONT HAVE TO) though but thats added cost again Current Tank Info: 75 gal under way |
|
|
|
|
02/14/2010, 10:10 PM
|
#3 |
|
Registered Member
Join Date: Dec 2006
Location: kaukauna, wi.
Posts: 3,879
|
mounting the leds i used 10-24 stainless screws. i made shure that every one was away from the solder on the leds...i dont want a short happening!!! i even used a multi meter to make shure there wasnt!!! i didnt have any nylon washers to use but i would advise them so you dont have to worry...ill be upgrading these soon..but this set up does work..
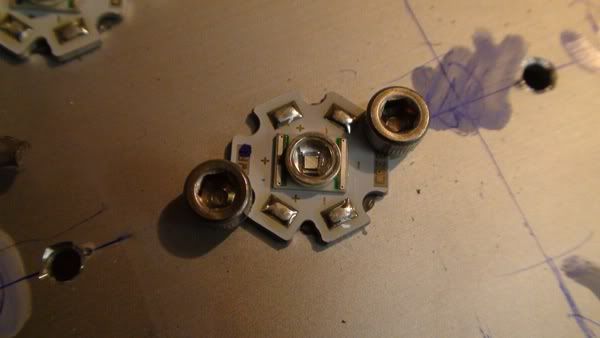 i went to radio shack for some of this stuff since i didnt want to make the leds a permanent thing...just incase i wanna change the set up or put it in another set up 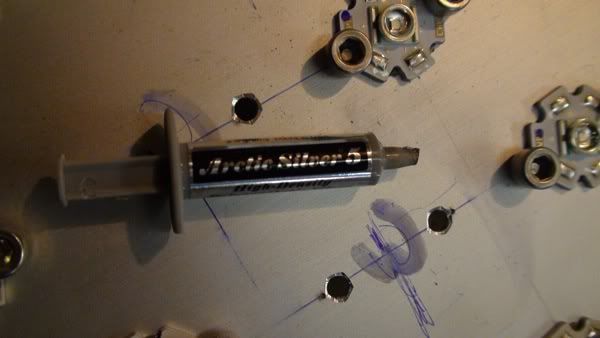 just a dab will do ya!!  half the lights (blues) 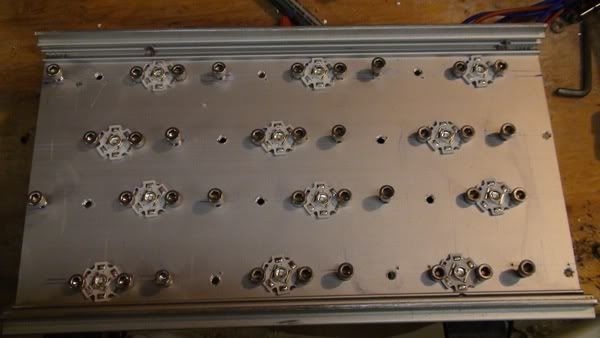 and the other half(whites) 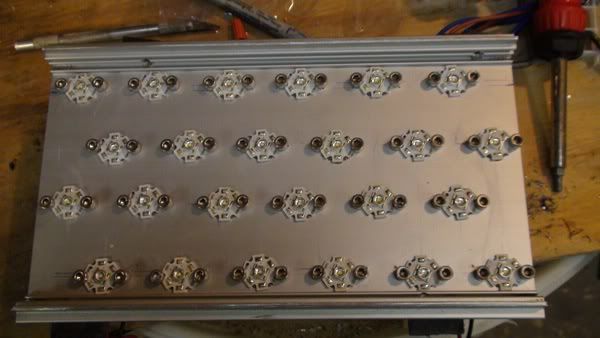 to be continued..........
__________________
PLEASE DONT USE GREAT STUFF (THE YELLOW STUFF) IN YOUR TANK........USE POND FOAM (THE BLACK STUFF).. I BEG YOU! Great stuff====$5 a can 24-48 hour cure Epoxy to cover it====little as $5 for small projects or up to $100+ for larger projects and another 24-48 hour cure I hope you covered it well cuz if you didnt it will start to break down in a few months sand is another added cost to cover up the yellow. Pond foams====$9-$15 a can 24-48 hour cure DONE! You can cover it with sand if you want to (YOU DONT HAVE TO) though but thats added cost again Current Tank Info: 75 gal under way |
|
|
|
|
02/14/2010, 10:24 PM
|
#4 |
|
Drug Enthusiast
Join Date: Oct 2007
Location: Rochester, MN
Posts: 2,958
|
Excellent work, it's a very clean job so far. Can't wait to see it in action. What optics are you planning on doing, and what are the dimensions of the frag tank?
|
|
|
|
|
02/14/2010, 10:33 PM
|
#5 |
|
Registered Member
Join Date: Aug 2004
Posts: 63
|
Can't wait to see the progress! keep the posts coming.
|
|
|
|
|
02/14/2010, 10:33 PM
|
#6 |
|
Registered Member
Join Date: Dec 2006
Location: kaukauna, wi.
Posts: 3,879
|
ill be using a full set of 60 degree optics and the tank for swaps is 20x16x6 yep its on the small side i know ...this light will be around 30" above that tank even...
i also wanna use this on the second half of one of my other frag tanks...hence why i used 60 degree...that frag tank is one of mine at home that is 5'x18"x14" of water. i started with wider optics cuz i wanted to see for my self when they can do....i plan to upgrade my 150xt to leds...i plan on testing this led set up on there also to see how the penetration is on that deep tank and also see how it compairs to a 250 radium as in power of the light
__________________
PLEASE DONT USE GREAT STUFF (THE YELLOW STUFF) IN YOUR TANK........USE POND FOAM (THE BLACK STUFF).. I BEG YOU! Great stuff====$5 a can 24-48 hour cure Epoxy to cover it====little as $5 for small projects or up to $100+ for larger projects and another 24-48 hour cure I hope you covered it well cuz if you didnt it will start to break down in a few months sand is another added cost to cover up the yellow. Pond foams====$9-$15 a can 24-48 hour cure DONE! You can cover it with sand if you want to (YOU DONT HAVE TO) though but thats added cost again Current Tank Info: 75 gal under way |
|
|
|
|
02/14/2010, 11:01 PM
|
#7 |
|
Registered Member
Join Date: Oct 2006
Location: Barrie, Ontario, Canada
Posts: 6,639
|
wow that looks like a tonne of LED's on such a small heatsink, you can go to a princess auto and get some little tiny miniature fans to mount in the top of that or side of that fixture i bet your LED's will thank you for it...otherwise this is a very cool and very clean build...great work so far..
i think the only reason for using a drill press is to insure your holes are perpendicular to your heatsink, as it makes the holes easier to tap...dont worry a drill bit will still walk in a press when the part is clamped down if you're not careful... |
|
|
|
|
02/14/2010, 11:45 PM
|
#8 |
|
Registered Member
Join Date: Dec 2006
Location: kaukauna, wi.
Posts: 3,879
|
i have a fan planned for this...coming up in the continuation. i drilled the holes big enough that i didnt need to tap them...the sink is thin enough also that there was no need to tap for these size screws. they cut there own threads. its not need for major threads to hold leds down flat.
i tried that all out on the pieces i cut off first befor attempting it on the sink that im using for this build
__________________
PLEASE DONT USE GREAT STUFF (THE YELLOW STUFF) IN YOUR TANK........USE POND FOAM (THE BLACK STUFF).. I BEG YOU! Great stuff====$5 a can 24-48 hour cure Epoxy to cover it====little as $5 for small projects or up to $100+ for larger projects and another 24-48 hour cure I hope you covered it well cuz if you didnt it will start to break down in a few months sand is another added cost to cover up the yellow. Pond foams====$9-$15 a can 24-48 hour cure DONE! You can cover it with sand if you want to (YOU DONT HAVE TO) though but thats added cost again Current Tank Info: 75 gal under way |
|
|
|
|
02/15/2010, 08:37 AM
|
#9 | |
|
Registered Member
Join Date: Oct 2006
Location: Barrie, Ontario, Canada
Posts: 6,639
|
Quote:
|
|
|
|
|
|
02/15/2010, 08:54 AM
|
#10 |
|
Registered Member
Join Date: Aug 2008
Location: Delaware
Posts: 1,028
|
Very nice and clean job so far! I am curious to see it lit up.

__________________
125 gal LED lighting Super Reef Octopus XP-3000 SSS Current Tank Info: 125 |
|
|
|
|
02/15/2010, 10:07 AM
|
#11 |
|
Premier World Traveler
Join Date: Nov 2000
Location: Ohio
Posts: 4,293
|
Hmmmm... I was planning to use my old, junk Coralvue ballast housings as nice, tidy holders for my Meanwells. The extrusions look very similar, I'll be interested to see how your heat works out with the limited surface area.
Tim
__________________
"The moment you doubt whether you can fly, you cease forever to be able to do it..." J.M. Barrie Current Tank Info: 210 AGA RR, Apex, 3x Kessil A360W & 2x 80W T5s, GEO 618 Ca Rx, BM220 CS2 skimmer, Tunze 6100s, 42" ETSS/AE Tech refugium/sump |
|
|
|
|
02/15/2010, 11:29 AM
|
#12 |
|
Registered Member
Join Date: Dec 2009
Posts: 146
|
Looks great, I can't wait to see them in action. I am really close to ordering all my LED's for my 90 gallon FOWLR. Were did you get all you components from? Thanks, Jeff
|
|
|
|
|
02/15/2010, 02:06 PM
|
#13 | |
|
Registered Member
Join Date: Dec 2006
Location: kaukauna, wi.
Posts: 3,879
|
Quote:
__________________
PLEASE DONT USE GREAT STUFF (THE YELLOW STUFF) IN YOUR TANK........USE POND FOAM (THE BLACK STUFF).. I BEG YOU! Great stuff====$5 a can 24-48 hour cure Epoxy to cover it====little as $5 for small projects or up to $100+ for larger projects and another 24-48 hour cure I hope you covered it well cuz if you didnt it will start to break down in a few months sand is another added cost to cover up the yellow. Pond foams====$9-$15 a can 24-48 hour cure DONE! You can cover it with sand if you want to (YOU DONT HAVE TO) though but thats added cost again Current Tank Info: 75 gal under way |
|
|
|
|
|
02/15/2010, 08:57 PM
|
#14 |
|
Registered Member
Join Date: May 2008
Location: Bay Area
Posts: 46
|
looks really good. keep us updated
|
|
|
|
|
02/15/2010, 08:58 PM
|
#15 |
|
Registered Member
Join Date: Dec 2006
Location: kaukauna, wi.
Posts: 3,879
|
continued...
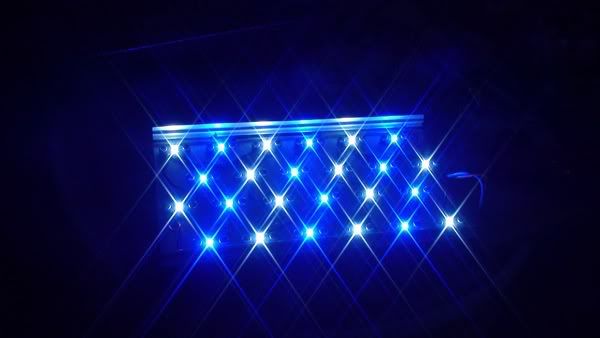
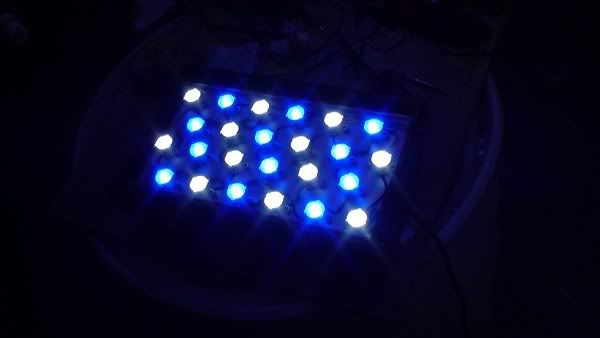
here we go again!!! thanks for every one watching and im glad i took the jump on this....your all right into thinking this is a very clean build..thats what im trying to do with it...it will make it more appealing to look at for customers at swaps this is my soldering beast!! i thank my wife for telling me to get this soldering iron!! she uses these at where she works. they build million dollar circuit boards for communications and even for military..so if they use it for that...it will work great for what i wanna use it for...by the way i got it off ebay for $75 and it is worth it!!! hech they are $300 new!!!!  i made sure to tin all my wires be for i tried to solder them to the stars....trust me in saying this....it makes things less messy and much faster!!! speed is what you need wile soldering these up...you dont want to heat up the star to much or you will burn the led....yep heat and leds dont mix...thats why you mount the leds first to the heat sink be for you solder....and also its easier to place the leds too with out wires in your way.. 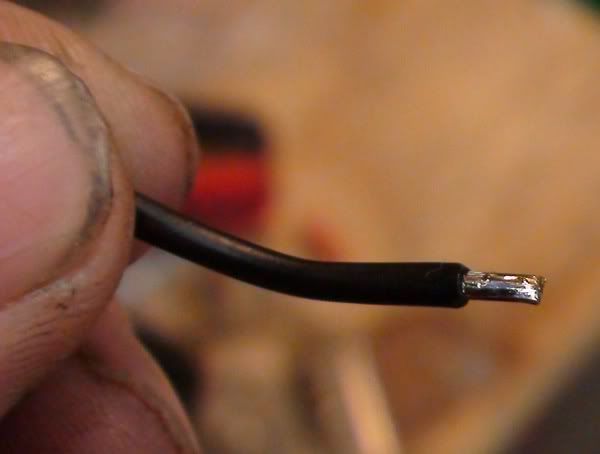 i soldered up all the blue ones first.....NEVER MIND THAT WIRE ON THE TOP OF THE SINK.....i soldered the wrong one at first then i caught it with the multi meter.....YOU NEED ONE OF THOSE TOO! i use one that has a sound that lets you know its a completed circuit.....it comes in handy testing all your leds...you turn it to that mark on the meter and it will light up your led just a little...that way you can test all your soldering and the leds too... each solder joint took me 3-4 seconds to put on with the metcal soldering iron!!!!! thats fast!!!!! 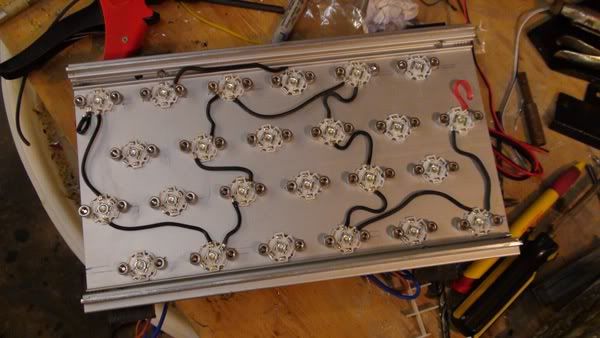 well i couldnt wait and after i checked and rechecked my soldering and complete circuit i plugged in the 110 to the mean well and i almost blinded my self with just the blues!!!! (i only plugged it in for max of 20 seconds cuz i didnt have the fan on the sink yet...i didnt wanna over heat one of these so early   now i got so excited about how bright these suckers are i forgot to take a pic of the soldering of the whites....you can get the picture though...same as the previous pic but just more wires!! but here is the pic of the whites on...need i remind you this is with NO optics on yet!! 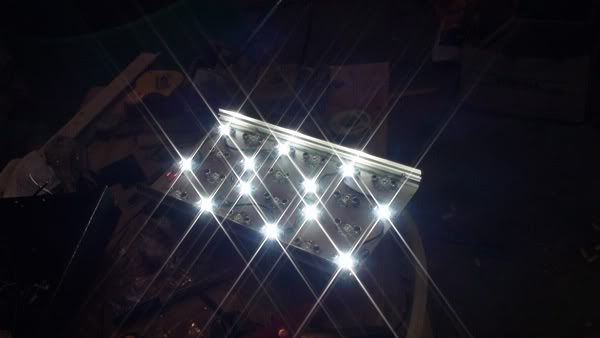
__________________
PLEASE DONT USE GREAT STUFF (THE YELLOW STUFF) IN YOUR TANK........USE POND FOAM (THE BLACK STUFF).. I BEG YOU! Great stuff====$5 a can 24-48 hour cure Epoxy to cover it====little as $5 for small projects or up to $100+ for larger projects and another 24-48 hour cure I hope you covered it well cuz if you didnt it will start to break down in a few months sand is another added cost to cover up the yellow. Pond foams====$9-$15 a can 24-48 hour cure DONE! You can cover it with sand if you want to (YOU DONT HAVE TO) though but thats added cost again Current Tank Info: 75 gal under way |
|
|
|
|
02/15/2010, 09:01 PM
|
#16 |
|
Registered Member
Join Date: Dec 2009
Posts: 48
|
not to rain on your parade but, that heat sink is going to run very hot. i hope you plan on using a fan.
|
|
|
|
|
02/15/2010, 09:03 PM
|
#17 |
|
Registered Member
Join Date: Dec 2006
Location: kaukauna, wi.
Posts: 3,879
|
now both....now with the camera on auto exposer its hard to get the brightness of these suckers with out doing a total wash out of the pic....these are very bright!!!!
 now for the cooling of this little monster....well all i had around was a few 24v fans....it sucked till i found a 24v trickle charger laying in my shop not in use since i bought the quick charger for my fire storm 18v set. i did a test with it and boy it worked very well with this fan......now remember im trying to make this an all in one set up for frag swaps...aka just plug in ONE plug in and go...thats why i took apart the trickle charger....yep i kinda modded that too (i cant leave anything alone!!) i soldered new 110v wires on to the 24v board and shortened up the fan wires so nothing is loose in the housing.....now you guys will give me a hard time...i used electrical tape to tape the board back into half of its orig housing and to keep it tight up to the fan. the fan is held on to the metal housing with (2) 1/4-20 button head stainless screws so it is not moving at all... 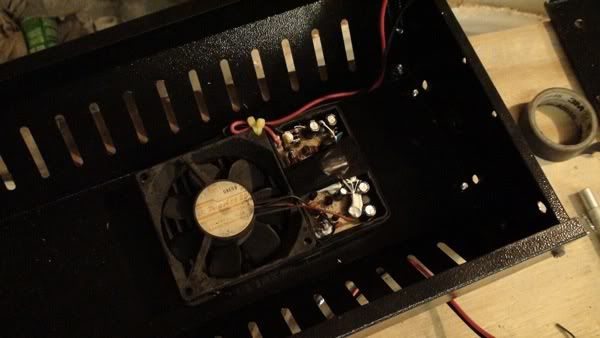 we now i needed to run the true 110v wire that will run this set up and tie it all togeather...the twist caps that rapid led gives you are filled with a jelly of some kind....ewwww....but i would assume that its so the copper will stay looking copper 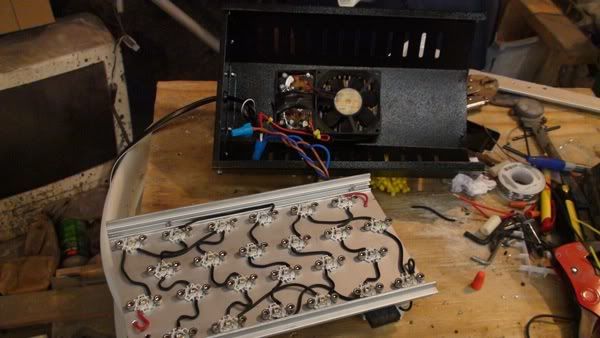 its a tight fit but there is room all around it for air to flow....  with it all togeather and the 60 degree optics on it looks great!!!! notice i used some nylon spacers on the sides to help keeping it centered side to side....i should have used arrows 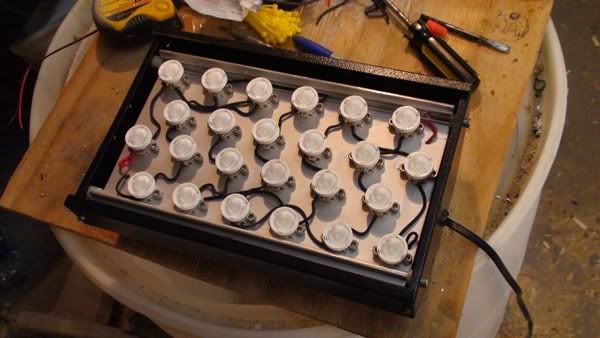
__________________
PLEASE DONT USE GREAT STUFF (THE YELLOW STUFF) IN YOUR TANK........USE POND FOAM (THE BLACK STUFF).. I BEG YOU! Great stuff====$5 a can 24-48 hour cure Epoxy to cover it====little as $5 for small projects or up to $100+ for larger projects and another 24-48 hour cure I hope you covered it well cuz if you didnt it will start to break down in a few months sand is another added cost to cover up the yellow. Pond foams====$9-$15 a can 24-48 hour cure DONE! You can cover it with sand if you want to (YOU DONT HAVE TO) though but thats added cost again Current Tank Info: 75 gal under way |
|
|
|
|
02/15/2010, 09:06 PM
|
#18 |
|
Moved On
Join Date: Jan 2008
Location: South Lake Tahoe
Posts: 1,550
|
great build so far. thanks for all the details. i'll be watching.
|
|
|
|
|
02/15/2010, 09:07 PM
|
#19 |
|
Registered Member
Join Date: Dec 2006
Location: kaukauna, wi.
Posts: 3,879
|
LET THERE BE LIGHT!!!!
 now when i say this little set up is bright....i do mean bright!!! 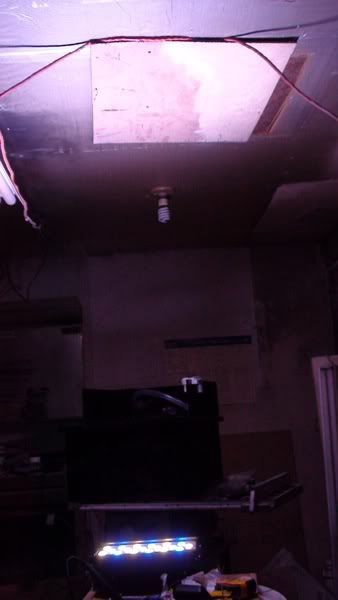 now you may be wondering about the fan and the flow of air i get through this set up plus how warm is the heat sink??? well with having the gap all the way around the sink the air flow does go all the way around and that fan im using is strong...now i wasnt looking for quiet...i didnt want it to over heat at all!! the air movement goes from the fan all the way around to the bottom and blows beyond that even...let me put it to you this way... the warmest thing on this set up even after 8 hours of running is the 60 degree lens!!! ill get an ir temp gauge soon to show ya all...i had one till one of my cats knocked it into a bucket of water now to answer your questions about the frag tank size....well its not a big one but its portable and thats what i really wanted...the first swap i did i took a 40 breeder along....thats to much freekin water to move when you have 2 kids in the blazer first to drop off at grandmas house!! 6 buckets of water was a lot of weight to move too! let alone the gas price to move it all too!!!!! well this little 20x16x6 by advanced aquatics will do great!!! you like my pvc upright too ??? 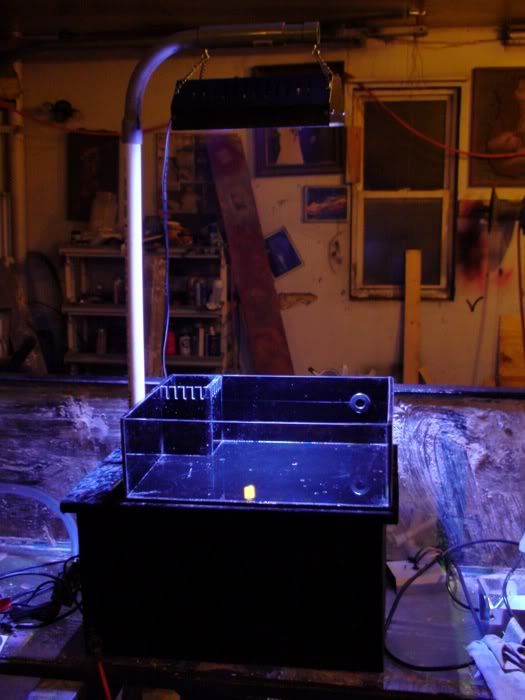 i will be running this over one of my frag tanks down stairs up to the date of the swap im going to in madison so i will take pics of that soon...... dang this was long!!!!!
__________________
PLEASE DONT USE GREAT STUFF (THE YELLOW STUFF) IN YOUR TANK........USE POND FOAM (THE BLACK STUFF).. I BEG YOU! Great stuff====$5 a can 24-48 hour cure Epoxy to cover it====little as $5 for small projects or up to $100+ for larger projects and another 24-48 hour cure I hope you covered it well cuz if you didnt it will start to break down in a few months sand is another added cost to cover up the yellow. Pond foams====$9-$15 a can 24-48 hour cure DONE! You can cover it with sand if you want to (YOU DONT HAVE TO) though but thats added cost again Current Tank Info: 75 gal under way |
|
|
|
|
02/15/2010, 09:08 PM
|
#20 | |
|
Registered Member
Join Date: Dec 2006
Location: kaukauna, wi.
Posts: 3,879
|
Quote:

__________________
PLEASE DONT USE GREAT STUFF (THE YELLOW STUFF) IN YOUR TANK........USE POND FOAM (THE BLACK STUFF).. I BEG YOU! Great stuff====$5 a can 24-48 hour cure Epoxy to cover it====little as $5 for small projects or up to $100+ for larger projects and another 24-48 hour cure I hope you covered it well cuz if you didnt it will start to break down in a few months sand is another added cost to cover up the yellow. Pond foams====$9-$15 a can 24-48 hour cure DONE! You can cover it with sand if you want to (YOU DONT HAVE TO) though but thats added cost again Current Tank Info: 75 gal under way |
|
|
|
|
|
02/16/2010, 11:09 AM
|
#21 |
|
Registered Member
Join Date: Feb 2010
Location: Vancouver, Canada
Posts: 205
|
Neat-o!
__________________
20G Frag Tank - Koralia 750, Sunlight Supply New Wave 4x24W T5HO, 50W Eheim Jager Heater. 20G Frag Tank - Koralia 550, 70W Metal Halide 20K Ushio, 50W Eheim Jager Heater 10G Rimless Display - Koralia 425, 70W Metal Halide 20K Ushio, 50W Eheim Jager Heater 15G Empty |
|
|
|
|
02/16/2010, 11:33 AM
|
#22 |
|
Registered Member
Join Date: Jul 2007
Location: lawn guy land
Posts: 1,418
|
that is cool. I bet someone could do something similar with an amp like for a really loud car stereo.
|
|
|
|
|
02/16/2010, 05:24 PM
|
#23 | |
|
Registered Member
Join Date: Dec 2006
Location: kaukauna, wi.
Posts: 3,879
|
Quote:
i got an ir thermometer today and ill do some heat showings for you all but that will be late tonight.
__________________
PLEASE DONT USE GREAT STUFF (THE YELLOW STUFF) IN YOUR TANK........USE POND FOAM (THE BLACK STUFF).. I BEG YOU! Great stuff====$5 a can 24-48 hour cure Epoxy to cover it====little as $5 for small projects or up to $100+ for larger projects and another 24-48 hour cure I hope you covered it well cuz if you didnt it will start to break down in a few months sand is another added cost to cover up the yellow. Pond foams====$9-$15 a can 24-48 hour cure DONE! You can cover it with sand if you want to (YOU DONT HAVE TO) though but thats added cost again Current Tank Info: 75 gal under way |
|
|
|
|
|
02/16/2010, 08:47 PM
|
#24 |
|
Registered Member
Join Date: Jun 2000
Location: earth
Posts: 3,218
|
great work!!!
__________________
"If the thunder don't get you then the lightning will" ..famous poet.. Current Tank Info: 500 gal starphire, reef sps dominated, 40 plus fish, 300 gallon sump in basement below, reeftek calcium reactor, reeftek kalkwasser reactor, lifeguard fluidized filter for rowaphose, 4 400MH 10k xm, 2 160 vho super attinic, DYI 50 gallon denitrator |
|
|
|
|
02/16/2010, 10:13 PM
|
#25 |
|
Registered Member
Join Date: May 2009
Location: SoCal
Posts: 284
|
Excellent! Gives me inspiration to fab a possible main light fixture to replace the halide/T-5 light I have now.
__________________
I Survived the Great Reef Central Black Out Of 2009! Best regards, Chris |
|
|
|
 |
|
|


