
|
|
 08/22/2006, 12:04 PM
|
#1 |
|
Registered Member
Join Date: Nov 2004
Location: Perry, OK
Posts: 13,946
|
Want to Start a Marine Aquarium?: A Step by Step Guide
Ah, the horrible rumors of marine aquariums and the woes of setting up your first tank.
 Well, it doesn't have to be!! That's right. This hobby isn't as difficult as it seems or as expensive. And I'll prove it to you. This thread is dedicated to the beginning marine aquarist with a consceincous awareness to a beginner's budget that have no problem getting their hands dirty with a little work. I hope you enjoy the tutorial. Well, it doesn't have to be!! That's right. This hobby isn't as difficult as it seems or as expensive. And I'll prove it to you. This thread is dedicated to the beginning marine aquarist with a consceincous awareness to a beginner's budget that have no problem getting their hands dirty with a little work. I hope you enjoy the tutorial.To be continued.... Table of Contents Tanks Stands and Canopies Substrates Lighting Systems Filtration Methods Water Parameters Water Flow Live Rock and Aquascaping Quarantine Tanks Hospital Tanks Cleanup Crews
__________________
Travis Stevens Current Tank Info: Restarting 28g Bowfront Last edited by WaterKeeper; 02/22/2007 at 02:40 PM. |

|
|
08/22/2006, 12:20 PM
|
#2 |
|
Registered Member
Join Date: Nov 2004
Location: Perry, OK
Posts: 13,946
|
Step 1: Selecting a Tank
I would have to say that this step is the most difficult and the most crucial choice. Things to consider are how much money you have to spend; what material the tank is made out of; the amount of space where the tank will be; what will be kept in the tank; your choice in lighting; etc. Since this tutorial is going to cater to the beginner, I will keep the budget low as possible as well as show primer techniques to other projects that you will be able to do yourself. First off, I chose a ten gallon tank. These are easy to find, cheap, drillable, and a decent size for a starter tank. Special consideration of what goes in the tank and techniques on maintenance is crucial because of the limited amount of water volume, but that will be covered later. 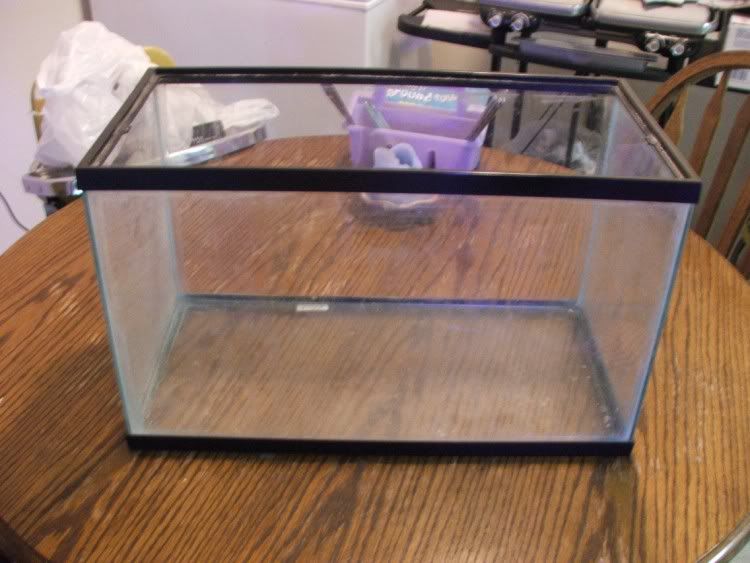
__________________
Travis Stevens Current Tank Info: Restarting 28g Bowfront |
|
|
|
08/22/2006, 12:27 PM
|
#3 |
|
Registered Member
Join Date: Oct 2005
Location: Portland, OR
Posts: 810
|
You had my attention right up to the point of recommending a 10G tank to start. This makes for a great QT tank, but isn't a smaller volume of water much, much harder to keep stable than a large volume? If you're just starting out, is t e10G really the best bet? I've read that a 30G is even on the small side...
__________________
120 DT/200 G mixed reef: birthed on Dec 1, 2010 * Neptune Systems controller * 40G Sump + 40G Fuge which gravity feeds into DT * Huge Reef Octopus Skimmer * Calc, GFO and Carbon RXs * 2x250W 20K Radium MH with VHO supplement * 3600 GPH closed loop with OM 4 way * 1700 GPH return |
|
|
|
08/22/2006, 12:33 PM
|
#4 |
|
Registered Member
Join Date: Nov 2004
Location: Perry, OK
Posts: 13,946
|
Step 2: Filtration Methods
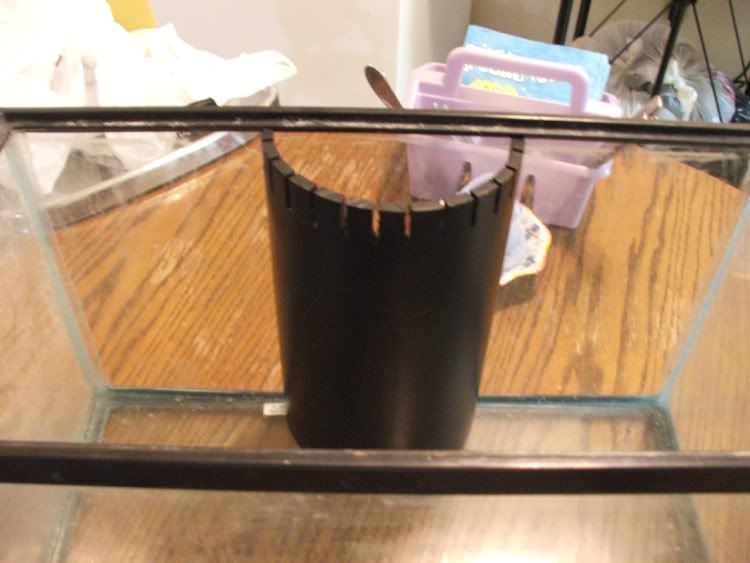
While there are many methods of filtration, I'm going to cover more common, natural, and well known methods since these are the most commonly used. We will be plumbing a sump and refugium underneath the tank. This will provide extra water volume, a place to hide your equipment, and an area for delicate invertebrates to grow and reproduce as well as allow you to keep other forms of filtration such as skimmers, deep sand beds, and macroalgae. Once again, details of this will be covered later. Since we are going to have to plumb the tank, we will need to build and place in an overflow. We will also need to drill the tank and make a bulkhead. Let's begin by building an overflow. First, find a 6" Inner Diameter PVC pipe. I had some previously used pipe laying around. Here it is as an example. 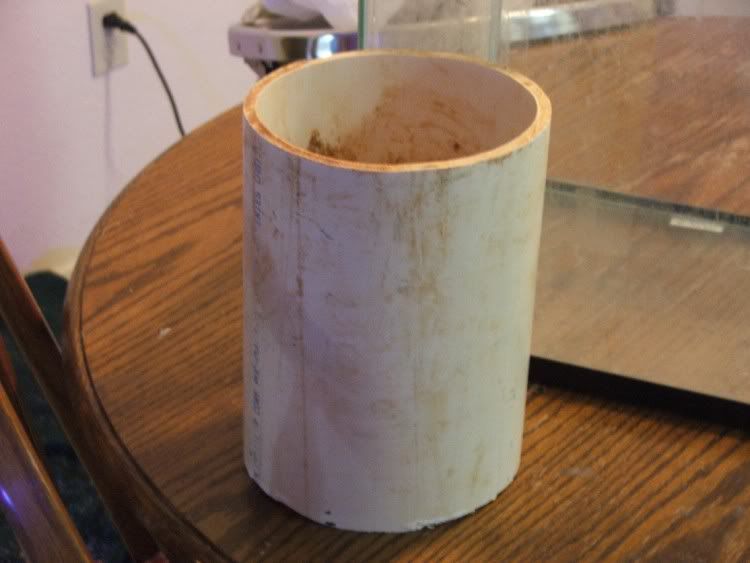 Next, you will need to cut the PVC in half length wise, and then cut it perpendicular so it will fit inside of the aquarium. Oh, don't forget to clean the pipe, too. I cut the PVC with a table saw. While not safe or ideal, it was what I had. I highly recommend that you cut it with a safer method using safety equipment. 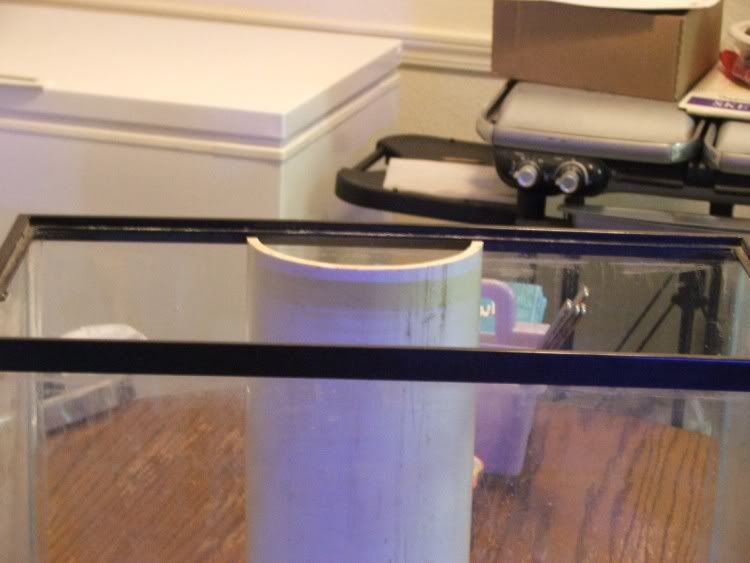 Now, we are going to need teeth in the overflow. This will allow the nutrients that build up on the surface of the water to skim off the top and be sucked to the sump to be filtered, but prevent any livestock from spilling over into the empty area where they can't escape or get sucked to the sump and hurt. In order to do this, we will first need to mark where we want the teeth to be placed. I chose the teeth to be one inch deep and 3/4 inch wide. This should be plenty of space to allow sufficient waterflow. 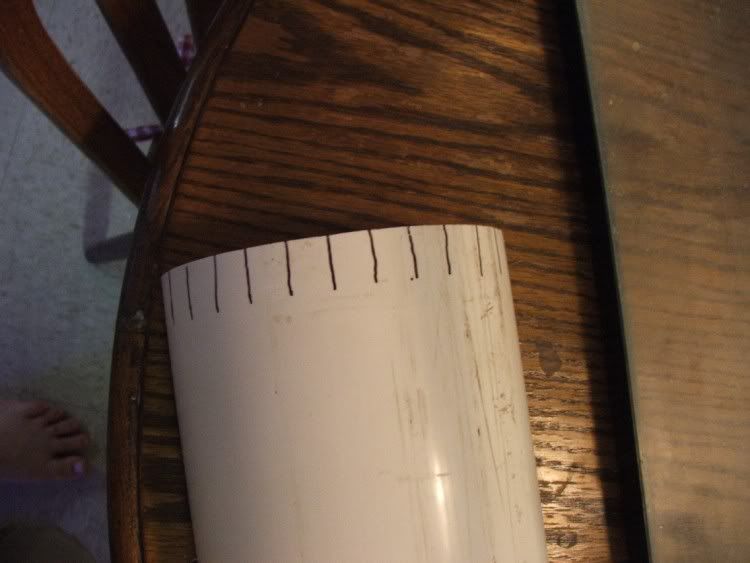 Always look to see how it will look in the tank. You might prefer them deeper, closer together, or any other combination. 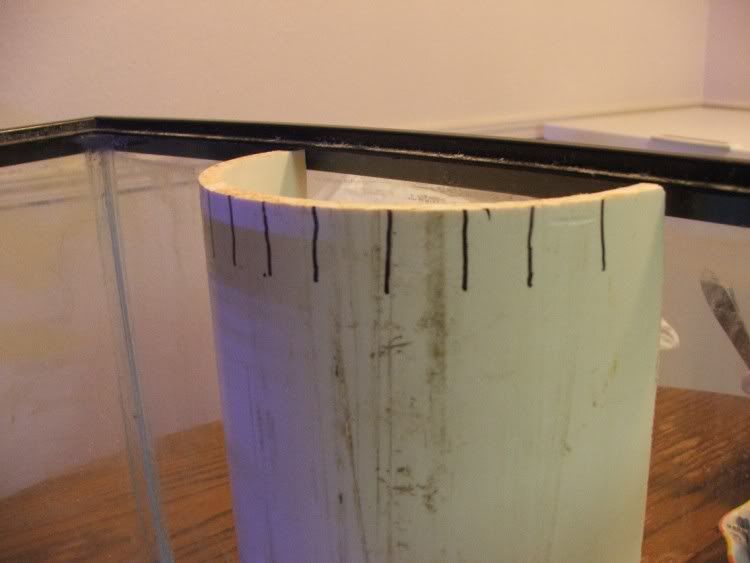 Then, it's time to cut them. I used a dremel tool with a drill bit to melt and/or chip away the PVC. Once again, very unsafe and not ideal. The best tool to use would be a router. Once again, make sure that you have your safety equipment on. 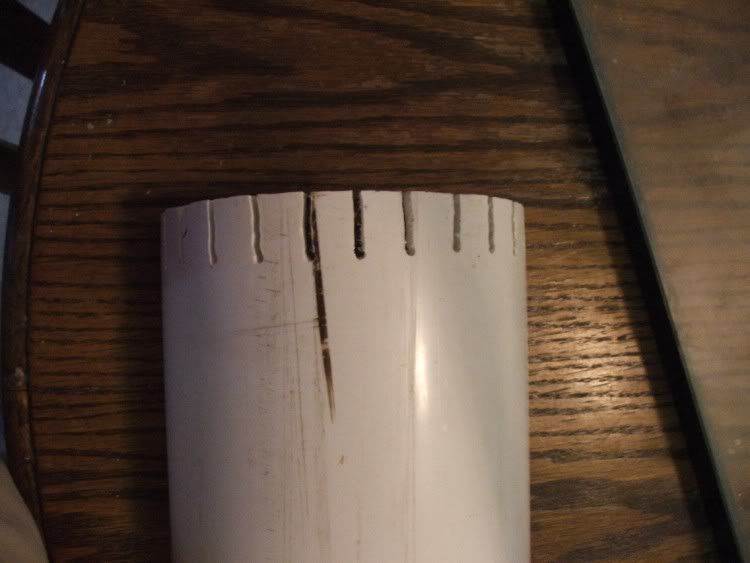 After they are cut, you will want to check and make sure that it fits in the tank the way you want them to. 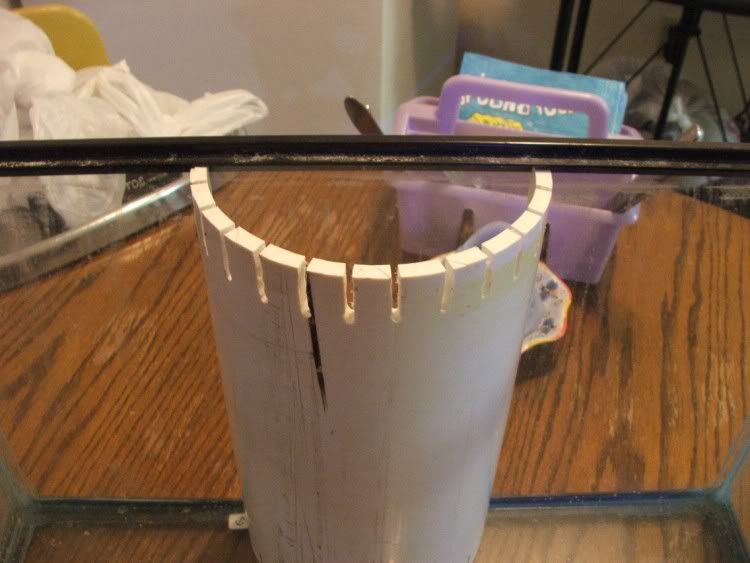 Finally, we've encountered a slight problem. It looks ugly! Yes, it's all aesthetic appeal and coralline will eventually cover it and make it purple, but I felt this part would be valuable for anyone that wanted color on anything. Let's make the overflow black. I picked up a can of Krylon Fusion spray paint. More specifically, it's Satin Black. Krylon Fusion spray paint bonds to the plastic that it's sprayed on and won't leak back out into the aquarium. You can spray your PVC, your powerheads, etc with this to make them all the same color or put vivid colors in there for a child's tank. The choice is yours. 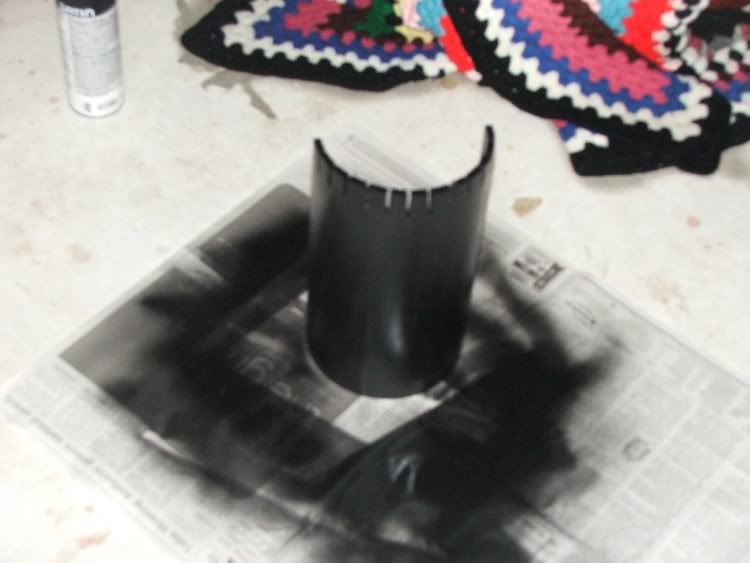 After a few coats of spray paint, we have a finished product. It looks pretty good if I do say so myself. I found out the hard way that you can't cover up scratches with it though. So, make sure that it's smooth before you spray paint it if you are concerned about looks. 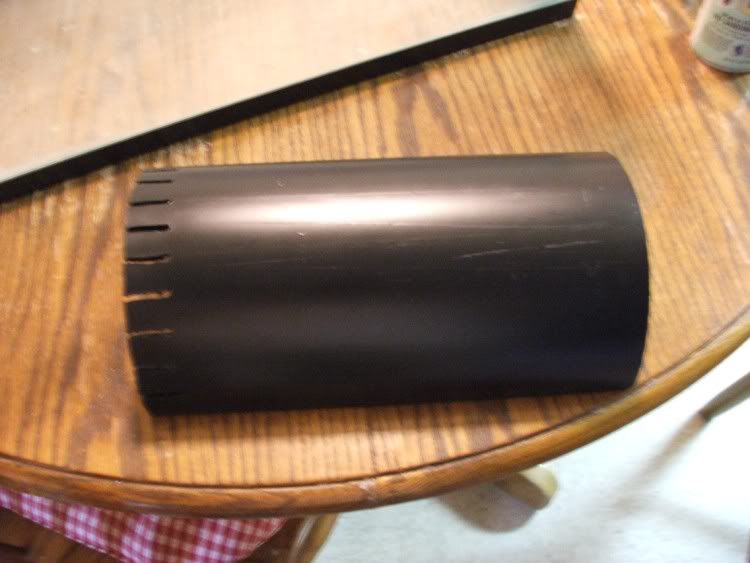
__________________
Travis Stevens Current Tank Info: Restarting 28g Bowfront |
|
|
|
08/22/2006, 12:36 PM
|
#5 |
|
Registered Member
Join Date: Nov 2004
Location: Perry, OK
Posts: 13,946
|
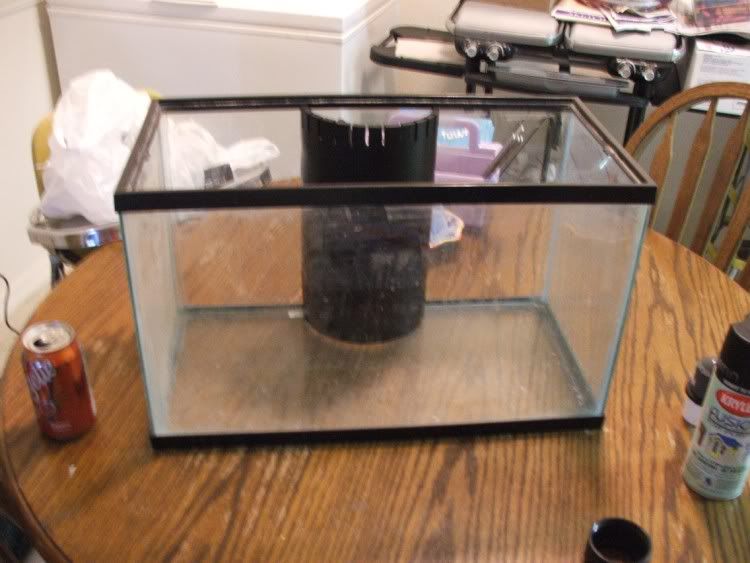
Here is the overflow in all its glory. Beautiful, isn't it? Make sure not to silicon it in yet. This step will be covered later.
__________________
Travis Stevens Current Tank Info: Restarting 28g Bowfront |
|
|
|
08/22/2006, 12:40 PM
|
#6 | |
|
Registered Member
Join Date: Nov 2004
Location: Perry, OK
Posts: 13,946
|
Quote:
For what it's worth, a 10g isn't really as hard. Once again, it's someone's opinion being blown out of proportion. I personally think they are easier because you see results immediately. That means if something starts to go wrong, you will see it quickly before it's too late, and then it takes less effort to act upon it. The biggest problem with such a small tank is the choice of livestock. But that's okay. There are some wonderful animals that will do fine in this situation. That will be covered towards the end though Also, for those following this thread, you don't have to do this exactly like I do. My main goal is to show you how to do it so you can try it on something else. This is also a work in progress so updates might have a time lapse in them depending on my budget and time availability.
__________________
Travis Stevens Current Tank Info: Restarting 28g Bowfront |
|
|
|
|
08/22/2006, 12:57 PM
|
#7 |
|
Registered Member
Join Date: Nov 2004
Location: Perry, OK
Posts: 13,946
|
Step 3: Plumbing
This section ties in with Step 2. After all, you need to plumb something to get it to your filtration method. Before we start, we will need some supplies. Luckily, we already have the tank, but now we need a bulkhead of the prefered size, a diamond coated ball point dremel bit, a diamond coated cylinder dremel bit, a dremel tool, a marker, and LOTS of water. Ideally, it would be best to buy a bulkhead, but at 2am I could only dig up these supplies. I've used this before with great success. The parts consist of one 1" Female Slip to Male Threaded PVC, a couple rubber washers, and a 1" Female Threaded to Male Barbed PVC to connect a hose to. 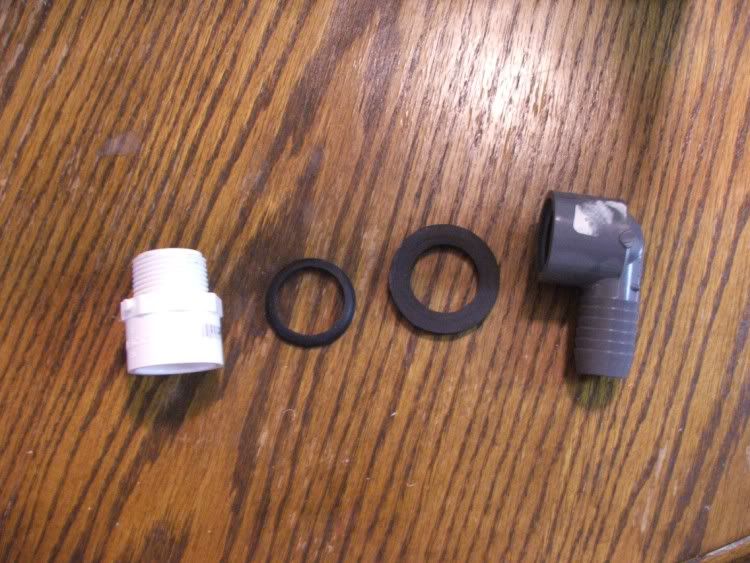 These items will go together like pictured below. The glass will be placed between the rubber washers to prevent leaking. Of course, the white PVC will be inside the overflow. The grey piece will attach some 1" vinyl tubing to drain to the sump. 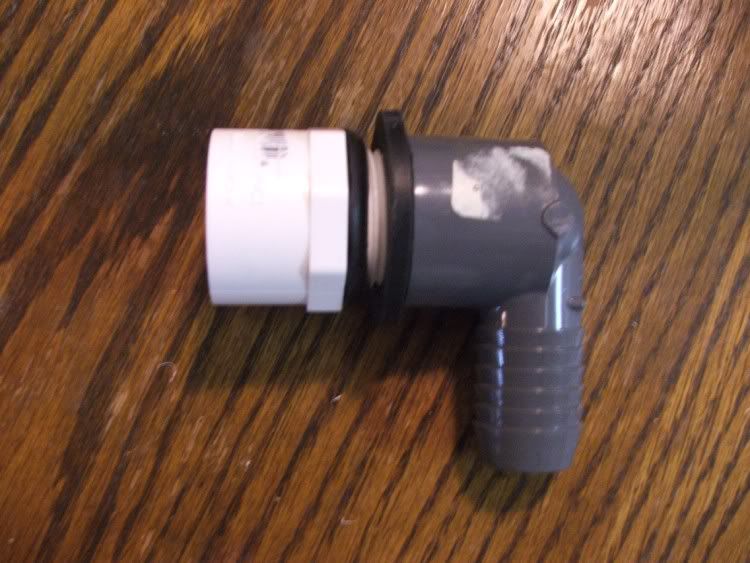 Now, we need to mark a circle of how big we want our hole to me. We will want to measure the inside of the nut of the bulkhead. In our case, it would be the inside of the PVC pipe. Make sure to measure it to be in the middle of the tank and below the waterline created from the teeth in the overflow. How far down you want it is completely up to you. I like mine to be pretty high up.  Now that we have it marked, let's double check to see if this is where we want it. It looks good to me. 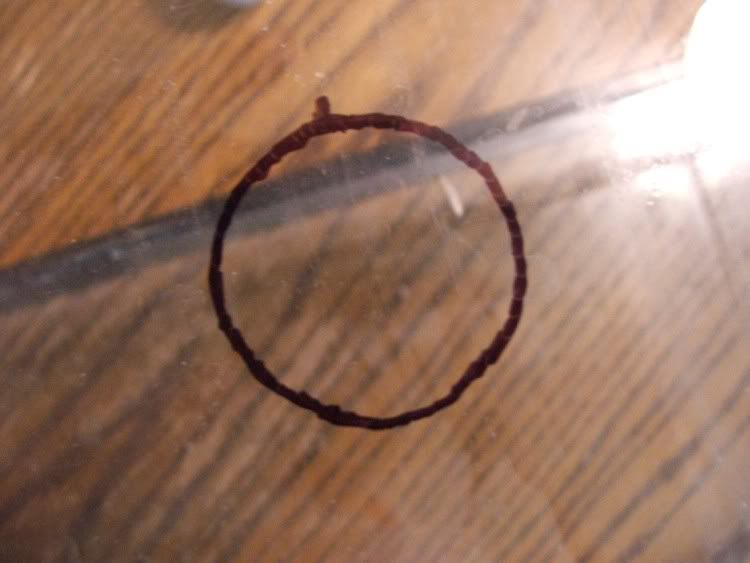 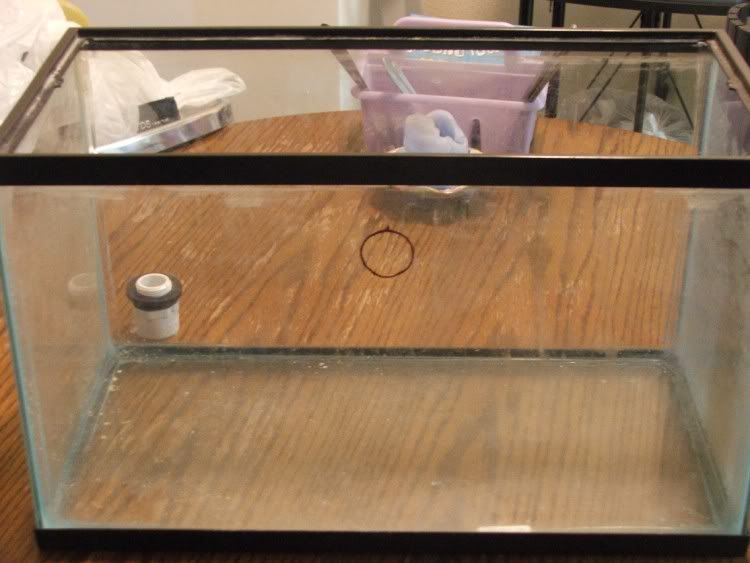 Next, we need to get the dremel tool ready. You might need to buy new clamp-thingies so the dremel can grip the new bits. The shafts are slightly thinner than other dremel bits. Let's load in the ball point bit. This will allow us to pierce the glass so we can go around it with the cylindrical bit. 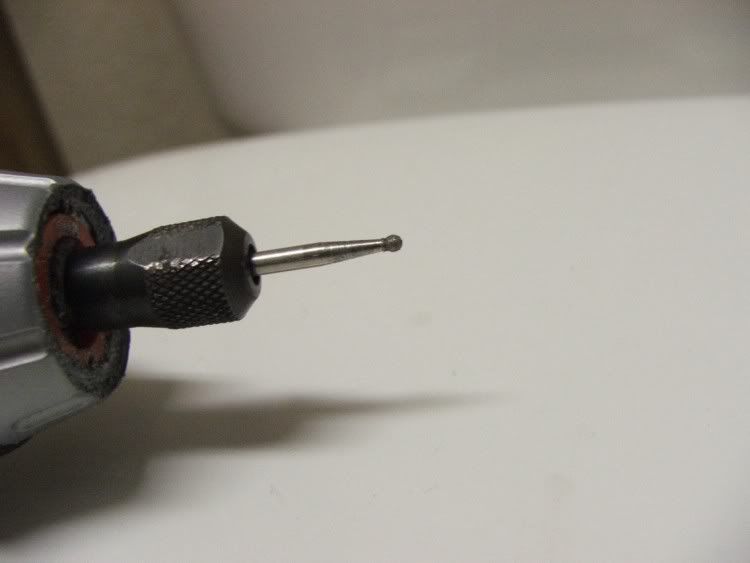 Now we will put the tank under some running water. There are many ways to get running water over it such as running a garden hose, a powerhead hooked up to some tubing in a tub with water, or you could get lucky and have your tank fit in the bathtub under faucet. 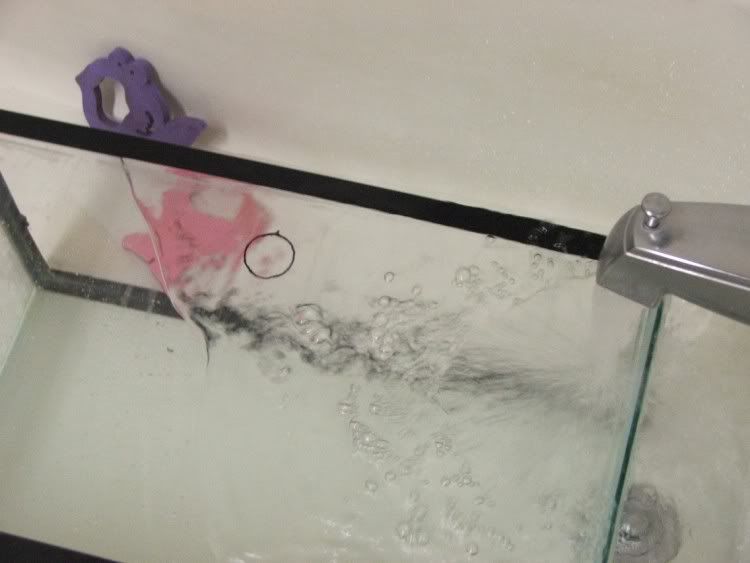 I'll have to leave off there for now. I'll finish drilling the tank tonight and silicon the overflow in and post instructions tomorrow. I hope this has helped a lot of potential hobbyists. A word of caution on drilling glass. I don't know how much I can say this, but wear your safety equipment. Also, you cannot drill tempered glass. Almost all tank bottoms are tempered glass. Most tanks have stickers that state that the bottom is tempered. Occassionally all the glass in a tank will be tempered. The tank that I got is from WalMart for $10.00 USD and the sides are not tempered. I've drilled a good 10-15 of these tanks already. To be continued......
__________________
Travis Stevens Current Tank Info: Restarting 28g Bowfront |
|
|
|
08/22/2006, 12:58 PM
|
#8 |
|
Registered Member
Join Date: Jun 2006
Location: Charleston, SC
Posts: 709
|
Good Stuff
Great idea for a thread Travis. Thanks for putting the amount of time and energy thus far into the thread and I hope it continues with the vigor it has now. Although I've already got my 55 gallon tank going, I'm sure that I will be interested in doing a nano in the future
 and I will definitely be following along. and I will definitely be following along. I remember when I first came to the forum I took a good week to read through Waterkeepers "So you want a saltwater tank" thread and have never looked back. I'm sure that this will be informative and inspiring to everyone who comes here. Thanks and keep it coming... Adam |
|
|
|
08/22/2006, 01:04 PM
|
#9 |
|
Registered Member
Join Date: Nov 2004
Location: Perry, OK
Posts: 13,946
|
No problem. I'm glad you've enjoyed it thus far. At the end of it all, I'll be listing all sorts of helpful links including all the stuff I can dig up from Waterkeeper. For those that are interested or need something to read while I'm posting or working on the tank, feel free to check out these links below.
55 Reef on a Budget Reefing on a Budget: 75g Tank Build
__________________
Travis Stevens Current Tank Info: Restarting 28g Bowfront |
|
|
|
08/22/2006, 01:07 PM
|
#10 |
|
Registered Member
Join Date: Jun 2006
Location: Charleston, SC
Posts: 709
|
Awesome Travis. I look forward to the next update.
Adam
__________________
"I spent 90% of my money on women and drink. The rest I wasted" - George Best Current Tank Info: 20H, Vortech MP20, Aquatinics TX5, SPS Only Tank |
|
|
|
08/22/2006, 01:22 PM
|
#11 | |
|
Registered Member
Join Date: Oct 2005
Location: Portland, OR
Posts: 810
|
Quote:
T |
|
|
|
|
08/22/2006, 01:24 PM
|
#12 | |
|
Registered Member
Join Date: Nov 2004
Location: Perry, OK
Posts: 13,946
|
Quote:

__________________
Travis Stevens Current Tank Info: Restarting 28g Bowfront |
|
|
|
|
08/23/2006, 07:31 AM
|
#13 |
|
Registered Member
Join Date: Nov 2004
Location: Perry, OK
Posts: 13,946
|
You'll have to excuse my forgetfulness. I got everything ready last night, but forgot to take my camera home from work. So, instead of getting pictures of drilling, putting in the bulkhead and siliconing the overflow, I just drilled the tank and I will take before and after shots tonight. Sorry about that.
I did find out some valuable information though. The dremel bits don't last that long. They managed to cut out 2 75g tanks, both of which had 1.5" bulkheads going in it and 2-3 10g tanks. It's definitely time for new dremel bits
__________________
Travis Stevens Current Tank Info: Restarting 28g Bowfront |
|
|
|
08/23/2006, 07:48 AM
|
#14 |
|
Registered Member
Join Date: Jun 2006
Location: Charleston, SC
Posts: 709
|
Just curious Travis, how much do the dremel bits usually run you?
__________________
"I spent 90% of my money on women and drink. The rest I wasted" - George Best Current Tank Info: 20H, Vortech MP20, Aquatinics TX5, SPS Only Tank |
|
|
|
08/23/2006, 07:50 AM
|
#15 |
|
Registered Member
Join Date: Nov 2004
Location: Perry, OK
Posts: 13,946
|
No more than $10 a pop. If I feel like running by the hardware store this afternoon, I'll price them. I need to price wood for the soon to be stand and canopy.
__________________
Travis Stevens Current Tank Info: Restarting 28g Bowfront |
|
|
|
08/23/2006, 07:56 AM
|
#16 |
|
Registered Member
Join Date: Jun 2006
Location: Charleston, SC
Posts: 709
|
Thanks Travis. I look forward to the updates in the coming days (as long as you remember the camera
 ). ).Adam
__________________
"I spent 90% of my money on women and drink. The rest I wasted" - George Best Current Tank Info: 20H, Vortech MP20, Aquatinics TX5, SPS Only Tank |
|
|
|
08/23/2006, 08:02 AM
|
#17 |
|
Registered Member
Join Date: Nov 2004
Location: Perry, OK
Posts: 13,946
|
 Hopefully I'll have the camera bag attached to my shoulder (as long as the camera is in it) Hopefully I'll have the camera bag attached to my shoulder (as long as the camera is in it) For what it's worth, me and my friend had an idea. He's putting a tank together for his office that is quite similar. He wanted a background on his tank, and we discussed our likes and dislikes and pros and cons of various different backgrounds. He will be spraying the back of his tank with Krylon Fusion to match the overflow as well. We then started thinking that the silicon in the overflow wouldn't be black and stand out. While this is just an aesthetic detail, we came up with taking a plastic bag and filling the inside of the aquarium with it, using the wide, clear box tape and taping it to the sides, taking a razor blade and cutting a smooth edge into the silicon, peel up any extra bag/tape from the silicon and overflow, and then spray the silicon. You would then have a 100% black back as well as a smooth edge on the silicon. Well, that is unless you are very good at using silicon (I'm not).
__________________
Travis Stevens Current Tank Info: Restarting 28g Bowfront |
|
|
|
08/23/2006, 08:52 AM
|
#18 |
|
Registered Member
Join Date: Jun 2006
Location: Charleston, SC
Posts: 709
|
That sounds like a really good idea and way of masking the silicone. I ended up just masking off the front and two sides of my 55 gallon and spraying the back pane with Kylon Fusion paint and it turned out really nice. I'm thinking now that I should have went with black paint but you can see below that it still turned out pretty nice:
 You'll have to post some pics of how that idea turns out for your friend. Adam |
|
|
|
08/23/2006, 09:58 AM
|
#19 |
|
Registered Member
Join Date: Oct 2005
Location: Portland, OR
Posts: 810
|
Why not spray paint the outside of the tank? Maybe that's what your doing and I'm just misreading...
This thread has gotten me off my but! I'm going to start a little DIY 20G for my office and use my old 10G, that's been collecting dust for years, as my fuge. T
__________________
120 DT/200 G mixed reef: birthed on Dec 1, 2010 * Neptune Systems controller * 40G Sump + 40G Fuge which gravity feeds into DT * Huge Reef Octopus Skimmer * Calc, GFO and Carbon RXs * 2x250W 20K Radium MH with VHO supplement * 3600 GPH closed loop with OM 4 way * 1700 GPH return |
|
|
|
08/23/2006, 10:00 AM
|
#20 |
|
Who Am I Here?
Join Date: Feb 2006
Location: Central Ohio
Posts: 1,155
|
great thread this should be a sticky
__________________
Shane Life's a climb... but the view is great. ______________________________ Current Tank Info: 2.5 Gallon Nano |
|
|
|
08/23/2006, 10:07 AM
|
#21 |
|
Registered Member
Join Date: Nov 2004
Location: Perry, OK
Posts: 13,946
|
Liquid Hobby: All of the back of the tank should be sprayed on the outside. This way you can scrape the glass without scraping the paint. But, in order to spray the silicon, you would need to spray just the inside. Heck, I might spray just the silicon in mine (but not the back).
__________________
Travis Stevens Current Tank Info: Restarting 28g Bowfront |
|
|
|
08/23/2006, 10:12 AM
|
#22 |
|
Premium Member
 Join Date: Jun 2002
Location: Long Island NY
Posts: 15,549
|
I can't wait to go out and start up a tank.
Thanks 
|
|
|
|
08/23/2006, 10:21 AM
|
#23 | |
|
Registered Member
Join Date: Oct 2005
Location: Portland, OR
Posts: 810
|
Quote:
T |
|
|
|
|
08/23/2006, 10:34 AM
|
#24 |
|
Registered Member
Join Date: Nov 2004
Location: Perry, OK
Posts: 13,946
|
Paul B: Go on. Get outta here. Go away. Shoo! Shoo! You're not new. You're as old as they get.
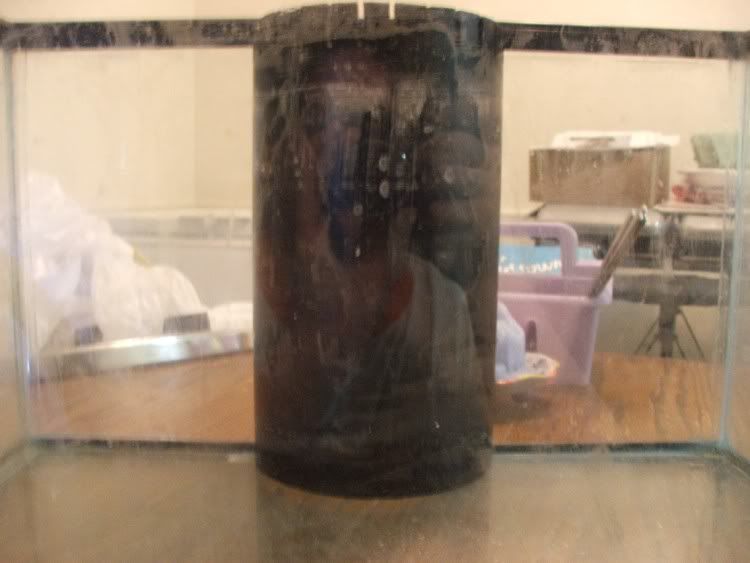
   Just kidding, bro. So, are you seriously thinking about starting one up? It can't compete with your 35 year old reef though Just kidding, bro. So, are you seriously thinking about starting one up? It can't compete with your 35 year old reef thoughLiquid Hobby: Hmm. One of us or both of us are confused somewhere I'll be posting pictures of what I'm talking about tomorrow, but I'll attempt to explain it. In order to make the overflow spill over the top to skim the surface of the water, you need to secure it to the back of the tank. This will be done with Silicon. GE Silicon I: Window and Door to be specific. But, when the silicon is dry, it's rather a transluscent white because I use LOTS of silicon. If you're REALLY good with silicon, you might be able to get a thin enough layer that it would be smooth. Since there is that thick whitish silicon around the overflow, I would like to turn it black to match the overflow. In order to do that, I was going to mask off the whole interior of the tank with a plastic bag and cut out a hole for the overflow. Then the bag was going to be taped around the overflow. The tape would then be cut with a razorblade slightly into the silicone to make a smooth edge. With the silicon and overflow exposed, I'll make a swipe with the spraypaint across the silicon. Then, when the paint is dry, I'll peel it all off. Viola! A clean cut, black colored silicon! Here is a picture of the silicon from the 75g I'm working on. Look to the left and right of the black box. That bumpy line is my "beautiful" silicon work. 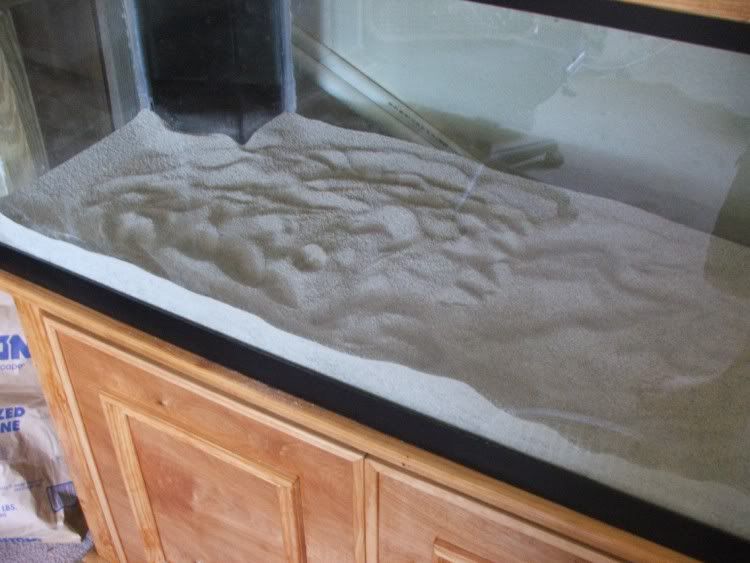
__________________
Travis Stevens Current Tank Info: Restarting 28g Bowfront |
|
|
|
08/23/2006, 11:29 AM
|
#25 |
|
Registered Member
Join Date: Jun 2005
Location: Stillwater, OK
Posts: 646
|
That's some beautiful woodwork you got there on your 75 Travis!
I was thinking though Travis, about the paint on the silicon.... The Fuzion brand fuses to plastic, so no worries about the paint leeching back into the water from the tank. Bonded to the overflow with no problem. But will it do the same with silicon? Silicon is notorious for not accepting paint on it. I was just wondering if the paint would adhere, but not bond to the silicon. Then over time, the paint would leech into the water column. Just a thought, I'll be Devil's Advocate today. |
|
|
 |
|
|


