
|
|
 09/21/2012, 04:56 PM
|
#5051 |
|
Registered Member
Join Date: Jul 2004
Location: AWOL
Posts: 12,013
|
Yes, you can make it reliably work by angling the horizontal run down at a 45° angle. 22.5°, I have not tried, but it will most likely work as well.
__________________
"Things should be made as simple as possible, but not simpler." (oft attributed to Einstein; most likely paraphrasing by Roger Sessions; compactly articulates the principle of Occam's Razor) Current Tank Info: 325 6' wide Reef |

|

|
|
09/22/2012, 11:26 AM
|
#5052 |
|
Registered Member
Join Date: Sep 2012
Location: The Netherlands
Posts: 10
|
Hi everyone!
I'm new to this amazing forum, but due to this forum I today bought my first aquarium  (wow, already in love with all this... (wow, already in love with all this...  ) It's a 240 liter (63 gallon) tank. ) It's a 240 liter (63 gallon) tank.First of all: I wanted to say thank you to all the guys with those smart ideas (for example BeanAnimal!!) The overflow mechanism in this thread looks very, very cool. I also went to the hardware store to buy all the PVC I need to make this. I was wondering (because the start-date from this topic is 02/03/2008) if the system/mechanism in the TS is still "up to date"? Or are there in the meantime better options? I bought a 45mm glass-drill, but I don't want to use it before I exactly know that this is the way to go. So I'm very curious now, lol With kind regards, Atmoz Oh, and sorry for my English: I'm from the Netherlands! |
|
|
|
|
09/22/2012, 12:02 PM
|
#5053 |
|
Registered Member
Join Date: Jul 2004
Location: AWOL
Posts: 12,013
|
This technology is current and up to date. It is also, the best drain system out there. Nothing else comes close to the performance.
Used in conjunction with the full length, "Coast to Coast" overflow, it is the definitive "reef ready" system, that the mass produced RR tanks fail miserably at competing with. The down side is you have to build it yourself, and build it as designed. Some modifications, don't cause issues, however some do. Here is the short version: http://www.beananimal.com/projects/s...ow-system.aspx Bean: Just send a check...... 
__________________
"Things should be made as simple as possible, but not simpler." (oft attributed to Einstein; most likely paraphrasing by Roger Sessions; compactly articulates the principle of Occam's Razor) Current Tank Info: 325 6' wide Reef |
|
|
|
|
09/23/2012, 06:18 AM
|
#5054 |
|
Registered Member
Join Date: Feb 2003
Location: Pittsburgh
Posts: 20,772
|
If I were making ANY money on the idea, I would be more than happy to
 Nothing for sale, no ad-words, no affilate networks... just silly me hosting a wesbsite... Maybe a could put up a few "donate" PayPal links. Is there a BeerPal link? BaconPal link? |
|
|
|
|
09/23/2012, 07:16 AM
|
#5055 |
|
Registered Member
Join Date: Aug 2011
Posts: 245
|
Beananimal i sent you a pm.
i will also be setting up a BA on a seahorse tank |
|
|
|
|
09/23/2012, 02:26 PM
|
#5056 | |
|
Registered Member
Join Date: Jul 2004
Location: AWOL
Posts: 12,013
|
Quote:
Hummm, can probably make a BeerPal or BaconPal link.............
__________________
"Things should be made as simple as possible, but not simpler." (oft attributed to Einstein; most likely paraphrasing by Roger Sessions; compactly articulates the principle of Occam's Razor) Current Tank Info: 325 6' wide Reef |
|
|
|
|
|
09/24/2012, 01:59 PM
|
#5057 | |
|
Registered Member
Join Date: Sep 2012
Location: The Netherlands
Posts: 10
|
Quote:
I think I understand mostly how this beautiful system works, except for this part: In the "normal" situation the middle (Full Siphon) standpipe does the job. Only VERY little water exits via the Open Channel Standpipe. But how does this exits? It only works if the water level is (a little) higher then the bottom of the horizontal pipe, right? (because the is no suction or whatever in that Standpipe) Am I correct with this? BeanAnimal: why don't you put a "Donate via PayPal button" on your website? I would be happy to donate something for your great ideas/research/work! With kind regards, Atmoz |
|
|
|
|
|
09/25/2012, 10:07 PM
|
#5058 |
|
Registered Member
Join Date: Sep 2012
Location: The Netherlands
Posts: 10
|
Anyone?
|
|
|
|
|
09/25/2012, 10:23 PM
|
#5059 |
|
Registered Member
Join Date: Jul 2004
Location: AWOL
Posts: 12,013
|
After the siphon starts, the valve on the siphon is closed, which raises the water level in the overflow. The water level is raised till water just flows in the open channel. Generally, the water level will be above the centerline of the elbows, and usually around the top of the elbows. (down turned elbows.) Sorry for the delay. I saw this last night, and spaced it.....
__________________
"Things should be made as simple as possible, but not simpler." (oft attributed to Einstein; most likely paraphrasing by Roger Sessions; compactly articulates the principle of Occam's Razor) Current Tank Info: 325 6' wide Reef |
|
|
|
|
09/26/2012, 01:36 AM
|
#5060 | ||
|
Registered Member
Join Date: Sep 2012
Location: The Netherlands
Posts: 10
|
Quote:
I thought this was the ideal situation: (sorry for my Paint skills  ) ) Quote:
With kind regards, Atmoz |
||
|
|
|
|
09/26/2012, 04:53 AM
|
#5061 |
|
Registered Member
Join Date: Feb 2003
Location: Pittsburgh
Posts: 20,772
|
The elbows on both th open channel and the siphon standpipe extend downward from the crest of the weir.
System Startup: Water rises and flows over the crest of the weir in both the open channel and siphon standpipes. The open channel standpipe is open to the the atmosphere and the siphon closed. The water falling through the standpipes displaces air and in effect acts like a piston or plunger, creating a vacuum behind it. That vacuum pulls in more air or water depending on what is available. That is, the siphon standpipe pulls in more water because that is what is available at its opening. The open channel standpipe pulls in air from its atmoshpheric vent. System Equillibirum: The siphon standpipe opening (again below the crest of the weir) is under negative pressure (suction) and therefore draws water from below the weir level. If the water rises in the overflow box (you adjusting the valve) the water may begin to flow over the weir again. If the water drops too low (you adjusting the valve) then water does not flow over the open channel weir. If the water gets too low in the box, the siphon draws in air and breaks. There are plenty of small variables that have been accounted for in this system. Imagine a MUCH deeper box with the down turned elbow on the siphon standpipe extending 6" below the crest of its weir. We may be able to get away with no open channel, as the water level (once the siphon starts) can fluctuate over almost the entire 6" range (or above it) and still be stable. The catch... getting that siphon to be able to start in the first place without air locking and then keeping it from quickly flushing due to rapid flow rate increase. The reality... the sweet spot will be about the same as it would have been without the downward extension. Hope that helps and gives you some insight into the mechanics (flow dynamics) of the desgin. |
|
|
|
|
09/26/2012, 05:15 AM
|
#5062 | |
|
Registered Member
Join Date: Jul 2012
Posts: 608
|
Quote:
Bean - with that said, doesn't AMOZs picture still hold true as far as water level goes? |
|
|
|
|
|
09/26/2012, 05:34 AM
|
#5063 |
|
Registered Member
Join Date: Feb 2003
Location: Pittsburgh
Posts: 20,772
|
If the right hand side of his picture is showing the down turned elbows in the overflow box, then pretty much yes, the picture depicts the water level when the siphon is adjusted properly.
You will find that in reality the water level in the box will appear to be a bit higher than that and appear to be just at the top edge of the elbows on most cases. There is resistance to flow created by the pipe, turbulance, etc. You will also find that in a high flow setup the water level near the standpipe intakes will be FAR lower than that in the rest of the box. Again, there is resistance to flow (friction, turbulance) in the box itself. |
|
|
|
|
09/26/2012, 01:37 PM
|
#5064 | |
|
Registered Member
Join Date: Sep 2012
Location: The Netherlands
Posts: 10
|
Quote:
 And thanks (again) for the explanation BeanAnimal! My (technical) English isn't that good to understand everything for 100%, but I think I got it now. Tomorrow is D-day, then I drill the 3 holes in my 240 liter (63 gallon) tank. All the needed PVC has already arrived today: 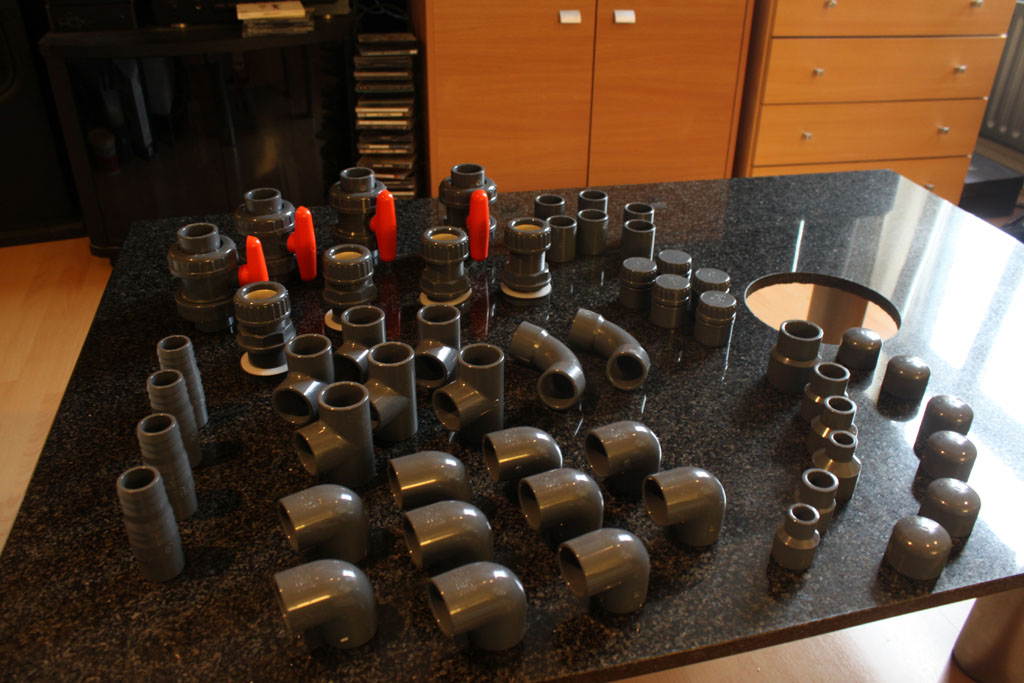 Whoaaa, nice stuff!!  Hopefully I can post a few pics with my succes tomorrow. Regards, Atmoz |
|
|
|
|
|
09/27/2012, 11:15 AM
|
#5065 |
|
Registered Member
Join Date: Jul 2012
Posts: 608
|
final review before D day please...
Hey All,
I too am about to drop off my template to the LFS for drilling of a new tank...."D" day so to say. Needless to say, it needs to be right! I had a general DIY thread asking for review and got some good feedback and made changes. Thought I'd ask for final review in this thread since most folks here are real close and many experienced with the process. Uncle - I didn't end up with your exact measurement, but I'm close at 2 3/4" from top edge of tank. Unless I hear otherwise, I'm keeping the siphon hole a 1/4" lower than the other two. Someone mentioned it wasn't necessary but I see it as it couldn't hurt when re-starting. I've got a few inches of hortizontal to travle before the first Tee. Anyway, template attached. Flow is expaected at 700-900 and I'll be at 1" pipes and the sump on the other side of the back wall immediately below the bottom edge of the display (on its own stand). |
|
|
|
|
09/27/2012, 12:05 PM
|
#5066 |
|
Registered Member
Join Date: Jul 2004
Location: AWOL
Posts: 12,013
|
2.75' to the edge of the hole, as you have drawn, would be 3.625" to the hole center which is in between the two figures I gave. (3.25" - 4.25".) 2.75" to the center of the hole, would place your dry emergency inlet above the top of the overflow weir...
 The original recommendation, concerning the starting issue you are trying to prevent by lowering the siphon, was raising the open channel ~ 1/2" give or take.....
__________________
"Things should be made as simple as possible, but not simpler." (oft attributed to Einstein; most likely paraphrasing by Roger Sessions; compactly articulates the principle of Occam's Razor) Current Tank Info: 325 6' wide Reef Last edited by uncleof6; 09/27/2012 at 12:14 PM. |
|
|
|
|
09/27/2012, 01:02 PM
|
#5067 | |
|
Registered Member
Join Date: Jul 2012
Posts: 608
|
Quote:
I plan on doing 2.75" from top edge of tank to top edge of hole. Do you (or anyone) see a real, significant, problematic, issue with that? ...I know there is a nit to be made about anything...
Last edited by meegwell; 09/27/2012 at 01:04 PM. Reason: typo |
|
|
|
|
|
09/27/2012, 02:13 PM
|
#5068 | ||
|
Registered Member
Join Date: Jul 2004
Location: AWOL
Posts: 12,013
|
Quote:
Quote:
...I know there is a nit to be made about anything... [/QUOTE]Of course.
__________________
"Things should be made as simple as possible, but not simpler." (oft attributed to Einstein; most likely paraphrasing by Roger Sessions; compactly articulates the principle of Occam's Razor) Current Tank Info: 325 6' wide Reef |
||
|
|
|
|
09/27/2012, 03:52 PM
|
#5069 |
|
Registered Member
Join Date: Sep 2012
Location: The Netherlands
Posts: 10
|
I have drilled the holes at 2" (from center of hole the top) of the tank. Isn't that good? Because you all talk about 3.25" - 4.25" now...
Why should it be not good if the holes are that high (as mine) in the tank? Thanks for your help guys!! Atmoz |
|
|
|
|
09/27/2012, 07:42 PM
|
#5070 | |
|
Registered Member
Join Date: Jul 2004
Location: AWOL
Posts: 12,013
|
Quote:
What reference are you using as the "top" of the tank? If it is a rimmed tank, 2" from the top of the "rim," you could not get the holes in. (not enough clearance.) If you are using the top of the glass (1/2" down from the top of the trim,) the holes will fit, but violate the 1.75" rule (spacing from edge of hole to edge of glass) and the bulkheads won't fit (hit the trim.) If from the bottom of the outside trim, you are good to go. If it is a rimless tank, 2" to center from the top of the tank is TOO HIGH! The problem here is everyone wants to do it different. What is good for one, may be way wrong for the next guy. But 2" has never been mentioned either IF we use "from the top of the glass" (1/2" down from the top of the trim on a rimmed tank,) then the measurements will be consistent, and apply to almost any tank out there. Measure from the top of the trim, the bottom of the trim, and throw in some measurements from the top edge of the glass, and no doubt some from the bottom of the tank , and we got a big huge mess, and we end up with someone that may have just drilled the holes in the wrong place....... For 1" bulkheads::: From the top edge of the glass: (minimum) 1" down for the top of the overflow weir. (for a rimless, some are more comfortable 1.5", if so add accordingly) 1" down for the water level (water level will be around the top of the elbows--see other posts) 3/4" down for the center of the hole. (~ outside diameter of the elbow) Holes set @ 2" below top edge of glass: Total: 2 3/4" down from the top edge of the glass, rimless or rimmed. This puts the edge of the hole 1 7/8" down from the edge of the glass, to follow the 1x hole diameter rule (1.75" for a 1" bulkhead) Ideal water level--  Holes set @ 2 3/4" below top edge of glass: Ideal water level--  2" below the top edge of the glass does not give you much room above the dry emergency inlet, puts the dry emergency inlet above the overflow weir, (significant? ehhh) and violates the 1x hole diameter to the edge of the hole. Actually, neither gives much room, which is why I suggested an additional inch down. (3 3/4" top edge of glass, to center of hole.) Regardless, what is done is done, too late to change it now....
__________________
"Things should be made as simple as possible, but not simpler." (oft attributed to Einstein; most likely paraphrasing by Roger Sessions; compactly articulates the principle of Occam's Razor) Current Tank Info: 325 6' wide Reef |
|
|
|
|
|
09/28/2012, 01:12 AM
|
#5071 | |
|
Registered Member
Join Date: Sep 2012
Location: The Netherlands
Posts: 10
|
Thanks for the explanation uncleof6!
Quote:
Honestly I only drilled 1 hole at the moment, so I can please the other 2 somewhere lower IF necessarily needed!! Atmoz |
|
|
|
|
|
09/28/2012, 09:46 AM
|
#5072 | |
|
Registered Member
Join Date: Jul 2012
Posts: 608
|
Quote:
Because you are not my master? Because I dont eat from strangers hands? I was determined to do something different than what you said was right? I didn't like your spoon? I dont know, pick one. Thanks for all your help Uncle. Considering your LFS comment, I will be putting hole centers on the template. My LFS is spacey at best. Getting solid answers or special orders is like herding cats. Nobody talks to each other, there are several different answers to the same question, and only one guy, the owner, can actually do anything important. |
|
|
|
|
|
09/28/2012, 11:04 AM
|
#5073 | |
|
Registered Member
Join Date: Jul 2004
Location: AWOL
Posts: 12,013
|
Quote:
Failsafe trip order: Siphon plugs, dry emergency takes over. If dry emergency cannot handle the flow (due to a plug also) water level rises further, submerging the tubing inlet to the open channel, and allows the open channel to be a siphon..... considering how high the inlet to the dry emergency is, the only safe thing to do would be to trip the open channel first. However, if the tubing inlet is too low, the main siphon may not start properly (another documented issue.)
__________________
"Things should be made as simple as possible, but not simpler." (oft attributed to Einstein; most likely paraphrasing by Roger Sessions; compactly articulates the principle of Occam's Razor) Current Tank Info: 325 6' wide Reef Last edited by uncleof6; 09/28/2012 at 11:38 AM. |
|
|
|
|
|
09/28/2012, 11:36 AM
|
#5074 | |
|
Registered Member
Join Date: Sep 2012
Location: The Netherlands
Posts: 10
|
Quote:
The hole that I already drilled in it is (as you mention) a little to high for the emergency outlet indeed. The top of a standard 32mm elbow (I think that is 1.25" for you guys) is exactly as high as the top of the top of my tank. So I have to cut a 0.5" or so from that elbow to fix this. OR I use this hole for one of the other standpipes... (and drill the other 2 holes at other depths that are better for the beautiful BeanAnimal Standpipe system) The weir I also have to build. I was thinking of an acrylic panel and bend this with my (selfmade) "acryl-bender". So that it looks like this: 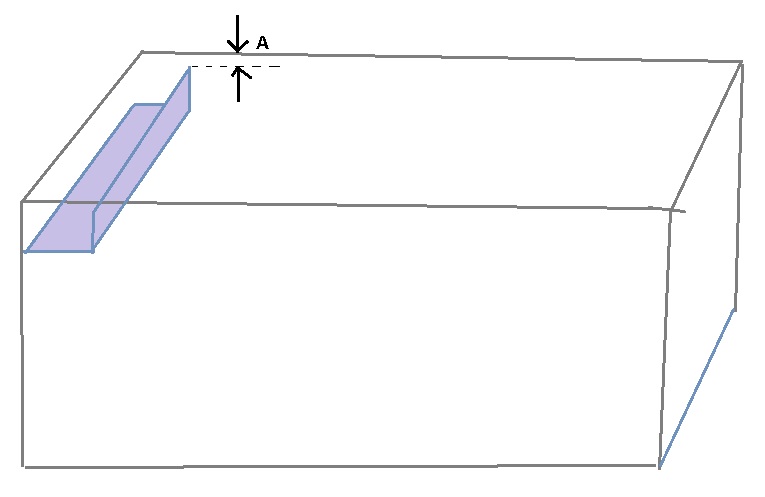 What should be a good distance for "A"? I was thinking of 1" or so... And about the 2 other holes I have to drill: what would you recommend me to do? (in THIS situation where I am now!! So with that 1 hole drilled "wrong") Thanks again for all your support  Have a nice evening/weekend, Atmoz |
|
|
|
|
|
09/28/2012, 11:50 AM
|
#5075 |
|
Registered Member
Join Date: Jul 2004
Location: AWOL
Posts: 12,013
|
Use the hole already drilled as a return? Then adjust your hole centers for the three drains.
Distance A: 1" or more, 1.25". 1.5" ...... Bending acrylic can be done, but IME is not as easy as they make it look ( i gave up acrylic usage a long time ago )
__________________
"Things should be made as simple as possible, but not simpler." (oft attributed to Einstein; most likely paraphrasing by Roger Sessions; compactly articulates the principle of Occam's Razor) Current Tank Info: 325 6' wide Reef |
|
|
|
 |
| Tags |
| beananimal, plumbing |
|
|


